- Mobile Device Information Provider — что это за программа на Андроид и нужна ли она? (com.amazon.appmanager)
- Mobile Device Information Provider — что это такое?
- Как удалить приложение?
- Заключение
- Manage devices used with your Microsoft account
- Register a device to see its warranty
- Fix a device
- Rename a device
- Remove a device
- Unlink a device from Microsoft Store
- Find or fix a device in your Microsoft account
- Device Information Sets
- Creating a Device Information Set
- Enumerating Device Information
- Портал устройств Windows для компьютеров Windows Device Portal for Desktop
- Настройка портала устройств Windows на компьютере Set up Windows Device Portal on a Desktop device
- Включите режим разработчика Turn on developer mode
- Включение портала устройств Windows Turn on Windows Device Portal
- Выключение портала устройств Windows Turn off Windows Device Portal
- Подключение к порталу устройств Windows Connect to Windows Device Portal
- Содержимое портала устройств Windows Windows Device Portal content
- Использование портала устройств Windows для тестирования и отладки приложений MSIX Using Windows Device Portal to test and debug MSIX apps
- Дополнительные возможности портала устройств Windows More Windows Device Portal options
- Настройка на основе реестра Registry-based configuration
- Параметры командной строки для портала устройств Windows Command line options for Windows Device Portal
- Устранение неполадок Troubleshooting
- WindowsUpdateSearch возвращает недопустимое число обновлений (0x800f0950 CBS_E_INVALID_WINDOWS_UPDATE_COUNT) WindowsUpdateSearch returns invalid number of updates (0x800f0950 CBS_E_INVALID_WINDOWS_UPDATE_COUNT)
- [SC] StartService: OpenService FAILED 1060: The specified service does not exist as an installed service (Указанная служба не установлена) [SC] StartService: OpenService FAILED 1060: The specified service does not exist as an installed service
- CBS cannot start download because the system is on metered network (CBS_E_METERED_NETWORK) (CBS не может начать скачивание, так как система находится в измеренной сети с лимитным тарифным планом (CBS_E_METERED_NETWORK)) CBS cannot start download because the system is on metered network (CBS_E_METERED_NETWORK)
Mobile Device Information Provider — что это за программа на Андроид и нужна ли она? (com.amazon.appmanager)
 Приветствую друзья! Сегодня мы будем разбираться с программой Mobile Device Information Provider, которую вы можете встретить на Android. Моя задача — найти максимум информации рассказать вам простыми словами.
Mobile Device Information Provider — что это такое?
Это приложение от Амазон, не является системным. Нужно для сбора какой-то информации о интересах, предпочтениях, возможно для того чтобы потом вам показывать рекламу. Появляется например если выбрать регион Индия (для шрифтов). Не думаю что вирус, однако кажется что прога бесполезная и ее можно удалить.
Узнал, что пакет приложения или процесс это com.amazon.appmanager:

Судя по названию — имеет отношение к Амазону.
Есть еще версия, что данное приложение — какой-то поставщик информации о мобильных устройствах.
Один человек написал что удалить можно — ибо это хлам, в котором может быть реклама.
Прога в списке приложений:

Один человек посоветовал сменить регион на вашу страну, возможно это поможет.. хотя по факту приложение Mobile Device Information Provider вообще ненужно.
На форуме Mi Community один юзер написал, что ему официальная поддержка ответила так: данное приложение не является системны и не имеет отношение к MIUI.
Как удалить приложение?
Как понимаю — есть несколько вариантов:
- Один юзер написал, что удалил через Тотал командер, в папке установленные приложения. Рут-права не нужны.Ссылка на сообщение юзера — посмотрите обязательно и надеюсь сможете быстро удалить.
- Удалить/заморозить при помощи Titanium Backup. Но нужны рут-права.
- Попробовать отключить его в приложениях, стереть данные, очистить кэш. Но разумеется оно все равно останется в системе.
- Удалить без рут-прав. Да, это возможно, но немного геморно — нужно использовать прогу ADB. Вариант для продвинутых юзеров, инструкцию об удалении читайте здесь.
Если оно ну никак вам не мешает, то можно и не удалять, однако.. оно может кушать в фоне батарею. Тел будет быстрее разряжаться.
По поводу Тотала командера — вот картинка, может помочь в удалении:

Некая полезная подсказка (удаление в командере):

Заключение
- Mobile Device Information Provider — фирменное приложение от Амазона, которое предположительно собирает информацию о ваших интересах, предпочтениях.
- На основе собранной инфы в будущем может показываться реклама.
- Приложение не является вирусным или опасным, однако польза от него сомнительная.
- Удалить можно — есть как сложный способ, так и легкий, и вроде бы оба — рабочие.
Надеюсь информация пригодилась. Удачи и добра, до новых встреч!
Manage devices used with your Microsoft account
Here’s how you can add a device to your Microsoft account:
Sign in to your Microsoft account on an Xbox or Windows 10 device.
Sign in to the Microsoft Store on your Windows 10 PC.
Go to account.microsoft.com/devices, select Don’t see your device?, then follow the instructions.
On an iOS device: Download Microsoft Edge from the Apple App Store and sign in with your Microsoft account.
On an Android device: Download Microsoft Edge, Microsoft Launcher, or Your Phone Companion from the Google Play Store and sign in with your Microsoft account.
MacOS devices can’t be added at this time.
Register a device to see its warranty
To see the warranty coverage for your Surface, Surface accessory, Xbox, or Xbox accessory, you’ll need to register its serial number. Some online features won’t be available when you add your device this way.
Go to account.microsoft.com/devices, sign in, and select Don’t see your device? to continue.
Enter your device’s serial number to register it to your account.
Select your device to see its warranty information.
Note: If your Surface is managed or owned by your company or organization, you don’t need to register it. To contact support and get additional resources for that situation, see Surface for Business help.
Fix a device
If you’re having problems with your device, you can get help online and create a service order. After you register your device, here’s how to create a service order:
Go to account.microsoft.com/devices, sign in, and select the device that’s having issues.
Select Start order, then follow the instructions.
Rename a device
Change the default name of your device so you can quickly identify it in your Microsoft account. When you want to download an app or game to another device, you’ll be able to find the device using its new name.
On the PC you want to rename:
Select Start > Settings > System > About .
Select Rename this PC.
Enter a new name and select Next. You may be asked to sign in.
Select Restart now or Restart later.
On the Xbox you want to rename:
Select Settings > System > Console info > Name.
Enter the new name and select Enter.
Restart your Xbox.
Remove a device
If you don’t use a device but it still appears in your devices, here’s how to remove it:
Go to account.microsoft.com/devices, sign in, and find the device you want to remove.
Select Show details to see info for that device.
Under your device’s name, select Manage > Remove.
Review your device details, select the check box, I’m ready to remove this device, then select Remove.
If you want to remove a device for a child in your family, have your child sign into account.microsoft.com/devices, then follow the same instructions.
Unlink a device from Microsoft Store
If you can’t download content from the Microsoft Store, you may have reached your device limit. Manage your limit by removing devices you don’t use or no longer have access to. To unlink a device:
Find the device you want to remove and select Unlink.
Review your device details and select Unlink.
Once you unlink a device, it won’t count towards your device limit. If you haven’t reached the limit, and download an app or game on this device later, it will count towards your device limit again.
Note: If you’re having trouble downloading or updating apps on any of your devices, see Fix problems with apps from Microsoft Store or I can’t find or install an app from Microsoft Store.
Find or fix a device in your Microsoft account
If your device is missing, and you’ve signed in to it with your Microsoft account, you might be able to find it. Here’s how:
Find the device you want to find, then select Show details.
Select Find my device.
To check for any security issues, go to Windows Defender settings, select Show details, and check your security status.
For more info on finding your device, go to Find and lock a lost Windows device.
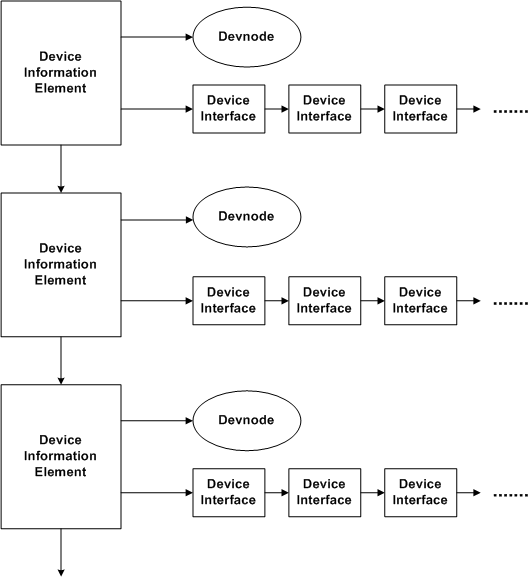
Device Information Sets
In user mode, devices that belong to either device setup classes or device interface classes are managed by using device information elements and device information sets. A device information set consists of device information elements for all the devices that belong to some device setup class or device interface class.
Each device information element contains a handle to the device’s devnode, and a pointer to a linked list of all the device interfaces associated with the device described by that element. If a device information set describes members of a setup class, the element might not point to any device interfaces, since setup class members are not necessarily associated with an interface.
The following diagram shows the internal structure of a device information set.
Creating a Device Information Set
After creating a device information set with SetupDiCreateDeviceInfoList, device information elements can be created and added to the list one at a time using SetupDiCreateDeviceInfo. Alternatively, SetupDiGetClassDevs can be called to create a device information set composed of all devices associated with a specified device setup class or device interface class.
Enumerating Device Information
Once a device information set is created, both the devices and the device interfaces that belong to the set can be enumerated, but different operations are required for each type of enumeration. SetupDiEnumDeviceInfo enumerates all devices that belong to the information set that meet certain criteria. Each call to SetupDiEnumDeviceInfo extracts a SP_DEVINFO_DATA structure that roughly corresponds to a device information element. SP_DEVINFO_DATA contains the GUID of the class that the device belongs to and a device instance handle that points to the devnode for the device. The principal difference between an SP_DEVINFO_DATA structure and a complete device element is that SP_DEVINFO_DATA does not contain the linked list of interfaces associated with the device. Therefore, SetupDiEnumDeviceInfo cannot be used to enumerate the interfaces in the device information set.
To enumerate the device interfaces in a device information set, call SetupDiEnumDeviceInterfaces. This routine steps through all the device information elements in the device information set, extracts the interfaces in the interface list of each element, and returns one interface with each call. If SetupDiEnumDeviceInterfaces is passed an SP_DEVINFO_DATA structure as input in its second parameter, it constrains the enumeration to only those interfaces that are associated with the device indicated by SP_DEVINFO_DATA.
SetupDiEnumDeviceInterfaces returns an SP_DEVICE_INTERFACE_DATA structure. SP_DEVICE_INTERFACE_DATA contains the interface class GUID and other information about the interface, including a reserved field that has encoded information that can be used to obtain the name of the interface. To get the interface name, one further step is required: SetupDiGetDeviceInterfaceDetail must be called. SetupDiGetDeviceInterfaceDetail returns a structure of type SP_DEVICE_INTERFACE_DETAIL_DATA that contains the path in the system object tree that defines the interface.
Портал устройств Windows для компьютеров Windows Device Portal for Desktop
Портал устройств Windows (WDP) — это средство для администрирования и отладки устройств, которое позволяет настраивать параметры устройств и управлять ими, а также просматривать диагностические сведения по протоколу HTTP из веб-браузера. Windows Device Portal (WDP) is a device management and debugging tool that lets you configure and manage device settings and view diagnostic information over HTTP from a web browser. См. сведения об использовании WDP на других устройствах в статье Обзор портала устройств Windows. For WDP details on other devices, see Windows Device Portal overview.
С помощью WDP можно: You can use the WDP for the following:
- управлять параметрами устройства (аналогично приложению Параметры Windows); Manage device settings (similar to the Windows Settings app)
- Просматривать список запущенных процессов и управлять им See and manipulate a list of running processes
- Устанавливать, удалять, запускать и завершать работу приложений Install, delete, launch, and terminate apps
- изменять профили Wi-Fi и просматривать сведения об уровне сигнала и об ipconfig; Change Wi-Fi profiles, view signal strength, and see ipconfig details
- Просматривать графики в режиме реального времени со сведениями об использовании ЦП, памяти, устройств ввода-вывода и GPU View live graphs of CPU, memory, I/O, network, and GPU usage
- Собирать дампы процессов Collect process dumps
- Собирать трассировки событий Windows Collect ETW traces
- Работать с изолированным хранилищем неопубликованных приложений Manipulate the isolated storage of sideloaded apps
Настройка портала устройств Windows на компьютере Set up Windows Device Portal on a Desktop device
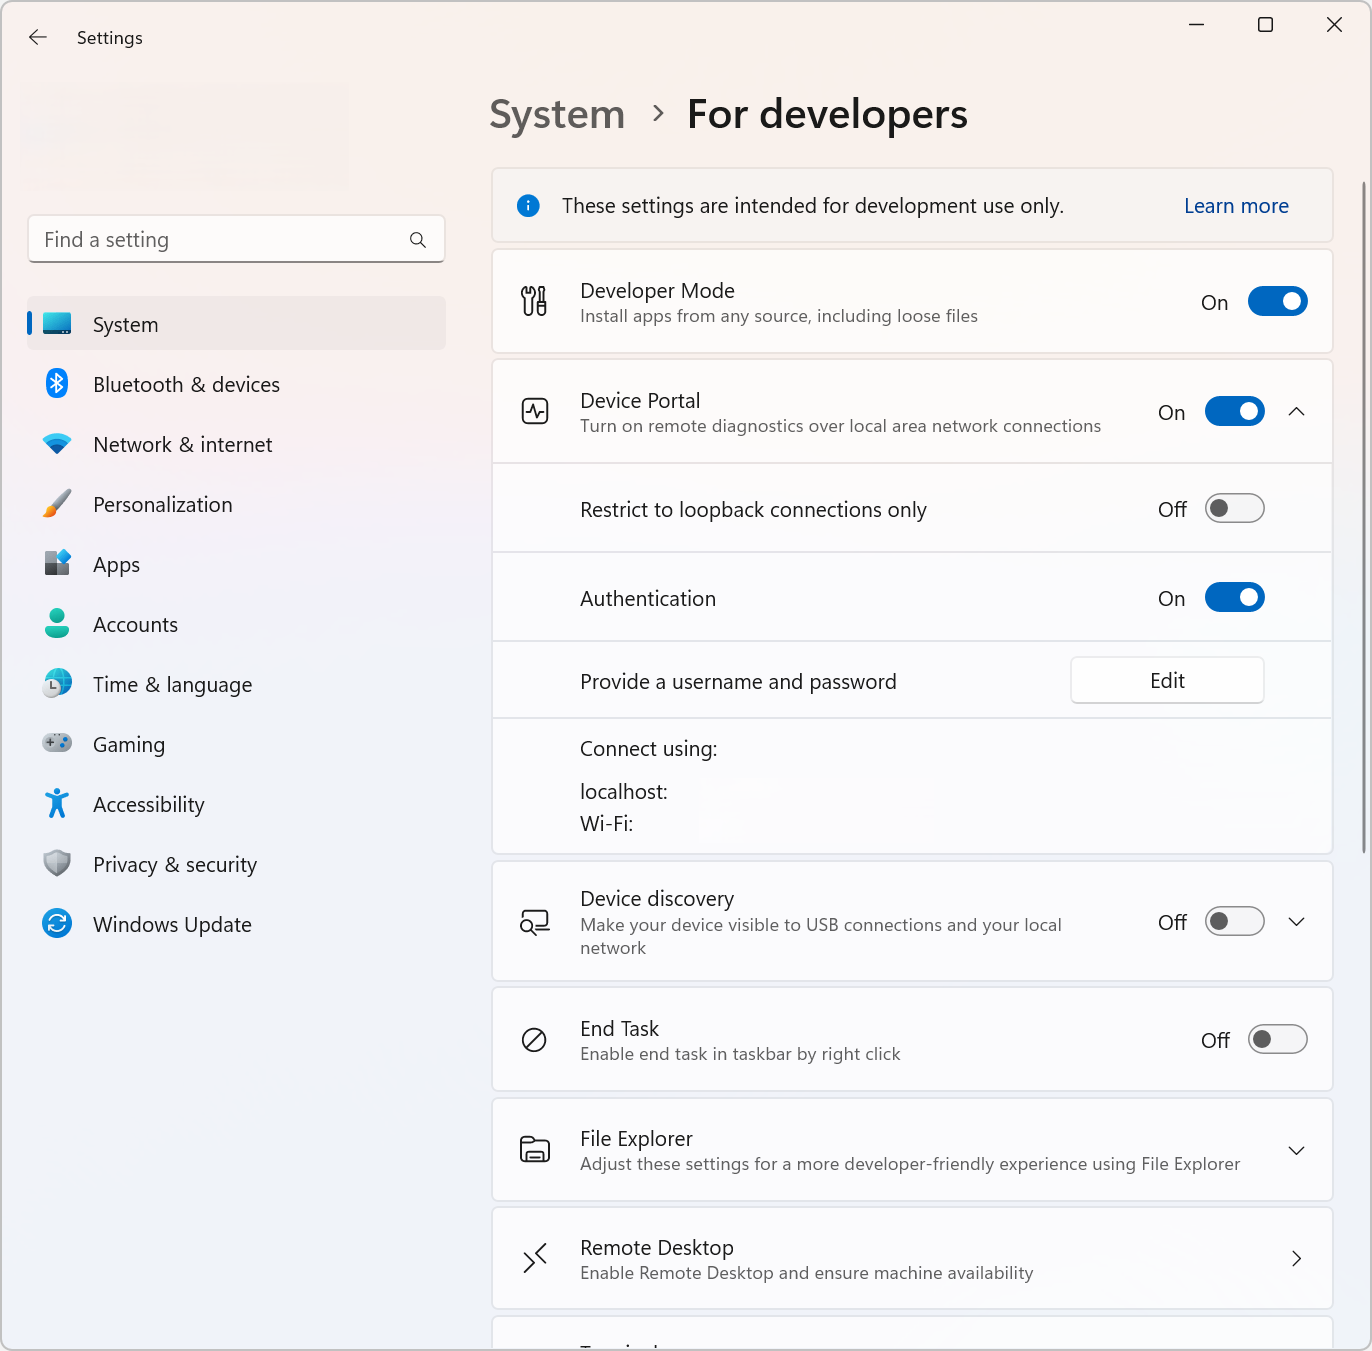
Включите режим разработчика Turn on developer mode
Начиная с Windows 10 версии 1607, некоторые новые функции для компьютеров доступны только при включенном режима разработчика. Starting in Windows 10, version 1607, some of the newer features for desktop are only available when developer mode is enabled. Сведения о том, как включить режим разработчика, см. в разделеПодготовка устройства для разработки. For information about how to enable developer mode, see Enable your device for development.
Иногда из-за проблем сети или совместимости режим разработчика может установиться на устройстве неправильно. Sometimes, due to network or compatibility issues, developer mode won’t install correctly on your device. Инструкции по устранению этих проблем см. в разделе Включение устройства для разработки. See the relevant section of Enable your device for development for help troubleshooting these issues.
Включение портала устройств Windows Turn on Windows Device Portal
Вы можете включить WDP в разделе Для разработчиков в приложении Параметры. You can enable WDP in the For developers section of Settings. При включении портала устройств вы должны также создать соответствующие имя пользователя и пароль. When you enable it, you must also create a corresponding username and password. Не используйте учетную запись Майкрософт или другие учетные данные Windows. Do not use your Microsoft account or other Windows credentials.
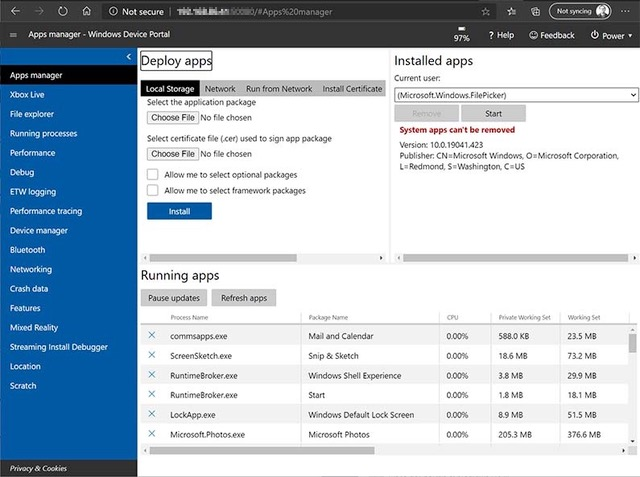
После включения WDP в нижней части раздела отобразятся соответствующие веб-ссылки. Once WDP is enabled, you will see web links at the bottom of the section. Запомните номер порта, расположенный в конце указанных URL-адресов: этот номер создается случайным образом при включении WDP, но он должен оставаться одинаковым при каждой перезагрузке компьютера. Take note of the port number appended to the end of the listed URLs: this number is randomly generated when WDP is enabled but should remain consistent between reboots of the desktop.
Эти ссылки предоставляют возможность подключиться к WDP двумя способами: через локальный узел и по локальной сети (в том числе VPN). These links offer two ways to connect to WDP: over the local network (including VPN) or through the local host. После подключения вы должны увидеть примерно следующее: Once you connect, it should look something like this:
Выключение портала устройств Windows Turn off Windows Device Portal
Вы можете выключить WDP в разделе Для разработчиков в приложении Параметры. You can disable WDP in the For developers section of Windows Settings.
Подключение к порталу устройств Windows Connect to Windows Device Portal
Чтобы подключиться через локальный узел, откройте окно браузера и введите один из указанных здесь URI для типа подключения, который вы используете. To connect through local host, open a browser window and enter the one of the URIs shown here (based on the connection type you’re using).
- Локальный узел: http://127.0.0.1:
Локальная сеть: https:// :
Local Network: https:// :
Для проверки подлинности и безопасного обмена данными необходима поддержка протокола HTTPS. HTTPS is required for authentication and secure communication.
Если вы используете WDP в защищенной среде, например в лаборатории тестирования, где вы доверяете всем пользователям в локальной сети, при этом на устройстве нет личных сведений и у вас есть особые требования, вы можете отключить проверку подлинности. If you are using WDP in a protected environment, for example, in a test lab, in which you trust everyone on your local network, have no personal information on the device, and have unique requirements, you can disable the Authentication option. В этом случае шифрование связи будет отключено, и любой пользователь сможет подключиться к вашему ПК и управлять им, зная его IP-адрес. This enables unencrypted communication, and allows anyone with the IP address of your computer to connect to and control it.
Содержимое портала устройств Windows Windows Device Portal content
WDP предоставляет следующий набор страниц. WDP provides the following set of pages.
- Диспетчер приложений Apps manager
- Xbox Live Xbox Live
- Проводник File explorer
- Запущенные процессы Running Processes
- Производительность Performance
- Отладка Debug
- Ведение журнала ETW (трассировка событий Windows) ETW (Event Tracing for Windows) logging
- Трассировка производительности Performance tracing
- Диспетчер устройств Device manager
- Bluetooth Bluetooth
- Сети Networking
- Данные о сбоях Crash data
- Компоненты Features
- Смешанная реальность Mixed Reality
- Отладчик потоковой установки Streaming Install Debugger
- Расположение Location
- Рабочая зона Scratch
Использование портала устройств Windows для тестирования и отладки приложений MSIX Using Windows Device Portal to test and debug MSIX apps
Дополнительные возможности портала устройств Windows More Windows Device Portal options
Настройка на основе реестра Registry-based configuration
Если вы хотите выбрать номера портов для WDP (например, 80 и 443), настройте следующие разделы реестра: If you would like to select port numbers for WDP (such as 80 and 443), you can set the following regkeys:
- в разделе HKEY_LOCAL_MACHINE\SOFTWARE\Microsoft\Windows\CurrentVersion\WebManagement\Service Under HKEY_LOCAL_MACHINE\SOFTWARE\Microsoft\Windows\CurrentVersion\WebManagement\Service
- UseDynamicPorts : необходимый параметр DWORD. UseDynamicPorts : A required DWORD. Задайте этому параметру значение 0, чтобы сохранить номера портов, которые вы выбрали. Set this to 0 in order to retain the port numbers you’ve chosen.
- HttpPort : необходимый параметр DWORD. HttpPort : A required DWORD. Содержит номер порта, на котором WDP прослушивает HTTP-подключения. Contains the port number on which WDP listens for HTTP connections.
- HttpsPort : необходимый параметр DWORD. HttpsPort : A required DWORD. Содержит номер порта, на котором WDP прослушивает HTTPS-подключения. Contains the port number on which WDP listens for HTTPS connections.
В том же пути раздела реестра можно также отключить требование к проведению проверки подлинности: Under the same regkey path, you can also turn off the authentication requirement:
- UseDefaultAuthorizer«0 — — отключено, 1 — включено. UseDefaultAuthorizer — 0 for disabled, 1 for enabled.
- Этот параметр управляет одновременно требованием к проведению обычной проверки подлинности для каждого подключения и перенаправлением из HTTP в HTTPS. This controls both the basic auth requirement for each connection and the redirect from HTTP to HTTPS.
Параметры командной строки для портала устройств Windows Command line options for Windows Device Portal
Из командной строки с правами администратора можно включить и настроить части WDP. From an administrative command prompt, you can enable and configure parts of WDP. Чтобы увидеть последний набор команд, поддерживаемых вашей сборкой, необходимо выполнить webmanagement /? . To see the latest set of commands supported on your build, you can run webmanagement /?
- sc start webmanagement или sc stop webmanagement sc start webmanagement or sc stop webmanagement
- Включение или отключение службы. Turn the service on or off. Для этого режим разработчика по-прежнему должен быть включен. This still requires developer mode to be enabled.
- -Credentials
- Задайте имя пользователя и пароль для WDP. Set a username and password for WDP. Имя пользователя должно соответствовать стандартам обычной проверки подлинности, поэтому оно не должно содержать двоеточие (:) и должно состоять из стандартных символов ASCII, например a–z, A–Z, 0–9, так как браузеры не анализируют полный набор символов стандартным способом. The username must conform to Basic Auth standards, so cannot contain a colon (:) and should be built out of standard ASCII characters for example, [a-zA-Z0-9] as browsers do not parse the full character set in a standard way.
- -DeleteSSL
- В результате это происходит сброс кэша SSL-сертификата, используемого подключениями по протоколу HTTPS. This resets the SSL certificate cache used for HTTPS connections. При возникновении ошибок подключения по протоколу TLS, которые нельзя обойти, (в отличие от ожидаемого предупреждения сертификате), это, возможно, поможет устранить проблему. If you encounter TLS connection errors that cannot be bypassed (as opposed to the expected certificate warning), this option may fix the problem for you.
- -SetCert
- Дополнительные сведения см. в статье Подготовка портала устройств Windows с использованием пользовательского SSL-сертификата. See Provisioning Windows Device Portal with a custom SSL certificate for details.
- Это позволяет установить SSL-сертификат и закрыть страницу предупреждения SSL, которая обычно отображается на WDP. This allows you to install your own SSL certificate to fix the SSL warning page that is typically seen in WDP.
- -Debug
- Запустите автономную версию WDP с определенной конфигурацией и видимыми сообщениями отладки. Run a standalone version of WDP with a specific configuration and visible debug messages. Это особенно полезно для создания упакованных подключаемый модулей. This is most useful for building a packaged plugin.
- Сведения о том, как выполнять запуск в качестве системы для полной проверки упакованного подключаемого модуля см. в статье из журнала MSDN Magazine. See the MSDN Magazine article for details on how to run this as System to fully test your packaged plugin.
Устранение неполадок Troubleshooting
Ниже приведены некоторые распространенные ошибки, которые могут возникнуть при настройке портала устройств Windows. Below are some common errors that you may encounter when setting up Windows Device Portal.
WindowsUpdateSearch возвращает недопустимое число обновлений (0x800f0950 CBS_E_INVALID_WINDOWS_UPDATE_COUNT) WindowsUpdateSearch returns invalid number of updates (0x800f0950 CBS_E_INVALID_WINDOWS_UPDATE_COUNT)
Эта ошибка может возникнуть при попытке установить пакеты разработчика в предварительной сборке Windows 10. You may get this error when trying to install the developer packages on a pre-release build of Windows 10. Эти пакеты по требованию (FoD) размещаются в Центре обновления Windows. Чтобы скачать предварительные сборки, требуется принять участие в фокус-тестировании. These Feature-on-Demand (FoD) packages are hosted on Windows Update, and downloading them on pre-release builds requires that you opt into flighting. Если в установке не включить правильную комбинацию сборки и цикла в фокус-тестировании, полезные данные не будут скачаны. If your installation is not opted into flighting for the right build and ring combination, the payload will not be downloadable. Дважды проверьте следующее: Double-check the following:
Перейдите в раздел Параметры > Update & Security (Обновление и безопасность) > Программа предварительной оценки Windows и убедитесь, что в разделе Windows Insider account (Учетная запись Программы предварительной оценки Windows) указаны правильные сведения об учетной записи. Navigate to Settings > Update & Security > Windows Insider Program and confirm that the Windows Insider account section has your correct account info. Если вы не видите этот раздел, щелкните Link a Windows Insider account (Связать учетную запись Программы предварительной оценки Windows), добавьте учетную запись электронной почты и убедитесь, что она отображается под заголовком Windows Insider account (Учетная запись Программы предварительной оценки Windows) (возможно, потребуется выбрать Link a Windows Insider account (Связать учетную запись Программы предварительной оценки Windows) второй раз, чтобы связать только что добавленную учетную запись). If you don’t see that section, select Link a Windows Insider account, add your email account, and confirm that it shows up under the Windows Insider account heading (you may need to select Link a Windows Insider account a second time to actually link a newly added account).
В разделе What kind of content would you like to receive? (Какого типа содержимое вы хотите получать?) щелкните Active development of Windows (Активная разработка Windows). Under What kind of content would you like to receive?, make sure Active development of Windows is selected.
В разделе What pace do you want to get new builds? (Как часто вы хотите получать новые сборки?) щелкните Windows Insider Fast (Предварительная оценка Windows — ранний доступ). Under What pace do you want to get new builds?, make sure Windows Insider Fast is selected.
Теперь вы сможете установить компоненты по запросу. You should now be able to install the FoDs. Если вы подтвердили, что вы участник программы предварительной оценки Windows и по-прежнему не можете установить компоненты по запросу, оставьте отзыв и приложите файлы журнала в каталог C:\Windows\Logs\CBS. If you’ve confirmed that you’re on Windows Insider Fast and still cannot install the FoDs, please provide feedback and attach the log files under C:\Windows\Logs\CBS.
[SC] StartService: OpenService FAILED 1060: The specified service does not exist as an installed service (Указанная служба не установлена) [SC] StartService: OpenService FAILED 1060: The specified service does not exist as an installed service
Вы можете получить эту ошибку, если пакеты разработчика не установлены. You may get this error if the developer packages aren’t installed. Без пакетов разработчика нет служб веб-управления. Without the developer packages, there is no web management service. Попробуйте установить пакеты разработчика еще раз. Try installing the developer packages again.
CBS cannot start download because the system is on metered network (CBS_E_METERED_NETWORK) (CBS не может начать скачивание, так как система находится в измеренной сети с лимитным тарифным планом (CBS_E_METERED_NETWORK)) CBS cannot start download because the system is on metered network (CBS_E_METERED_NETWORK)
Эта ошибка может возникать, если вы используете подключение к Интернету с лимитным тарифным планом. You may get this error if you’re on a metered internet connection. Вы не сможете скачать пакеты разработчиков в сети при лимитном тарифном плане. You won’t be able to download the developer packages on a metered connection.


