- Как активировать функцию Windows Error Reporting в Windows 8.
- Использование редактора реестра для сбора User Mode
- How to enable or disable Windows 10 Error Reporting Service
- How the Windows 10 Error Reporting Service Works and Why
- Should I disable the Windows error reporting service?
- Steps to disable Window 10 Error Reporting Service
- Method One: Use Command to disable Window 10 Error Report
- Method Two: Use the Registry Editor
- Служба Windows Error Reporting и очистка каталога WER\ReportQueue в Windows
- Служба Windows Error Reporting
- Очистка папки WER\ReportQueue в Windows
- Отключение Window Error Reporting в Windows Server 2012 R2 / 2008 R2
- Отключение функции сбора и отправки отчетов в Windows 10
- Отключение Windows Error Reporting через групповые политики
Как активировать функцию Windows Error Reporting в Windows 8.

Всякий раз, когда система падает, используя дамп файла . DMP, мы можем легко проанализировать,что вызвало падение системы.Это особенно полезно, чтобы найти проблему в сторонних модулей и является причиной этой проблемы или нет. Таким образом, используя анализ дампа,могут быть решены ошибки и сбои.Функция Windows Error Reporting (WER) ,была введена в Windows Vista,и работает для сбора пользовательского режима сбора ошибок.
Но эта услуга не включена по умолчанию в ОС Windows 8 и трюк с реестром может заставить работать эту функцию, чтобы привести её в действие.
Активировать Windows Error Reporting Service
В этой статье я покажу вам, как включить эту службу отчета об ошибках Windows с тем, что бы Вы могли легко собрать дамп файла в папке внутри Проводника. Обратите внимание и на то, что в том числе и приложения, которые делают свои собственные пользовательские отчеты об аварии . NET приложений, которые не поддерживаются этой функцией.
Использование редактора реестра для сбора User Mode
Так как функция отчёт об ошибках Windows не включена по умолчанию, вы можете использовать следующий трюк параметра реестра , чтобы запустить его:
1.Нажмите комбинацию клавиш Windows Key+R,в диалоговом окне в Run введите тип Regedt32.exe и нажмите Enter,чтобы открыть Редактор реестра .
. 2 Перейдите к этой записи :
HKEY_LOCAL_MACHINE \ SOFTWARE \ Microsoft \ Windows \ Windows Error Reporting \ LocalDumps

3.На правой панели, вы можете создавать различные значения данных для настройки WER. Вот различные данные, которые вы можете создавать здесь:
. DumpFolder — (Создание: с помощью правой кнопкой мыши -> New -> Расширяемый строковый параметр)
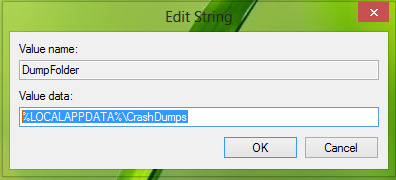
Эта строка значения обрабатывает место для сбора данных о сбоях системы в папке. Вы можете дважды щелкнуть над созданной строкой для изменения её значения данных. Данные по умолчанию должны быть LOCALAPPDATA%% \ CrashDumps . Чтобы найти файлы, хранящие отчёт после аварии, нажмите Windows Key + R ,введите тип % LOCALAPPDATA% \ CrashDumps и получите дамп файлов.
б. DumpCount — <Создание: с помощью правой кнопкой мыши -> New -> DWORD (32 бита) >
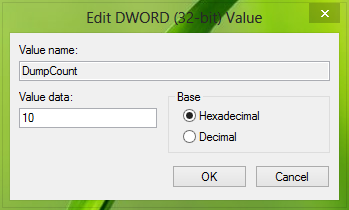
Созданный DWORD заботится о том, сколько файлов дампа должны храниться по месту нахождения созданного ранее в шаге 1. По умолчанию это число равно 10 . Поскольку количество файлов превышает 10 , наиболее старые файлы будут удалены, а новые файлы получат своё место.
C. DumpType — <Создание: с помощью правой кнопкой мыши -> New -> DWORD (32 бита)>
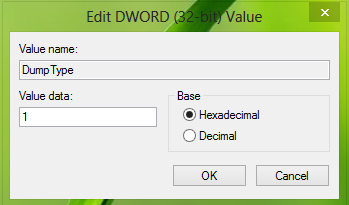
Этот DWORD может быть настроен, чтобы получить файл дампа в качестве пользовательского отчёта;мини отчёта;полного дампа по вашему требованию.Используйте соответственно Value Data 0 , 1 , 2.Таким образом, в этом случае вы можете хранить файлы дампа для сбоев системы. Если вы ищете для хранения файлов дампа для конкретного применения,то вам необходимо создать подраздел для ключа LocalDumps :
HKEY_LOCAL_MACHINE \ Software \ Microsoft \ Windows \ Windows Error Reporting \ LocalDumps
Например, если вы хотите хранить файлы дампа для ImageReady , компонентов Adobe Photoshop,вы можете назвать подраздел как ImageReady.exe . Подразделы могут быть расположены как:
HKEY_LOCAL_MACHINE \ Software \ Microsoft \ Windows \ Windows Error Reporting \ LocalDumps \ ImageReady.exe.
То вы можете выполнять шаг 3 для настройки,и ввести нужный вам тип данных,которые будут храниться в этом подразделе.Пожалуйста, обратите внимание,что параметры подраздела т.е. ImageReady.exe отменяют настройки основных ключей т.е. LocalDumps.
[share-locker locker_id=»3f8a01b2edcbb8f0f» theme=»blue» message=»Если Вам понравилась эта статья,нажмите на одну из кнопок ниже.СПАСИБО!» facebook=»true» likeurl=»CURRENT» vk=»true» vkurl=»CURRENT» google=»true» googleurl=»CURRENT» tweet=»true» tweettext=»» tweeturl=»CURRENT» follow=»true» linkedin=»true» linkedinurl=»CURRENT» ][/share-locker]
How to enable or disable Windows 10 Error Reporting Service


The Windows 10 error reporting service is designed to help ensure your PC works optimally. The central idea behind Windows Error Report (WER) is to keep Microsoft informed about user issues working with Windows.
However, every Windows OS version has the service enabled on default settings. But an individual user can choose to disable if the need arises. This article explores how to enable or disable the error reporting service on Windows 10.
How the Windows 10 Error Reporting Service Works and Why
Windows 10 Error Report focuses on discovering hardware and software issues from the user’s PC and report to Microsoft. With a database of likely complaints experienced with using the Windows 10, Microsoft can then send solutions for troubleshooting.
While working with the PC, some users experience pop-ups or alerts requesting the submission of the problem report. Windows error report usually occurs after a system failure, program crashes, refused to load properly or operating system errors. Windows usually prompt the user to submit an error report online to help proffer solutions in the future. The problem report may include program name, date, time of error and version.
Should I disable the Windows error reporting service?
Windows users often disable error reporting due to disk space or privacy issues but might need to exercise restraint. Error reporting service for Windows 10 offers dual benefits to Microsoft and the PC users.
Each error report helps Microsoft develop more advanced service packs for dealing with glitches. That means better user experience with Windows 10 based on the information gathered.
Steps to disable Window 10 Error Reporting Service
- Use Command to disable Window 10 Error Report
- Use the Registry Editor to disable Window 10 Error Report
Just like other versions, Windows 10 does have a slightly different graphical user interface for disabling error reports. Lower versions of Windows OS have error reporting under Action Center Setting. On Windows 10 it is the Security & Maintenance function requiring working with registries.
Method One: Use Command to disable Window 10 Error Report
It’s a simple and straightforward process. Here are the steps to follow:
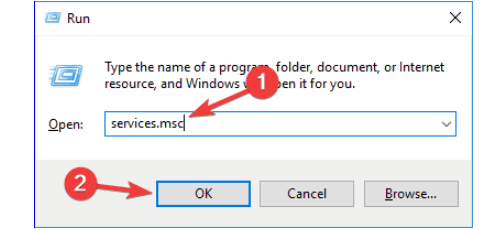
- Use the shortcut key. From the keyboard press down the Windows key+R. It should navigate to the Run dialog box.
- Into the open space of the dialog box type service.msc.

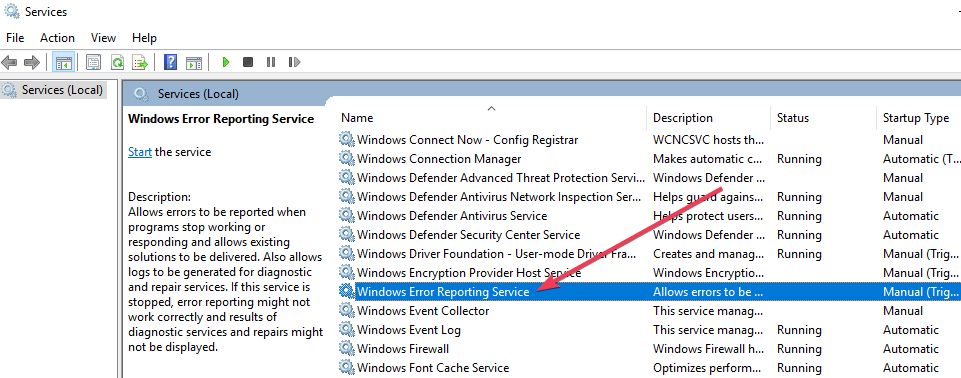
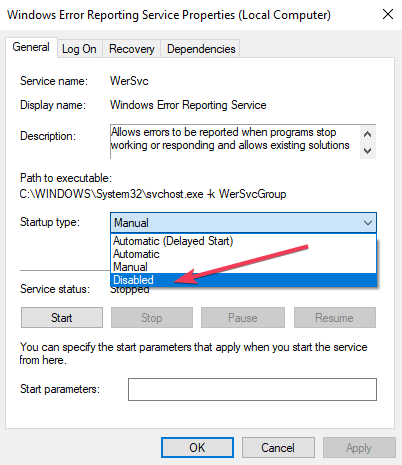
- Move the cursor to Windows Error Reporting Service and right-click it.
- Locate Startup types and scroll through the drop down menu list on the right.
- Click Disabledwhich is at the bottom of the list.
- Click ‘OK‘ or apply to complete the action.
- Close the service window to exit. Now the process has been completed.
- RELATED: 5 best software to fix runtime errors in Windows 10
Note:
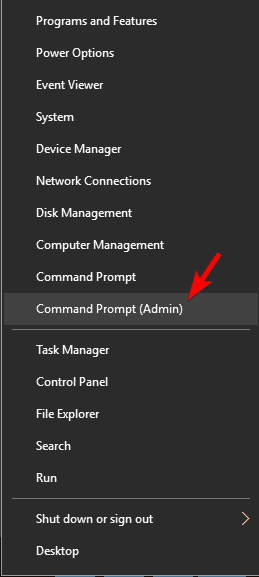
In some cases, the Startup type which is close to disabled might appear as gray. That means the user needs admin rights to continue the process. Therefore, log out and log in as an administrator. Or locate the administrative command prompt by pressing Windows key+ X to select command prompt admin.
Method Two: Use the Registry Editor
Using the Registry Editor is another way to safely disable the Windows 10 Error Reporting Service. This second method for disabling Windows error reporting service includes tweaking the registry. But first, you need to check for error report issues:
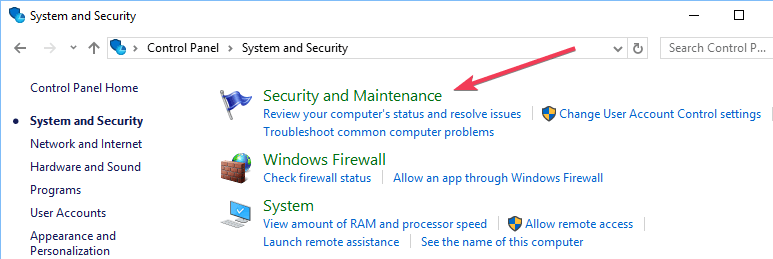
- Locate Control Panel from Windows startup.
- Click Control Panel> System and Security> Security and Maintenance.
- Look out for Report problems. Report problems should by default display ‘On’.
- RELATED: Fix Blue Screen of Death errors with these 4 software solutions
Steps to disable Windows Error Reporting Service using the Registry Editor
- Locate the registry editor app below:
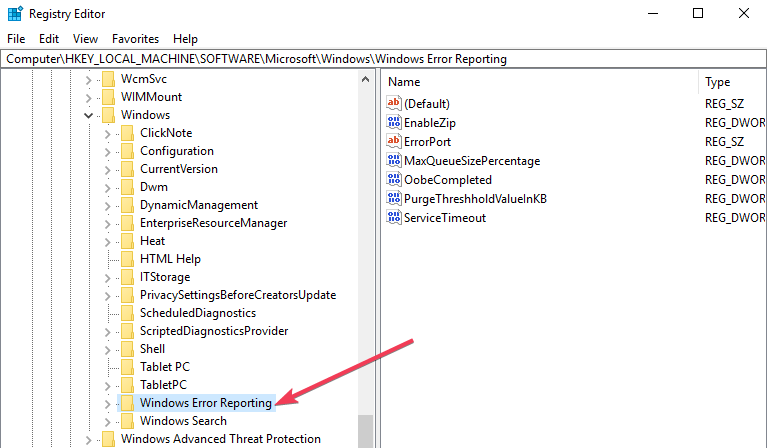
- HKEY_LOCAL_MACHINE\SOFTWARE\Microsoft\Windows\Windows Error Reporting
- HKEY_LOCAL_MACHINE\SOFTWARE\Microsoft\Windows\Windows Error Reporting
- To the right of your window, locate the registry key in the dialog box.
- Click on the option ‘disabled’ so the dialog box can appear. Replace the value ‘0’ with ‘1’.
- If there is no value then create a new one with the same name, ‘Disabled’.
- Then set the new 32-Bit DWORD value to ‘1’.
- Tap ‘OK’ to effect changes.
Note:
- To confirm that the Windows error reporting service has been disabled, go to Security and Maintenance. Check the comment on the report problem to see if it reads on or off.
- To re-enable error reporting service on Windows 10 simply set the disabled value back to zero. Another option would be to delete the disabled value.
- To create a new DWORD from the registry editor one needs to locate Edit > New on the menu.
It’s quite simple to disable and enable Windows 10 error reporting service anytime. And understanding how to use the Registry Editor or finder makes everything much simpler.
Служба Windows Error Reporting и очистка каталога WER\ReportQueue в Windows
Служба WER (Windows Error Reporting) служит для сбора и отправки отладочной информации о падении системных и сторонних приложений в Windows на сервера Microsoft. По задумке Microsoft, эта информация должна анализироваться и при наличии решения, вариант исправления проблемы должен отправляется пользователю через Windows Error Reporting Response. Но по факту мало кто пользуется этим функционалом, хотя Microsoft настойчиво оставляет службу сбора ошибок WER включенной по умолчанию во всех последних версиях Windows. В большинстве случае о службе WER вспоминают, когда каталог C:\ProgramData\Microsoft\Windows\WER\ReportQueue\ начинает занимать на системном диске довольно много места (вплоть до нескольких десятков Гб), даже не смотря на то что на этом каталоге по умолчанию включена NTFS компрессия.
Служба Windows Error Reporting
Служба Windows Error Reporting представляет собой отдельный сервис Windows, который можно легко отключить командой:
net stop WerSvc
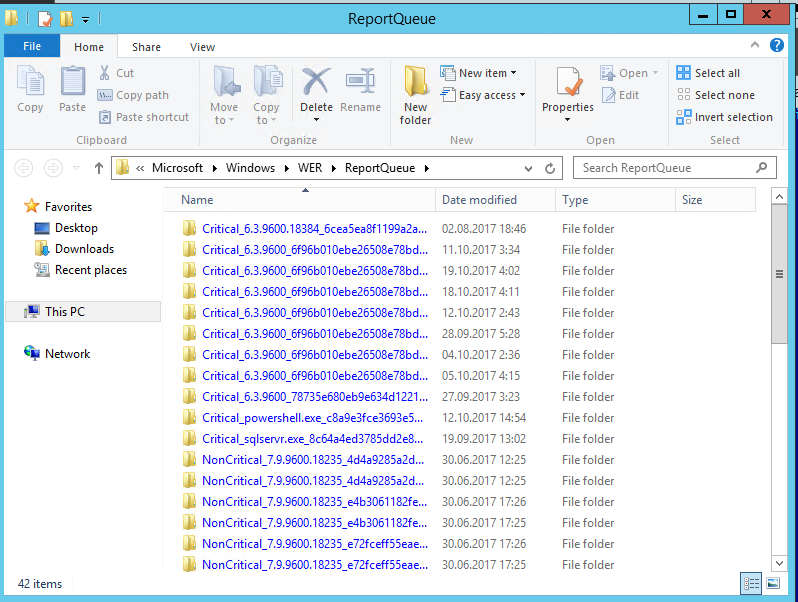
Внутри каталога WER\ReportQueue\ содержится множество каталогов, с именами в формате:
- Critical_6.3.9600.18384_
_00000000_cab_3222bf78 - Critical_powershell.exe_
_cab_271e13c0 - Critical_sqlservr.exe__
_cab_b3a19651 - NonCritical_7.9.9600.18235__
_0bfcb07a - AppCrash_cmd.exe_
_bda769bf_37d3b403
Как вы видите, имя каталога содержит степень критичности события и имя конкретного exe файла, который завершился аварийно. Во всех каталогах обязательно имеется файл Report.wer, который содержит описание ошибок и несколько файлов с дополнительной информацией.
Очистка папки WER\ReportQueue в Windows
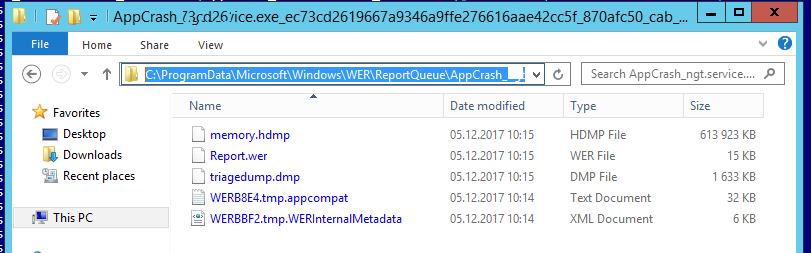
Как правило, размер каждой папки незначителен, но в некоторых случаях для проблемного процесса генерируется дамп памяти, который занимает довольно много места. На скриншоте ниже видно, что размер файла дампа memory.hdmp составляет около 610 Мб. Парочка таким дампов – и на диске исчезло несколько свободных гигибайт.
Чтобы очистить все эти ошибки и журналы штатными средствами, откройте панель управления и перейдите в раздел ControlPanel -> System and Security -> Action Center -> Maintenance -> View reliability history -> View all problem reports и нажмите на кнопку Clear all problem reports.
![]()
Для быстрого освобождения места на диске от файлов отладки, сгенерированных службой WER, содержимое следующих каталогов можно безболезненно удалить и руками.
Отключение Window Error Reporting в Windows Server 2012 R2 / 2008 R2
Отключить запись информации об ошибках Windows Error Reporting в серверных редакция Windows можно следующим образом:
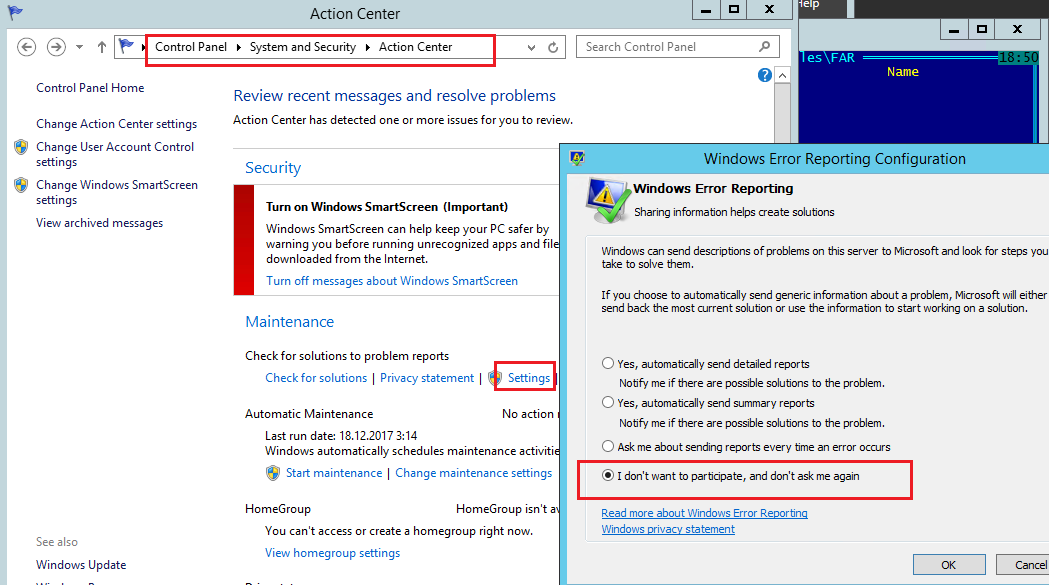
- Windows Server 2012 / R2 – Панель Управления -> System and Security -> Action Center -> раздел Maintenance -> Settings -> выберите опцию I don’t want to participate, and don’t ask me again
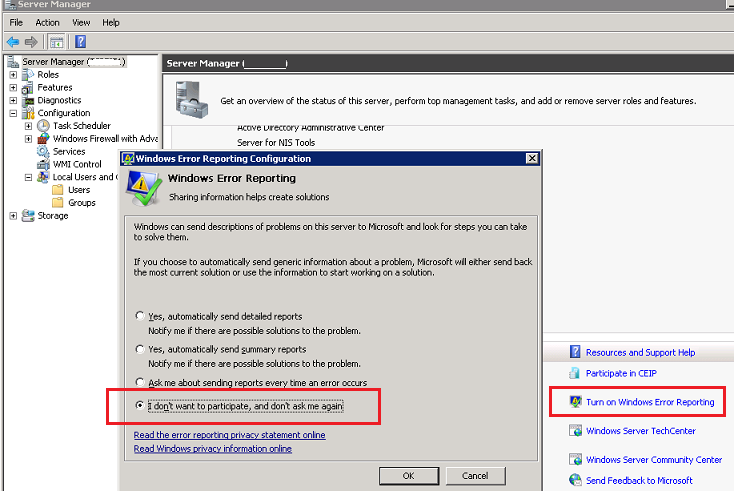
- Windows Server 2008 R2 – откройте консоль Server Manager и промотайте список, перейдя в раздел Resources and Support. Нажмите на Turn Off Windows Error Reporting и выберите пункт I don’t want to participate, and don’t ask me again.
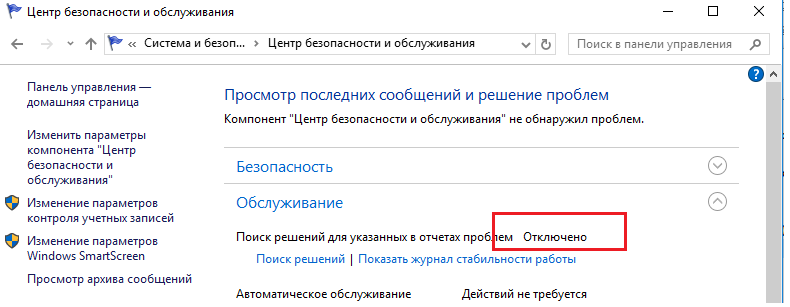
Отключение функции сбора и отправки отчетов в Windows 10
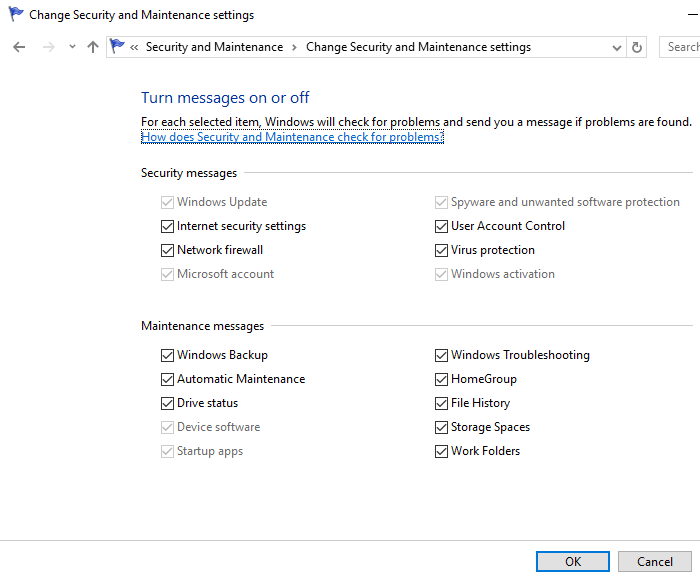
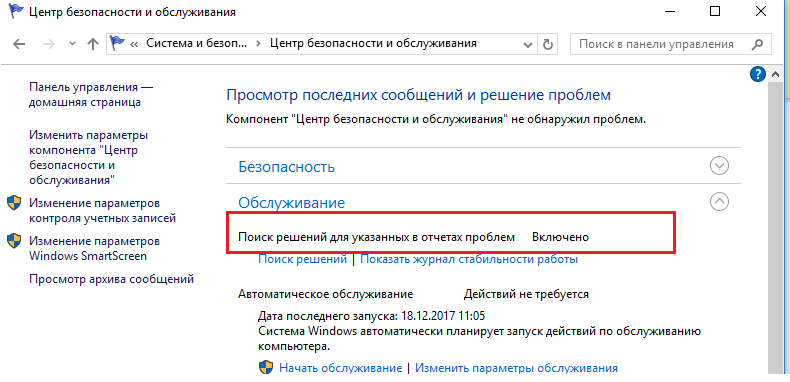
В Windows 10 возможность отключить Error Reporting через GUI отсутствует. Проверить статус компонента можно в панели управления Система и безопасность ->Центр безопасности и обслуживания -> секция Обслуживание. Как вы видите, по умолчанию параметр Поиск решения для указанных в отчетах проблем включен (Control Panel -> System and Security -> Security and Maintenance -> Maintenance -> Check for solutions to problem reports).
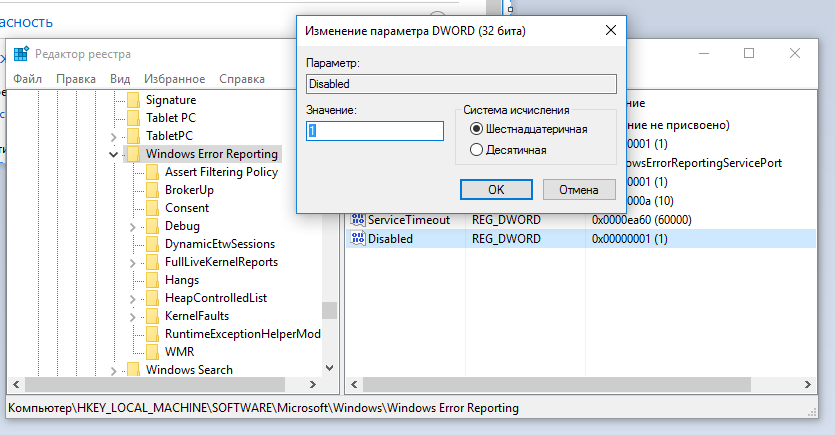
Отключить Windows Error Reporting в Windows 10 можно через реестр. Для этого в ветке HKLM\SOFTWARE\Microsoft\Windows\Windows Error Reporting нужно создать новый параметр типа DWORD (32 бита) с именем Disabled и значением 1.
Теперь еще раз проверим статус параметра Поиск решения для указанных в отчетах проблем в панели управления. Его статус должен изменится на Отключено.
Отключение Windows Error Reporting через групповые политики
Ведение журналов службой Windows Error Reporting можно отключить и через групповую политику. Она находится в разделе Computer Configuration/Administrative Templates/Windows Components/Windows Error Reporting (Компоненты Windows -> Отчеты об ошибках Windows). Для отключения сбора и отправки данных включите политику Disable Windows Error Reporting (Отключить отчеты об ошибках Windows).
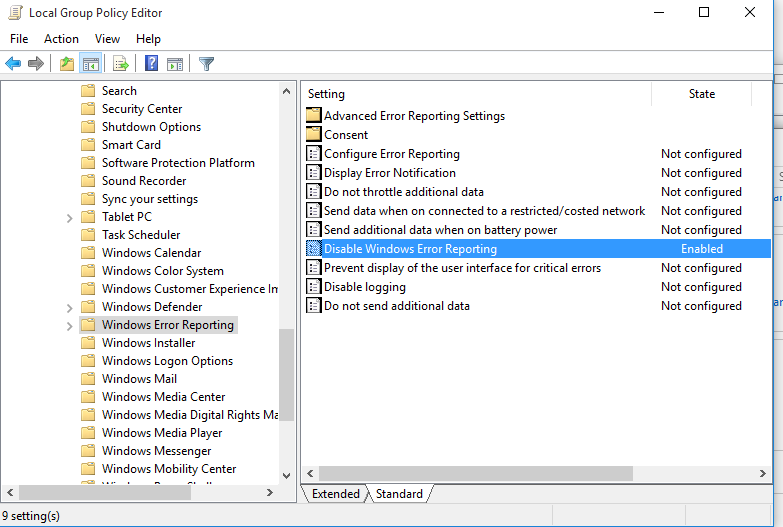
В результате сообщения об ошибках приложений в Windows перестанут формироваться и автоматически отправляться в Microsoft.


