- Настройка служб IIS для драйверов Майкрософт для PHP для SQL Server Configuring IIS for the Microsoft Drivers for PHP for SQL Server
- Учебники Tutorials
- Видеопрезентации Video Presentations
- Ресурсы поддержки Support Resources
- Microsoft IIS 7.0 и выше
- Включение поддержки FastCGI в IIS
- Настройка IIS для обработки PHP запросов
- Использование Интерфейса управления IIS для создания обработчика PHP
- Использование командной строки для создания сопоставления обработчика PHP
- Представление и доступ к файловой системе
- Установка index.php как документ по умолчанию в IIS
- FastCGI и PHP удаление конфигурации
- Установка таймаута FastCGI
- Install and Configure PHP
- Install PHP
- Windows Installer
- Zip File Installation
- Extensions
- PHP.INI File Settings
- Required Settings
- Optional Settings
- Enable PHP Session State
Настройка служб IIS для драйверов Майкрософт для PHP для SQL Server Configuring IIS for the Microsoft Drivers for PHP for SQL Server
Скачать драйвер PHP Download PHP Driver
Эта статья содержит ссылки на ресурсы на веб-сайте служб IIS, посвященные настройке служб IIS для размещения приложений PHP. This topic provides links to resources on the Internet Information Services (IIS) Web site that are relevant to configuring IIS to host PHP applications. Перечисленные здесь ресурсы относятся к использованию протокола FastCGI со службами IIS. The resources listed here are specific to using FastCGI with IIS. FastCGI является стандартным протоколом, который позволяет исполняемым файлам CGI исполняющей среды взаимодействовать с веб-сервером. FastCGI is a standard protocol that allows an application framework’s Common Gateway Interface (CGI) executables to interface with the Web server. Протокол FastCGI отличается от стандартного протокола CGI тем, что FastCGI повторно использует процессы CGI для нескольких запросов. FastCGI differs from the standard CGI protocol in that FastCGI reuses CGI processes for multiple requests.
Учебники Tutorials
Ниже представлены ссылки на руководства по настройке протокола FastCGI для PHP и размещению приложений PHP в службах IIS 6.0 и IIS 7.0: The following links are for tutorials about setting up FastCGI for PHP and hosting PHP applications on IIS 6.0 and IIS 7.0:
Видеопрезентации Video Presentations
Ниже представлены ссылки на видеопрезентации о настройке FastCGI для PHP и использовании функций служб IIS 7.0 для размещения приложений PHP: The following links are for video presentations about setting up FastCGI for PHP and using IIS 7.0 features to host PHP applications:
Ресурсы поддержки Support Resources
Указанные ниже форумы предоставляют поддержку сообщества по использованию FastCGI в службах IIS: The following forums provide community support for FastCGI on IIS:
Microsoft IIS 7.0 и выше
Этот раздел содержит инструкции по настройке Internet Information Services (IIS) 7.0 и более поздних версий для работы с PHP на Microsoft Windows Vista SP1, Windows 7, Windows Server 2008 и Windows Server 2008 R2. Для получения инструкций по настройке IIS 5.1 и IIS 6.0 на Windows XP и Windows Server 2003 перейдите на страницу Microsoft IIS 5.1 и IIS 6.0.
Включение поддержки FastCGI в IIS
Модуль FastCGI при установке IIS по умолчанию отключён. Способы включения его различаются в зависимости от версии используемой Windows.
Для включения поддержки FastCGI на Windows Vista SP1 и Windows 7:
В меню «Пуск» выберите пункт «Выполнить», в появившемся окне введите с клавиатуры «optionalfeatures.exe» и нажмите «Ok»;
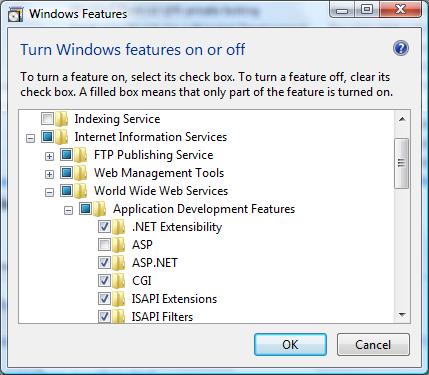
В открывшемся окне «Компоненты Windows» раскройте папку «Службы IIS», «Службы интернета», «Компоненты разработки приложений» и установите галочку напротив «CGI»;
Нажмите OK и ждите окончания процесса установки.
Чтобы включить поддержку FastCGI на Windows Server 2008 и Windows Server 2008 R2:
В Windows откройте меню Пуск выберите пункт «Выполнить:», наберите с клавиатуры «CompMgmtLauncher» и нажмите «Ok»;
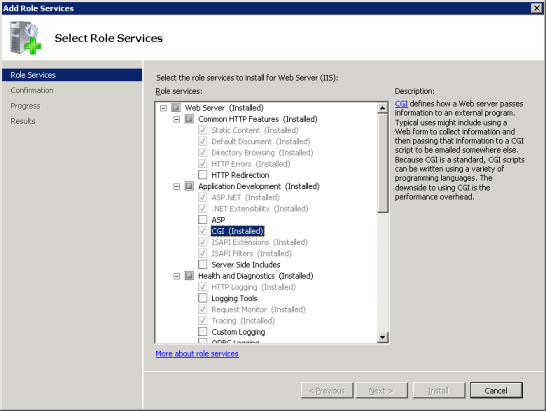
Если роль «Веб-сервер (IIS)» не представлена во вкладке «Роли», добавьте её, выбрав «Добавить роли»;
Если роль «Веб-сервер (IIS)» присутствует, выберите «Выбор службы ролей» и установите галочку напротив «CGI» в группе «Компоненты разработки приложений»;
Нажмите «Далее» затем «Установить» и ждите окончания процесса установки.
Настройка IIS для обработки PHP запросов
Скачайте и установите PHP в соответствии с инструкциями, приведёнными в описании установки
При использовании IIS рекомендуется использовать потоко-небезопасную (Non-thread-safe) сборку PHP, которая доступна по ссылке » PHP для Windows: Установочные файлы и исходный код.
Измените CGI и FastCGI настройки в файле php.ini как показано ниже:
Пример #1 CGI и FastCGI настройки в php.ini
Настройте IIS обработчик для PHP, используя Интерфейс управления IIS или через командную строку.
Использование Интерфейса управления IIS для создания обработчика PHP
Следующие шаги позволят вам создать IIS обработчик для PHP в Интерфейсе управления IIS:
В Windows меню Пуск выберите команду «Выполнить:», введите в клавиатуры команду «inetmgr» и нажмите «Ok»;
В Интерфейсе управления IIS выберите сервер в дереве «Подключения»;
На «Начальной странице» откройте «Сопоставления обработчиков»;
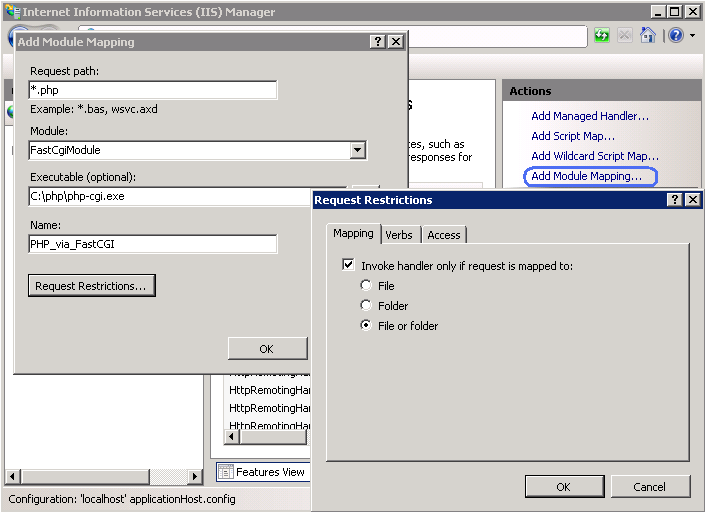
На вкладке «Действия» выберите «Добавить сопоставление модуля. «;
В окне «Добавление сопоставления модуля» введите следующее:
- Путь запроса: *.php
- Модуль: FastCgiModule
- Исполняемый файл: C:\[Path to PHP installation]\php-cgi.exe
- Имя: PHP_via_FastCGI
Нажмите кнопку «Ограничения запроса» и сконфигурируйте сопоставление вызывать обработчик только при сопоставлении с файлом или каталогом;
Нажмите OK во всех диалогах для сохранения конфигурации.
Использование командной строки для создания сопоставления обработчика PHP
Используйте команды приведённые ниже для создания пула процессов IIS FastCGI который будет использовать php-cgi.exe выполняемый для PHP запросов. Замените значение параметра fullPath на абсолютный путь к файлу php-cgi.exe .
Пример #2 Создание IIS FastCGI пула процессов
Настройка IIS для обработки специфических запросов PHP из командной строки показана ниже. Замените значение параметра scriptProcessor на абсолютный путь к файлу php-cgi.exe .
Пример #3 Создание сопоставления обработчика запросов PHP
Эта команда создает для IIS сопоставление обработчика для файлов с расширением *.php, который получается в результате и обрабатывается модулем FastCGI.
На этом шаге установка и настройка завершены. Следующие инструкции необязательны, но очень рекомендуются для достижения оптимальной функциональности и производительности PHP на IIS.
Представление и доступ к файловой системе
При использовании IIS рекомендуется включить представление FastCGI в PHP. Это контролируется директивой fastcgi.impersonate в php.ini файле. Когда имперсонация включена, PHP будет выполнять все операции с файловой системой под аккаунтом, который был определён при аутентификации IIS. Это гарантирует, что при общем PHP процессе для всех сайтов IIS, PHP скрипты этих сайтов не будут иметь доступ к файлам друг друга до тех пор, пока IIS использует различные учетные записи для каждого из сайтов.
Для примера, в настройках по умолчанию IIS 7, включена анонимная аутентификация под стандартным пользователем IUSR. Это значит, что давая разрешение IIS выполнить PHP скрипт, так же необходимо дать права на чтение этого скрипта аккаунту IUSR. Если PHP приложению необходимо выполнить запись в некоторые файлы или папки, тогда аккаунту IUSR следует дать права на запись в них.
Чтобы решить какой пользователь используется для идентификации в IIS 7, можно использовать следующие команды. Замените «Default Web Site» на имя IIS сайта, с которым вы работаете. На выходе, в XML конфигурации смотрите атрибут userName .
Пример #4 определение аккаунта, используемого IIS при анонимной идентификации
Если атрибут userName отсутствует в элементе anonymousAuthentication , или установлен как пустая строка, это значит, что удостоверение пула приложений используется как анонимное для этого веб-сайта.
Для изменения настроек доступа для файлов или папок, используйте интерфейс пользователя в проводнике Windows или команду icacls .
Пример #5 Настройка разрешения доступа к файлам
Установка index.php как документ по умолчанию в IIS
По умолчанию в IIS не установлено имя документа для обработки HTTP запросов по умолчанию. В PHP приложениях, обычно используется по умолчанию документ index.php . Чтобы добавить index.php в лист документов по умолчанию IIS, используйте такую команду:
Пример #6 Установка index.php как документ по умолчанию в IIS
FastCGI и PHP удаление конфигурации
Настройка IIS FastCGI установок для утилизации PHP процессов с помощью команд приведена ниже. Опция FastCGI instanceMaxRequests устанавливает максимальное количество запросов, которое может обрабатываться одним php-cgi.exe процессом пока IIS не начнет их отключать. PHP переменная окружения PHP_FCGI_MAX_REQUESTS устанавливает как много запросов будет обрабатывать один php-cgi.exe процесс пока сам не начнет удалять их. Конечно, значение установленное для FastCGI InstanceMaxRequests меньше или равно PHP_FCGI_MAX_REQUESTS .
Пример #7 Настройка FastCGI и PHP утилизации
Установка таймаута FastCGI
Увеличение параметра таймаута для FastCGI делается, если имеется долго выполняемый PHP скрипт. Два параметра контролируют таймаут, это: activityTimeout и requestTimeout . Используйте команды приведённые ниже для изменения настроек таймаута. Конечно, надо заменить значение параметра fullPath на полный путь к файлу php-cgi.exe .
Пример #8 Конфигурация установок таймаута FastCGI
Install and Configure PHP
The fastest and easiest way to install PHP on Internet Information Services (IIS) is by using the MicrosoftВ® Web Platform Installer (Web PI). Web PI completely automates setting up IIS, FastCGI, and the latest version of PHP from the php.net Web site. With Web PI, you can navigate to the «Web Platform» tab and select «PHP» under «Framework and Runtimes» customize link. Alternately, use the instructions that follow as guidance for installing PHP with WindowsВ® Installer or using a compressed (Zip) file installation.
There are two builds for each PHP version: one is thread-safe, and one is not (referred to as the non-thread-safe [NTS] version). The thread-safe version is designed for environments where the Web server core can keep the PHP engine in memory, running multiple treads of execution for different Web requests simultaneously. The architecture of IIS and the FastCGI extension provide an isolation model that keeps requests separate, removing the need for a thread-safe version. The NTS version does not have any of the code that allows PHP to manage multiple threads. As a result, there is a performance improvement on IIS when using the NTS version when compared to the tread-safe version because the NTS version avoids unnecessary thread-safety checks (FastCGI ensures a single-threaded execution environment).
Install PHP
There are two main ways to install PHP on a WindowsВ®-based computer: download the Windows Installer or use the Windows Zip file from the PHP Web site. Either method will get PHP working, but both have some extra steps that are needed to make PHP work well.
Windows Installer
The Windows Installer version can get a complete PHP environment up and running, but the installation of extensions can be confusing. By default, no extensions are installed, and this can adversely affect the usefulness of the PHP installation. Alternately, all of the extensions can be installed; this results in an unstable system because some of the extensions can conflict with others. It is generally easier to use the Zip file installation.
Zip File Installation
To use the Zip file installation, follow the instructions in Using FastCGI to Host PHP Applications on IIS 7.0 and Above. The Zip file installation installs many of the extensions that are available for the Windows Installer version; however, none of the extensions are enabled until their entries in the Php.ini file are set up.
Download the latest non-thread-safe Zip file package with binaries of PHP. Under Windows Binaries, click on the most current PHP non-thread-safe Zip package to download the PHP files.
Unpack the files to a directory of your choice (for example, C:\PHP ) on your IIS server.
Rename the Php.ini-recommended to php.ini.
Open the Php.ini file in a text editor, then uncomment and modify settings as follows:
Set fastcgi.impersonate = 1.
FastCGI under IIS supports the ability to impersonate security tokens of the calling client. This allows IIS to define the security context that the request runs under.
Set cgi.fix_pathinfo = 0
The cgi.fix_pathinfo provides PATH_INFO/PATH_TRANSLATED support for Common Gateway Interface (CGI). Setting this to 1 will cause PHP CGI to fix its paths to conform to the specification.
Set cgi.force_redirect = 0.
Set open_basedir to point to a folder or network path where the content of the Web site(s) is located.
Set extension_dir to point to a location where PHP extensions reside. For PHP 5.2.X, this is typically extension_dir = «./ext».
Set error_log=»C:php_errors.log»
This can help with troubleshooting.
Enable the required PHP extension by un-commenting corresponding lines. More information follows in the section, Extensions.
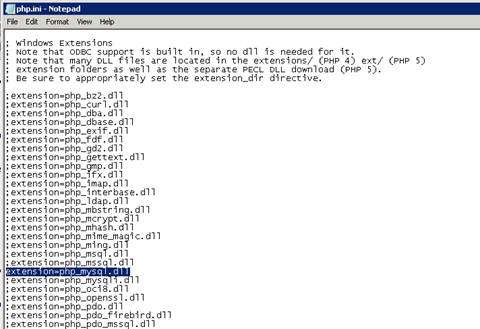
Figure 1 Windows extensions
Click on Start, Settings, Control Panel, and then double-click on the System icon (using the class view).
Click on the Advanced system settings link in the left column.
From the System Properties window, click on the Advanced tab, and then click on the Environment Variables button at the bottom.
Select the Path variable from the System Variables section, and then click on Edit. Add: c:\php to your system path.
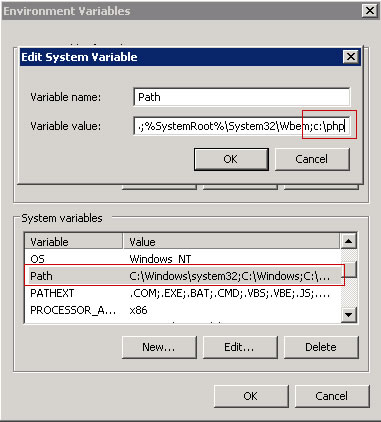
Figure 2: Edit System Variable
Click OK until you have exited the System Properties window.
Start IIS Manager by clicking on Start, Programs, Administrative Tools, and then Internet Information Services (IIS) Manager.
From the IIS Manager, click on the hostname of your server in the Connections panel on the left.
Double-click on the Handler Mappings icon.

Figure 3: Internet Information Services (IIS) Manager
From the Handler Mappings Actions panel, click on Add Module Mapping.

Figure 4: Handler Mappings
Type the following information into the appropriate text boxes, and then click OK.
- Request path: *.php
- Module : FastCGImodule
- Executable: C:\php\php-cgi.exe
- Name: FastCGI

Figure 5: Add Script Map
Click OK, and then c lick Yes.
In the left panel, click on your server’s hostname, and then double-click on the Default Document icon.
From the Actions panel on the right, click Add.
Enter index.php as the new default document name, and then click OK.
Enter default.php as the new default document name, and then click OK.
In the left panel, click on your server’s hostname.
In the Actions panel on the right, click Restart.
Create a new text document, and save it as c:\inetpub\wwwroot\phpinfo.php with the following content:
You should now see the PHP information page at http://localhost/phpinfo.php .

Figure 6: PHP information page
Extensions
It is important to determine which extensions are needed by the applications that will be running and then to limit the installed extensions to only those. For a typical open-source application installation, for example, the following extensions are installed:
- Database Extensions — Most open-source applications that use MySQL for a database engine use either the php_mysql or the php_mysqli extensions. For new development work, either of these extensions work well, or consider using the PDO versions of the MySQL driver (PDO is a PHP extension providing a data-access abstraction layer that can be used with a variety of databases); this extra layer of abstraction provides a richer set of object database functionality and controls. If Microsoft® SQL Server® (or an express version, such as Microsoft® SQL Server® 2008 Express or Microsoft® SQL Server® 2005 Express Edition) is the database engine, use the php_mssql extension for open-source applications. For new development work, use the PDO version of the SQL driver.
- Image Handling Extensions — Many of the open-source applications that enable work with images make use of the GD2 extension – php_gd2, which has a number of good basic image manipulation application programming interfaces (APIs). Some applications use the ImageMagick application and libraries. There is also a php_exif library for working with the extended information that modern digital cameras store within the images.
- Internationalization and Localization Extensions &mdash- The two most commonly used extensions for i18n and l10n are php_mbstring (Multi-Byte String) and php_gettext (Native Language Support). Many of the open-source applications use one or both of these.
- Web Services Extensions — Choose the Web services extensions based on the services desired. For PHP, the SOAP extension is widely used. The XML-RPC extension is often used in conjunction with SOAP and other services.
PHP.INI File Settings
The Php.ini file provides PHP with configuration and environmental information. Below are a number of settings for the Php.ini file that help PHP work better with Windows.
Required Settings
The extension_dir needs to point to the directory where the PHP extensions are stored. The path can be fully qualified (for example, C:\PHP\ext ) or relative (for example, .\ext). Extensions that are specified lower in the Php.ini file need to be located in the extension_dir. If the extensions specified are not in the extension_dir, then PHP will give a warning message at the start of script execution, and the application may show errors because of the missing functionality.
C:\inetpub\temp\php-errors.log ). That puts the log in a place that IIS can use, and also keeps the log close to where PHP applications are running.
Optional Settings
- max_execution_time=## This directive sets the maximum amount of time that can be taken executing any given script. The default is 30 seconds. Some applications need more time to process batch operations (for example, Gallery2 loading multiple images from a remote location). However, setting the execution time higher than 300 seconds is not advised because there are often other parts of the connection that cannot support such a long execution time.
- memory_limit=###M The amount of memory available for the PHP process (in MB). The default is 128 MB, which is appropriate for most PHP applications.
- display_errors=Off This directive determines whether to include any error messages in the stream that it returns to the Web server. If turned on, PHP will send the classes of errors that are defined with the error_reporting directive back to IIS as part of the error stream. Many of the open-source applications bypass error reporting by executing commands prefaced with @. This allows the applications to control error handling.
- Mail functions PHP is configured by default to send outbound mail through an SMTP server located on the same system as the Web server. Note that most Windows installations usually have the Web and mail servers on separate systems.
Enable PHP Session State
In WindowsВ® Explorer, create the session subdirectory in the PHP installation directory.
Right-click the session directory, and select Properties.
In the Security tab, click Edit.
Click Add, and enter IIS_IUSRS for Enter the object names to select.
Click OK.
Select the Modify permission check box, and click OK.

Figure 7: Permissions for session folder
Click OK in the Session Properties window.
Open php.ini in the PHP installation directory, and set the session.save_path setting to the session subdirectory:
Save and close the file.
Click Start, and then select Command Prompt.
Type runas /user:administrator cmd.exe to enable elevated permissions.
Type iisreset at the command prompt, and then press the ENTER key.

Figure 8: IISRESET command
Note that PHP uses file-based session state by default. You can modify a number of additional session settings, including whether cookie or URL sessions should be used, and whether sessions are created on the first request or need to be explicitly created.
Test the session state by using Windows Explorer, navigate to C:\inetpub\wwwroot .
Create a folder and rename it phpapp.
Create session.php in the phpapp directory.
Paste the following into it:
Save and close the file.
Start Internet Explorer, and navigate to http://localhost/phpapp/session.php .

Figure 9: Using session state
Observe that the counter is 1.
Request http://localhost/phpapp/session.php again, or press F5.
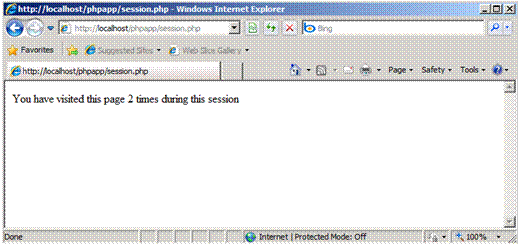
Figure 10: Using session state
Observe that the counter is 2.
This article uses information from «Using FastCGI to Host PHP Applications on IIS 7.0 and Above» by Ruslan Yakushev, published on December 5, 2007.


