Блог Викторовича
Windows 10: Установка NET Framework 3.5 без интернета

Я недавно после установки Windows 10 2004 (1607, LTSB, 1803, 1809, LTSC, 1909, Win8.1) столкнулся с такой проблемой. Дело в том, что нужно было установить некоторые, скажем так, очень нужные, но чертовски дорогие программы. Так вот некоторые стали кричать и требовать NET.Framework версии 3.5, включая 3.0 и 2.0, а интернет без надежного файервола подключать нельзя. Ну слетят просто активации, сами знаете. ;))

Внимание! Статья была обновлена 09.06.2020 в связи с выходом новейших версий Windows. И будет обновляться по мере выхода новых редакций.
Для удобства общий архив был разделен на отдельные файлы по выпускам. Отдельно программа и руководство.
Так что, выбирайте своё 🙂

Перечитал кучу информации в интернете. Всё друг у друга попереписанное 100-тыщ-500 раз. Сайтов 30, наверное, перечитал. Вразумительного ответа так и не получил, но представление об установке сложилось.
Но способ нашелся, чем с вами и поделюсь. Приступим .
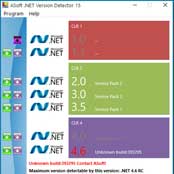
На верхней картинке видно, что Framework установлен. Но чисто ради понтов к поисковикам Яндекса и Гугла: если вам не удается воспользоваться модемом от МТС на редакциях Windows после версии 1803, то можете почитать очень даже полезную статью о Windows 10: МТС модем. Подключение разорвано!
Ниже — там текст для более ранних версий. Ошибки — тоже ниже. Читайте .
Мы же сейчас поговорим о новых системах Windows. Эти подружки крайне упорно не хотят устанавливать и включать функции Framework 3.5, 3.0, 2.0.
Дело в том, что они требует фреймворк ИМЕННО из своего дистрибутива. Да еще и установщик.
Вообщем, распаковал я образ и извлек папку sources, а в ней не распакованная папка sxs. Всё лишнее выбросил за ненадобностью.
Теперь перемещаем папку sources с единственной папкой внутри sxs в корень любого диска(раздела), только не системного.
У меня вот так, на разделе D:

Теперь запускаем маленькую программку (архивчик качнете ниже), выбираем свой диск(раздел). Она сама строчкой ниже определит папки.
Жмем «Install». Ну, чего проще -то ??
Программулька замечательная. Установки никакой не требует.Вот так она выглядит:

Короче: ближе к телу, как говорил Мопассан. ))
Работоспособность проверена бесчисленное количество раз.
Итак.
1. Распакуйте архив в корень любого НЕ системного диска/раздела.
2. Запустите прилагаемую программу от имени администратора.
3. В первом окошке выберите из выпадающего списка диск/раздел, куда распаковали.
4. Во втором окошке должен появиться путь и справа зеленая надпись — (Found), т.е. найдено.
Чуть не забыл. При использовании нужной папки, сотрите цифры версии, т.е. «sources 1903» оставляем только «sources»
5. Жмем Install и ждем пару минут, в зависимости от скорости вашей машинки.
Ну и собственно — всё. ))
Папки sources для редакций Windows 10 + обновления оффлайн .NET Framework_1.1_2.0_3.0_3.5_4.0_4.8 + подробная инструкция и программа установки ниже.
Скачать напрямую с Яндекс.Диска
Программа, руководство и .NET Framework_1.1_2.0_3.0_3.5_4.0_4.8 
Размер: 69.4 мБ
sources 1607, LTSB
Размер: 68.6 мБ
sources 1803, 1809, LTSC
Размер: 70.8 мБ
sources 1909
Размер: 70.7 мБ
sources 2004
Размер: 69.3 мБ
sources 8.1
Размер: 66.2 мБ
———————————————————————————————-
Ниже приводится тоже актуальная запись, но для систем вышедших ранее. А также установка Framework 3.5 для Windows 8.1
Для начала вам потребуется распакованный дистрибутив windows 8/8.1 или 10.
Скопируйте из него папку sources с вложенной в нее папкой sxs, в корень какого нибудь раздела на вашем диске. НЕ на диск С. Любой подойдет. Даже флешка. Кроме папки sxs, всё остальное выбросите в корзину. Оно не пригодится для нашей цели.
У меня эта скопированная папка на диске D. Соответственно путь до нее выглядит D:/sources/sxs
В папке sxs советуют распаковать архив microsoft-windows-netfx3-ondemand-package.cab
Я не распаковывал.
Теперь запустите командную строку от имени Администратора, скопируйте и введите команду ниже:
Жмем ENTER и дожидаемся результата.

(на картинке ошибочно указан диск «С». Переустанавливать, право, лень:))
Иногда возникает ошибка: «Не удается построить цепочку сертификатов для доверенного корневого центра сертификации.»
Либо — «Цепочка сертификатов обработана, но обработка прервана на корневом сертификате. »
Значит Вы не получаете автоматически обновления ;))
Я, например, намертво блокирую любые попытки обновления из Центра мелко-туды их-нах-мягких.
Что мне нужно для системы — скачиваю и устанавливаю автономно.
Так вот.
В случае появления таких ошибок — установите сертификат MicrosoftRootCertificateAuthority2011.cer
Сейчас напишу немного мутоты, в которой сам поначалу запутался, а в конце дам ссылку на свой собственный архив с инструкцией и всем — всем необходимым, где всё это уже проделано. Давно пользуюсь. Версия обновляется по мере выхода свежей.
Вы можете устранить ошибку буквально в 2 минуты.
Ну, поехали!
(Вообще надо сразу ставить этот сертификат, т.к. он и для 4.6; 4.7, 4.7.2, 4.8 . версий Framework.)
Нужно открыть мастер импорта сертификатов одним из описанных далее способом.
1. Установка через Internet Explorer:
Запустите iexplorer. В главном меню выберите Сервис / Свойства обозревателя.
2. Откройте «Свойства обозревателя» через меню Пуск / Панель управления.
Переключитесь на вкладку «Содержание».
Откроется окно «Сертификаты». Переключитесь на вкладку «Доверенные корневые центры сертификации».
Нажмите кнопку «Импорт».
Запустите файл сертификата как программу. Появится окно «Сертификат».
Нажмите кнопку «Установить сертификат».
3. Через консоль MS Windows.
Внимание! Данный вариант — ЕДИНСТВЕННЫЙ работоспособный для Windows 7!
1. Запустите консоль mmc, для этого выполните следующие действия: Войти в «Пуск / Выполнить», в строке «Найти программы и файлы» пропишите mmc, Разрешите внести изменения — кнопка Да.
2. Появится окно консоли. В главном меню выберите Консоль(Файл) / Добавить или удалить оснастку
Появится окно «Добавить или удалить оснастку».
3. В списке оснастки выберите «Сертификаты» и нажмите «Добавить».
4. В окне «Оснастка диспетчера сертификатов» оставьте значения по умолчанию и нажмите «Готово»
(Закройте окно «Добавить изолированную оснастку» (кнопка «Закрыть»)
5. В окне «(((Добавить или удалить оснастку)))» нажмите «ОК»
В дереве консоли появится запись «Сертификаты». Раскройте ее и найдите раздел «Доверенные корневые центры сертификации», «Сертификаты»
6. На строке «Сертификаты»(слева) нажмите правую кнопку мыши и в контекстном меню выберите Все задачи / Импорт
7. На шаге «Импортируемый файл» (Шаг может быть пропущен, в зависимости от варианта запуска мастера) с помощью кнопки «Обзор…» выберите корневой сертификат и нажмите «Далее >».
8. На шаге «Хранилище сертификатов» установите опцию «Поместить все сертификаты в следующее хранилище» и нажмите кнопку «Обзор».
9. В окне выбора хранилища установите флаг «Показать физические хранилища», раскройте «ветку» (+) «Доверенные корневые центры сертификации» и выберите место хранения сертификата:
«Реестр» — для пользования корневым сертификатом только текущим пользователем под данной операционной системой.
«Локальный компьютер» — для пользования корневым сертификатом всеми пользователями операционной системы.
10. После нажатия кнопок «Ок», «Далее» и «Готово» может появиться предупреждение о безопасности (зависит от внутренних настроек операционной системы) с вопросом «Установить данный сертификат?», нажмите «Да».
Появится сообщение — «Импорт успешно выполнен», корневой сертификат добавлен в доверенные корневые центры сертификации для вашей или для всех учетных записей.
Если все сделали пошагово правильно — ошибок не будет.
Единственное, может быть потребуется взять sources из другого дистрибутива.
Папка sources для Windows 8.1 + обновление Framewoek 3.5 от 09.10.2018 + подробная инструкция и программа установки ниже.
Скачать напрямую с Яндекс.Диска
Размер: 269МБ
На этом у меня все. Не получается? Пишите в комментариях.
————————————————————————————
У некоторых не получается включить функции Framework 3.5 средствами DISM.
Причины настолько разные , что все их описать невозможно.
Может быть, не в корень диска кинули, в пути присутствует кириллица (включая название компа и Админа).
Ой. много нюансов.
Выкладываю весь собственный архив, которым пользуюсь не один год.
Читайте, смотрите, что вам подойдет в конкретном случае.
АРХИВ
Размер: 265 мБ
ВСЕМ ДОБРА!
Можете попутно, раз уж зашли, нажать на кнопочки — Вам 2 секунды, а мне очень приятно и полезно для сайта.
Спасибо!
А теперь.
А ТЕПЕРЬ ВАУ. Калейдоскоп! Подвигайте мышкой по картинке. ;))
Can’t enable .NET Environment in Windows 10 1903
Well, this is a showstopper for me. I’m in the Release Preview ring & installed 1903 (18362.30) yesterday . Update went fine. No issues experienced.
Got a Cumulative Update to install today (KB4495666). Installed it & rebooted. Build is now at 18362.53. .NET framework was disabled & 90% of my applications will no longer run! In «Control Panel/Programs and Features/Turn Windows Features on or off», «.NET Environment» is unchecked. If I check it & hit «OK» it take about 10 seconds & says «Windows completed the requested changes». The .NET Environment, however, is still unchecked when I go back to «Turn Windows Features on or off» & >NET applications still don’t work.
I’ve uninstalled all of the updates installed today (KB4495666 & KB4493478), but .NET is still utterly broken. I’ve read that this was an issue prior to the release of 18362 to the Release Preview ring but was supposed to have been fixed. Looks like this MAJOR bug was reintroduced with the cumulative update?
Replies (169)
* Please try a lower page number.
* Please enter only numbers.
* Please try a lower page number.
* Please enter only numbers.
I think the USB is probably fine, as you used it to install Windows. E:\sources\sxs should have 4 files:
You can check the status of the NetFx3
DISM /Online /Get-CapabilityInfo /CapabilityName:NetFx3
You can also try adding NetFx3 with the enable feature command, but this usually fails:
DISM /Online /Enable-Feature /All /FeatureName:NetFx3 /Source:E:\Sources\sxs
Another way is by adding the .cab files as packages:
DISM /Online /Add-Package /PackagePath:E:\Sources\sxs
2012 Alienware Aurora R4 ALX
Intel i7-3960X, 32GB RAM, 250GB NVMe SSD, NVIDIA GeForce GTX 690
1 person found this reply helpful
Was this reply helpful?
Sorry this didn’t help.
Great! Thanks for your feedback.
How satisfied are you with this reply?
Thanks for your feedback, it helps us improve the site.
How satisfied are you with this reply?
Thanks for your feedback.
Thanks for all of your help on this thread. I followed your suggestion in the previous post, and it’s still not working for me.
I have Windows 10 Pro, 1903, Build 18362.267.
- Uninstalled KB4495620 successfully
- Ran the DISM command with Windows ISO in a flash drive successfully
- Installed KB4502584 successfully
Tried running the DISM command and received an error 50 saying that Microsoft-Windows-FetFx3-OC-Package could not be enabled. Once I checked optionalfeatures.exe, I saw that the «abnormal» list was not fixed.
I have the following updates on my PC:
- KB4497932
- KB4509096
- KB 4500109
- KB 4498523
- KB 4497727
- KB 4502584
- KB 4505903
- KB 4508433
Also, I had reset my Windows 10 and updated Windows as soon as I installed it. I had the problem before and after, so no news here.
Please let me know if you see anything different than your instruction here.
Was this reply helpful?
Sorry this didn’t help.
Great! Thanks for your feedback.
How satisfied are you with this reply?
Thanks for your feedback, it helps us improve the site.
How satisfied are you with this reply?
Thanks for your feedback.
I will re-quote my previous directions, from an earlier reply above, which worked for me, except below I have replaced KB4495620 with KB4506991, which is a newer .NET update. Please give the below steps a try (after where it says «To resolve the issue»). Hopefully it will work.
________________________________________________________________________________________
I can still replicate this issue on Windows 10 Version 1903, build 18362.175. The fix is not as straightforward as installing the latest Windows Updates.
However, this can be fixed with some extra steps and still keep the device on Version 1903.
To replicate the issue:
Run Optionalfeatures.exe to see the problem list of Optional Features.
To resolve the issue:
Uninstall KB4506991
Install KB4506991 — This cannot be reinstalled without first adding back the NetFx3
Capability, as it will indicate that the KB is not applicable.
2012 Alienware Aurora R4 ALX
Intel i7-3960X, 32GB RAM, 250GB NVMe SSD, NVIDIA GeForce GTX 690
Was this reply helpful?
Sorry this didn’t help.
Great! Thanks for your feedback.
How satisfied are you with this reply?
Thanks for your feedback, it helps us improve the site.
How satisfied are you with this reply?
Thanks for your feedback.
After reading every answer and fix, plus researching tech net as well. I finally got a solution that I should have done from the get go. I did a full reformat and install with version 1809. I was able to then add the .NET framework 2.0 and 3.5 from control panel with no issue.
I spent many hours trying to fix it with all the cmd line prompts the .NET fix tool and nothing worked. even did the powershell thing.
I install windows with no internet connection and after it did a fresh install of 1809. I installed the .net frame work add in, then I got brave and tried the 1903 update which did work as well . Seems you need to install the .NET frame work 2.0 feature prior too 1903 update . This seemed to work I had 5 new machines with 1903 that would not let me install 2.0 or 3.5 framework
Do yourself a favor do a reformat and install a fresh windows 10 it works best.
2 people found this reply helpful
Was this reply helpful?
Sorry this didn’t help.
Great! Thanks for your feedback.
How satisfied are you with this reply?
Thanks for your feedback, it helps us improve the site.
How satisfied are you with this reply?
Thanks for your feedback.
![]()
Was this reply helpful?
Sorry this didn’t help.
Great! Thanks for your feedback.
How satisfied are you with this reply?
Thanks for your feedback, it helps us improve the site.
How satisfied are you with this reply?
Thanks for your feedback.
What worked for me if anyone wants to try out.
I opted in windows insider and chose the «skip ahead» build (I have the 18985 build).
I restarted and manually verified for updates in order to install the build.
It took some time to finish (around 3-4 hours), but it kept my files and programs and net framework was installed again (3.5 and 4.8).
Right now since most things look stable I opted out (I chose the «Stop getting preview builds setting»).
I don’t know if any of these things influenced the outcome but before opting in windows insider I tried most of the solutions involving «Dism» and «pkmngr» commands.
I also manually extracted all the missing «mum» and «cat» files related to net framework (netfx) into the packages folder and tried to to run the commands from there.
I also had net framework 4.8 sdk installed.
Right now I’m just happy I can install the programs that I need.
Was this reply helpful?
Sorry this didn’t help.
Great! Thanks for your feedback.
How satisfied are you with this reply?
Thanks for your feedback, it helps us improve the site.
How satisfied are you with this reply?
Thanks for your feedback.
HenryYHO’s workaround did not work al all.
We just had a machine in that was not in any kind of Insider loop. Exactly the issue as described in the thread: Feature list unrecognizable, bunch of software stopped working because of missing .net. Including Powershell that has gone down the drain.
Got interested in trying out Don Cuthbert’s solution. Only, none of the KB’s he mentions ( KB4506991 or KB4495620) are present. So his solution never works.
This machine is Windows 10 Pro (in Dutch), 1903, build 18362.418 with following updates present (and uninstallable if needed)
User describes the problem having started after an update.
Is any of these KB’s relevant to Don Cuthbert’s solution, i.e. that you can uninstall it, run the first command in Don’s solution, install it, and then run the second command from Don (the long one)? I am going to give it a shot myself, and see what happens.
OK, follow up on this: when trying to uninstall KB4517389, I get an error after a while. No details given. Downloading and running the standalone says the update is already installed.
1 person found this reply helpful
Was this reply helpful?
Sorry this didn’t help.
Great! Thanks for your feedback.
How satisfied are you with this reply?
Thanks for your feedback, it helps us improve the site.
How satisfied are you with this reply?
Thanks for your feedback.
Sorry for the outdated information. That worked at that time because the KB listed was the most recent .NET Cumulative Update.
I have not reproduced and tested this issue for a long time.
I can do a test, to see if I can reproduce the failed OptionalFeatures state again, to see if it is still resovable in any way.
2012 Alienware Aurora R4 ALX
Intel i7-3960X, 32GB RAM, 250GB NVMe SSD, NVIDIA GeForce GTX 690
Was this reply helpful?
Sorry this didn’t help.
Great! Thanks for your feedback.
How satisfied are you with this reply?
Thanks for your feedback, it helps us improve the site.
How satisfied are you with this reply?
Thanks for your feedback.
I decided to do a fresh install on a formatted sdd. Winver 1903. So far no issues. But it looks like some CU still wreck the OptionalFeatures, so probably some guys in the know need to have a relook at this. Thanks for the effort.
Was this reply helpful?
Sorry this didn’t help.
Great! Thanks for your feedback.
How satisfied are you with this reply?
Thanks for your feedback, it helps us improve the site.
How satisfied are you with this reply?
Thanks for your feedback.
I did run a test and was able to replicate the strange listing in the OptionalFeatures menu, showing all .NET disabled. I could not find a way to uninstall the latest .NET Cumulative Update — KB4522738. However, I still ran the Add-Capability command to reinstall NetFx3
and the long command to try to add back everything else.
DISM /Online /Add-Capability /CapabilityName:NetFx3
DISM /Online /Enable-Feature /All /FeatureName:Microsoft-Windows-NetFx3-OC-Package /FeatureName:Microsoft-Windows-NetFx4-US-OC-Package /FeatureName:Microsoft-Windows-Client-EmbeddedExp-Package /FeatureName:Microsoft-Windows-NetFx3-WCF-OC-Package /FeatureName:Microsoft-Windows-NetFx4-WCF-US-OC-Package
The second command worked, except for /FeatureName:Microsoft-Windows-Client-EmbeddedExp-Package. But it fixed the OptionalFeatures.exe menu and i was then able to add back anything missing normally, using that OptionalFeatures menu.
Because I have never seen this happen on a device, unless I force it, I don’t know if what I did replicates your situation, but as far as I can test, it seems still repairable by using the above DISM commands.
Meanwhile, I am glad to hear that you have it fixed for now and hope there may be enough info here to help others, if they want to try the repair, rather than a reinstall.
2012 Alienware Aurora R4 ALX
Intel i7-3960X, 32GB RAM, 250GB NVMe SSD, NVIDIA GeForce GTX 690


