- Call Windows Runtime APIs in desktop apps
- Modify a .NET project to use Windows Runtime APIs
- .NET 5: Use the Target Framework Moniker option
- Earlier versions of .NET: Install the Microsoft.Windows.SDK.Contracts NuGet package
- Configure projects that multi-target different versions of .NET
- Modify a C++ Win32 project to use Windows Runtime APIs
- Add Windows 10 experiences
- Support Windows XP, Windows Vista, and Windows 7/8 install bases
- Conditional compilation
- Runtime checks
- Related Samples
- Find answers to your questions
- Ускоряем загрузку Windows 7
- Установка Windows SDK
- Установка xPerf из дистрибутива
- Анализ процесса загрузки Windows 7
- Оптимизация процесса загрузки Windows Seven
- Результаты оптимизации времени загрузки Windows 7
Call Windows Runtime APIs in desktop apps
You can use Universal Windows Platform (UWP) APIs to add modern experiences to your desktop apps that light up for Windows 10 users.
First, set up your project with the required references. Then, call Windows Runtime APIs from your code to add Windows 10 experiences to your desktop app. You can build separately for Windows 10 users or distribute the same binaries to all users regardless of which version of Windows they run.
Some Windows Runtime APIs are supported only in desktop apps that have package identity. For more information, see Available Windows Runtime APIs.
Modify a .NET project to use Windows Runtime APIs
There are several options for .NET projects:
- Starting in .NET 5, you can add a Target Framework Moniker (TFM) to your project file to access WinRT APIs. This option is supported in projects that target Windows 10, version 1809 or later.
- For earlier versions of .NET, you can install the Microsoft.Windows.SDK.Contracts NuGet package to add all necessary references to your project. This option is supported in projects that target Windows 10, version 1803 or later.
- If your project multi-targets .NET 5 (or later) and earlier versions of .NET, you can configure the project file to use both options.
.NET 5: Use the Target Framework Moniker option
This option is only supported in projects that use .NET 5 (or a later release) and target Windows 10, version 1809 or a later OS release. For more background info about this scenario, see this blog post.
With your project open in Visual Studio, right-click your project in Solution Explorer and choose Edit Project File. Your project file should look similar to this.
Replace the value of the TargetFramework element with one of the following strings:
- net5.0-windows10.0.17763.0: Use this value if your app targets Windows 10, version 1809.
- net5.0-windows10.0.18362.0: Use this value if your app targets Windows 10, version 1903.
- net5.0-windows10.0.19041.0: Use this value if your app targets Windows 10, version 2004.
For example, the following element is for a project that targets Windows 10, version 2004.
Save your changes and close the project file.
Earlier versions of .NET: Install the Microsoft.Windows.SDK.Contracts NuGet package
Use this option if your app uses .NET Core 3.x or .NET Framework. This option is supported in projects that target Windows 10, version 1803 or a later OS release.
Make sure package references are enabled:
- In Visual Studio, click Tools -> NuGet Package Manager -> Package Manager Settings.
- Make sure PackageReference is selected for Default package management format.
With your project open in Visual Studio, right-click your project in Solution Explorer and choose Manage NuGet Packages.
In the NuGet Package Manager window, select the Browse tab and search for Microsoft.Windows.SDK.Contracts .
After the Microsoft.Windows.SDK.Contracts package is found, in the right pane of the NuGet Package Manager window select the Version of the package you want to install based on the version of Windows 10 you want to target:
- 10.0.19041.xxxx: Choose this for Windows 10, version 2004.
- 10.0.18362.xxxx: Choose this for Windows 10, version 1903.
- 10.0.17763.xxxx: Choose this for Windows 10, version 1809.
- 10.0.17134.xxxx: Choose this for Windows 10, version 1803.
Click Install.
Configure projects that multi-target different versions of .NET
If your project multi-targets .NET 5 (or later) and earlier versions (including .NET Core 3.x and .NET Framework), you can configure the project file to use the Target Framework Moniker to automatically pull in the WinRT API references for .NET 5 and use the Microsoft.Windows.SDK.Contracts NuGet package for earlier versions.
With your project open in Visual Studio, right-click your project in Solution Explorer and choose Edit Project File. The following example demonstrates a project file for an app that uses .NET Core 3.1.
Replace the TargetFramework element in the file with a TargetFrameworks element (note the plural). In this element, specify the Target Framework Monikers for all the versions of .NET you want to target, separated by semi-colons.
- For .NET 5 or later, use one of the following Target Framework Monikers:
- net5.0-windows10.0.17763.0: Use this value if your app targets Windows 10, version 1809.
- net5.0-windows10.0.18362.0: Use this value if your app targets Windows 10, version 1903.
- net5.0-windows10.0.19041.0: Use this value if your app targets Windows 10, version 2004.
- For .NET Core 3.x, use netcoreapp3.0 or netcoreapp3.1.
- For .NET Framework, use net46.
The following example demonstrates how to multi-target .NET Core 3.1 and .NET 5 (for Windows 10, version 2004).
After the PropertyGroup element, add a PackageReference element that includes a conditional statement that installs the Microsoft.Windows.SDK.Contracts NuGet package for any versions of .NET Core 3.x or .NET Framework that your app targets. The PackageReference element must be a child of an ItemGroup element. The following example demonstrates how to do this for .NET Core 3.1.
When you’re done, your project file should look similar to this.
Save your changes and close the project file.
Modify a C++ Win32 project to use Windows Runtime APIs
Use C++/WinRT to consume Windows Runtime APIs. C++/WinRT is an entirely standard modern C++17 language projection for Windows Runtime (WinRT) APIs, implemented as a header-file-based library, and designed to provide you with first-class access to the modern Windows API.
To configure your project for C++/WinRT:
- For new projects, you can install the C++/WinRT Visual Studio Extension (VSIX) and use one of the C++/WinRT project templates included in that extension.
- For existing projects, you can install the Microsoft.Windows.CppWinRT NuGet package in the project.
For more details about these options, see this article.
Add Windows 10 experiences
Now you’re ready to add modern experiences that light up when users run your application on Windows 10. Use this design flow.
вњ… First, decide what experiences you want to add
There’s lots to choose from. For example, you can simplify your purchase order flow by using monetization APIs, or direct attention to your application when you have something interesting to share, such as a new picture that another user has posted.
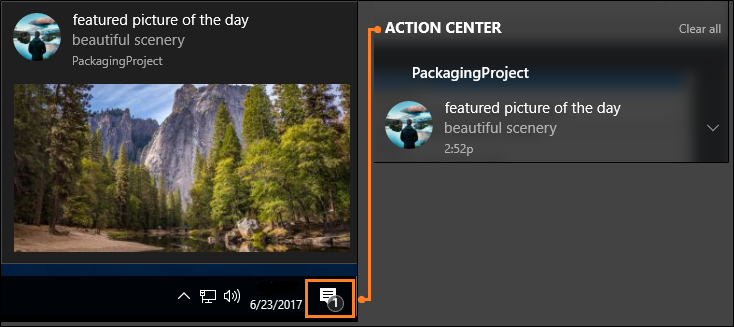
Even if users ignore or dismiss your message, they can see it again in the action center, and then click on the message to open your app. This increases engagement with your application and has the added bonus of making your application appear deeply integrated with the operating system. We’ll show you the code for that experience a bit later in this article.
Visit the UWP documentation for more ideas.
вњ… Decide whether to enhance or extend
You’ll often hear us use the terms enhance and extend, so we’ll take a moment to explain exactly what each of these terms mean.
We use the term enhance to describe Windows Runtime APIs that you can call directly from your desktop app (whether or not you have chosen to package your application in an MSIX package). When you’ve chosen a Windows 10 experience, identify the APIs that you need to create it, and then see if that API appears in this list. This is a list of APIs that you can call directly from your desktop app. If your API does not appear in this list, that’s because the functionality associated with that API can run only within a UWP process. Often times, these include APIs that render UWP XAML such as a UWP map control or a Windows Hello security prompt.
Although APIs that render UWP XAML typically cannot be called directly from your desktop, you might be able to use alternative approaches. If you want to host UWP XAML controls or other custom visual experiences, you can use XAML Islands (starting in Windows 10, version 1903) and the Visual layer (starting in Windows 10, version 1803). These features can be used in packaged or unpackaged desktop apps.
If you have chosen to package your desktop app in an MSIX package, another option is to extend the application by adding a UWP project to your solution. The desktop project is still the entry point of your application, but the UWP project gives you access to all of the APIs that do not appear in this list. The desktop app can communicate with the UWP process by using a an app service and we have lots of guidance on how to set that up. If you want to add an experience that requires a UWP project, see Extend with UWP components.
вњ… Reference API contracts
If you can call the API directly from your desktop app, open a browser and search for the reference topic for that API. Beneath the summary of the API, you’ll find a table that describes the API contract for that API. Here’s an example of that table:

If you have a .NET-based desktop app, add a reference to that API contract, and then set the Copy Local property of that file to False. If you have a C++-based project, add to your Additional Include Directories, a path to the folder that contains this contract.
вњ… Call the APIs to add your experience
Here’s the code that you’d use to show the notification window that we looked at earlier. These APIs appear in this list so you can add this code to your desktop app and run it right now.
Support Windows XP, Windows Vista, and Windows 7/8 install bases
You can modernize your application for Windows 10 without having to create a new branch and maintain separate code bases.
If you want to build separate binaries for Windows 10 users, use conditional compilation. If you’d prefer to build one set of binaries that you deploy to all Windows users, use runtime checks.
Let’s take a quick look at each option.
Conditional compilation
You can keep one code base and compile a set of binaries just for Windows 10 users.
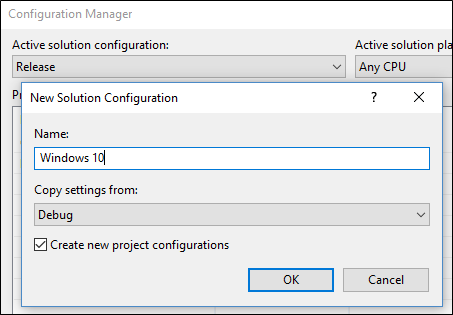
First, add a new build configuration to your project.
For that build configuration, create a constant that to identify code that calls Windows Runtime APIs.
For .NET-based projects, the constant is called a Conditional Compilation Constant.

For C++-based projects, the constant is called a Preprocessor Definition.

Add that constant before any block of UWP code.
The compiler builds that code only if that constant is defined in your active build configuration.
Runtime checks
You can compile one set of binaries for all of your Windows users regardless of which version of Windows they run. Your application calls Windows Runtime APIs only if the user is runs your application as a packaged application on Windows 10.
The easiest way to add runtime checks to your code is to install this Nuget package: Desktop Bridge Helpers and then use the IsRunningAsUWP() method to gate off all code that calls Windows Runtime APIs. See this blog post for more details: Desktop Bridge — Identify the application’s context.
Related Samples
Find answers to your questions
Have questions? Ask us on Stack Overflow. Our team monitors these tags. You can also ask us here.
Ускоряем загрузку Windows 7
Одна из сильных сторон Windows 7 по сравшению с Windows XP — это отсутствие «тупняка» на старте и завершении работы по прошествии года использования. И как показывает практика время старта Windows Seven можно уменьшить еще более, оптимизировав процесс загрузки операционной системы.

Речь в статье пойдет не о ковырянии в реестре и шаманских заклинаниях, что чаще приносит результат в конкретных случаях и при массовом использовании малоэффективно, либо вообще вредно, а о официальном программном обеспечении.
Корпорация Microsoft осталась верной себе. Как и для Windows XP была выпущена специальная утилита оптимизирующая процесс загрузки. Но она также не попала в состав самой операционной системы.
Напомню, что процесс оптимизации заключается в более «правильном» расположении на диске загружаемых операционной системой файлов. По сути является дефрагментацией. Но сама программа оптимизации делает несколько больше, чем просто дефрагментация диска.
Набор утилит по оптимизации процесса загрузки Windows 7 называется «Windows Performance Toolkit». Но продукт не распространяется отдельно, а входит в состав Windows SDK. Скачать свежую версию которого можной с официального сайта http://www.microsoft.com/en-us/download/details.aspx?id=8279
И хотя Windows Performance Toolkit не распространяется отдельно, у меня все же есть прямые ссылки на скачивание с официального сайта:
Performance Tools Kit 4.1.1 (x86)
Performance Tools Kit 4.1.1 (Itanium)
Performance Tools Kit 4.1.1 (x64)
Установка Windows SDK
Скачиваем с официального сайта Microsoft http://www.microsoft.com/en-us/download/details.aspx?id=8279 Microsoft Windows SDK for Windows 7 and .NET Framework 4 и запускаем winsdk_web.exe
После формальных «I Agree» и пару нажатий «Next». Выбираем только Windows Performance Toolkit из предлагаемого к установке списка продуктов. 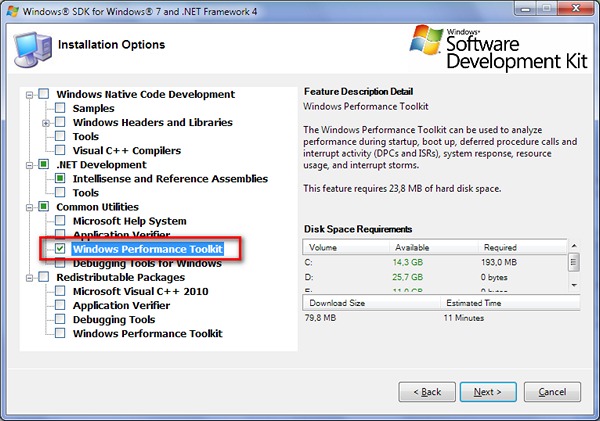
Опять жмем «Next» и ждем окончания загрузки и установки коспонентов.
Установка xPerf из дистрибутива
Если Вы скачали Windows Performance Toolkit по прямым ссылкам, то установка утилиты ничем не отличается от обычной установки программного обеспечения. 
Как всегда со всем соглашаемся и жмем «Next».
Анализ процесса загрузки Windows 7
Заходим в каталог куда установили утилиту. У меня она находится здесь: «c:Program FilesMicrosoft Windows Performance Toolkit».
И запускаем команду
xbootmgr -trace boot (Будьте внимательны, компьютер автоматически перезагрузится!)
После перезагрузки в каталоге, в котором эта команда была выполнена останется файл «boot_BASE+CSWITCH_1.etl»
При желании проанализировать процесс текущей загрузки можно выполнить команду
xperf boot_BASE+CSWITCH_1.etl
Оптимизация процесса загрузки Windows Seven
Но если Вы не сильны в анализе и доверяете автоматике, то выполните следующую команду:
xbootmgr -trace boot -prepSystem
По умолчанию выполняется шесть перезагрузок.
По окончании этой процедуры, а в зависимости от производительности компьютера она может длиться 30..60 минут, в каталоге откуда была запущена команда появятся 6 трайсов после каждого этапа. И Вы можете оценить скорость загрузки после каждой перезагрузки и оптимизации.
Результаты оптимизации времени загрузки Windows 7
С помощью утилиты Windows Performance Toolkit мне удалось уменьшить время загрузки моего ноутбука на 45 сек с 2-х минут до 1 минуты 15 секунд.


