- Manage Server Storage in Windows Server Essentials
- Manage hard drives using the Dashboard
- Available hard drive management tasks
- Increase storage on the server
- To format the hard disk
- To clean up the hard drive
- Perform checks and repairs on hard drives
- To check and repair hard drives
- Format hard drives
- Add a new hard drive
- Use the new hard drive to store server folders
- Use the new hard drive to store server backups
- Use the new hard drive to increase storage pool capacity
- Storage Spaces Overview
- Create a storage space
- To create a storage space in Windows Server Essentials
- To create a storage space in Windows Server Essentials
- Microsoft windows storage server essentials
- Видеообзор Thecus W4000
- Конструкция и характеристики
- Настройка системы
- Тестирование
- Возможные дополнения
Manage Server Storage in Windows Server Essentials
Applies To: Windows Server 2016 Essentials, Windows Server 2012 R2 Essentials, Windows Server 2012 Essentials
Windows Server Essentials enables you to manage all your server storage (including hard drives and storage spaces) from the Hard Drives pages on the Storage tab of the Dashboard.
The following sections provide information that will help you increase your server storage, understand and use storage spaces, and manage your hard drives:
Manage hard drives using the Dashboard
Windows Server Essentials allows you to manage all the hard drives that are connected to the server through the Dashboard. On the Dashboard Storage tab, Hard Drives displays all the hard drives that are available on the server for storing data and server backups. The server monitors the space available on each hard drive, and displays an alert if hard drive space becomes low. The Hard Drives tab displays the following information:
The name of each hard drive
The capacity of each hard drive
The amount of used space on each hard drive
The amount of free space on each hard drive
The status of each hard drive; a blank status means that the hard drive is operating properly
The details pane, which displays all the storage stack information (for storage pool, storage space, and hard drive) if the selected hard drive is located on a Storage Space (instead of a physical disk)
The following table lists the hard drive management tasks that are available in the Dashboard and their descriptions. Some of the tasks are displayed only when a hard drive is selected.
Available hard drive management tasks
| Task Name | Description |
|---|---|
| View the hard drive properties | Opens the HardDriveNameProperties page. This task is displayed when the hard drive is selected. The General tab of the HardDriveName Properties page includes the following additional tasks: |
— Drive cleanup: Allows you to clean up unused files on the hard drive (this task is only available in Windows Server Essentials).
— Check and repair: Checks the hard drive for file system errors and attempts to repair detected errors automatically.
The Shadow Copies tab of the HardDriveNameProperties page allows you to enable shadow copies. This tab also displays the next time that shadow copies is scheduled to run.
Opens the Storage Spaces control panel, from which you can create and manage storage pools and storage spaces.
Opens the Increase Capacity of a Storage Pool Wizard, which allows you to use one or more hard drives to increase the capacity of a storage pool.
Increase storage on the server
To increase the storage on the server, you can add an additional internal hard disk to the server. To add the additional internal hard disk, you must shut down the server, add the internal hard disk, and then restart the server. You do not need to shut down the server if the hard disk is attached to the SCSI controller. In that case, the hard disk can be plugged in while the server is running.
Depending on whether the hard disk to be added is formatted, do one of the following:
Formatted If the internal hard disk is formatted with NTFS or ReFS, the server assigns it a drive letter, and the hard disk appears on the Hard Drives tab. You can now create or move server folders to the new hard drive.
Not formatted If the internal hard disk is unformatted, the following alert appears: One or more unformatted hard drives are connected to the server. Use the following procedure to format the hard disk.
To format the hard disk
Open the Dashboard.
In the navigation pane, click the alert icon to launch the Alert Viewer in Windows Server Essentials, or the Health Monitoring tab in Windows Server Essentials.
In the Alert Viewer or the Health Monitoring tab, click the alert, and then in the tasks pane, click Troubleshoot this issue.
Follow the instructions to complete the Add a New Hard Drive Wizard.
To clean up the hard drive
Open the Dashboard.
In the navigation pane, click Storage, and then click Hard Drives.
In the Hard drives section, select the drive letter that was assigned to the newly added hard disk, and in the task pane, click View the hard drive properties.
In Properties, on the General tab, click Drive cleanup.
Perform checks and repairs on hard drives
The hard drives check and repair process verifies the health of the file system stored on the hard drives. It runs a chkdsk process on the volume that the backup files are stored in. The following alert issue can be resolved by running a check and repair on the hard drives:
- One or more hard drives in Server Backup must be checked.
To check and repair hard drives
Open the Dashboard.
Click Server Folders and Hard Drives, and then click Hard Drives.
Select the hard drive that is displaying the error, and then select View the hard drive properties.
On the Check and Repair tab, click Check and Repair.
Format hard drives
When an unformatted internal hard drive is detected on the server, a health alert guides the user through the process of formatting it. The Add a New Hard Drive Wizard walks you through formatting the hard drive and enables you to configure the hard drive in one of the following ways:
Format the hard drive and automatically create a drive on it. If you choose this option, when the wizard is completed, one logical hard drive formatted with the NTFS file system is created.
Format the hard drive and set it up for server backup. If you choose this option, the Set Up Server Backup Wizard is launched, and it walks you through the server backup configuration.
If a storage space doesn’t exist, use the new hard drive to create a storage space. You must have at least two hard drives to create a storage space.
If a storage space already exists, use the new hard drive to increase the capacity of a storage pool. This option is only displayed if there is an existing storage space created on the server. If you choose this option, the wizard will add this hard drive to the storage pool.
Add a new hard drive
When you plug a new hard disk drive into a server running Windows Server Essentials, you can:
Use the new hard drive to store server folders
To use the new hard drive to store server folders, you can add a new server folder to the hard drive or move an existing server folder to the hard drive.
To store server folders
Open the Dashboard.
Click the STORAGE tab, and then click Server Folders.
In the Server Folders Tasks pane, do one of the following:
To add a server folder, click Add a folder.
To move a server folder, select the folder that you want to move to the new hard drive, and then click Move a folder.
If you browse to the hard drive and select it as the server folder location without creating a folder, the following error message appears: A root directory (such as C:\, D:\) cannot be added as a server folder. Create a new folder or select an existing one under the root directory, and then try again. To resolve this error, create a new folder in the newly added hard drive, and then select the new folder as the location to store server folders.
Follow the instructions to finish the wizard.
For more information about moving server folders, see Add or move a server folder.
Use the new hard drive to store server backups
You can use the newly added hard drive to store server backups.
To store server backups
Open the Dashboard.
Click the Devices tab, select the server from the list pane, and then from the task pane, do one of the following:
If Server Backup is not configured on the server, click Set up Server Backup.
If Server Backup is configured on the server, click Customize Server Backup.
The Set Up Server Backup Wizard appears.
In the Select the Backup Destination page, select the new hard drive as the backup destination.
Follow the instructions to finish the wizard.
Use the new hard drive to increase storage pool capacity
When your storage pool capacity is low, you receive an alert stating that you can increase the storage pool capacity by adding a new hard drive to the storage pool by using the Increase Capacity of a Storage Pool Wizard.
You can perform this procedure only if you created a storage pool on the server.
To increase storage pool capacity
Open the Dashboard.
Click the Storage tab, and then click Hard Drives.
Select the drive that is showing a low capacity.
From the task pane, select Increase storage pool capacity. The Increase Capacity of a Storage Pool Wizard appears.
Follow the instructions to finish the wizard.
Storage Spaces Overview
Storage Spaces lets you group disks together in a storage pool. You can then use pool capacity to create storage spaces. Storage spaces are virtual drives that appear on the Hard Drives tab of the Dashboard. You can use storage spaces like any other drive, so it’s easy to work with files on them. When you run low on pool capacity, you can create large storage spaces and add more drives to the storage pool. If you have two or more disks within the storage pool, you can create storage spaces with a two-way mirror that won’t be affected by a drive failure ?or even the failure of two drives ?if you create a three-way mirror storage space.
To create a storage space, all you need is one or more extra drives in addition to the drive on which Windows is installed. These drives can be internal or external hard drives, or solid state drives. You can use a variety of types of drives with Storage Spaces, including USB, SATA, and SAS drives.
If you configure Storage Spaces on a server running Windows Server Essentials, you cannot perform a Factory Reset with the Clean Data option. The workaround for this issue is to first remove Storage Spaces and then perform a Factory Reset with the Clean Data option.
For more information about Storage Spaces, see Storage Spaces Frequently Asked Questions (FAQ).
Create a storage space
To begin working with Storage Spaces on server, the following minimum requirements must be met:
The server running Windows Server Essentials must be attached to additional physical drives (not just the boot drive), the drives must not host any volumes and must have a minimum capacity of 10 GB. One physical drive is required to create a storage pool; a minimum of two physical drives is needed to create a resilient mirror storage space.
A minimum of two physical drives are required to create a storage space with resiliency through parity or two-way mirroring.
If you configure Storage Spaces on a server running Windows Server Essentials, you cannot perform a Factory Reset with the Clean Data option. The workaround for this issue is to first remove Storage Spaces and then perform a Factory Reset with the Clean Data option.
To create a storage space in Windows Server Essentials
Add or connect all the drives that you want to group together with Storage Spaces to the server running Windows Server Essentials.
From the Dashboard, click Advanced: Manage Storage Spaces.
Click Create a new pool and storage space.
Select the drives you want to add to the new storage space, and then click Create pool.
Give the drive a name and letter, and then choose a layout. Two-way mirror, Three-way mirror, and Parity can help protect the files in the storage space from drive failure.
Enter the maximum size the storage space can reach, and then click Create storage space.
In Windows Server Essentials, you can create a two-way mirrored storage space by using the Create a Storage Space Wizard from the Dashboard.
To create a storage space in Windows Server Essentials
Add or connect all the drives that you want to group together with Storage Spaces to the server running Windows Server Essentials.
From the Dashboard, click Manage Storage Spaces. The Create a Storage Space Wizard appears.
Follow the instructions to complete the wizard.
For information about increasing storage pool capacity, see Use the new hard drive to increase storage pool capacity.
Microsoft windows storage server essentials
Итак, к нам на обзор приехало очень маленькое и интересное хранилище NAS, Windows Storage Server 2012 R2 Essentials на базе Thecus W4000. Нацелено на использование в офисах и для малого бизнеса.
Поставляется данный агрегат в зелёненькой коробочке с присущими Майкрасофт картинками счастливых людей.
Видеообзор Thecus W4000
Хоть на коробке написано, что это модель W4000, но сбоку есть наклейка, что это версия «+». Этот чемоданчик имеет четыре отсека под жесткие диски, но бывают модели и постарше, на 8-16 винчестеров. Сам аппарат позиционируется для малого и среднего бизнеса (SMB) и частных лиц и организаций, имеющих до 50 сотрудников (SOHO)


Конструкция и характеристики
За основу коробки взята модель Thecus на четыре винчестера, но тут удалены логотип, экранчик и дополнительные кнопки на корпусе. Размер устройства — 172 х 250 х 200 мм. Почти весь корпус изготовлен из метала с малым количеством пластика, что придаёт устройству достаточную увесистость — 6,5 кг, и это без учёта 800 граммового блока питания.
На лицевой части у нас есть пластиковая дверца, которая открывает доступ к винчестерам. 2 x USB 3.0, кнопка питания и маленький дисплей с индикаторами работы сети и жестких дисков.


На задней стороне есть 2 x USB 2.0, выход VGA, аудиовыход 3,5 мм миниджека, один порт eSATA, выход HDMI, два гигабитных сетевых порта, вход для питания и отверстие кенсингтонского замка. Также на задней стороне присутствует выхлоп единственного 92-миллиметрового вентилятора, который охлаждает всю систему.
В целом конструкция не предлагает разборку корпуса в большинстве случаев, за исключением добавления карты расширения в слот PCI. Ну, или в нашем случае, когда просто интересно глянуть, что там внутри. Под крышкой сразу в гордом одиночестве расположен SSD-накопитель AData Premier Pro SP600 на 64 Гигабайта. Он предназначен для системы. И хочу отметить, что по факту доступно около 30 ГБ для системы, остальное пространство не размечено.
Процессором выступает совсем не новый Intel Atom D2701, чип имеет 2 ядра х86 с поддержкой Hyper Threading с частотой 2.13 ГГц и набором 64-битных команд. Модель W4000+ имеет 4 ГБ оперативной памяти в отличие от 2-Гигабайтной версии W4000.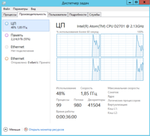

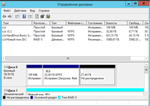
Стандарт памяти DDR3-1600, и в нашем случае стоит максимальный объём, поддерживаемый платформой в виде двух планок по 2 ГБ. Также можно найти на плате один разъём PCI-e X1 и один слот mini-PCIe. Мы установили четыре винчестера марки WD Enterprise-class (WD2000F9YZ) по 2 ТБ каждый, и запустили их в Raid-5, что в конечно итоге дало нам 6 ТБ общего пространства.


За систему охлаждения отвечает один 92мм вентилятор и алюминиевые радиаторы, установленные на чипсете и процессоре.


Настройка системы
Для того чтобы запустить и настроить устройство, вам понадобится подключить монитор, мышку и клавиатуру.
Сразу после первого включения нам предлагают установить язык и регион и ввести ключ продукта, который написан на верхней части корпуса. После этого нас заставляют придумать пароль Администратора с использованием цифр и букв разного регистра.
Далее нам предлагают воспользоваться программой для упрощения начала работы. В ней вы по пунктам сможете пройти ряд основных системных настроек. В целом это достаточно упрощенный вариант, и если вы хотите настроить систему более гибко и не сильно разбираетесь в такого рода системах, то без опытного администратора вы вряд ли сможете это сделать. Вы не найдёте никаких туториалов в коробке или ещё каких-то вспомогательных программ для понятия системы. Так что сразу приготовьтесь скачивать много литературы или читать большое количество статей и обучений, если же сами хотите работать с этой системой.
Тестирование
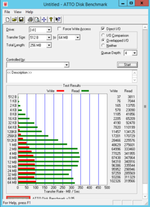
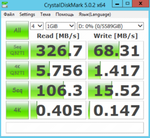
Скажу сразу, что утилиту Intel NASPT не удалось поставить. Система ругалась на нехватку .Net Framework, который не хотел устанавливаться даже через центр обновлений. Так что скорость работы винтов я проверял через Cristal Disk и ATTO benchmark. Напомню, что четыре диска были объединены в один Raid-5 массив.

Возможные дополнения
Обзор сервачка — конечно, не самая интересная тема, но я попробовал немного пофантазировать и слепить из него разные варианты применения.
Для начала поговорим о разъёме miniJack 3,5 мм, я так понимаю, он предназначен для админа-меломана. Ведь просто сидеть и следить за системой будет совсем не интересно, а так хоть музычку с ВК послушать можно.
Следующим дополнением может послужить один PCI-e слот, в который теоретически можно установить 10-гигабитную карту и получить большую скорость доступа к серверу. Ну, или же попробовать купить переходник с PCI-e x1 на x16 и попытаться вставить видеокарту, и тогда помимо послушать музыку, админ сможет и поиграть.
Ну, и напоследок, SSD. Вы всегда сможете снести установленный Windows Server и установить тот же Linux или же FreeNas, ну, или сделать совсем по-глупому и установить обычную Windows, и в купе с нашим миниджеком, непонятной видеокартой и слабым процессором мы получим совершенно не игровой системный блок. Ну, зато он будет маленький и тихий.
Если у Вас тоже есть какие-то фантазии по этому поводу, можете написать их в комментариях, аж самому интересно стало, что ещё можно подключить и для чего.
Коробка получилась интересной. С одной стороны, если бы здесь не стояла сразу Windows, то можно было бы установить сюда тот же Linux и загрузить сервачка по всем его техническим возможностям. У нас же коробка сразу с бонусом в виде установленной Windows Server, которая отлично подойдёт для малого и среднего бизнеса. Да, сама система не такая простая в настройках, как хотелось бы, но если вам нужен специальный софт, который есть только под Windows, научиться ей пользоваться всё же придётся. А вот к железной составляющей претензий в целом нету. Компактное, тихое и в меру производительное устройство. Коробка стояла на столе в 30 см от меня, и из звуков было слышно только работу жестких дисков, и то всё в рамках комфорта. Думаю, что если вы не хотите забивать себе голову, какой сервак собрать и какое железо туда установить, то готовые решения такого плана, как наш, может сэкономить много времени, а в бизнесе, как говорится, «Время — деньги».


