- Software Center user guide
- How to open Software Center
- Applications
- Install an application
- Install multiple applications
- Share an application
- Updates
- Operating Systems
- Installation status
- Device compliance
- Options
- Work information
- Power management
- Computer maintenance
- Remote Control
- Custom tabs
- More information for IT administrators
- Руководство пользователя центра программного обеспечения Software Center user guide
- Переход к центру программного обеспечения How to open Software Center
- Приложения Applications
- Установка приложения Install an application
- Установка нескольких приложений Install multiple applications
- Предоставление общего доступа к приложению Share an application
- Обновления Updates
- Операционные системы Operating Systems
- Состояние установки Installation status
- Соответствие устройства Device compliance
- Элемент Options Options
- Сведения о работе Work information
- Исключение брандмауэра Windows для прокси-сервера пробуждения Power management
- Обслуживание компьютера Computer maintenance
- Удаленное управление Remote Control
- Настраиваемые вкладки Custom tabs
- Дополнительные сведения для ИТ-администраторов More information for IT administrators
Software Center user guide
Applies to: Configuration Manager (current branch)
Your organization’s IT admin uses Software Center to install applications, software updates, and upgrade Windows. This user guide explains the functionality of Software Center for users of the computer.
Software Center is installed automatically on Windows devices that your IT organization manages. To get started, see How to open Software Center.
General notes about Software Center functionality:
This article describes the latest features of Software Center. If your organization is using an older but still supported version of Software Center, not all features are available. For more information, contact your IT admin.
Your IT admin may disable some aspects of Software Center. Your specific experience may vary.
If multiple users are using a device at the same time, the user with the lowest session ID will be the only one to see all available deployments in Software Center. For example, multiple users on a remote desktop environment. Users with higher session IDs may not see some of the deployments in Software Center. For example, the users with higher session IDs may see deployed Applications, but not deployed Packages or Task Sequences. Meanwhile the user with the lowest session ID will see all deployed Applications, Packages, and Task Sequences. The Users tab of Windows Task Manager shows all users and their session IDs.
Your IT admin may change the color of Software Center, and add your organization’s logo.
How to open Software Center
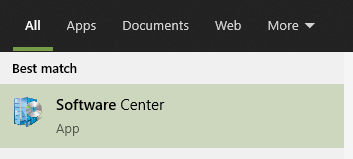
Software Center is installed automatically on Windows devices that your IT organization manages. For the simplest method to start Software Center on a Windows 10 computer, press Start and type Software Center . You may not need to type the entire string for Windows to find the best match.
To navigate the Start menu, look under the Microsoft Endpoint Manager group for the Software Center icon.
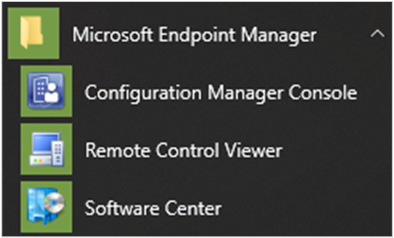
The above Start menu path is for versions from November 2019 (version 1910) or later. In earlier versions, the folder name is Microsoft System Center.
If you can’t find Software Center in the Start menu, contact your IT administrator.
Applications
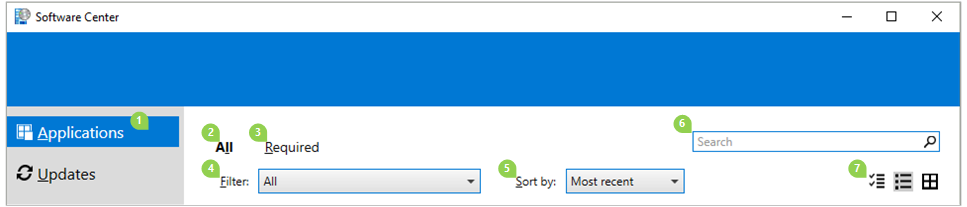
Select the Applications tab (1) to find and install applications that your IT admin deploys to you or this computer.
All (2): Shows all available applications that you can install.
Required (3): Your IT admin enforces these applications. If you uninstall one of these applications, Software Center reinstalls it.
Filters (4): Your IT admin may create categories of applications. If available, select the drop-down list to filter the view to only those applications in a specific category. Select All to show all applications.
Sort by (5): Rearrange the list of applications. By default this list sorts by Most recent. Recently available applications display with a New banner that’s visible for seven days.
Search (6): Still can’t find what you’re looking for? Enter keywords in the Search box to find it!
Switch the view (7): Select the icons to switch the view between list view and tile view. By default the applications list shows as graphic tiles.
| Icon | View | Description |
|---|---|---|
 | Multi-select mode | Install more than one application at a time. For more information, see Install multiple applications. |
 | List view | This view displays the application icon, name, publisher, version, and status. |
 | Tile view | Your IT admin can customize the icons. Below each tile displays the application name, publisher, and version. |
Install an application
Select an application from the list to see more information about it. Select Install to install it. If an app is already installed, you may have the option to Uninstall.
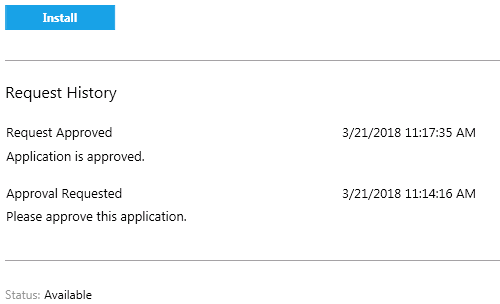
Some apps may require approval before they install.
When you try to install it, you can enter a comment and then Request the app.

Software Center shows the request history, and you can cancel the request.
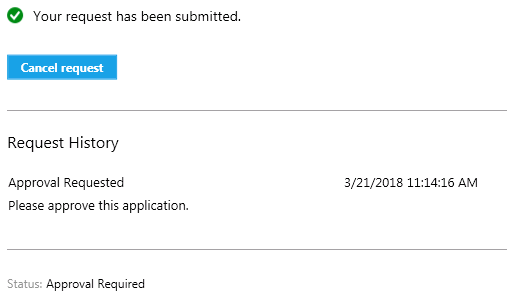
When an administrator approves your request, you can install the app. If you wait, Software Center automatically installs the app during your non-business hours.
Install multiple applications
Install more than one application at a time instead of waiting for one to finish before starting the next. The selected apps need to qualify:
- The app is visible to you
- The app isn’t already downloading or installed
- Your IT admin doesn’t require approval to install the app
To install more than one application at a time:
Select the multi-select icon in the upper right corner:
Select two or more apps to install. Select the checkbox to the left of each app in the list.
Select the Install Selected button to start.
The apps install as normal, only now in succession.
Share an application
To share a link to a specific app, after you select the app, select the Share icon in the upper right corner:
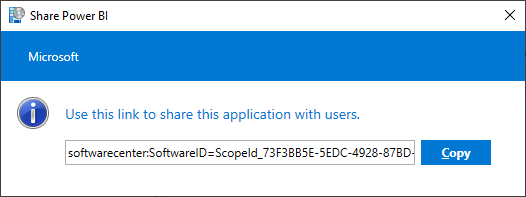
Copy the string, and paste elsewhere, such as an email message. For example, softwarecenter:SoftwareID=ScopeId_73F3BB5E-5EDC-4928-87BD-4E75EB4BBC34/Application_b9e438aa-f5b5-432c-9b4f-6ebeeb132a5a . Anyone else in your organization with Software Center can use the link to open the same application.
Updates
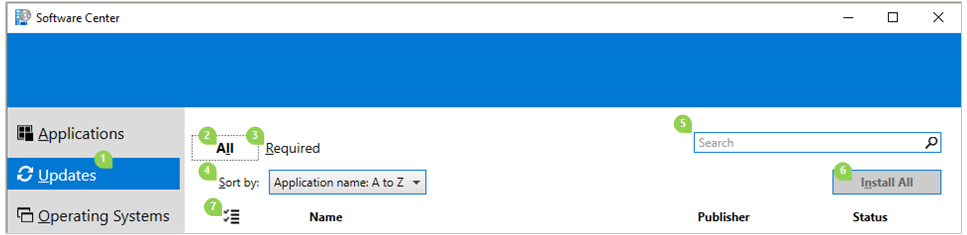
Select the Updates tab (1) to view and install software updates that your IT admin deploys to this computer.
All (2): Shows all updates that you can install
Required (3): Your IT admin enforces these updates.
Sort by (4): Rearrange the list of updates. By default this list sorts by Application name: A to Z.
Search (5): Still can’t find what you’re looking for? Enter keywords in the Search box to find it!
To install updates, select Install All (6).
To only install specific updates, select the icon to enter multi-select mode (7): Check the updates to install, and then select Install Selected.
Operating Systems
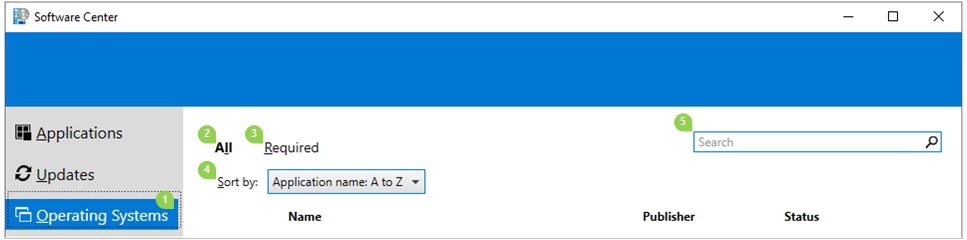
Select the Operating Systems tab (1) to view and install versions of Windows that your IT admin deploys to this computer.
All (2): Shows all Windows versions that you can install
Required (3): Your IT admin enforces these upgrades.
Sort by (4): Rearrange the list of updates. By default this list sorts by Application name: A to Z.
Search (5): Still can’t find what you’re looking for? Enter keywords in the Search box to find it!
Installation status
Select the Installation status tab to view the status of applications. You may see the following states:
Installed: Software Center already installed this application on this computer.
Downloading: Software Center is downloading the software to install on this computer.
Failed: Software Center wasn’t able to install the software.
Scheduled to install after: Shows the date and time of the device’s next maintenance window to install upcoming software. Maintenance windows are defined by your IT admin.
The status can be seen in the All and the Upcoming tab.
You can install before the maintenance window time by selecting the Install Now button.
Device compliance
Select the Device compliance tab to view the compliance status of this computer.
Select Check compliance to evaluate this device’s settings against the security policies defined by your IT admin.
Options
Select the Options tab to view additional settings for this computer.
Work information
Indicate the hours that you typically work. Your IT admin may schedule software installations outside your business hours. Allow at least four hours each day for system maintenance tasks. Your IT admin can still install critical applications and software updates during business hours.
Select the earliest and latest hours that you use this computer. By default these values are from 5:00 AM through 10:00 PM.
Select the days of the week that you typically use this computer. By default Software Center only selects the weekdays.
Specify whether you regularly use this computer to do your work. Your administrator might automatically install applications or make additional applications available to primary computers. If the computer you’re using is a primary computer, select I regularly use this computer to do my work.
Power management
Your IT admin may set power management policies. These policies help your organization conserve electricity when this computer isn’t in use.
To make this computer exempt from these policies, select Do not apply power settings from my IT department to this computer. By default this setting is disabled and the computer applies power settings.
Computer maintenance
Specify how Software Center applies changes to software before the deadline.
Automatically install or uninstall required software and restart the computer only outside of the specified business hours: This setting is disabled by default.
Suspend Software Center activities when my computer is in presentation mode: This setting is enabled by default.
When instructed by your IT admin, select Sync Policy. This computer checks with the servers for anything new, such as applications, software updates, or operating systems.
Remote Control
Specify remote access and remote control settings for your computer.
Use remote access settings from your IT department: By default, your IT department defines the settings to remotely assist you. The other settings in this section show the state of the settings that your IT department defines. To change any settings, first disable this option.
Level of remote access allowed
- Do not allow remote access: IT administrators can’t remotely access this computer to assist you.
- View only: An IT administrator can only remotely view your screen.
- Full: An IT administrator can remotely control this computer. This setting is the default option.
Allow remote control of this computer by administrators when I am away. This setting is Yes by default.
When an administrator tries to control this computer remotely
- Ask for permission each time: This setting is the default option.
- Do not ask for permission
Show the following during remote control: These visual notifications are both enabled by default to let you know that an administrator is remotely accessing the device.
- Status icon in the notification area
- A session connection bar on the desktop
Play sound: This audible notification lets you know that an administrator is remotely accessing the device.
- When session begins and ends: This setting is the default option.
- Repeatedly during session
- Never
Custom tabs
Your IT admin can remove the default tabs or add additional tabs to Software Center. Custom tabs are named by your admin, and they open a web site that the admin specifies. For instance, you might have a tab called «Help Desk» that opens your IT organization’s help desk web site.
More information for IT administrators
More information is available for IT administrators on how to plan for and configure Software Center in the following articles:
Руководство пользователя центра программного обеспечения Software Center user guide
Область применения: Configuration Manager (Current Branch) Applies to: Configuration Manager (current branch)
ИТ-администратор организации использует центр программного обеспечения для установки приложений, обновлений программного обеспечения и обновления Windows. Your organization’s IT admin uses Software Center to install applications, software updates, and upgrade Windows. Это руководство содержит описание функциональных возможностей центра программного обеспечения для пользователей компьютеров. This user guide explains the functionality of Software Center for users of the computer.
Центр программного обеспечения автоматически устанавливается на всех устройствах с Windows, которыми управляет ваша ИТ-организация. Software Center is installed automatically on Windows devices that your IT organization manages. Чтобы приступить к работе, изучите раздел Переход к центру программного обеспечения. To get started, see How to open Software Center.
Общие замечания о возможностях центра программного обеспечения General notes about Software Center functionality:
В этой статье описываются новые функции центра программного обеспечения. This article describes the latest features of Software Center. Если в вашей организации используется более старая, но поддерживаемая версия центра программного обеспечения, не все возможности будут доступны. If your organization is using an older but still supported version of Software Center, not all features are available. Для получения дополнительных сведений обратитесь к ИТ-администратору. For more information, contact your IT admin.
ИТ-администратор может отключить некоторые возможности центра программного обеспечения. Your IT admin may disable some aspects of Software Center. Работа некоторых функций может отличаться. Your specific experience may vary.
Если несколько пользователей одновременно используют устройство, только пользователь с наименьшим идентификатором сеанса будет видеть все доступные развертывания в центре программного обеспечения. If multiple users are using a device at the same time, the user with the lowest session ID will be the only one to see all available deployments in Software Center. Например, так происходит при нескольких входах в среду удаленного рабочего стола. For example, multiple users on a remote desktop environment. Пользователи с более высокими идентификаторами могут не видеть некоторые развертывания. Users with higher session IDs may not see some of the deployments in Software Center. Например, пользователи с более высокими идентификаторами сеанса могут видеть развернутые приложения, но не развернутые пакеты или последовательности задач. For example, the users with higher session IDs may see deployed Applications, but not deployed Packages or Task Sequences. Пользователь же с наименьшим идентификатором будет видеть все развернутые приложения, пакеты и последовательности задач. Meanwhile the user with the lowest session ID will see all deployed Applications, Packages, and Task Sequences. На вкладке Пользователи в диспетчере задач Windows отображаются сведения обо всех пользователях и все идентификаторы сеансов. The Users tab of Windows Task Manager shows all users and their session IDs.
ИТ-администратор может изменить цвет оформления и добавить логотип организации в центре программного обеспечения. Your IT admin may change the color of Software Center, and add your organization’s logo.
Переход к центру программного обеспечения How to open Software Center
Центр программного обеспечения автоматически устанавливается на всех устройствах с Windows, которыми управляет ваша ИТ-организация. Software Center is installed automatically on Windows devices that your IT organization manages. Проще всего запустить центр программного обеспечения на компьютере Windows 10: нажмите кнопку Пуск и введите Software Center . For the simplest method to start Software Center on a Windows 10 computer, press Start and type Software Center . Вам может оказаться достаточно ввести лишь часть строки для Windows, чтобы найти наилучшее соответствие. You may not need to type the entire string for Windows to find the best match.

В главном меню этот компонент можно найти по значку Центр программного обеспечения в группе Microsoft Endpoint Manager. To navigate the Start menu, look under the Microsoft Endpoint Manager group for the Software Center icon.

Выше указаны пути в главном меню для версии 1910 (от ноября 2019 г.) или более поздней версии. The above Start menu path is for versions from November 2019 (version 1910) or later. В более ранних версиях эта папка называется Microsoft System Center. In earlier versions, the folder name is Microsoft System Center.
Если центр программного обеспечения не удается найти в главном меню, свяжитесь с ИТ-администратором. If you can’t find Software Center in the Start menu, contact your IT administrator.
Приложения Applications

Перейдите на вкладку Приложения (1), чтобы найти и установить приложения, развертывание которых ИТ-администратор настроил для вас или для этого компьютера. Select the Applications tab (1) to find and install applications that your IT admin deploys to you or this computer.
Все (2): отображаются все доступные приложения, которые вы можете установить. All (2): Shows all available applications that you can install.
Обязательные (3): ИТ-администратор настроил принудительную установку этих приложений. Required (3): Your IT admin enforces these applications. При удалении одного из этих приложений центр программного обеспечения снова его установит. If you uninstall one of these applications, Software Center reinstalls it.
Фильтры (4): ИТ-администратор может создавать категории приложений. Filters (4): Your IT admin may create categories of applications. Если отображается раскрывающийся список, щелкните его, чтобы отфильтровать представления и вывести только приложения в определенной категории. If available, select the drop-down list to filter the view to only those applications in a specific category. Выберите Все для отображения всех приложений. Select All to show all applications.
Сортировать по (5): список приложений можно упорядочить. Sort by (5): Rearrange the list of applications. По умолчанию этот список отсортирован по Самые последние. By default this list sorts by Most recent. Недавно добавленные приложения в течение семи дней отображаются с отметкой New (новое). Recently available applications display with a New banner that’s visible for seven days.
Поиск (6): по-прежнему не можете найти то, что ищете? Search (6): Still can’t find what you’re looking for? Введите ключевые слова в поле поиска. Enter keywords in the Search box to find it!
Переключение режима просмотра (7): Щелкните значки, чтобы переключать представления между списком и плитками. Switch the view (7): Select the icons to switch the view between list view and tile view. По умолчанию список приложений отображается в виде плиток. By default the applications list shows as graphic tiles.
| Значок Icon | Просмотр View | Описание: Description |
|---|---|---|
 | Режим множественного выбораMulti-select mode | Установка нескольких приложений одновременно. Install more than one application at a time. Дополнительные сведения см. в разделе Установка нескольких приложений. For more information, see Install multiple applications. |
 | Представление спискаList view | в этом представлении отображается значок приложения, имя, издатель, версия и состояние. This view displays the application icon, name, publisher, version, and status. |
 | Представление плитокTile view | ИТ-администратор может настраивать значки. Your IT admin can customize the icons. Под каждой плиткой отображается имя приложения, издатель и версия. Below each tile displays the application name, publisher, and version. |
Установка приложения Install an application
Выберите в списке приложение, чтобы просмотреть дополнительные сведения о нем. Select an application from the list to see more information about it. Щелкните Установить, чтобы установить его. Select Install to install it. Если приложение уже установлено, при необходимости вы можете удалить его. If an app is already installed, you may have the option to Uninstall.
Для некоторых приложений перед установкой требуется утверждение. Some apps may require approval before they install.
При попытке установить такое приложение вы сможете ввести комментарий и отправить запрос на утверждение. When you try to install it, you can enter a comment and then Request the app.

В центре программного обеспечения вы можете просмотреть журнал запросов и при необходимости отменить свой запрос. Software Center shows the request history, and you can cancel the request.

Когда администратор утвердит ваш запрос, вы сможете установить приложение. When an administrator approves your request, you can install the app. Если приложение не нужно вам срочно, центр программного обеспечения автоматически установит его в нерабочее время. If you wait, Software Center automatically installs the app during your non-business hours.

Установка нескольких приложений Install multiple applications
Вы можете установить сразу несколько приложений одновременно, не дожидаясь завершения одной установки перед началом следующей. Install more than one application at a time instead of waiting for one to finish before starting the next. Выбранные приложения должны соответствовать нескольким требованиям: The selected apps need to qualify:
- приложение должно быть видимо для вас; The app is visible to you
- приложение не должно быть уже загружено или установлено; The app isn’t already downloading or installed
- ИТ-администратор не требует утверждения для установки приложения. Your IT admin doesn’t require approval to install the app
Установка нескольких приложений одновременно To install more than one application at a time:
Щелкните значок множественного выбора справа в верхнем углу:
Выберите два или более приложений для установки. Select two or more apps to install. Установите флажок слева от каждого приложения в списке. Select the checkbox to the left of each app in the list.
Нажмите кнопку Установить выбранные, чтобы начать установку. Select the Install Selected button to start.
Приложения устанавливаются как обычно, но только последовательно. The apps install as normal, only now in succession.
Предоставление общего доступа к приложению Share an application
Чтобы поделиться ссылкой на конкретное приложение, после его выбора щелкните значок Общий доступ справа в верхнем углу:

Скопируйте строку и вставьте ее в нужное расположение, например в сообщение электронной почты. Copy the string, and paste elsewhere, such as an email message. Например, softwarecenter:SoftwareID=ScopeId_73F3BB5E-5EDC-4928-87BD-4E75EB4BBC34/Application_b9e438aa-f5b5-432c-9b4f-6ebeeb132a5a . For example, softwarecenter:SoftwareID=ScopeId_73F3BB5E-5EDC-4928-87BD-4E75EB4BBC34/Application_b9e438aa-f5b5-432c-9b4f-6ebeeb132a5a . Любой другой сотрудник вашей организации, имеющий доступ к центру программного обеспечения, сможет открыть это же приложение по этой ссылке. Anyone else in your organization with Software Center can use the link to open the same application.
Обновления Updates

Перейдите на вкладку Обновления (1), чтобы просмотреть и установить обновления программного обеспечения, которые ИТ-администратор развертывает на этом компьютере. Select the Updates tab (1) to view and install software updates that your IT admin deploys to this computer.
Все (2): отображаются все обновления, которые вы можете установить. All (2): Shows all updates that you can install
Обязательные (3): ИТ-администратор настроил принудительную установку этих обновлений. Required (3): Your IT admin enforces these updates.
Сортировать по (4): список обновлений можно упорядочить. Sort by (4): Rearrange the list of updates. По умолчанию этот список сортируется по имени приложения: от A до Z. By default this list sorts by Application name: A to Z.
Поиск (5): по-прежнему не можете найти то, что ищете? Search (5): Still can’t find what you’re looking for? Введите ключевые слова в поле поиска. Enter keywords in the Search box to find it!
Чтобы установить обновления, выберите команду Установить все (6). To install updates, select Install All (6).
Чтобы установить лишь некоторые обновления, щелкните значок перехода в режим множественного выбора (7): . Установите флажки для устанавливаемых обновлений, а затем нажмите кнопку Установить выбранные. Check the updates to install, and then select Install Selected.
Операционные системы Operating Systems

Перейдите на вкладку Операционные системы (1), чтобы просмотреть и установить версии Windows, которые ИТ-администратор развертывает на этом компьютере. Select the Operating Systems tab (1) to view and install versions of Windows that your IT admin deploys to this computer.
Все (2): отображаются все версии Windows, которые вы можете установить. All (2): Shows all Windows versions that you can install
Обязательные (3): ИТ-администратор настроил принудительную установку этих обновлений. Required (3): Your IT admin enforces these upgrades.
Сортировать по (4): список обновлений можно упорядочить. Sort by (4): Rearrange the list of updates. По умолчанию этот список сортируется по имени приложения: от A до Z. By default this list sorts by Application name: A to Z.
Поиск (5): по-прежнему не можете найти то, что ищете? Search (5): Still can’t find what you’re looking for? Введите ключевые слова в поле поиска. Enter keywords in the Search box to find it!
Состояние установки Installation status
Перейдите на вкладку Состояние установки для просмотра состояния приложений. Select the Installation status tab to view the status of applications. Возможны следующие состояния. You may see the following states:
Установлено: центр программного обеспечения уже установил это приложение на этом компьютере. Installed: Software Center already installed this application on this computer.
Загрузка: центр программного обеспечения загружает программное обеспечение для установки на этом компьютере. Downloading: Software Center is downloading the software to install on this computer.
Ошибка: В центре программного обеспечения не удалось установить это программное обеспечение. Failed: Software Center wasn’t able to install the software.
Запланирована установка после: отображаются дата и время следующего периода обслуживания устройства для установки программного обеспечения. Scheduled to install after: Shows the date and time of the device’s next maintenance window to install upcoming software. Периоды обслуживания устанавливает ИТ-администратор. Maintenance windows are defined by your IT admin.
Состояние может отображаться на вкладках Все и Предстоящие. The status can be seen in the All and the Upcoming tab.
Время периода обслуживания можно установить, нажав на кнопку Установить сейчас. You can install before the maintenance window time by selecting the Install Now button.
Соответствие устройства Device compliance
Перейдите на вкладку Соответствие устройств для просмотра состояния соответствия этого компьютера. Select the Device compliance tab to view the compliance status of this computer.
Нажмите кнопку Проверить соответствие, чтобы оценить соответствие параметров этого устройства политикам безопасности, заданным ИТ-администратором. Select Check compliance to evaluate this device’s settings against the security policies defined by your IT admin.
Элемент Options Options
Перейдите на вкладку Параметры, чтобы просмотреть дополнительные параметры для этого компьютера. Select the Options tab to view additional settings for this computer.
Сведения о работе Work information
Укажите время, когда вы обычно работаете. Indicate the hours that you typically work. ИТ-администратор может запланировать установку программного обеспечения на нерабочее время. Your IT admin may schedule software installations outside your business hours. Выделите по крайней мере четыре часа в день для задач обслуживания системы. Allow at least four hours each day for system maintenance tasks. Тем не менее ИТ-администратор может устанавливать важные приложения и обновления программного обеспечения в рабочее время. Your IT admin can still install critical applications and software updates during business hours.
Выберите самое ранее и самое позднее время суток, когда вы используете этот компьютер. Select the earliest and latest hours that you use this computer. По умолчанию здесь настроен диапазон от 05:00 до 22:00. By default these values are from 5:00 AM through 10:00 PM.
Выберите дни недели, в которые вы обычно используете этот компьютер. Select the days of the week that you typically use this computer. По умолчанию центр программного обеспечения выбирает только стандартные рабочие дни. By default Software Center only selects the weekdays.
Укажите, регулярно ли вы используете этот компьютер для работы. Specify whether you regularly use this computer to do your work. Ваш администратор может автоматически устанавливать приложения или предоставлять доступ к дополнительным приложениям на основным компьютерам. Your administrator might automatically install applications or make additional applications available to primary computers. Если этот компьютер является для вас основным, установите флажок Этот компьютер регулярно используется для работы. If the computer you’re using is a primary computer, select I regularly use this computer to do my work.
Исключение брандмауэра Windows для прокси-сервера пробуждения Power management
ИТ-администратор может задать политики управления электропитанием. Your IT admin may set power management policies. Эти политики помогают организации экономить электроэнергию, когда компьютеры не используются. These policies help your organization conserve electricity when this computer isn’t in use.
Чтобы исключить этот компьютер из области действия таких политик, установите флажок Do not apply power settings from my IT department to this computer (Не применять параметры питания, заданные ИТ-отделом, к этому компьютеру). To make this computer exempt from these policies, select Do not apply power settings from my IT department to this computer. По умолчанию этот параметр отключен, то есть компьютер применяет параметры управления питанием. By default this setting is disabled and the computer applies power settings.
Обслуживание компьютера Computer maintenance
Укажите способ применения центром программного обеспечения изменений программного обеспечения до наступления крайнего срока. Specify how Software Center applies changes to software before the deadline.
Автоматически устанавливать или удалять необходимое программное обеспечение и перезагружать компьютер только в заданное нерабочее время. По умолчанию этот параметр отключен. Automatically install or uninstall required software and restart the computer only outside of the specified business hours: This setting is disabled by default.
Приостанавливать действия центра программного обеспечения, когда компьютер работает в режиме презентации. Этот параметр выбран по умолчанию. Suspend Software Center activities when my computer is in presentation mode: This setting is enabled by default.
Выберите элемент Sync Policy (Синхронизировать политики), получив соответствующее указание от ИТ-администратора. When instructed by your IT admin, select Sync Policy. Компьютер проверяет, нет ли на сервере новых компонентов для установки, например приложений, обновлений программного обеспечения или операционной системы. This computer checks with the servers for anything new, such as applications, software updates, or operating systems.
Удаленное управление Remote Control
Настройте параметры удаленного доступа и удаленного управления для компьютера. Specify remote access and remote control settings for your computer.
Use remote access settings from your IT department (Использовать параметры удаленного доступа от ИТ-отдела): по умолчанию ИТ-отдел определяет эти параметры, чтобы организовать удаленную поддержку. Use remote access settings from your IT department: By default, your IT department defines the settings to remotely assist you. Остальные параметры в этом разделе получают те значение, которые определяет ваш ИТ-отдел. The other settings in this section show the state of the settings that your IT department defines. Чтобы изменить другие параметры, прежде всего отключите этот параметр. To change any settings, first disable this option.
Допустимый уровень удаленного доступа: Level of remote access allowed
- Do not allow remote access (Запретить удаленный доступ). ИТ-администраторы не смогут удаленно подключаться к этому компьютеру для оказания поддержки. Do not allow remote access: IT administrators can’t remotely access this computer to assist you.
- Только просмотр. ИТ-администратор удаленно сможет только просматривать содержимое экрана. View only: An IT administrator can only remotely view your screen.
- Полные. ИТ-администратор сможет удаленно управлять этим компьютером. Full: An IT administrator can remotely control this computer. Это значение по умолчанию. This setting is the default option.
Разрешить администраторам удаленно управлять этим компьютером в мое отсутствие. Allow remote control of this computer by administrators when I am away. Для этого параметра по умолчанию задано значение Да. This setting is Yes by default.
При попытке администратора удаленно управлять этим компьютером: When an administrator tries to control this computer remotely
- Запрашивать разрешение каждый раз: Это значение по умолчанию. Ask for permission each time: This setting is the default option.
- Не запрашивать разрешениеDo not ask for permission
Отображать во время удаленного управления: Оба этих визуальных оповещения по умолчанию включены. Они будут информировать вас о том, что администратор использует удаленный доступ к вашему устройству. Show the following during remote control: These visual notifications are both enabled by default to let you know that an administrator is remotely accessing the device.
- Значок состояния в области уведомленийStatus icon in the notification area
- Панель подключения сеанса на рабочем столеA session connection bar on the desktop
Воспроизведение звука: Звуковое оповещение уведомит вас о том, что администратор использует удаленный доступ к вашему устройству. Play sound: This audible notification lets you know that an administrator is remotely accessing the device.
- Только в начале и в конце сеанса: Это значение по умолчанию. When session begins and ends: This setting is the default option.
- Периодически во время сеансаRepeatedly during session
- Никогда; Never
Настраиваемые вкладки Custom tabs
ИТ-администратор может удалять стандартные вкладки или добавлять новые вкладки в центре программного обеспечения. Your IT admin can remove the default tabs or add additional tabs to Software Center. Администратор присваивает имена настраиваемым вкладкам и указывает сайты, которые открываются с их помощью. Custom tabs are named by your admin, and they open a web site that the admin specifies. Например, вы можете добавить вкладку под названием «Служба технической поддержки», которая позволяет открыть веб-сайт службы ИТ-поддержки вашей организации. For instance, you might have a tab called «Help Desk» that opens your IT organization’s help desk web site.
Дополнительные сведения для ИТ-администраторов More information for IT administrators
ИТ-администраторы могут получить дополнительные сведения о том, как проектировать и настраивать центр программного обеспечения, из следующих статей: More information is available for IT administrators on how to plan for and configure Software Center in the following articles:


