- Set up MIDI devices using Audio MIDI Setup on Mac
- View a MIDI configuration
- Create a MIDI configuration
- Edit a MIDI configuration
- MIDI Guitar for GarageBand 4+
- Jam Origin
- Captures d’écran
- Description
- MIDI Guitar for GarageBand 4+
- Play any synth on your guitar
- Jam Origin
- Screenshots
- Description
- MIDI Guitar & MIDI Bass
- FOR WINDOWS & MAC
- Installing the plugins
- Windows users:
- Mac users:
- How to buy and apply license
- How to use in your DAW
- Getting started with MIDI Guitar in your DAW
- Ableton Live 9
- Ableton Live 8
- Apple Logic Pro X
- AVID ProTools
- Using BlueCat VST wrapper ( this works only on macOS)
- Cakewalk Sonar
- Old versions of Sonar:
Set up MIDI devices using Audio MIDI Setup on Mac
If you use MIDI devices or a MIDI interface connected to your Mac, you can use Audio MIDI Setup to describe the configuration of your MIDI devices. There’s a default configuration already created, but you can set up your own.
You can use this configuration information for apps that work with MIDI, such as sequencers, to control your MIDI devices.
Note: Make sure your MIDI devices are connected to your Mac. If you’re using an interface device, connect any other MIDI devices you’re using to the interface. Also check that any software provided by the manufacturer of the MIDI devices has been installed. For more information, see the documentation that came with your devices.
View a MIDI configuration
In the Audio MIDI Setup app  on your Mac, choose Window > Show MIDI Studio.
In the MIDI Studio window, click the Choose MIDI Configuration pop-up menu (it may show Default), then choose the configuration you want to view.
In the toolbar, click the following buttons to change how the configuration is shown:
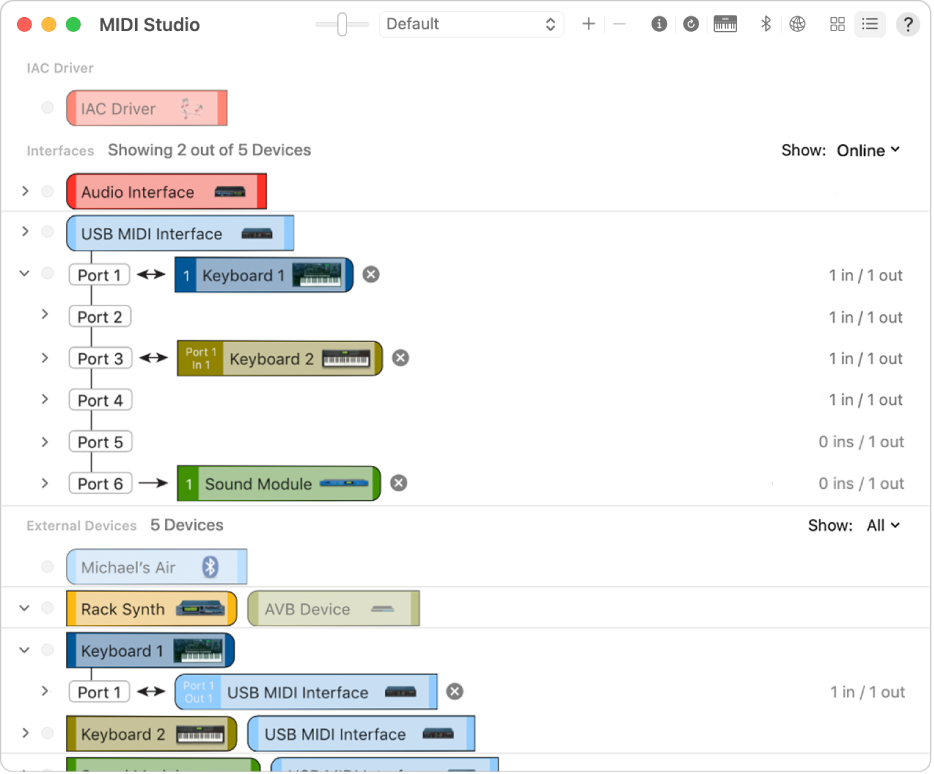
Show Icon View  : Devices in the configuration are shown as icons. If a device isn’t connected, its icon is dimmed. To view information about a device, such as channel properties and ports, and to add or remove ports, double-click the device’s icon.
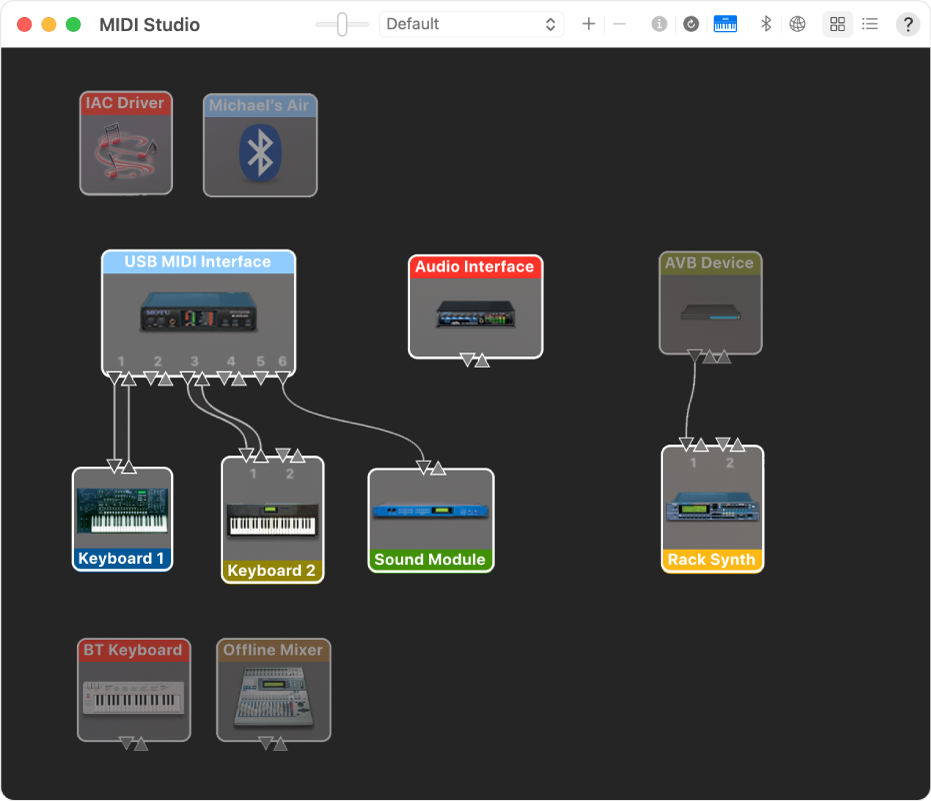
Show List View  : Devices in the configuration are shown in a list, organized by type (such as Interface or External Device). If a device isn’t connected, it’s dimmed. To filter which devices are shown, click the Show pop-up menu, then choose an option (such as Online or Connected). To view information about a device, double-click the device. To view its ports, or to connect or disconnect devices, click the device’s disclosure triangle.
Create a MIDI configuration
In the Audio MIDI Setup app on your Mac, choose Window > Show MIDI Studio.
In the MIDI Studio window, click the Choose MIDI Configuration pop-up menu (it may show Default), then choose New Configuration.
Enter a name for the new configuration, then click OK.
To add a new external MIDI device, click the Add button  in the MIDI Studio toolbar.
To set properties and add or remove ports for the MIDI device, double-click the device, or select it, then click the Device Info button  in the toolbar.
In the Properties window, do any of the following:
Describe the device: Enter a name for the MIDI device; the name appears in apps you use with the device. If you know the manufacturer and model, you can enter those.
Change the device icon: Click the MIDI device’s icon to open the Icon Browser, select a different icon to represent the device, then click the new icon to close the Icon Browser.
Change the device color: Click the color well, select a different color to use for the MIDI device, then close the Colors window.
Set the device channels and other properties: Click Properties, then click the channels to use for transmitting and receiving audio. To deselect a channel, click it again. Also select whether to use the MIDI Beat Clock, the MIDI Time Code, or both, then select other features.
Add or remove ports: Click Ports, click the Add button below the list of ports, then specify the MIDI In and MIDI Out connectors for the port. To delete a port, select it in the list, then click the Remove button  .
.
Select MIDI-CI profiles for interface devices: If an interface device supports MIDI-CI, click MIDI-CI to see the profiles available on each channel. To turn a profile on or off, select or deselect its checkbox.
Repeat steps 4 through 7 for each MIDI device you want to include in the configuration.
In the MIDI Studio window, specify the connection between MIDI devices:
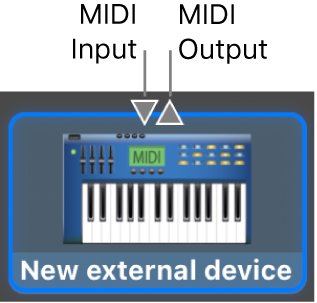
In Icon View , drag the In or Out connectors at the top of a device icon to the corresponding connector on another device icon.
In List View , click a device’s disclosure triangle, click the Port disclosure triangle, click the Add Connection icon, then use the pop-up menus to specify the connections.
If you have a MIDI interface connected to the USB port on your Mac, it should appear in the MIDI Studio window. If it doesn’t, see If a connected MIDI device isn’t shown.
You can’t specify a “MIDI thru” connection between two MIDI devices. To indicate a MIDI thru connection, connect the two MIDI devices to the same port of the MIDI interface device.
Edit a MIDI configuration
In the Audio MIDI Setup app on your Mac, choose Window > Show MIDI Studio.
In the MIDI Studio window, click the Choose MIDI Configuration pop-up menu (it may show Default), then choose Edit Configurations.
Select a configuration, then click Duplicate, Rename, or Delete.
When you’re finished making changes, click Done.
Источник
MIDI Guitar for GarageBand 4+
Jam Origin
-
- Gratuit
- Inclut des achats intégrés
Captures d’écran
![]()
![]()
![]()
Description
MIDI Guitar is a revolutionary piece of software that allows you to play software instruments and synths on your guitar, essentially converting your guitar into a polyphonic MIDI controller/keyboard. The guitar-to-MIDI transcription runs in real-time, with latency and accuracy comparable to expensive and inconvenient hardware MIDI guitar solutions.
##### See what users are doing with it at: http://jamorigin.com ######
MIDI Guitar for GarageBand is meant to be used with Garageband’s virtual instruments but it is also a powerful and versatile guitar effect processor on its own. It can be used with MainStage or Logic as well, using Apple’s Virtual MIDI standard, or even hardware synths with good old MIDI cables.
It will analyse your guitars playing in real-time and and know exactly what you play. As you can imagine, this opens up for a whole new dimension of guitar effects.
MIDI Guitar for Garageband is very easy to set up (it just works) but it has some limitations compared to the more expensive plugin version of MIDI Guitar (more info at our website).
In order to use MIDI Guitar you need guitar- or audio-interface. It will work with all types of guitars, but it performs best with a solid body electric guitar. Use a dry guitar signal, bridge pickup, tone all way up.
The app is free to try and evaluate with your setup.
If you previously purchased the in-app-purchase, please go to «Shop» to restore it.
In case of problems please write to our support or in the forum.
Источник
MIDI Guitar for GarageBand 4+
Play any synth on your guitar
Jam Origin
-
- 1.0 • 2 Ratings
-
- Free
- Offers In-App Purchases
Screenshots
![]()
![]()
![]()
Description
Play any synth or virtual instrument on your guitar!
MIDI Guitar is a revolutionary piece of software that allows you to play software instruments and synths on your guitar, essentially converting your guitar into a polyphonic MIDI controller/keyboard. The guitar-to-MIDI transcription runs in real-time, with latency and accuracy comparable to expensive and inconvenient hardware MIDI guitar solutions.
##### See what users are doing with it at: http://jamorigin.com ######
MIDI Guitar for GarageBand is meant to be used with Garageband’s virtual instruments but it is also a powerful and versatile guitar effect processor on its own. It can be used with MainStage or Logic as well, using Apple’s Virtual MIDI standard, or even hardware synths with good old MIDI cables.
It will analyse your guitars playing in real-time and and know exactly what you play. As you can imagine, this opens up for a whole new dimension of guitar effects.
MIDI Guitar for Garageband is very easy to set up (it just works) but it has some limitations compared to the more expensive plugin version of MIDI Guitar (more info at our website).
In order to use MIDI Guitar you need guitar- or audio-interface. It will work with all types of guitars, but it performs best with a solid body electric guitar. Use a dry guitar signal, bridge pickup, tone all way up.
The app is free to try and evaluate with your setup.
If you previously purchased the in-app-purchase, please go to «Shop» to restore it.
In case of problems please write to our support or in the forum.
Источник
MIDI Guitar & MIDI Bass
FOR WINDOWS & MAC
MIDI Guitar turns any guitar into a true polyphonic MIDI Guitar, with latency and accuracy comparable to expensive and inconvenient hardware MIDI-Guitar solutions. This is achieved by connecting your guitar to your computer and letting MIDI Guitar use its polyphonic (multi-note) pitch detection algorithm to convert your guitars signal to MIDI that can be used to play a soft synth or virtual instrument or as a plugin in your Digital Audio Workstation
MIDI Guitar is available as both a VST/Audio Unit plugin, but also a standalone application that can transfer MIDI to your Digital Audio Workstation using Virtual MIDI on Mac OS X and a virtual MIDI cable driver on Windows.
The free trial of MIDI Guitar allows you to evaluate the recognition technology without any interruptions when using the Test Piano and with interruptions when hosting plugins or using MIDI output.
Installing the plugins
After downloading the latest MIDI Guitar installers from jamorigin.com/download, you can install the standalone app and plugins. This is done by an installer on windows and manually on macOS.
(for MIDI Bass the steps are the same, but read MIDI Bass instead of MIDI Guitar)
Windows users:
Running the installer will ask you where to install the plugins. You need to put them in the plugin folder where your DAW expects to find them. If you don’t know where your plugins folder is, use the most commonly used location, given below:
The default plugin folder for most 32bit hosts is c:/program files (x86)/Steinberg/VstPlugins/
The default plugin folder for most 64bit hosts is c:/program files/Steinberg/VstPlugins/
However, some DAWs use another VSTs folder. Sonar and Mixcraft for example use c:/Program files/Cakewalk/VstPlugins for 64-bit plugins and c:/Program files (x86)/Cakewalk/VstPlugins for 32-bit plugins.
Most DAWs allow you to set your VST or plugin folder. You may have to add the VST folder above to the list in which your DAW search for plugins inside your DAWs preferences window.
Mac users:
Open the DMG installer image find the two plugins: MIDI Guitar 2.vst and MIDI Guitar 2.component.
NOTE: AU (Audio Unit) plugins have a .component extension.
Copy MIDIGuitar2 .vst file to your VST plugins folder /Library/Audio/Plug-Ins/VST/
Copy MIDIGuitar2 .component file to your AudioUnit plugins folder: /Library/Audio/Plug-Ins/Components/
If you cant find these folders, open Finder and hold “cmd” and “shift” keys and press “G”. Now copy the above path into the dialog that pops up.
In order for your DAW to discover the new MIDI Guitar plugins you sometimes need to make it rescan your plugins folder for plugins or restart the Mac.
How to buy and apply license
- Our shop is at http://jamorigin.com/products/midi-guitar/buy
- MIDI Bass is only available bundled with MIDI Guitar 2. The MIDI Guitar 2 license allways includes MIDI Bass for free.
- At checkout, please make sure the VAT-id field is empty. Only if you own a VAT-id, this field should be used
A simple way to do this, is to send it as an email attachment to yourself.
Installing the license for MIDI Guitar:
Open the standalone MIDI Guitar app, play with any other patch than “test piano”, when interruption comes, choose “apply license”, point to the downloaded .license file in your downloads folder
How to use in your DAW
After copying the VST/AU to your plugin folders, MIDI Guitar should work with almost any DAW.
- In general: our plugins need a short buffersetting. 256 is for the most systems a good place to start.
- VST is the preferred plugin format: unless noted otherwise allways choose the VST format instead of the AU version!
(Logic X, Garageband and Mainstage only work with AU ) - Allthough our plugins can load plugins itself, this does not provide for recording of the midi: therefore the midi is send to another DAW instrument track. Some DAWs also reportedly are unstable when our plugin loads bigger synths itself.
Since DAWs are usually complex applications with lots of options, we try to keep a list of tutorials and videos for setting up a DAW project with MIDI Guitar. Please locate your DAW below.
What if my DAW is not (yet) here in the list?
Getting started with MIDI Guitar in your DAW
Ableton Live 9
IMPORTANT: if you installed the VST, but it doesn’t show up in Live, try the following:
1) goto Live / Preferences / Plugins
2) Hit “rescan” with the “alt” key pressed. This will force Live to evaluate all plugins.
Here is another video that shows the basics of using MIDI Guitar as a plugin in Ableton Live 9, but is also slightly misleading. Please see the comment below.
In this video, the MIDI Guitar 2 AudioUnit is loaded and it outputs MIDI with the V-MIDI option, which works, but cause a latency overhead. Please don’t use the AudioUnit with Ableton. Instead, load the MIDI Guitar 2 VST plugin and use the direct midi output (which is enabled by default). In your MIDI/instrument track, go to “MIDI From” and select the audio track on which the MIDI Guitar VST is loaded. Now, when recording, you get MIDI into the piano roll of that MIDI track.
Ableton Live 8
- In Preferences / Audio, check that Audio Input Device and Audio Output Device are correct.
- In Preferences / Audio, check that In/Out Sample Rate is 44100
- In Preferences / Audio, check that Buffer Size is 256 or 128 samples
- In Preferences / File Folder, set “Use VST Plug-in System Folders” to Yes on Mac OS X and make sure the MIDI Guitar VST is found on Windows.
- Press Tab key to access Arrangement View
- Check menu “options”. Latency compensation should be OFF!
- Click “I-O” button to show In/Out section
- Click “M” button to show Mixer section
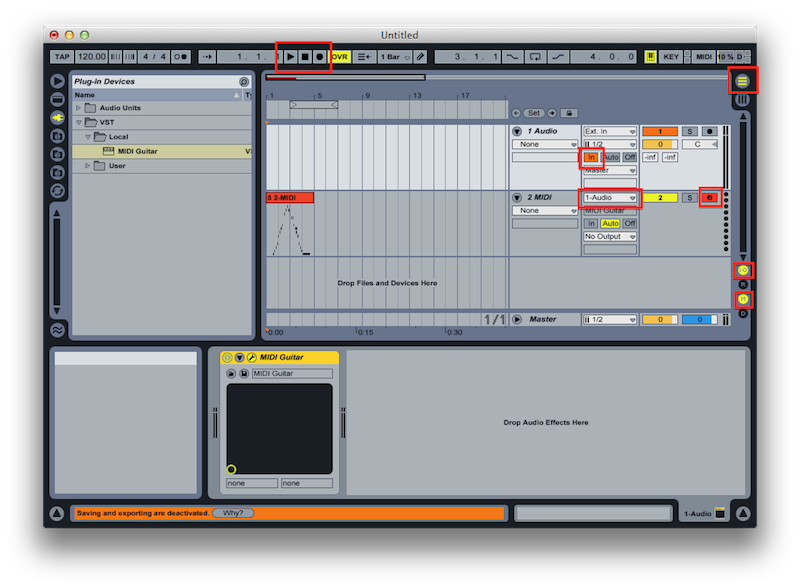
- Make sure you have an Audio Track named “1 Audio” and a MIDI track named “2 MIDI”
- Add MIDI Guitar VST to “1 Audio” track
- Click “In” button on the “1 Audio track” to verify that MIDI Guitar works with your audio interface.
- Select “1 Audio” as “Input Type” for “2 MIDI” track to redirect MIDI from MIDI Guitar to your MIDI track.
- Arm recording for “2 MIDI” track to record MIDI from MIDI Guitar.
- Click Record and then Play to start recording MIDI from MIDI Guitar.
Acoustica MIxcraft (not compatible)
Mixcraft (windows only app) does not support standard midirouting and therefore does not work with our plugin out of the box. Workarounds are theoretically possible but not for the faint of heart!
Video tutorial for GarageBand:
Apple Logic Pro X
Apple Logic Pro X
Logic will use MIDI Guitar’s virtual midi output to get MIDI from your guitar and its simple to setup.
Recommended setup:
The best way to use MG with Logic is using the MG AudioUnit (customers only):
- Make sure you place the MIDI Guitar 2.component in your plugins folder (typically thats /Library/audio/plugins/ Components/) as described above.
- Restart your computer so that Logic Pro will scan the new files you have installed.
- Next, open Logic Pro on your Mac and create two tracks… The first track should be an “audio track” for the audio from your guitar. On the channel fader of this “first” track, activate Midi Guitar 2 in the audio FX slot. Make sure you don’t use any other effects before MIDI Guitar (as MIDI Guitar needs a completely dry input).
- Now, create a second track. This new “second” track should be an “instrument track” for the “midi information” that will automatically come from the Midi Guitar 2 plugin on the first guitar track you created… These two tracks will work together!
On the second track you created, do not call up Midi Guitar 2 in the channel fader slots.
When you create an “instrument track” in Logic Pro, it automatically installs an instrument in a midi instrument slot… That is the instrument that will be activated and played by the midi information recorded on the track.. you can of course change it to any instrument.
The following video shows how to use MG in Logic Pro X
This video shows how to use both internal sounds and midi in a simple studio setup:
Using only the MIDI Guitar standalone:
- Instead of using the MIDI Guitar Audio Unit, you can simply run the MIDI Guitar standalone and select the MIDI Output Route: “MIDI Guitar Virtual MIDI Out”. Now “MIDI Guitar” appears in Logic as a MIDI input without any additional work. That’s it. It’s just there. This method will add a bit of latency compared to recommended approach described above.
Apple Mainstage 3
If the buffersize in Ardour is set to 256, the usage of our MIDI Guitar VST is very straightforward.
We still need to add a quickstart vid here.
AVID ProTools (only via extra bridging plugin and midi loopback)
AVID ProTools
Since ProTools does not support VST or AU plugins you need to use MIDI Guitar standalone and a virtual midi driver. The idea is that you connect MIDI Guitar to ProTools though a virtual cable (in much the same way you would connect a physical midi keyboard controller though its software driver). Its fairly simple:
1. If you are using Windows you need a virtual midi loop driver, such as loopMidi or loopBe1 (both freeware). Mac users can skip this step as Apple operating systems already include a virtual midi standard.
2. Make sure MIDI Guitar works in standalone mode, i.e. you can play the Test Piano.
3. In MIDI Guitar select the virtual midi loop driver as MIDI Output (bottom left). On Windows that is a loopMidi/loopBe1 device. On Mac its the “MIDI Guitar Virtual MIDI Out”.
4. In ProTools, enable the same device as input. (Setup > MIDI >Input Devices > Check the box next to the MIDI Guitar loop output). Mac users just select the built in “MIDI Guitar Virtual MIDI Out”.
5. Thats it. Your guitar is now connected to ProTools, just like a midi keyboard.
Note that virtual midi is not ideal in terms of latency, although usually the impact is unnoticeable. We will consider an AAX plugin in the future.
Note for Windows users: Since most ASIO drivers only works with one application at a time you might also need a second interface.
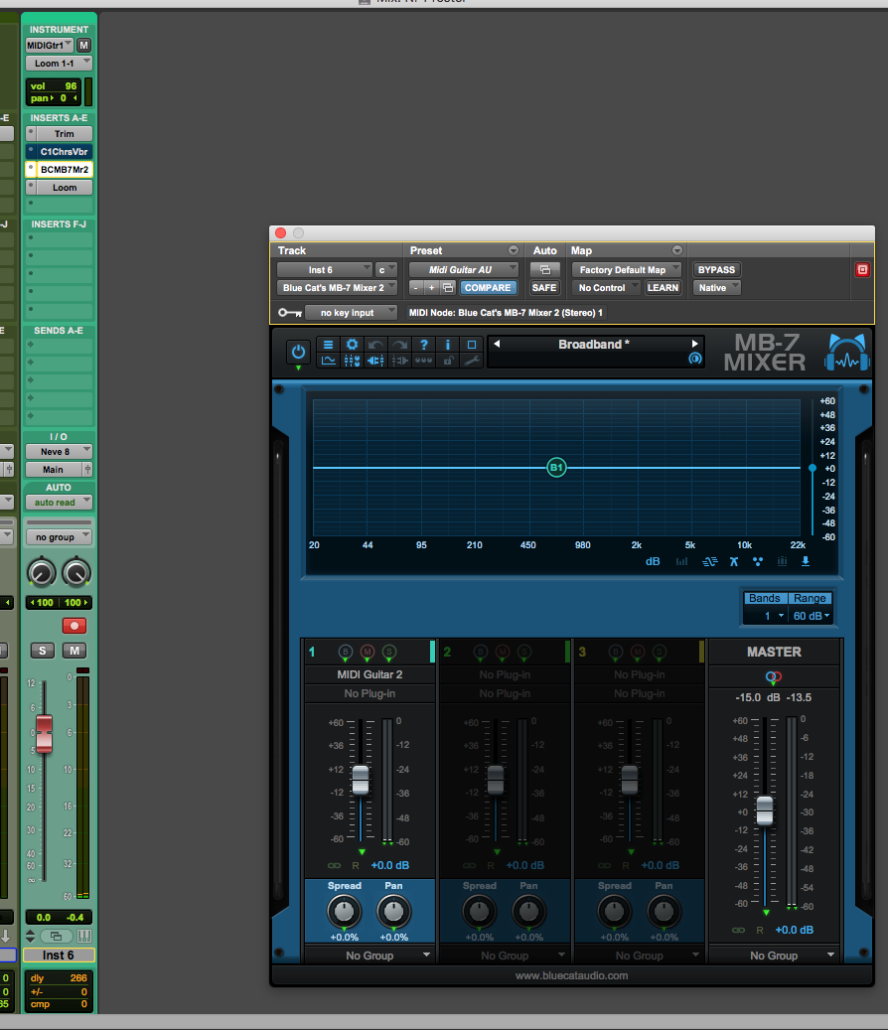
Using BlueCat VST wrapper ( this works only on macOS)
As an alternative to the above, you can use the BlueCat VST wrapper.
You have to load the MIDI Guitar AU audio unit: that plugin will create a virtual midi port.
Our plugins work in Bitwig, and the MIDI is routable from our plugin to other tracks.
there is a quirk however with getting Bitwig to be able to record the MIDI onto a pianoroll.
We contacted Bitwig but still havent got an answer yet
Cakewalk by Bandlab
Cakewalk Sonar
Starting with Sonar X3 and any newer versions works great with MIDI Guitar:
- Copy the MIDI Guitar plug-in to the VST folder
- Launch SONAR. If the plug-in is no listed in the Audio FX list, run the VST scanner.
- Create or open a project.
- Add new audio track, set the input to a mono source (or use an existing mono track). Insert MIDI Guitar into FX bin or ProChannel. To record MIDI data from MIDI Guitar MIDI, using the VST2 drop down in the plug-in header click “Enable MIDI Output” otherwise load a synth plug-in directly into the instrument output of MIDI Guitar, enable input echo on and skip step 5.
- Add a new synh or change the input to an existing synth to MIDI Guitar. Make sure both the MIDI Guitar audio track and the synth (Instrument or MIDI) track have input echo enabled.
Old versions of Sonar:
In older versions of Sonar (version X1, X2) there are issues with MIDI Guitar. The Sonar addressed these issues in version X3, but some have found a workaround for old versions Sonar that apparently works in X1 and X2.
( Quoted from MoreK at KVR Forum: RE Sonar X2 & MIDI Guitar )
What I missed was the MIDI Guitar pop-up menu in the Synth rack. Clicking the keyboard icon with right mouse button gives a menu with no “Enable MIDI Output” option. You have to click grey area of the synth and you’ll get a different menu with the MIDI output option.
So, to summarize the whole setup:
- Copy VST plugin to your VST folder
- Launch Sonar. It should automatically recognize the new plug-in and create needed registry entries (ie you should see the plug-in as an effect in Audio FX menu). If not, use Plug-in Manager to scan new plug-ins.
- Use Cakewalk Plug-in Manager, find MIDI Guitar in Effects section and open “Plug-in Properties”. Enable “Configure as synth” option.
- Close Sonar and use Regedit to change generateEvents key from “0” to “1” in HKEY_CURRENT_USERSoftwareCakewalk Music SoftwareSONAR ProducerCakewalk VST X64Inventory -> MIDI Guitar
- Launch Sonar. Add new audio track. Insert MIDI Guitar (now found in Soft Synths menu) to FX bin.
- Go to Synth rack view. Right click grey area of the MIDI Guitar synth block and click “Enable MIDI Output”.
That’s it. Add your favourite synth to a new track and route MIDI input from MIDI Guitar, which should be visible in MIDI input menu.
Источник


