- Migrate Windows 7 from HDD to SSD Without Reinstalling | 2 Ways
- Why migrate Windows 7 to SSDпјџ
- Method 1: Migrate OS to SSD in Windows 7 with Backup and Restore
- Part 1: Create system image backup with Backup and Restore
- Part 2: Create bootable media with Windows 7 USB/DVD Download Tool
- Part 3: Restore system image to SSD
- Method 2: Migrate Windows 7 from HDD to SSD effortlessly with AOMEI Backupper
- Conclusion
- How to Migrate Windows 7 from HDD to SSD for Free?
- Why Migrate Windows 7 to SSD?
- Free Software to Migrate Windows 7 to SSD
- How to Migrate Windows 7 to SSD by Other Ways?
- Way1: Copy Disk Entirely
- Way2: Clean Install Windows 7
Migrate Windows 7 from HDD to SSD Without Reinstalling | 2 Ways
You will learn how to migrate Windows 7 from HDD to SSD with built-in Backup and Restore or AOMEI Backupper Professional. It will greatly enhance your computer without reinstalling Windows.

By Ivy  / Last Updated November 28, 2020
Why migrate Windows 7 to SSDпјџ
After a span of time, your computer may become slower and slower. Sometimes, you may even take several minutes to boot up your computer and wait for a quite long time to open programs and files. It’s annoying and time-consuming. At this time, you may want to migrate Windows 7 from HDD to SSD for better performance.
As known, SSDs have great performance than HDDs, and it’s affordable nowdays. Here are some obvious advantages of it in the following.
SSD are almost 10 times quicker than ordinary HDDs
SSD has less dissipation and zero noise.
SSD is not easy to wear out.
SSD is smaller in volume and lighter in weight, which is convenient for users to take away.
SSD does not contain any moving part.
Now, you may also want to migrate Windows 7 from HDD/SSD to SSD to improve the overall performance of your computer. Here are two common methods, namely, use the built-in free tool «Backup and Restore» or migrate OS to SSD or clone HDD to SSD in Windows 7 with a professional SSD migration software like AOMEI Backupper Professional. I’ll introduce both ways in details, but the later one is easier. Please keep reading below to get more.
Method 1: Migrate OS to SSD in Windows 7 with Backup and Restore
Here you will use the built-in free backup and restore software to move Windows 7 to SSD, and the entire process is divided into 3 parts. In a simple word, you need to create a system image backup to SSD, and then restore system image from external hard drive via bootable media. For detailed steps, click the anchor text to check.
Part 1: Create system image backup with Backup and Restore
Step 1. Insert an empty disk into your computer to store the backup image and make sure it can be detected.
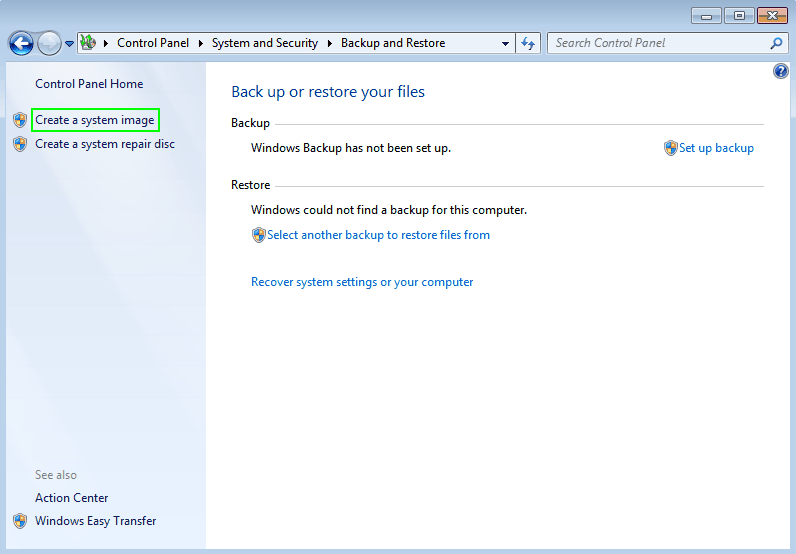
Step 2. Go to Start > Control Panel > System and Security > Backup and Restore, then click “Create a system image”.
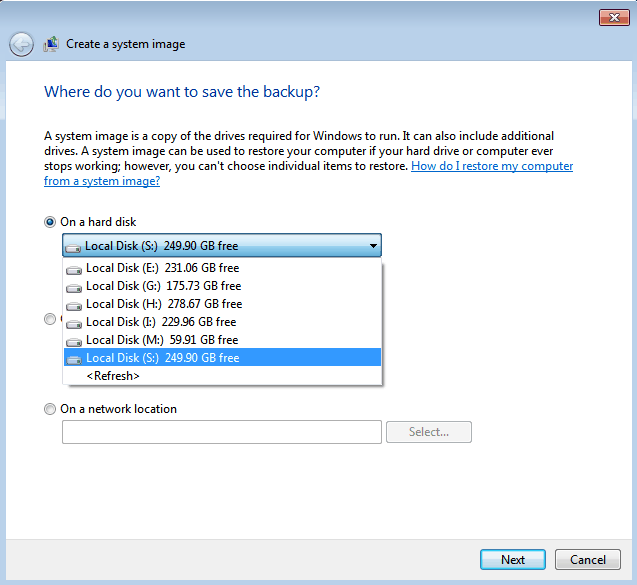
Step 3. Choose the hard drive you insert as destination path. Click Next to proceed.
Step 4. You’ll be asked: “which drives do you want to include in the backup?” The system drive and system reserved drive are included by default. You can add more drives to the image file or you can just ignore this part. Click Next to continue.
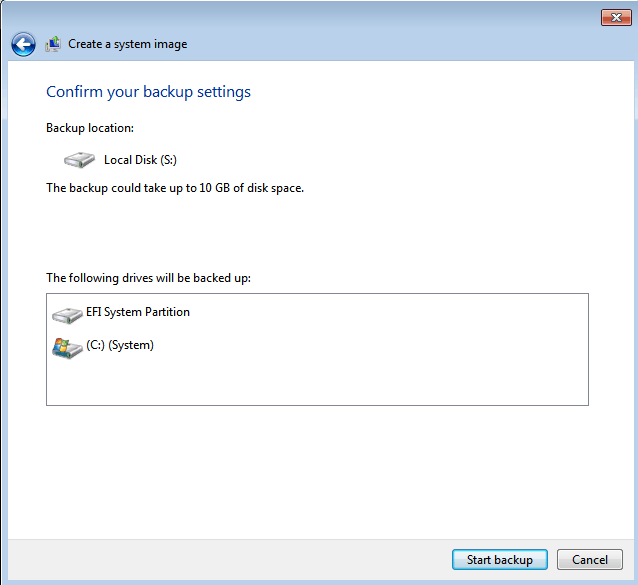
Step 5. check the backup location and the size of the backup image, then click Start backup. When finished, the system image backup is saved on the SSD and you can verify it from this drive.
Part 2: Create bootable media with Windows 7 USB/DVD Download Tool
Now, we should start to create a repair disk or bootable media in Windows 7. Both of them can help you boot your computer. But they are different. The repair disk can only be created on CD/DVD while the bootable media with Windows 7 USB/DVD Download Tool can be burned to USB flash drive.
If you don’t have a CD/DVD, you can follow the steps below and learn how to upgrade to SSD in Windows 7.
Step 1. Download Windows 7 USB/DVD Download Tool and ISO files from Microsoft.
Step 2. Open this tool and click Browse to locate Windows 7 ISO files from your computer.
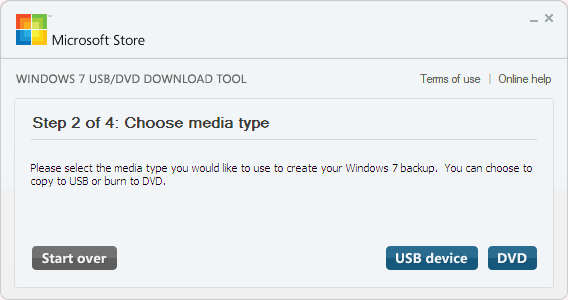
Step 3. Select USB device as the media type.
Step 4. Connect USB drive at least 4GB and select it from the drop-down menu, then click Begin copying. Wait until the process is 100% completed.
Part 3: Restore system image to SSD
This is the final part. Just connect the hard drive which contain the system image, new SSD and bootable USB drive to your computer, then set boot priority for the USB drive and press F10 to restart your computer. Then, follow the steps below to transfer Windows 7 to SSD.
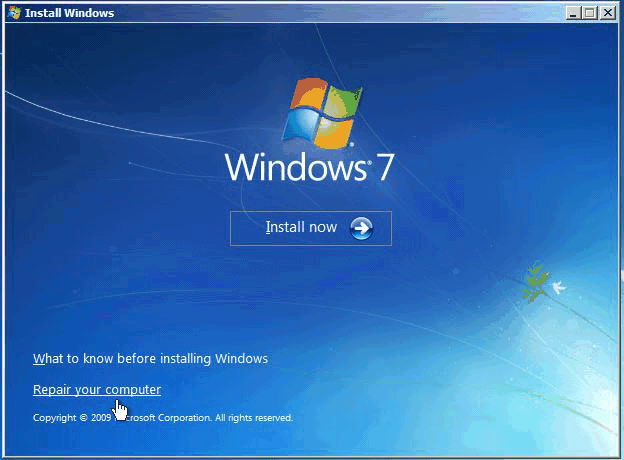
Step 1. Press any key to boot from the USB drive when prompted. Then, click Next until you see Repair your computer at the lower left.
Step 2. Click Repair your computer.
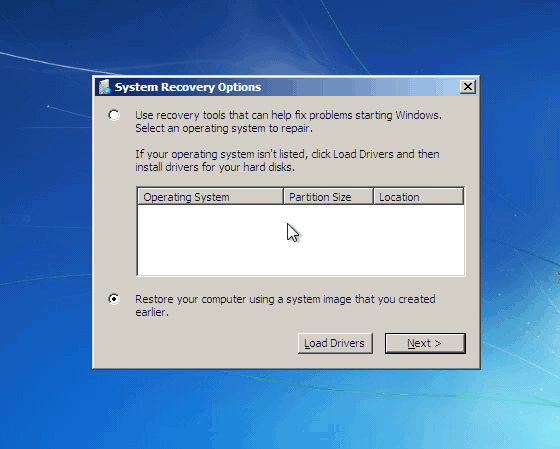
Step 3. Click «Restore your computer using a system image that you created earlier”, then click Next.
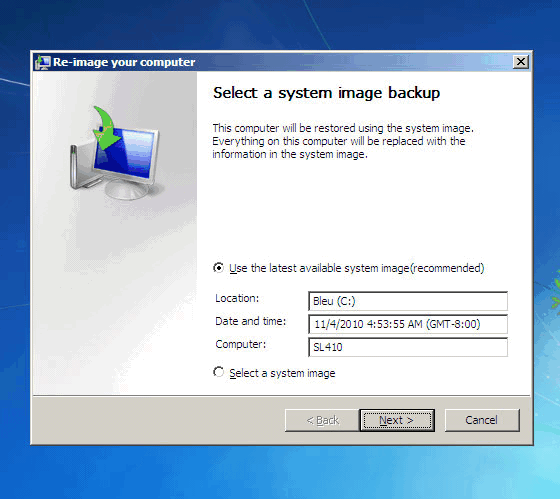
Step 4. Tick Use the latest available system image(recommended) and click Next to complete the restore process. Reboot the system and see if your boot drive is SSD.
Now, how to replace hard drive with SSD in Windows 7 has already been done successfully. But if your target disk is smaller, the restoration will fail. Even some users report that there is no available backup image in the re-image your computer window.
If that’s your case or you just want something simplier, you can choose to move Windows 7 from HDD to SSD with Backup and Restore alternative — AOMEI Backupper Professional. It’s simple and effective, you just need to click the corresponding button and this software take care of the rest.
Method 2: Migrate Windows 7 from HDD to SSD effortlessly with AOMEI Backupper
AOMEI Backupper Professional is a professional disk clone software, which integrates “System Clone”, “Disk Clone“ and ”Partition Clone” together. Therefore, whether you want to migrate OS to SSD or clone HDD to SSD, you can use it to transfer Windows 7 to new hard drive effortlessly.
Also, this software is applicable to migrate Windows 10/8 to SSD. More over, its «SSD Alignment» feature makes full use of 4k technology to boost the writting and reading speed of SSDs. Finally, thanks to wizard-like interface and clear step, every users can use it smoothly, even the novice.
Note: The destination disk will be overwritten after cloning Windows 7 hard drive to SSD, please create a disk backup to prevent any unexpected failure or human error. If you only want to protect important data, family photos or working documents, for example, you can choose to backup files or folders.
Step 1. Download and run the professional SSD migration software — AOMEI Backupper Professional. If your computer is server 2008 or any of them, you could consider using AOMEI Backupper Server. Connect SSD to your computer and make sure it can be detected.
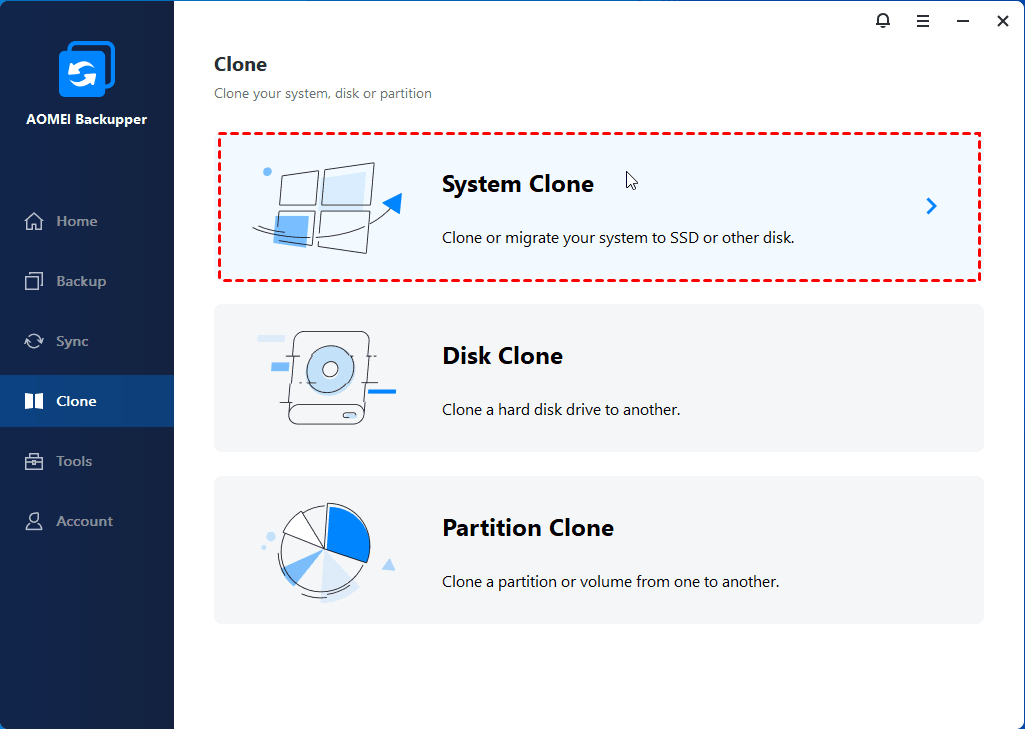
Step 2. In the main page of AOMEI Backupper, click “Clone» and then select “System Clone” subsequently. To clone entire hard drive, just click «Disk Clone».
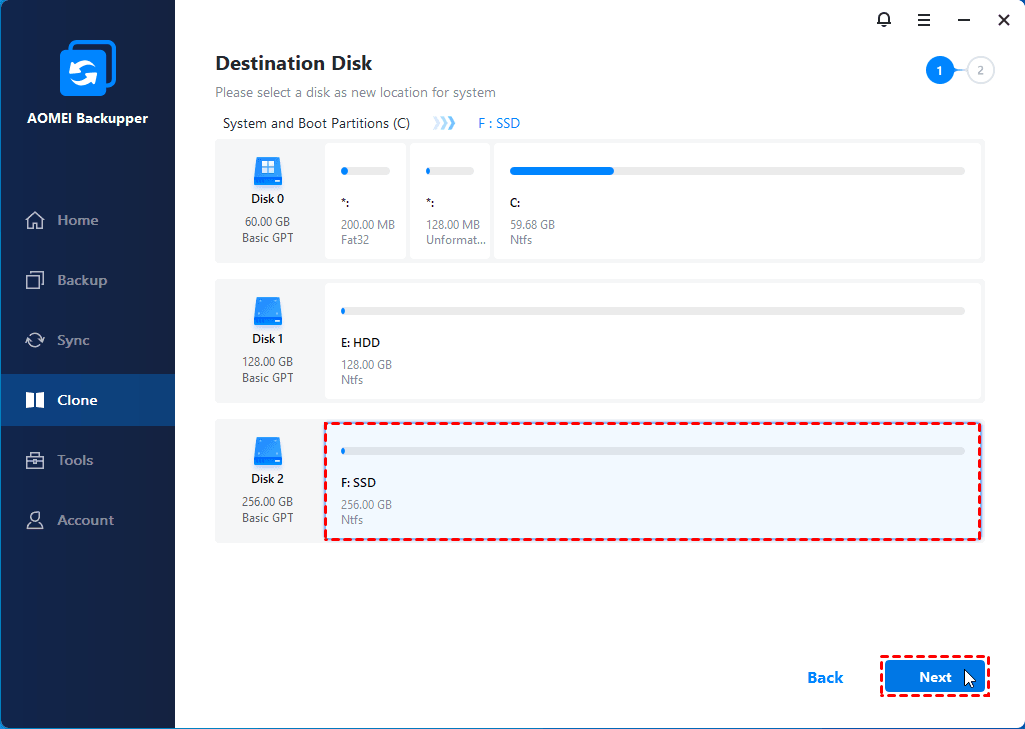
Step 3. Select the connected SSD as the destination disk and click “Next”.
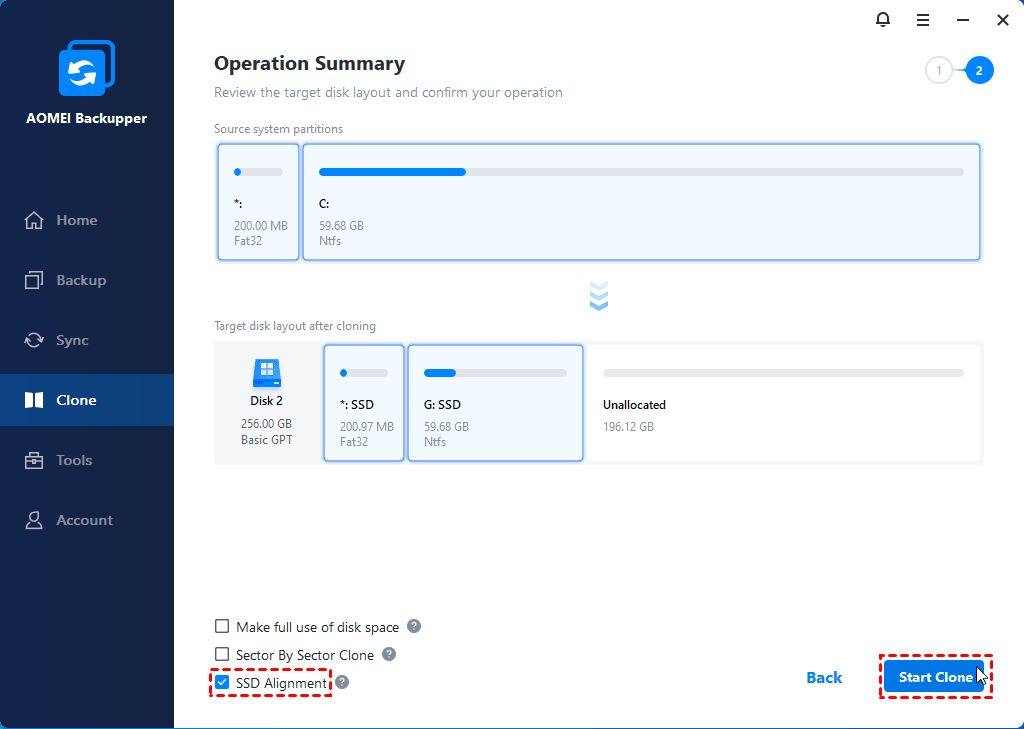
Step 4. Confirm the source and destination partition, then check the “SSD Alignment” option to optimize your SSD and Click “Start Clone” to migrate OS to SSD.
Notes вњЋ.
• Don’t check «Sector by sector clone» if the used space on target disk is smaller than source disk, otherwise the cloning process will fail.
• It’s suggested to use SSD as OS and HDD for storage if your original hard drive works well, so you can enjoy the excellent performance of SSDs and large capacity of HDDs.
• If your disk space is insufficient, you can choose to clone hard drive to larger drive or clone SSD to HDD.
Step 5. Wait for a while, and click «Finish» when this operation is completed. Then, boot computer from the cloned hard drive and check if all your content are intact.
Conclusion
Here comes to the end of this post. You are suppose to know how to migrate Windows 7 to SSD as well as migrate Windows 10/8 to SSD easily and quickly. You can choose to backup and restore with built-in Windows backup utility, but the process is complicated. In addition, the restoration may fail due to different reasons, such as, Windows cannot find a system image backup on this computer, not enough space, system restore fails because of EFI/BIOS etc.
Therefore, you’d better use a trusta and reliable software like AOMEI Backupper Professional. with it, you can choose to clone system or entire disk and then directly boot from the cloned hard drive without restoring image first. Also, it’s still a backup and restore software, so you can use it to create a system image backup, incremental/differential backup, USB plugged in backup, deploy image to multiple computers (supported by AOMEI Backupper Technician) simultaneously, etc.
How to Migrate Windows 7 from HDD to SSD for Free?
This article shows how to migrate Windows 7 to SSD or another HDD without reinstalling to upgrade hard disk and improve performance. Learn how to do it with secure boot.

By AOMEI  / Last Updated September 12, 2019
Why Migrate Windows 7 to SSD?
«I bought an SSD to hold Windows 7 on my PC so that I can speed up the computer, while the only problem is that I have no idea about how to migrate Windows 7 off my current HDD to the new SSD. Please note that I only have the OEM version where the OS can only be installed onto one computer.«
The problem is from an internet user, it is a typical question on why migrate OS from HDD to SSD in Windows 7, Windows 8 or Windows 10. By migrating, you can speed up the computer so it would not cost you much time to start your system. By migrating, you may copy OS to new hard drive or onto any computer. Anyhow, your computer’s performance would be improved as well.
Free Software to Migrate Windows 7 to SSD
Commonly, there are two ways to transfer OS to SSD in Windows 7, one is use Windows tool, and the other is use third-party software. Some SSD like Samsung SSD brings its own data migration utility. If you have purchased this brand SSD, you can migrate Windows 7 to Samsung SSD using that tool. Here, I’d like to recommend the easy way with third-party software, which can help you move everything on system drive as well as its related partitions from HDD to SSD without data loss.
AOMEI Partition Assistant Standard Edition is a comprehensive and powerful disk migrate program that can be used free of charge. Its built-in “Migrate OS to SSD” feature allows you to transfer data or system drive to a new SSD without reinstalling. TRIM for SSD and partition alignment would be performed by this software as well. The software simplifies the process of migrating Windows 7 from HDD to SSD on Windows. With a few clicks of the mouse, you will achieve the target.
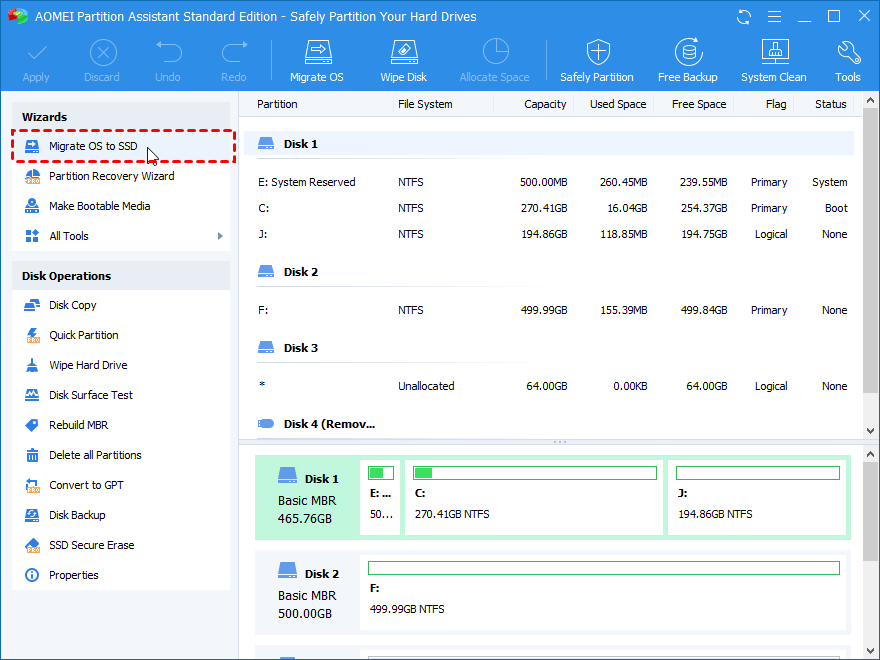
Step 1: Connect the SSD to your computer and make sure it can be detected. Download, install and launch AOMEI Partition Assistant.
Step 2: Click “Migrate OS to SSD” and read the information.
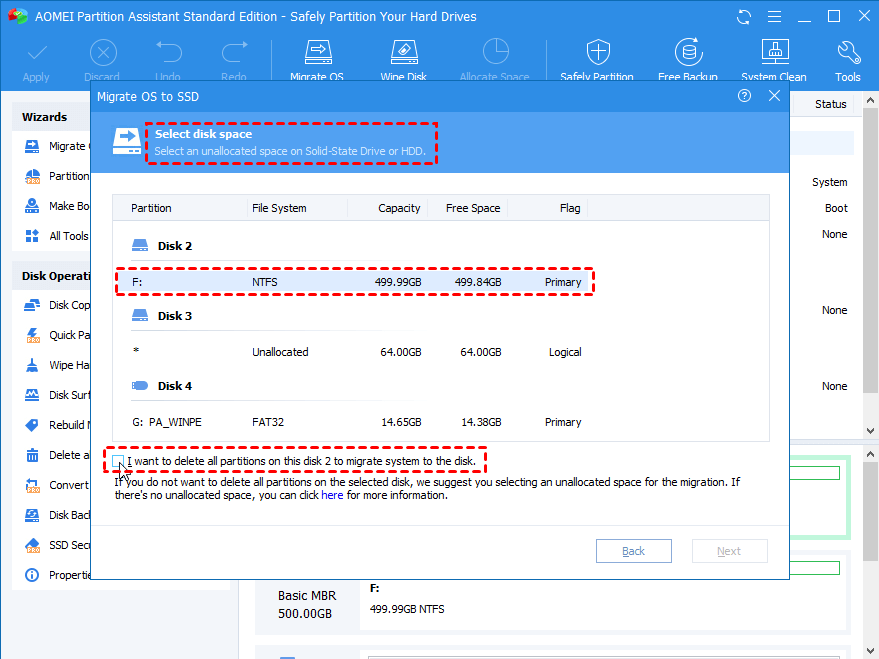
Step 3: Select the SSD as the destination disk. All partitions will be deleted if you check the option below. Back up important files beforehand.
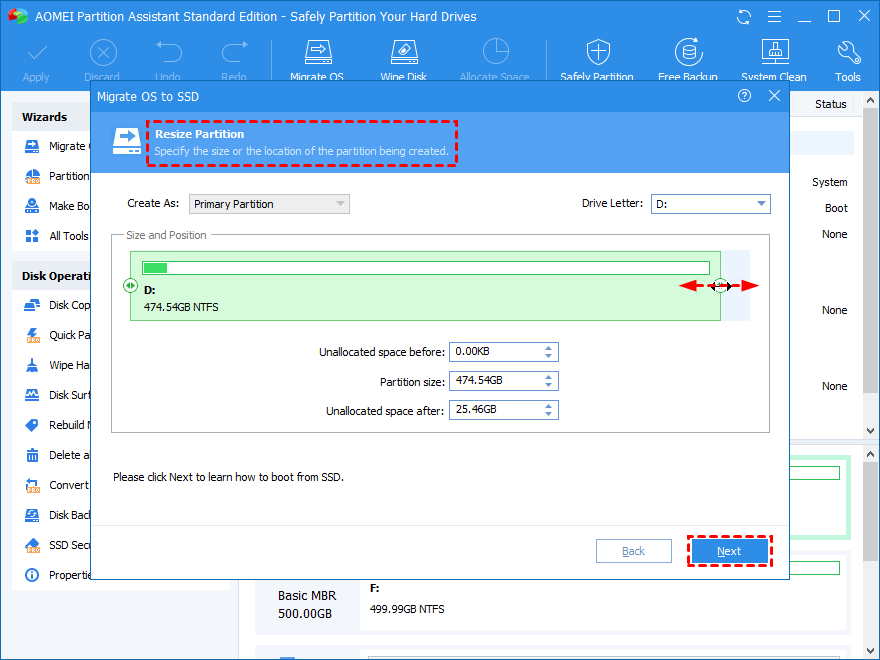
Step 4: You can resize the partition on the destination disk before you move Windows 7 to SSD. Bear the «Note» that comes next in mind.
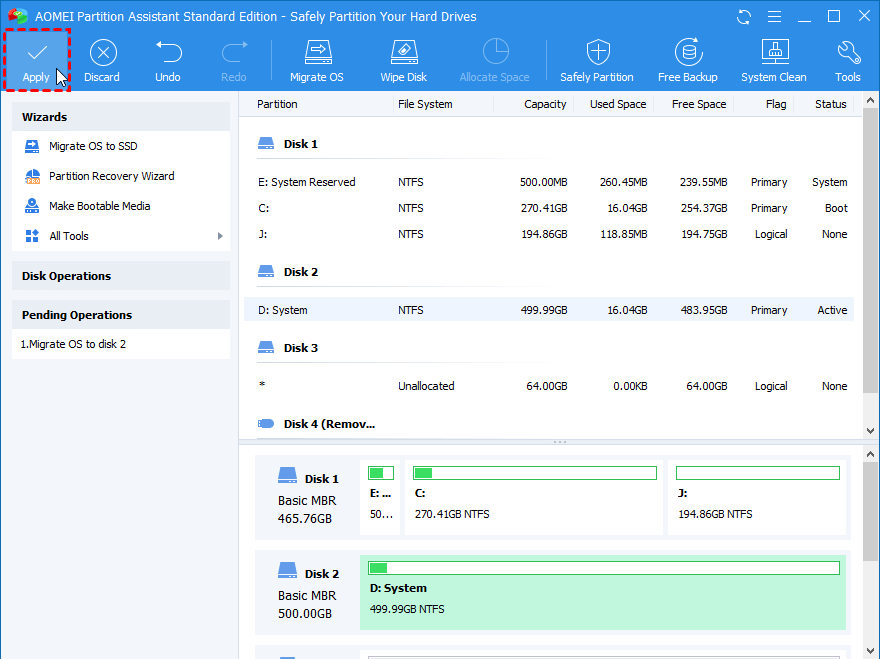
Step 5: Click “Apply” and then «Proceed» to execute the operations. It will complete the task in Restart mode.
Tips:
Windows 10, Windows 8/8.1, Windows 7, Windows XP and Windows Vista are supported by AOMEI Partition Assistant Standard.
AOMEI Partition Assistant Standard only supports to transfer Windows 7 to SSD between MBR and MBR disks. To migrate operating system between MBR and GPT disk, please upgrade to Professional edition.
How to Migrate Windows 7 to SSD by Other Ways?
It’s easy for users, especially for the newbie, to migrate Windows 7 from HDD to SSD with AOMEI software. Some People may also try to find other ways, and then we need to refer to the following two methods.
Way1: Copy Disk Entirely
Because Operating System is installed on HDD, you may migrate Windows OS by copying or cloning entire HDD to the SSD. This transfers not only the system partitions but also data partitions to SSD. Please note that this method requires the destination SSD is equal to or larger than the used space of HDD. What’s more, to clone Windows 7 HDD to SSD on laptop, you have to pay more attention to the process.
Way2: Clean Install Windows 7
It’s a little time-consuming and complicated to directly install OS and necessary applicationsto SSD, or copy the data and files to SSD from the original system.
Firstly, you need to back up your current drive, and then delete all your personal files if necessary so that your Windows installation can fit on the solid-state drive. After this, you’ll clone your current drive onto the SSD and erase your current drive as required. This operation allows you to move all your folders back to the original hard drive and restore all your personal files from the back up. This is just a brief procedure of migrating Windows from HDD to SSD, but the whole process is genuinely complicated.
By contrast, you’ll easily find free AOMEI Partition Assistant is a better choice to migrate Windows 7 from HDD to SSD. Just with a few clicks of the mouse, you can move Windows to SSD


