- Миграция физических серверов на VMware ESXi через VMware Converter Standalone
- Перенос физического сервера Windows на виртуальную машину VMware
- Виртуальный сервер на базе Windows
- VMware Converter
- VMware OVF Tool
- Migrate windows server to vmware
- How to Migrate VMware vCenter from Windows to VCSA 6.7 Update 1
- Supported Migration Paths
- System Requirements
- Migration of Windows-based vCenter to VCSA – The steps
- Mount the VCSA 6.7 ISO and Launch Migration Assistant
- Provide Administrator@vsphere.local password and wait for pre-checks to finish
- From your management Workstation take the Migrate Option to start migration
- Connect to the source server
- Specify Appliance Deployment Target
- Specify the VM settings for the appliance to be deployed
- Select the Deployment Size
- Select Datastore
- Configure Network Settings
- Migrate Stage One
- Click continue for configuration
- You are asked to join Microsoft Active Directory
- Choose what you want to migrate
- Make sure you backed up your original vCenter Server
- The original VM will be shut down during the migration
- During this time the original vCenter with migration assistant helps during the process of migration
- Migration complete
- Connection after migration
- Migration complete and the New HTML 5 Web User Interface
Миграция физических серверов на VMware ESXi через VMware Converter Standalone

Существует несколько вариантов конвертирования или миграции физических серверов, а также рабочих станций в виртуальную среду VMware ESXi. Ранее мы рассматривали простой и удобный способ с помощью утилиты Disk2VHD для переноса работающей системы без необходимости ее остановки на Microsoft Hyper-V. Сейчас выполним такую же операцию, но конечным средством виртуализации будет VMware ESXi 5.5 up2. Для этого нам потребуется специализированная утилита VMware Converter Standalone 5.5, которая доступна для загрузки с официального сайта.
В рассмотренном случае, утилита конвертации установлена на ПК под управлением MS Windows 7. Осуществляется миграция с физического сервера под управлением MS Windows Server 2008 32bit на хост виртуализации VMware ESXi. На что стоит обратить внимание:
- для уменьшения времени конвертирования стоит отключить SSL шифрование
- нужно знать логин и пароль учетной записи локального администратора
- для установки агента конвертирования необходимо убрать ограничения брандмауэра (либо временно отключить его)
- иногда требуется устанавливать VMware Tools перед началом конвертирования (для корректного завершения переноса образа системы)
Ниже представлена инструкция с картинками по настройке переноса физических серверов. Для наглядности и краткости описания необходимые действия выделены красным цветом:
Обратите внимание на количество доступных вариантов конвертирования. Различные образы виртуальных дисков, образы дисков Acronis (.tib), а также работающие ОС.
Указываем источник конвертирования. В нашем случае выполняется миграция физического сервера. Для этого делаем соответствующие настройки – IP адрес. логин и пароль.
Установка агента конвертирования выполняется автоматически, нам стоит лишь выбрать в каком режиме (автоматическом или ручном) будет выполнена деинсталляция данного ПО.
Аналогично, указывает источник назначения наш сервер или кластер ESXi – IP адрес, данные пользователя root.
Здесь мы задаем параметры для конвертирования – диск мигрирующей системы, а также параметры создаваемой VM (CPU, RAM, LAN). Также здесь можно указать параметры гостевой ОС (имя, членство в домене и т.п.), а также ее финальную перенастройку (оптимизация под гипервизор) и установку VMware Tools.
Далее этого запустится сам процесс конвертирования VM. В 90% случаев оно проходит успешно, рекомендуется останавливать на время конвертирования активно используемые службы и БД (указав в настройках переноса последующую синхронизацию).
После этого можно запускать склонированную виртуальную систему и вносить необходимые коррективы в “новую” ОС.
Нашли ошибку в тексте? Выделите фрагмент текста и нажмите Ctrl+Enter
Перенос физического сервера Windows на виртуальную машину VMware
Для миграции вам необходимо сконвертировать ваш физический сервер в файл формата ovf. OVF (Open Virtualization Format) — стандарт для хранения и распространения виртуальных машин.
Виртуальный сервер на базе Windows
- Лицензия включена в стоимость
- Тестирование 3-5 дней
- Безлимитный трафик
Требования к ova/ovf файлам:
— Hardware Version машины не выше 11й;
— Тип дисков scsi.
VMware Converter
VMware® vCenter Converter Standalone представляет собой решение для преобразования виртуальных и физических машин в виртуальные машины VMware. Мы будем использовать данную программу для конвертации физического сервера в файл конфигурации vmx.
Загрузите установщик VMware® vCenter Converter Standalone после регистрации на сайте компании Vmware

Примечание: на момент написания инструкции последняя версия VMware vCenter Converter Standalone 6.1.1.
Перейдите в папку «Downloads» и запустите на исполнение скачанный файл.
Выберете «Local installation», т. к. Вам необходимо создавать и управлять задачами преобразования только с компьютера, на котором установлено приложение. Converter Standalone server, Converter Standalone agent и Converter Standalone client будут доступны только для локального использования.

После установки запустите приложение и выберете пункт горизонтального меню «Convert machine».

Выберете тип конвертируемой машины: «Powered on», «This local machine».

Выберете тип назначения «VMware Workstation or other VMware virtual machine», т. к. это позволит сохранить полученный в результате конвертации файл на локальном диске.
В поле «Name» укажите имя Вашей виртуальной машины.
Так же укажите путь, где будет сохранена виртуальная машина.

Далее отключите все сетевые адаптеры, сняв галочку в столбце «Connect at power-on», чтобы избежать проблем с сетью.

Обратите внимание, что на диске, путь к которому Вы указали на прошлом шаге, должно быть достаточное количество свободной памяти, не менее значения указанного в разделе «Total».
Отметьте следующие пункты галочками «Ignore page file and hibernation file», «Create optimized partition layout», т. к. это выровняет секторы виртуального диска.

Далее начнется конвертация.

После завершения конвертации перейдите в каталог, который вы указывали, для сохранения виртуальной машины.
Пример содержимого каталога:

VMware OVF Tool
VMware OVF Tool представляет собой решение для импорта и экспорта OVF пакетов из продуктов VMware. Мы будем использовать данную утилиту для конвертации файла vmx в файл формата ovf.
Загрузите установщик VMware OVF Tool на сайте компании Vmware.
Выберете необходимую версию.

Перейдите в папку «Downloads» и запустите на исполнение скачанный файл.
После установки откройте Windows PowerShell. Для конвертации необходим файл ovftool.exe, который находится по указанному при установки пути. Например:
C:\Program Files (x86)\VMware\VMware OVF Tool\ovftool.exe
Перейдите в каталог «VMware OVF Tool» с помощью команды cd.
cd ‘C:\Program Files (x86)\VMware\VMware OVF Tool’
В командной строке введите команду со следующим синтаксисом:
.\ovftool.exe «C:\VM\VM-example\VM-example.vmx» «C:\VM\VM-example\VM-example.ovf»
» height=»148″ src=»https://1cloudstat.com/img/help/migracija-windows-na-vmware/12.png» width=»855″/>
После завершения конвертации у вас появится ovf файл с вашей виртуальной машиной.
Migrate windows server to vmware
You are using an outdated browser. Please upgrade your browser to improve your experience.
—> share-line
—> —> —> —> plus
VMware provides supported paths for migrating from vCenter Server version 5.5 and version 6.0 installations on Windows to vCenter Server Appliance 6.5 installations.
You can migrate the following deployments:
| Source Configuration | Target Configuration |
|---|---|
| vCenter Server 5.5 with an embedded vCenter Single Sign-On instance on Windows | vCenter Server Appliance 6.5 with an embedded Platform Services Controller appliance |
| vCenter Server 6.0 with an embedded Platform Services Controller instance on Windows | |
| vCenter Single Sign-On 5.5 instance on Windows | External Platform Services Controller 6.5 appliance |
| Platform Services Controller 6.0 instance on Windows | |
| vCenter Server 5.5 instance on Windows | vCenter Server Appliance 6.5 with an external Platform Services Controller appliance |
| vCenter Server 6.0 instance on Windows |
Figure 1. High-level Tasks for vCenter Server on Windows Migration to vCenter Server Appliance 6.5 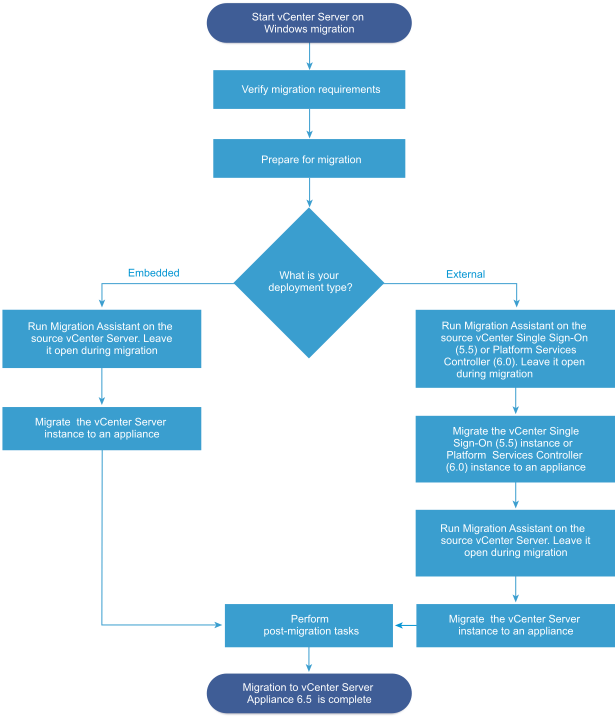
You can use the GUI method or the CLI method to migrate your vCenter Server installation from Windows to an appliance.
How to Migrate VMware vCenter from Windows to VCSA 6.7 Update 1
VMware worked out a great way to migrate users running vCenter server applications on Windows-based systems into a Linux appliance. This Linux appliance is based on Photon OS, a VMware Linux distribution, optimized for a vCenter server application.
It provides hardened security with security patches released fast when a vulnerability is discovered. Previously, VMware vCenter Server Appliance (VCSA) was based on SUSE Linux Enterprise Server (SLES) where the security patches were released when SUSE released them.
So now when VMware owns the full stack, the VCSA not only has all the features that the Windows-based vCenter server has but even more.
Today we will demonstrate the migration of Windows-based vCenter server to VMware VCSA. The migration is semi-automatic, where you need to perform some manual tasks and follow assistants.
However, the migration is very smooth and very straightforward thanks to those assistants. You don’t need to have any Linux skills in order to migrate your vCenter server into VCSA.
Some guidelines, however, shall be respected. For example, you should make a full backup of your existing vCenter server. In case something goes wrong, you can always revert back to your existing environment.
Supported Migration Paths
You can migrate from vCenter server 6.0 or 6.5 into the VCSA 6.7 U1. You can also have external Platform service controllers (PSC), where v6.0 and 6.5 are supported.
If you have installed vSphere Update Manager (VUM) as a side product within your vCenter server on Windows or if it runs on a separate VM, both ways are supported and you can migrate to VCSA 6.7 U1
In this post, we will use a graphical user interface (GUI) method for the migration process. However, you might also be interested in a CLI method which uses a JSON template.
| StarWind VSAN for vSphere uses your local hypervisor cluster to create fault-tolerant and robust virtual shared storage, eliminating the need to buy a costly physical SAN. You can deploy it on any off-the-shelf hardware you already got. Thanks to mirroring of internal hard disks and flash between hypervisor servers, you get a 2-node Highly Available cluster. There is no need for a witness instance, and you’re not restricted on storage size, features, or number of VMs. Your IT-environment will not only achieve constant uptime and skyrocketing performance, you will also save a good deal on CapEx and OpEx. | |
Find out more about  StarWind VSAN for vSphere StarWind VSAN for vSphere |
System Requirements
Source and target systems must meet specific software and hardware requirements before you can migrate a vCenter Server, vCenter Single Sign-On, or Platform Services Controller deployment to a vCenter Server Appliance or Platform Services Controller appliance.
- Clock synchronization of the target machines on the vSphere network before migration starts.
- If you’re using Fully qualified domain name (FQDN), make sure that the management workstation you’re using to launch and monitor the migration process and the destination ESXi or vCenter are on the same DNS server.
- If your vCenter Server service is running in a user account other than the Local System account, verify that the user account, in which the vCenter Server service is running, has the following permissions:
– Member of the Administrators group
– Log on as a service
– Act as part of the operating system (if the user is a domain user)
– Replace a process level token
- Source vCenter server (and PSC, if separated) are not using DHCP.
Migration of Windows-based vCenter to VCSA – The steps
Let’s get started with the migration. At first, connect to your vCenter server on Windows with elevated privileges.
Mount the latest VCSA ISO > Go to a subfolder on the root called Migration-assistant > Execute the VMware-Migration-Assistant.exe.
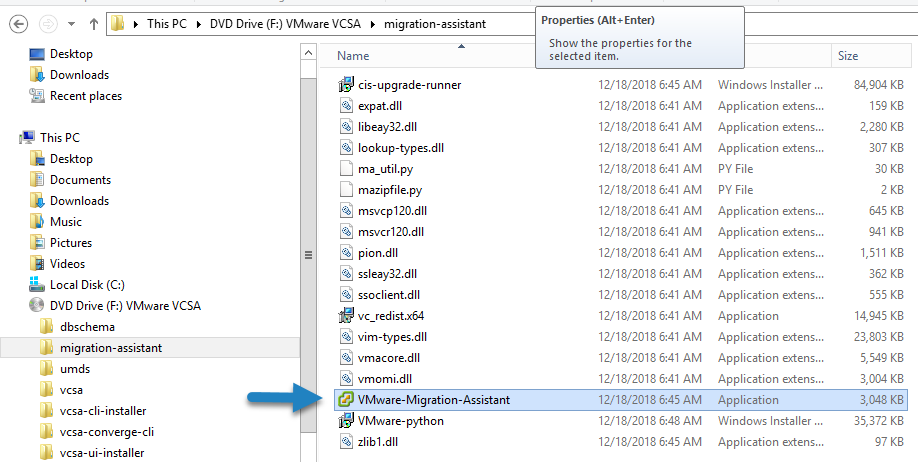
Mount the VCSA 6.7 ISO and Launch Migration Assistant
You’ll need to provide an administrator@vsphere.local (or whatever name you had set up for SSO domain).
The assistant will do several checks of the whole environment before showing a message “Waiting for migration to start”.
The pre-migration-checker verifies that:
- vCenter Server or Platform Services Controller to verify that migration is supported
- SSL certificates validity and compatibility with system names
- Network connections
- DNS resolution
- Internal and external ports used
- External database connectivity (if any external DB is configured)
- Administrator privileges on the Windows machine
- Required disk space for exporting configuration data
- NTP server validation
- Any credentials that you enter
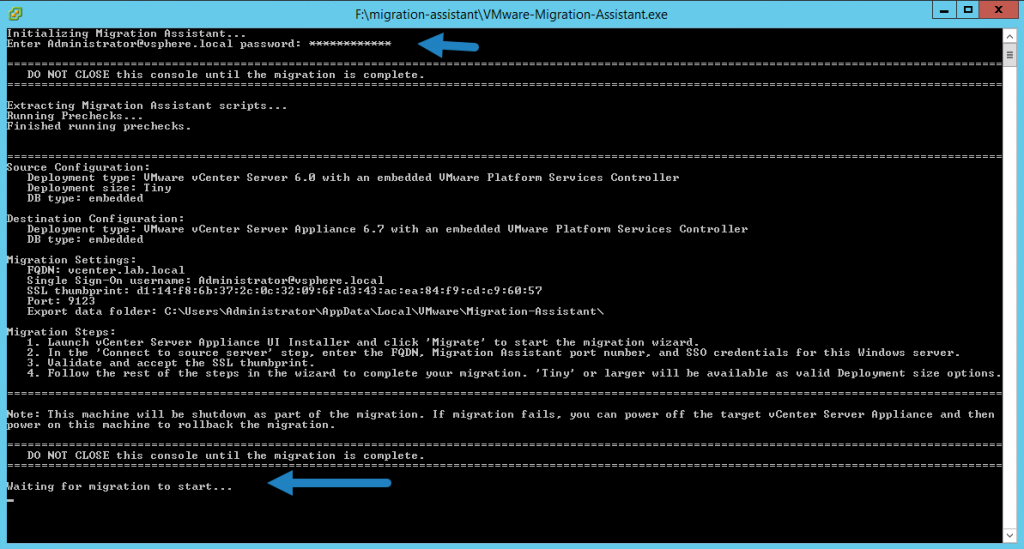
Provide Administrator@vsphere.local password and wait for pre-checks to finish
The pre-migration checker performs also checks for the target environment:
- Minimum processor requirements
- Minimum memory requirements
- Minimum disk space requirements
- Administrator privileges on the target host
- Any credentials that you enter
So after seeing the “Waiting for migration to start” you can leave the Windows VM as is and go to your management workstation.
The management workstation can run Windows, Linux or macOS as a system. Both 3 are supported for launching the migration from.
In our case, we’ll be using a Windows machine.
Mount the VCSA ISO and launch the installer.exe file, which you can find in the “vcsa-ui-installer” folder, where there is a subfolder called win32.
As being said, if you’re using Linux or Mac, you’ll choose either “lin64” or “mac” as a folder and look for the installer there.
Launch the “install.exe” and click the large “Migrate” button to start a new assistant.
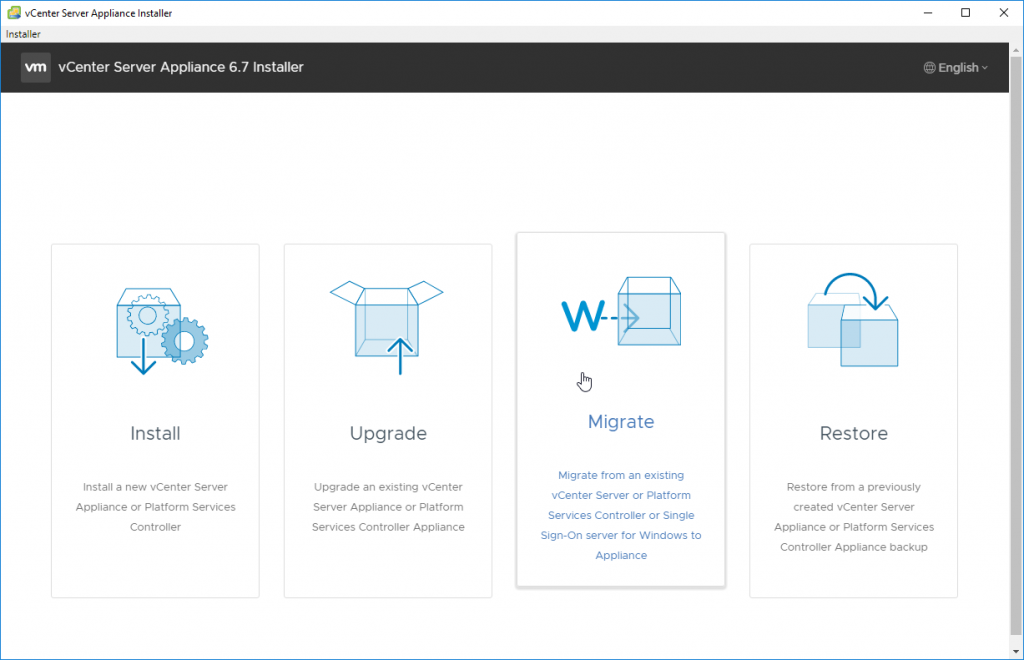
From your management Workstation take the Migrate Option to start migration
Accept the End user licensing agreement (EULA) and enter the source server. Example from the lab is below.
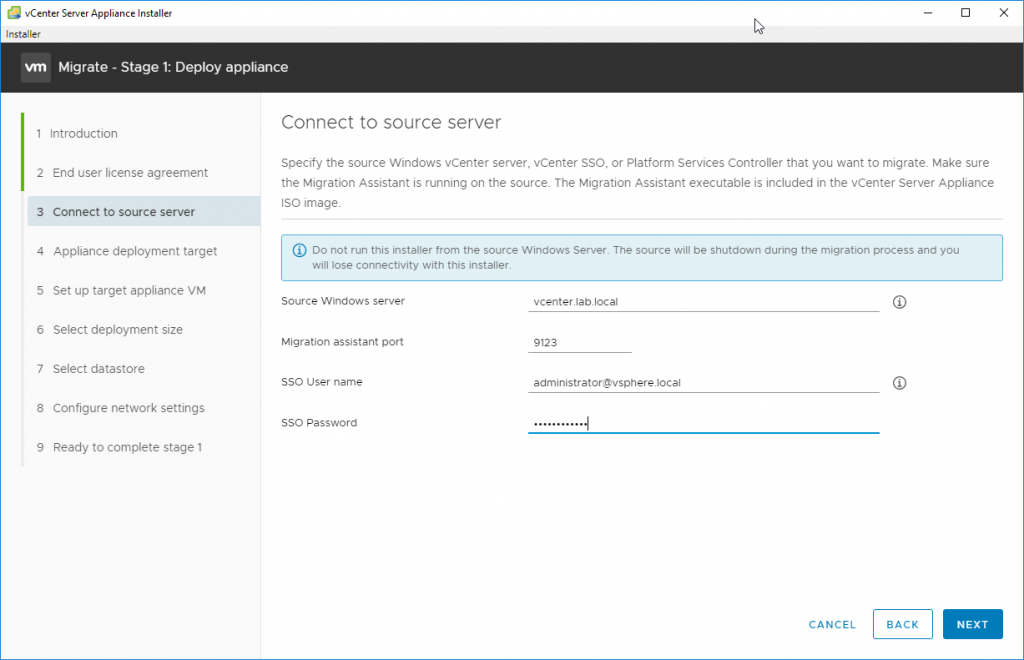
Connect to the source server
Then after clicking Next, enter the ESXi host or vCenter server. This is the destination where you’ll be deploying the new VCSA appliance.
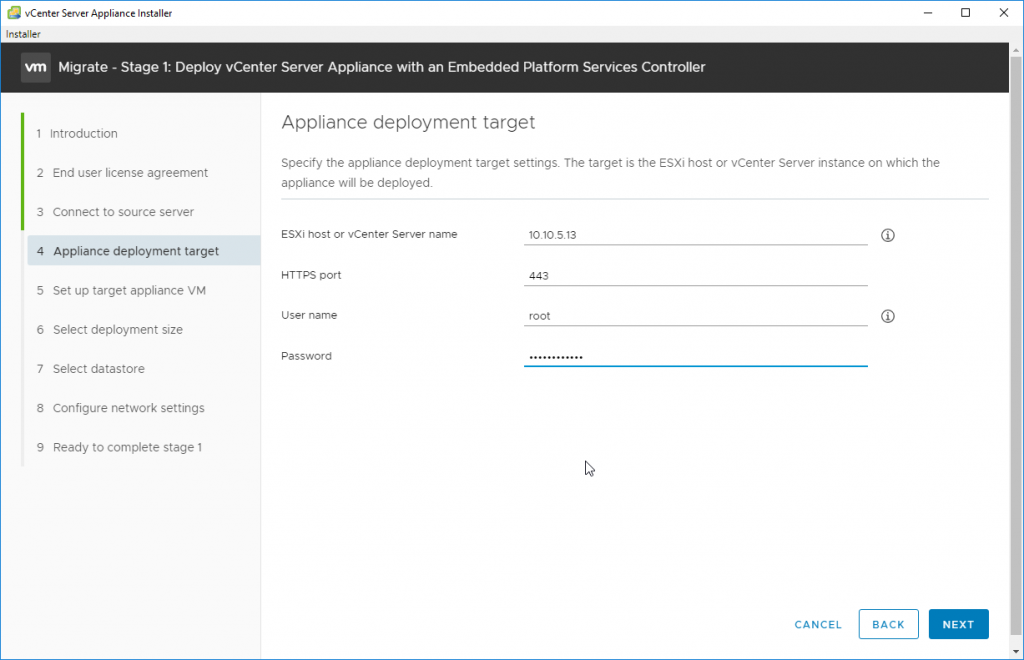
Specify Appliance Deployment Target
After clicking Next, specify the VM name and set a root password. Don’t forget the root password as it is used when you connect directly to the VCSA appliance and for monitoring or patching and (or) upgrades.
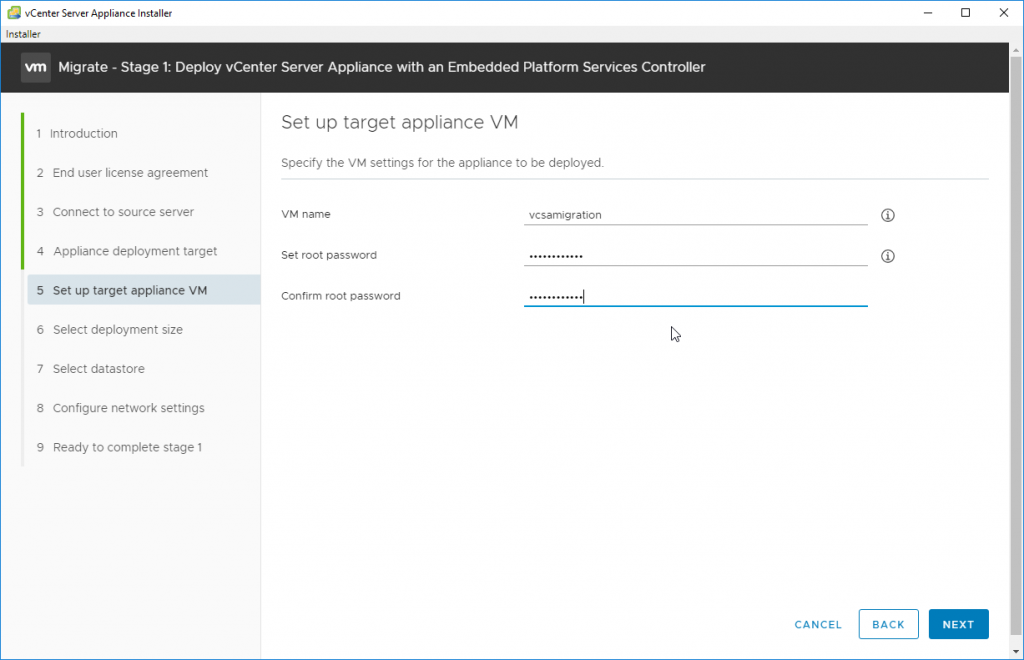
Specify the VM settings for the appliance to be deployed
On the next page, we’ll have to choose the size of our environment. VMware covers all environments, you can use the drop-down menu to pick the one which fits your environment.
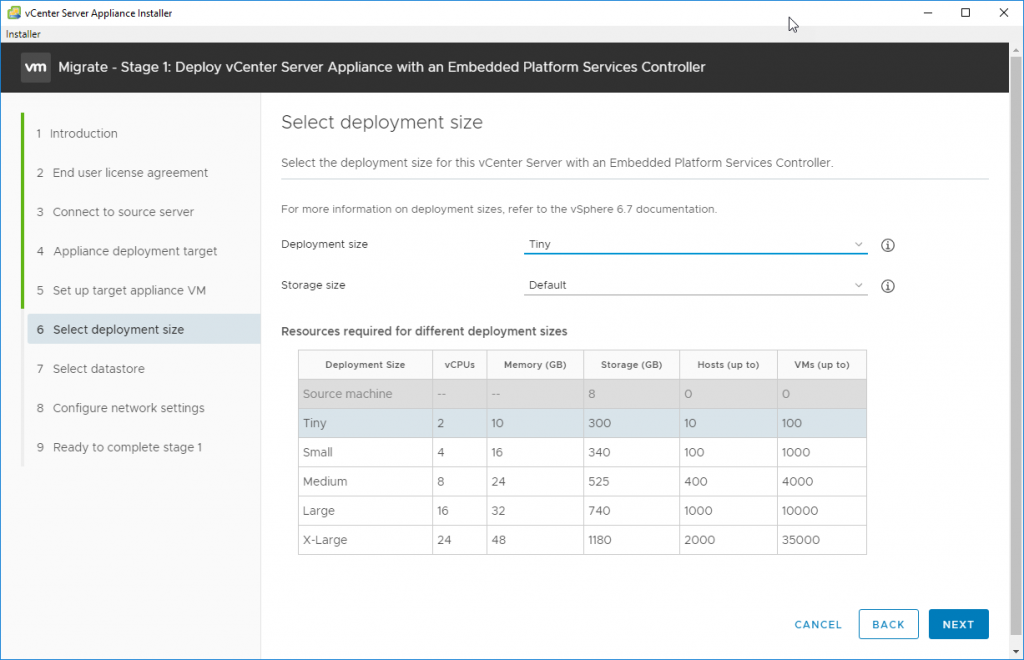
Select the Deployment Size
After, on the next page, you’ll need to pick storage where the VM will be created and stored. You have the possibility to use thin disks to save disk space.
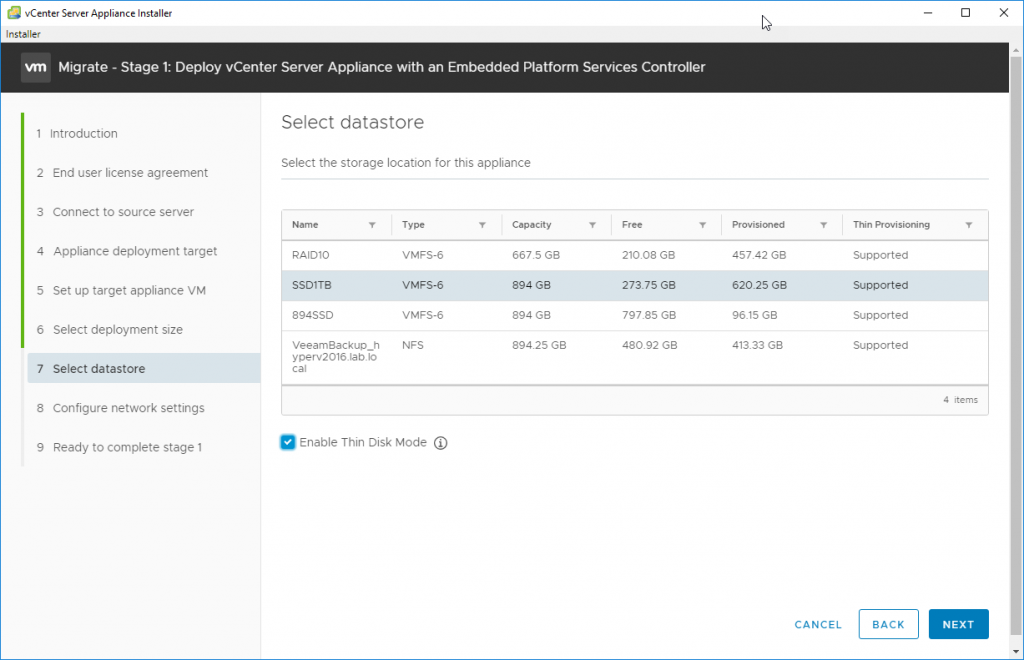
Select Datastore
On the next screen, choose network settings.
Note that those settings are not the final settings as the final network settings will be copied from the original vCenter server.
Like this, the migration will be completely transparent to the network and no other reconfiguration of your satellite products is necessary (this can be backup/monitoring software etc).
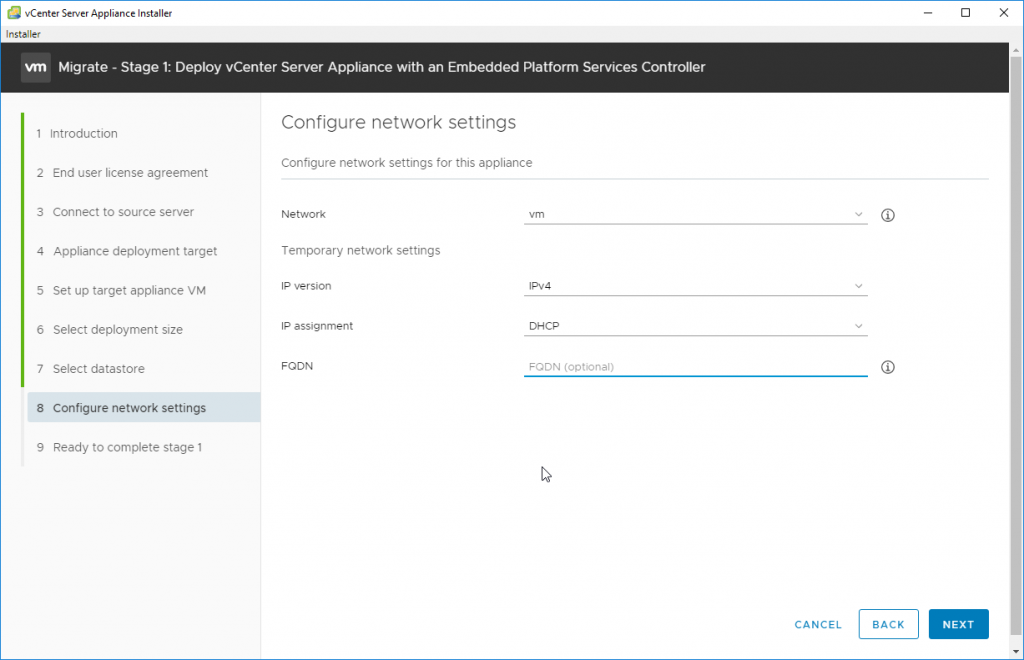
Configure Network Settings
The first phase will start where a new clean VCSA is deployed and started.
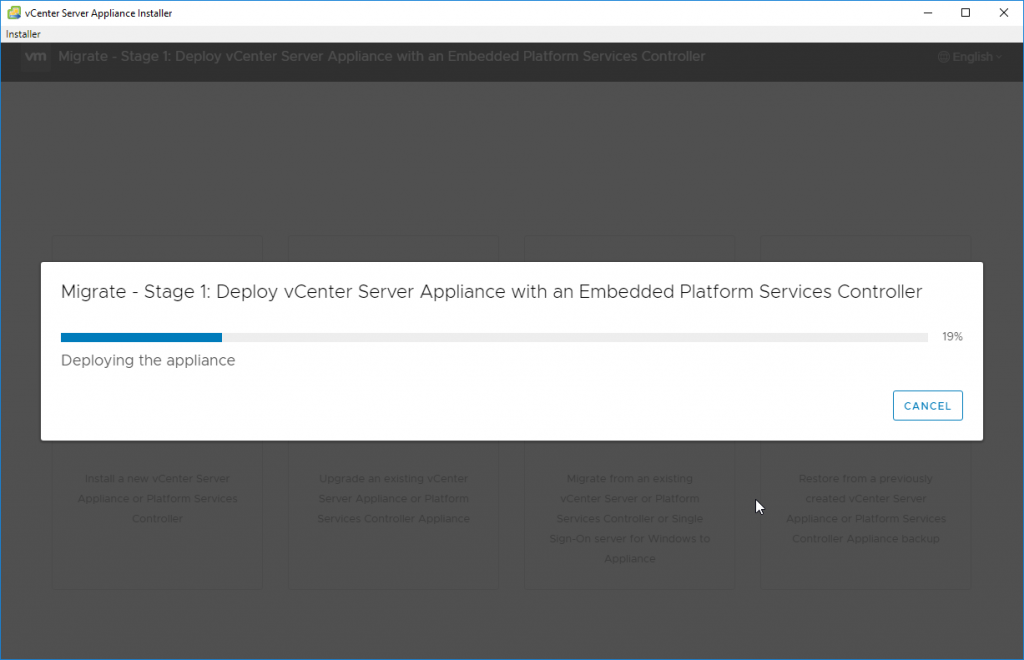
Migrate Stage One
After the first phase is done, the second phase will copy over all the necessary data from your old vCenter server.
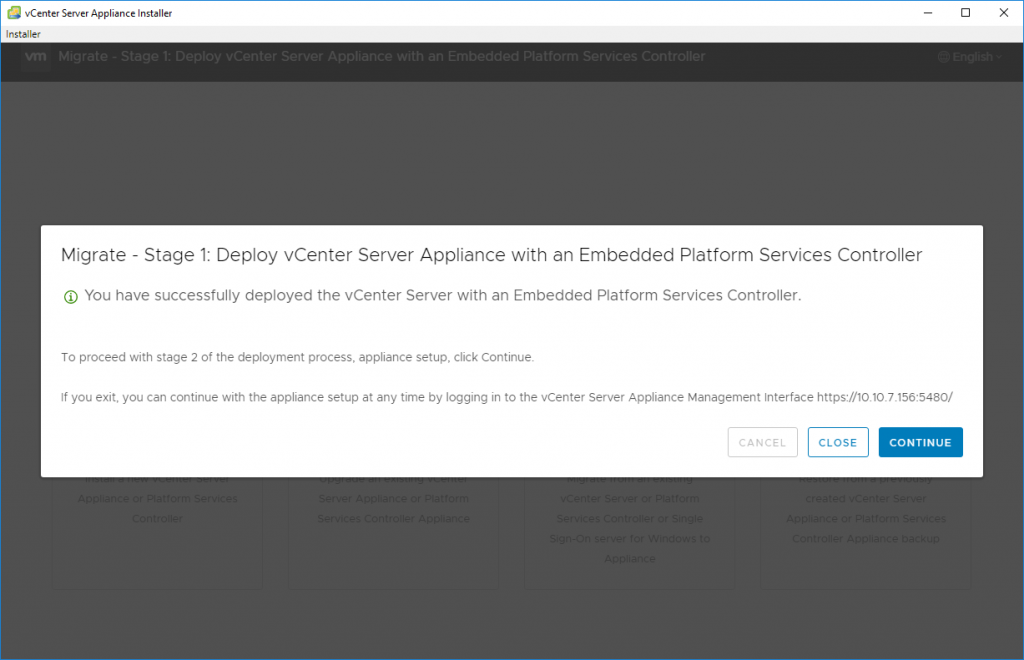
Click continue for configuration
If your vCenter on Windows is part of Microsoft Active Directory, you’ll have to specify your Microsoft Active Directory (AD) domain, administrator user name, and password.
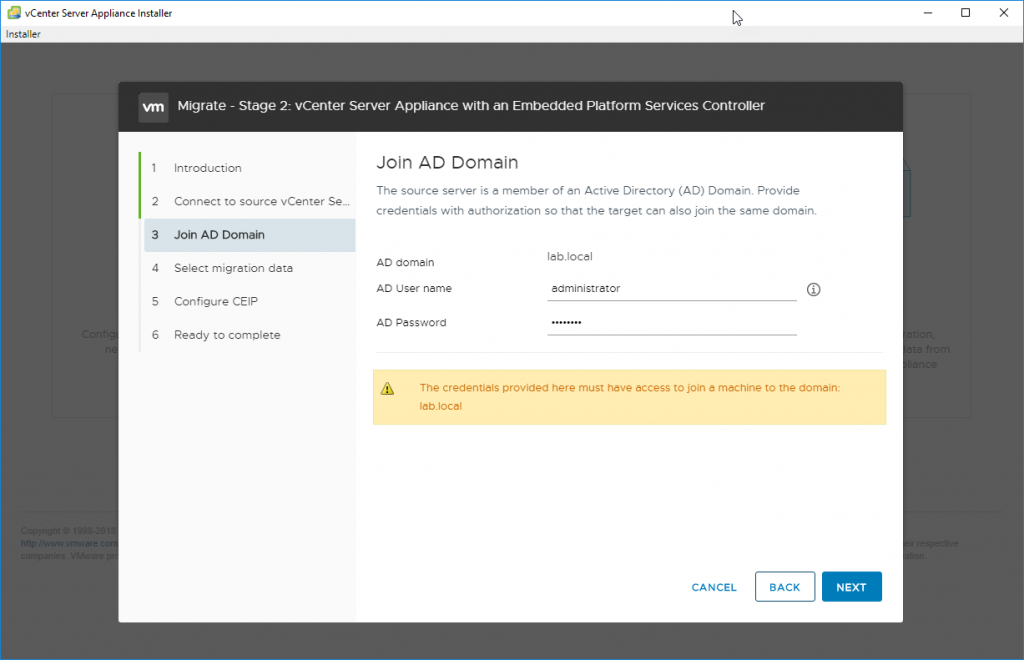
You are asked to join Microsoft Active Directory
And you can also select what you want to copy to the VCSA. There might be old data you do not want to copy or you do not care to copy.
It will also speed up the migration process.

Choose what you want to migrate
The final recapitulation screen shows all the parameters we have just entered.
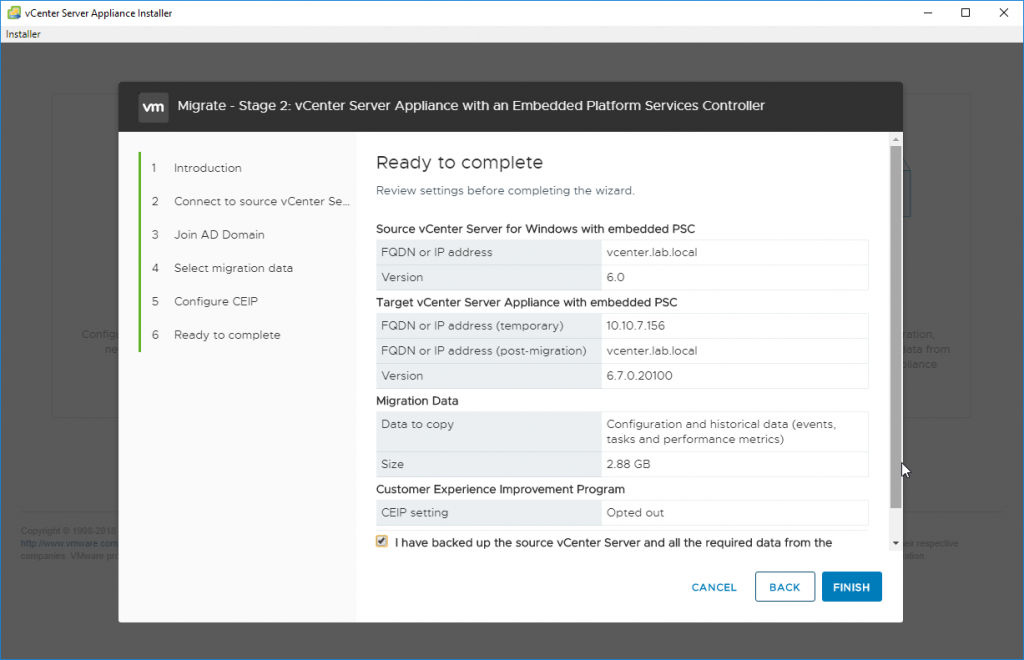
Make sure you backed up your original vCenter Server
You’ll receive a warning that the original vCenter server will be shut down after the copy is finished. In case if you cannot migrate during business hours, this allows you to prepare those steps ahead and do the final step when you have time.
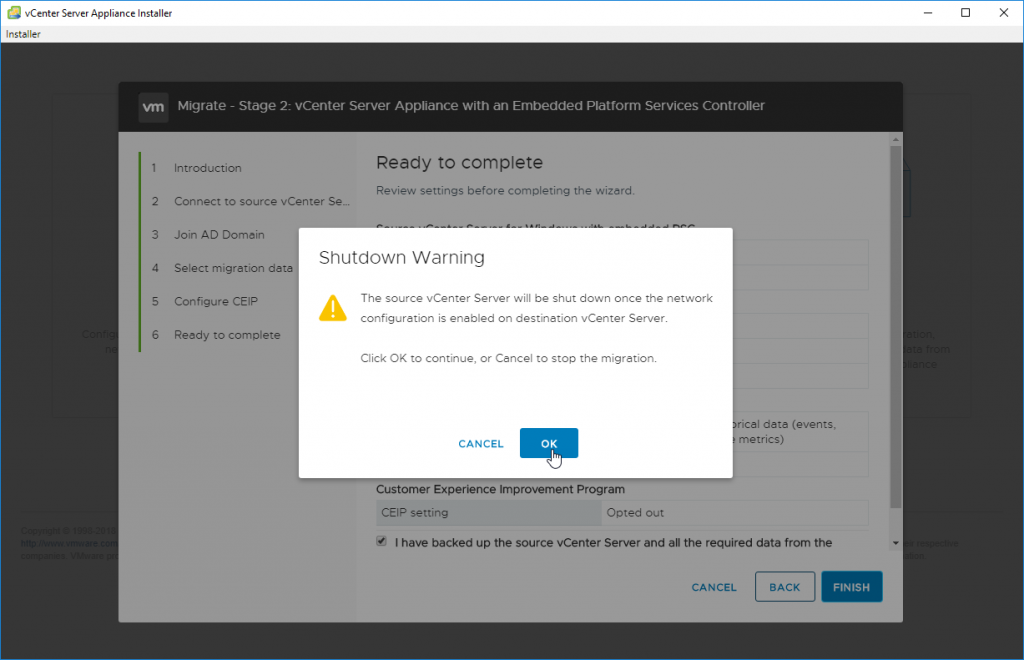
The original VM will be shut down during the migration
If you click OK, you can also have a look at the Windows vCenter server VM where in the background, you’ll see some copy operations going along other migrations steps.
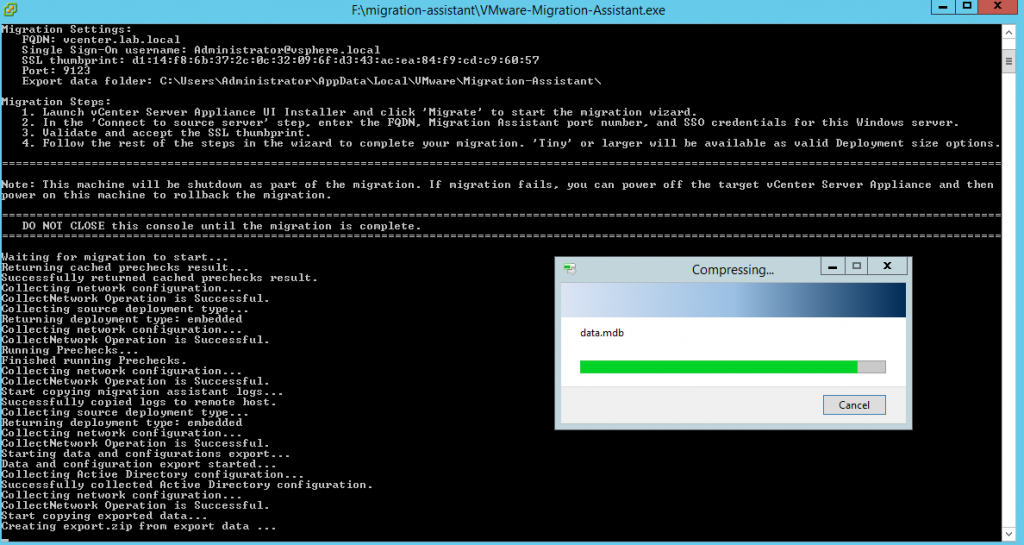
During this time the original vCenter with migration assistant helps during the process of migration
And the final screen should show no errors and successful migration.
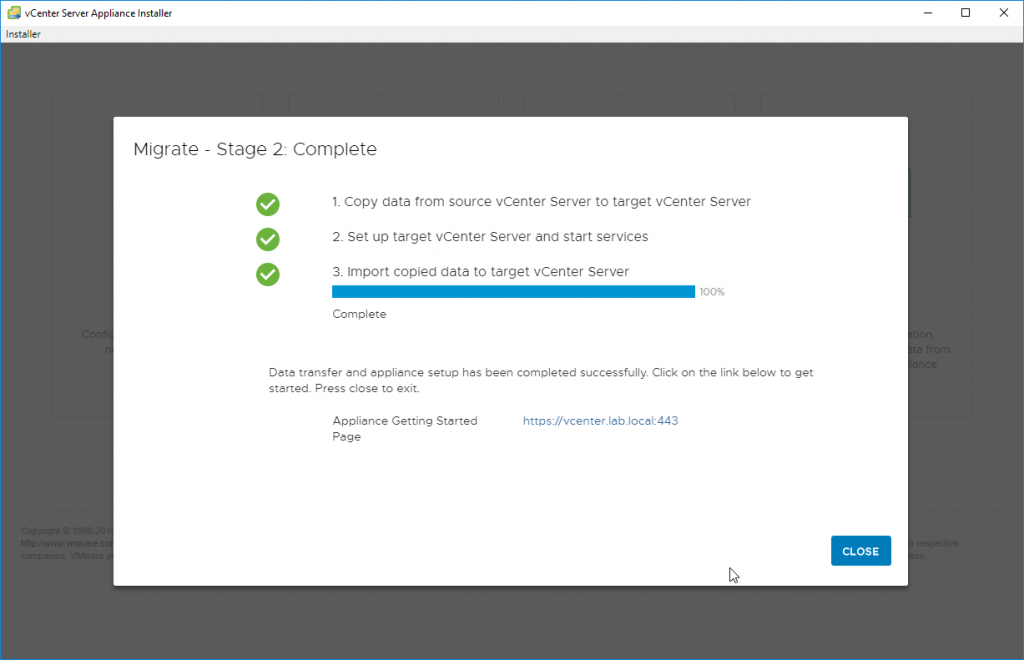
Migration complete
After clicking the Close button, you’re automatically redirected to the connection page where you (still) can connect via the vSphere Web Client (Flex) or choose the new and modern HTML 5 web-based client.
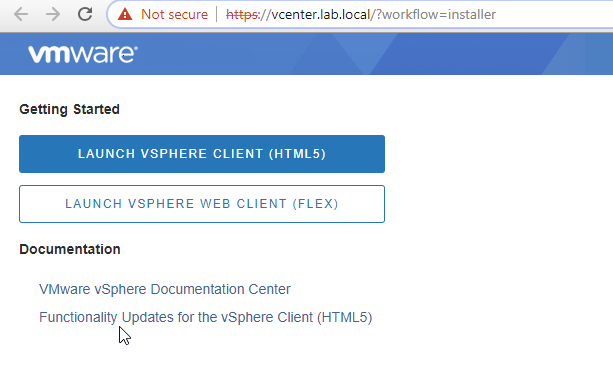
Connection after migration
And you’re now connected to VCSA, where vCenter has a nice web-based user interface.
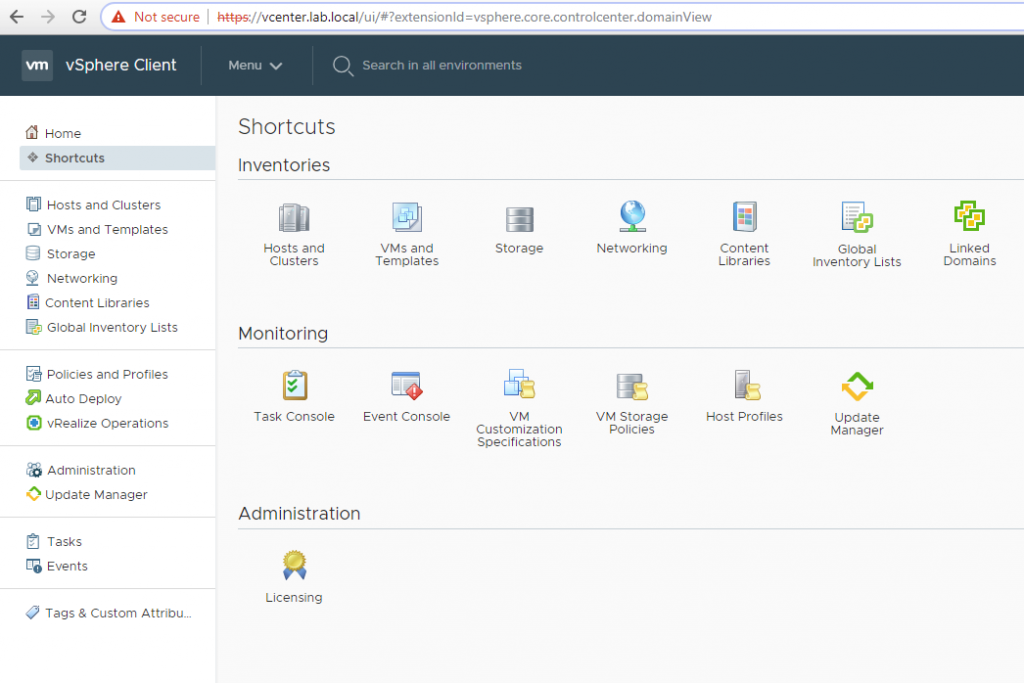
Migration complete and the New HTML 5 Web User Interface
Final Words
VMware has done a good job by creating this migration assistant with its workload. It really simplifies the migration to VCSA. If you’re still running your vCenter server on Windows, you do not have to worry about the migration. It is pretty easy.
You should know that the next big release of VMware vSphere will not be available on Windows any longer. VMware is clearly stepping out of the dependency on Windows and privileges the VCSA.
While in the past, the VCSA did not have features parity, the VCSA 6.7 U1 has even more features than Windows-based vCenter server.


