- Full Guide: Migrate Windows/Mac OS from Slow HDD to Fast SSD Drives
- Necessary to migrate OS from HDD to SSD
- How to Move OS to SSD drive?
- Part 1. Getting everything prepared
- Part 2. Start the process
- Part 3. You’re almost finished…
- Free OS Migration Software: Migrate OS to SSD without Reinstallation
- Two ways to migrate OS to SSD/HDD for free
- 1. Migrate OS with Windows built-in tool
- 2. Migrate OS with the free OS migration tool
- Verdict
- Переносим данные на SSD-накопители
Full Guide: Migrate Windows/Mac OS from Slow HDD to Fast SSD Drives
Want to speed up your Windows/Mac computer and enjoy better performance? You can start a fresh installation onto SSD drive or directly migrate OS to SSD drive.

By Emily  / Last Updated March 1, 2019
Necessary to migrate OS from HDD to SSD
In today’s era, most desktops, laptops and other computer devices come with traditional Hard Disk Drive (HDD) which are kind of outdated and slow. Meanwhile, along with more applications, programs, files being downloaded and stored on the Hard Disk Drive, the computer’s running and responding speed will be affected significantly.
When the slow computer does not support some basic operations like surfing, emailing, media consumption, many users are more likely to upgrade either RAM or HDD, or upgrade both of them. But in fact, RAM is not the actual cause for computer running slowly, so this won’t make much visible difference. Instead, it is the (HDD) with slow spindle speed (around 5400 revolutions per minute) that leads to the slowness of computing devices.
Therefore, upgrading the old, slow HDD to a new and extremely fast Solid State Drive (SSD) is the most recommended way to speed up an old computer. Since SSD is much faster in reading and writing data than HDD, you can enjoy a speedy boot process and the applications/Webpage will load very quickly (for more difference between SSD and HDD, refer to “SSD vs HDD: Which One is Better for You to Select?”). A big day and night difference!!
How to Move OS to SSD drive?
To migrate OS to SSD drive or another HDD, you can perform a clean reinstallation, which always requires an operating system installation disc. Moreover, all your precious data on the original system drive will be erased, so you need to set up OS, download and install some programs again. Quite time-consuming and troublesome! Luckily, there is another better choice: directly migrate OS from HDD to SSD drive, which will directly transfer all data (original OS, programs, applications) on the system drive/partition to another SSD/HDD.
But the real problem is how to realize such OS migration from HDD to SSD drive? here comes this tutorial to help you.
Part 1. Getting everything prepared
Basically, you will have to prepare something for this OS migration to work. Here is what we recommend:
> A good-condition SSD drive. Its free space should be large enough to store all data on your original system drive. If not, you can try to delete unnecessary files from your current SSD drive to free up more disk space.
> Make a data backup. It is never a good idea, at any time, to start messing around with your hard drive without a backup. To avoid data loss during the migration, please make a full backup of your important data before starting.
> OS migration tools. For moving Windows operating system, you can try AOMEI Partition Assistant. For transferring Mac operating system, SuperDuper is a good choice.
Part 2. Start the process
>> First of all, we will show you how to migrate Windows OS from HDD to SSD drive via AOMEI Partition Assistant.
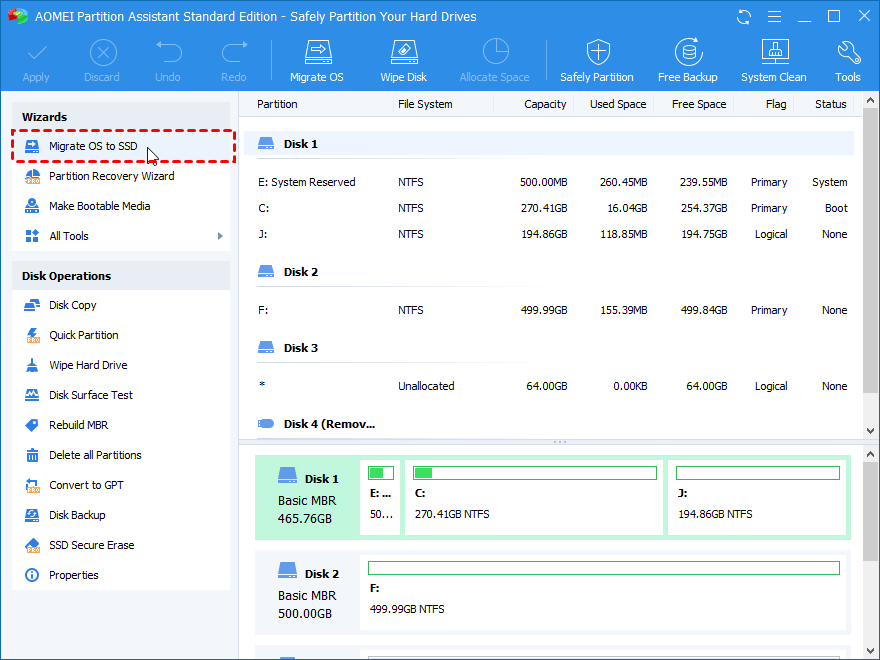
Step 1. Double click AOMEI Partition Assistant icon and open it. In its main interface, you can get all disk/partition information. Click “Migrate OS to SSD” under “Wizard” column.

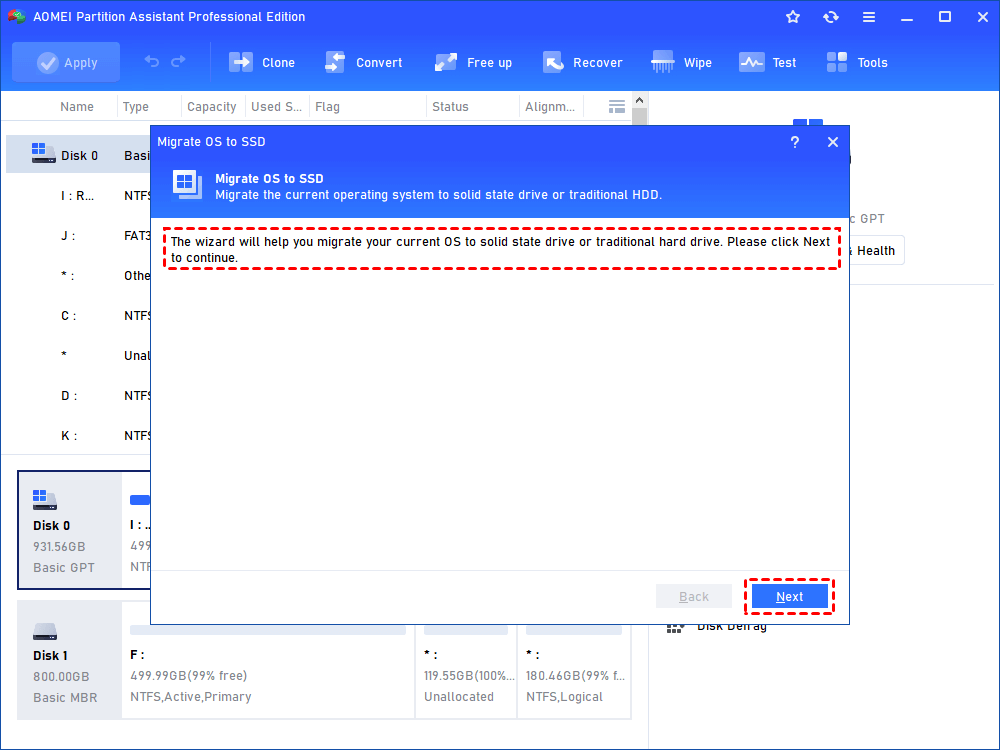
Step 2. Then you will receive a note about this operation, you can click “Next” to continue.
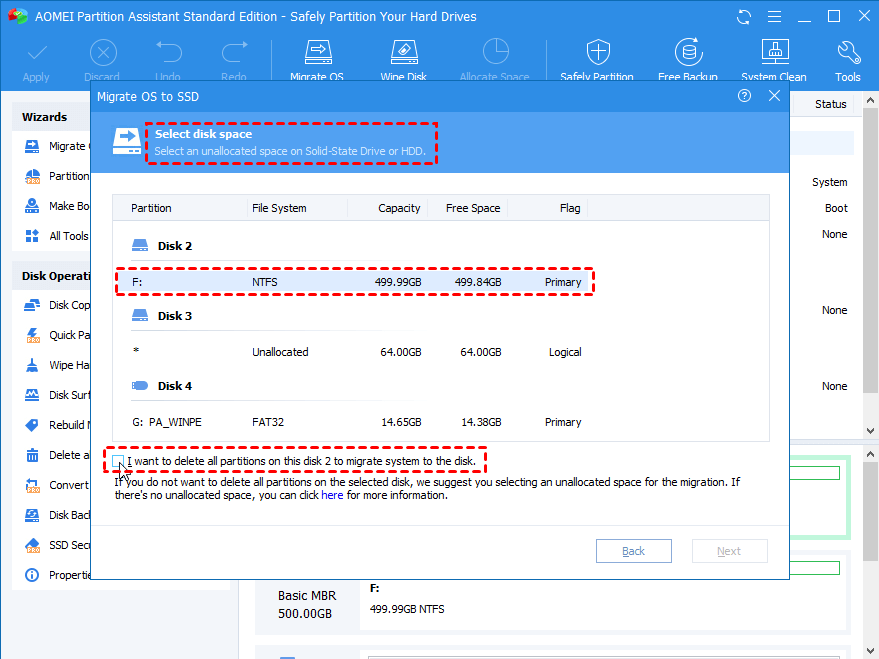
Step 3. In this window, you need to choose an unallocated space on Solid State Drive or HDD. Only when the unallocated space is selected, then the “Next” button is clickable, or it will grey out. So if it is without unallocated space, you need to first create unallocated space.

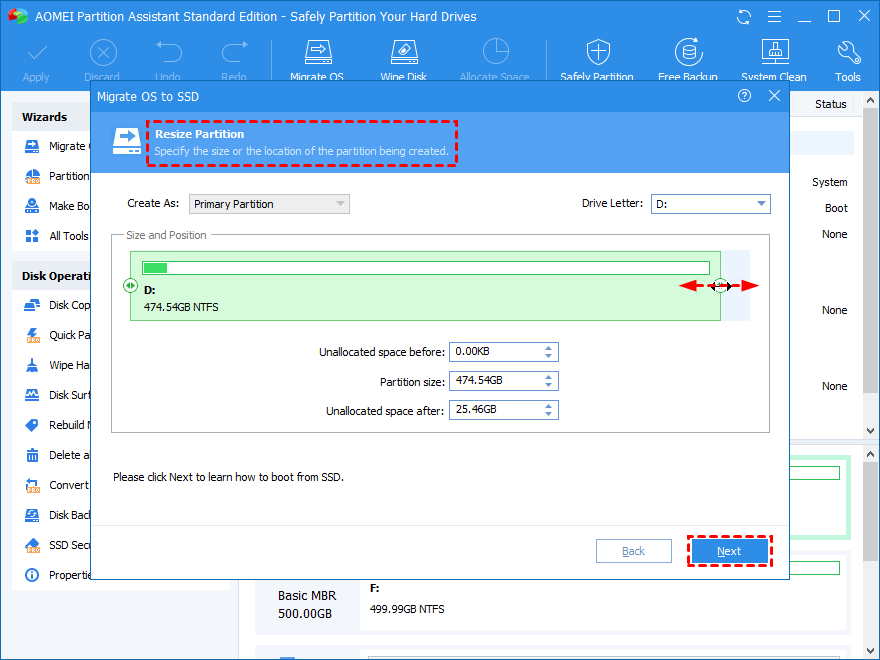
Step 4. Here, you can resize partition and decide the location of this (system) partition being created. Then hit on “Next”.

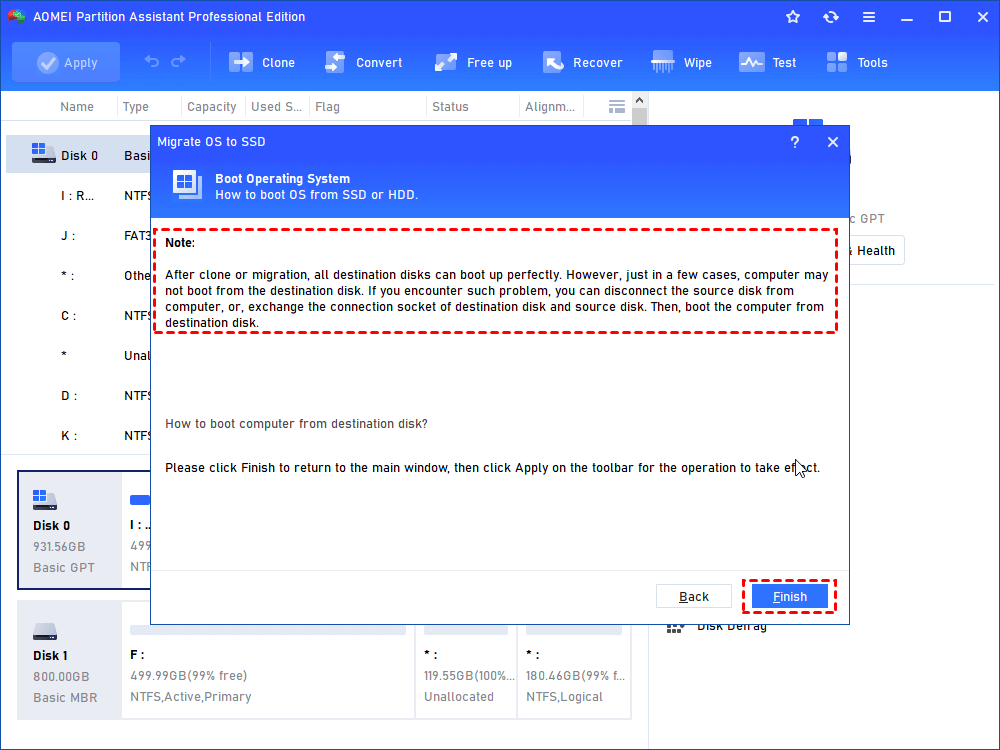
Step 5. Then, a brief note will appear, teaching you how to deal with possible Windows failing to boot problem after migration.
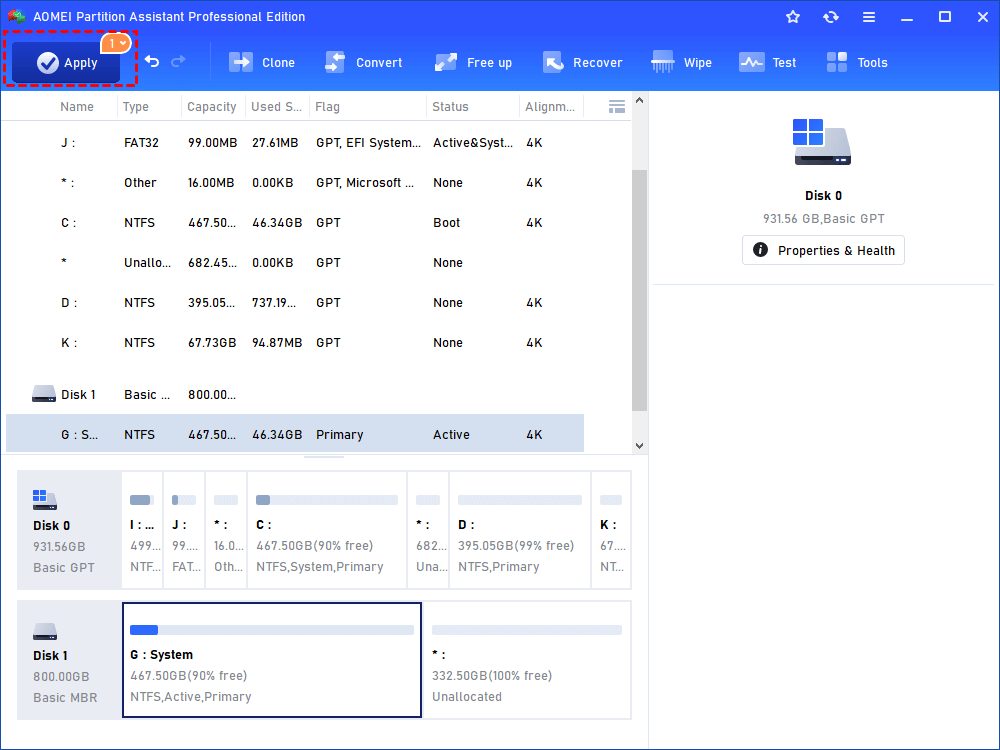
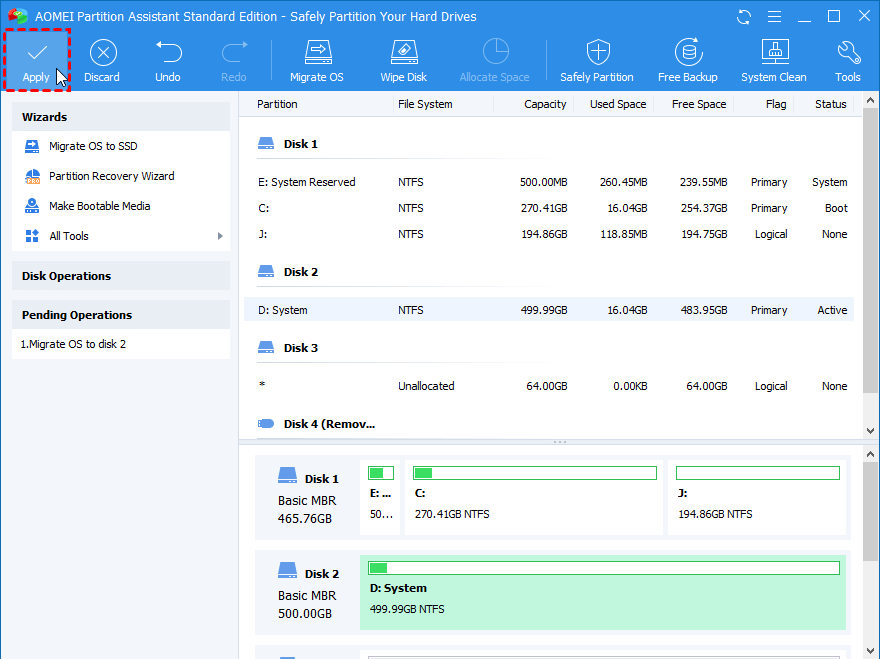
Step 6. Now, you will return to the main window now, click “Apply” on the top left and then “Proceed” to make this OS migration operation to take effect.
To move Windows Server, try its Server edition.
>> In order to migrate Mac OS to SSD, you will need to connect your SSD drive to Mac computer and take the following steps to get this job done.
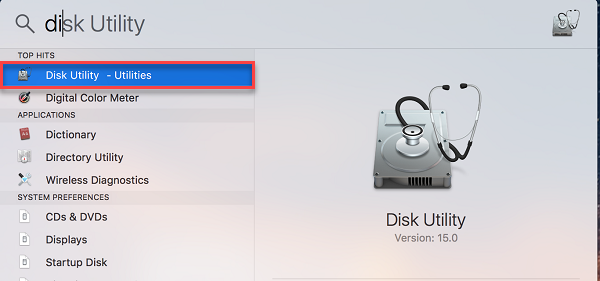
Step 1. Access “Disk Utility” (Apple’s own free software) on Mac computer: Click on the “Spotlight” icon on the menu bar. Type “Disk Utility” in the search field. Then double-click on “Disk Utility – Utilities”.
Step 2. Choose the connected SSD. Generally, it will be listed in the sidebar to the left under “External”. And click “Erase” option to erase SSD drive.
Step 3. Now, you can go to “https://www.shirt-pocket.com/SuperDuper/SuperDuperDescription.html”. Click “Download” on the right side of the webpage to download it onto your Mac computer.
Step 4. Install and launch SuperDuper. Usually, Super Duper will open automatically as long as the installation is finished. If not, you can open it manually in the “Applications” folder in the Finder.
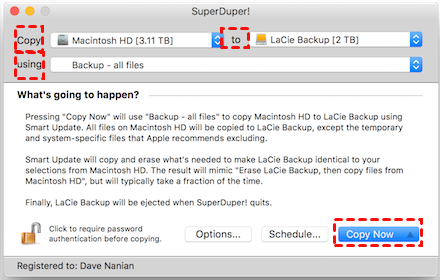
Step 5. Select your Mac current operating system hard drive under “Copy” column, select the target SSD drive under “To” column and select “Back up-all files” in the “using” column. When everything is done, click “Copy Now”.
Step 6. Then, you will need to type your user password to allow the disk copying.
Step 7. Click “Copy” to confirm that you want to clone the Mac hard drive to SSD. When the process is completed, click “OK”.
Part 3. You’re almost finished…
To make Windows operating system boot from new SSD drive, do as following:
Step 1. Restart your computer and enter “BIOS” setup.
Step 2. Use the arrow keys to go to the BOOT tab. System devices appear in order of priority.
Step 3. To give an SSD drive boot sequence priority over the hard drive, you can move the SSD drive device to the top of the boot sequence list.
Step 4. Save and exit the BIOS setup utility.
To make Mac operating system boot from SSD drive, do as below:
Step 1. Keep both old and new SSD drives connected to your Mac computer;
Step 2. Go to “System Preference” > Click on “Startup Disk” > Select new SSD drive as the new boot drive;
Step 3. Replace the old boot drive with new SSD: Right-click on the old SSD drive in “Finder” > Select “Eject Only Macintosh HD”;
Step 4. Shut down the Mac computer, install new SSD drive to it, and then reboot computer again.
Now, enjoy a faster boot time or apps loading time on your new SSD drive. I sincerely hope this guide help you to migrate OS to SSD successfully.
Источник
Free OS Migration Software: Migrate OS to SSD without Reinstallation
If you want to migrate OS to another hard drive, download the free OS migration software: AOMEI Partition Assistant Standard, which allows you to migrate OS to a new SSD/HDD drive without reinstallation.
By Emily / Last Updated September 26, 2021
Two ways to migrate OS to SSD/HDD for free
If you want to transfer the operating system (OS) to a new hard disk drive (HDD) or solid-state drive (SSD) without reinstalling Windows, you can use the Windows built-in backup and restore tool or third party free OS migration software.
1. Migrate OS with Windows built-in tool
If you want to migrate OS without third-party tool, you can create a system backup and then restore it to the new hard drive or SSD. In Windows 11,В 10 or Windows 7, you can create an image backup including all critical volumes. If you are using Windows 8 or 8.1, you can still create a system image.
However, before you do, you need to confirm the following:
1. The destination drive must be equal or large to the hard drive that you backed up.
2. Only NTFS formatted volumes can be protected. You may need to format or convert partition to NTFS file system.
3. The destination drive must have the same partition style (MBR or GPT) as the source drive.
2. Migrate OS with the free OS migration tool
If the first way is a little bit complicated for you, you can move the operating system to another SSD or HDD drive using a third-party free OS migration tool like AOMEI Partition Assistant Standard. This freeware comes withВ «Migrate OS to SSD Wizard», enabling you to migrate operating system and all applications in the boot partition (usually the C: drive) to another drive so that you don’t have to spend lots of time on reinstallation. Now, free download it and see the detailed steps:
Step 1. Connect the SSD to your computer; install and run AOMEI Partition Assistant Standard; then, click Migrate OS to SSD and read the information.
Step 2. Choose an unallocated space on your target SSD.
Step 3. Here you can adjust the partition on the destination disk. Then, keep the Note in mind.
Step 4. Click Apply and Proceed to commit operation.
After transferring OS and booting computer from the destination SSD successfully, you can format the old C drive on the source disk to free up the disk space.
Verdict
AOMEI Partition Assistant Standard runs well with Windows platforms, including Window 11/10/8.1/8/7, XP and Vista. If you want to transfer all content on your current hard drive, you can employ its «Disk Copy Wizard»В to clone the entire disk. To migrate Windows Server 2019/2016/2012/2008/2003 OS to another hard drive, you can use the Server edition.В
Источник
Переносим данные на SSD-накопители
Число различных устройств хранения данных постоянно растет. На рынке их появляется все больше. Самая современная тенденция, или, лучше сказать, технология – использование твердотельных накопителей (SSD). SSD, как принято считать, – наилучшее решение для таких операций с данными, где необходима высокая производительность, например, работа операционных систем или приложений. Здесь мы попробуем рассказать о нескольких способах перемещения ОС и данных на SSD.

Твердотельный накопитель (SSD), как вы уже, наверное, слышали, электронное устройство хранения данных, в котором отсутствуют движущиеся части – их заменяют специальные микрочипы флэш-памяти.По сути, это большая флэш-карта. Накопитель также обеспечивает простой доступ к данным благодаря поддержке стандартного интерфейса SATA, который используется для подключения жестких дисков на всех современных материнских платах и внешних адаптерах. Таким образом, для любой системной платы, BIOS или внешнего контроллера SSD ничем не отличается от стандартного устройства хранения данных и, соответственно, его вполне можно использовать вместо обычного винчестера.
Существует несколько видов SSD, в которых для хранения данных используются разные типы микрочипов флэш-памяти. Также SSD отличаются физическими размерами и, что более важно, емкостью и, конечно, ценой. Цены на SSD постоянно падают благодаря снижению стоимости флэш-памяти, но твердотельные накопители все еще стоят значительно дороже обычных жестких дисков.
Несмотря на то, что SSD и жесткие диски внешне выглядят практически одинаково, в их внутреннем устройстве больше различий, чем общих черт. Флэш-память работает быстрее, чем движущиеся диски и магнитные головки традиционных винчестеров. SSD – чемпион по скорости доступа к произвольным данным и быстроте операций чтения, то есть, действия с большим количеством маленьких файлов, расположенных в различных ячейках памяти, SSD всегда выполняет быстрее. Именно это и нужно для ускорения запуска ОС и приложений, таким образом SSD прекрасно подходи для размещения операционной системы, программного обеспечения и хранения важных данных.
Как и все в IT, SSD имеет ряд недостатков, и, соответственно, технологии есть, куда расти. Прежде всего, важно знать об ограниченном сроке службы ячеек памяти. После определенного числа операций перезаписи ячейка просто перестает работать. На сегодняшний день не существует данных о точном количестве операций, после которого SSD окончательно перестанет функционировать; все поставщики устройств гарантируют некоторое количество рабочих часов (или операций). Но эти показатели значительно ниже тех, что предлагают традиционные жесткие диски. Скорее всего, дальнейшие улучшения технологии SSD будут связаны с увеличением срока службы флэш-памяти. Еще одна возможность – увеличение объема памяти в сочетании со снижением цены.
Нет никаких сомнений в том, что твердотельные накопители получат дальнейшее распространение, заменяя традиционные диски в компьютерах, особенно ноутбуках, нетбуках, лэптопах и планшетных ПК. SSD, учитывая все их преимущества, прекрасно подойдут домашним пользователям компьютеров. Если вы уже приобрели твердотельный накопитель, то пора узнать, как перевести на него и систему.
Итак, вы решили скопировать программную среду и данные на SSD с целью повышения производительности системы. Для этого существует несколько способов. Во-первых, вы можете повторно установить все приложения и ОС на новый диск, а затем скопировать все данные. Но это, без сомнения, потребует значительного времени и усилий; не лишним будет некоторый опыт работы с компьютером и знания по предмету, например, нужно иметь представление об особенностях выравнивания разделов, размере кластера файловой системы. Все SSD работают с большими блоками данных — секторами по 4 KБ, и копируемый том должен правильно располагаться относительно границы этого 4 KБ блока, иначе снизится эффективность работы системы и сократится срок службы SSD. Размер кластера файловой системы также важен для выполнения операций с данными и выравнивания.
Во-вторых, вы можете перенести все тома с жесткого диска на SSD с помощью программ копирования данных. Но в этом случае Вам нужно убедиться в том, что это решение выполнит операцию с учетом всех заданных параметров. Но зачем копировать на диск все тома? Лучше скопировать всего один раздел, где находится система и приложения. И даже в этом случае могут возникнуть проблемы, если объем данных в исходном разделе превышает емкость SSD.
И, наконец, существует еще один простой способ миграции системы – решение, специально созданное для решения таких проблем, например, Paragon Migrate OS to SSD.
Используем Migrate OS to SSD
После установки программы ее можно запустить, выбрав в списке программ или щелкнув мышью соответствующий ярлык на рабочем столе, перезагрузка компьютера в этом случае не нужна.
1. В окне приветствия мастера появится информация о наличии данных на втором диске. В соответствии с логикой работы программы, все данные на этом диске будут перезаписаны в результате копирования данных с исходного диска. То есть, если на втором диске имеется важная информация, необходимо сохранить ее где-нибудь еще.
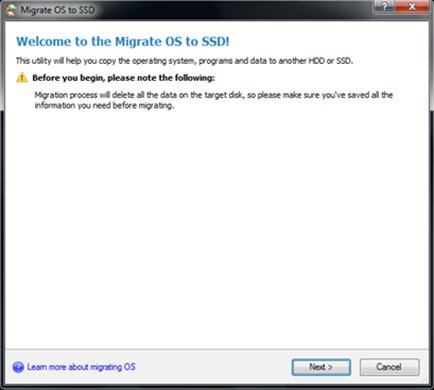
По ссылке в нижнем левом углу можно перейти к окну справки, где вы найдете полезную информацию о программе.
2. Следующим шагом мастера программы будет анализ конфигурации диска компьютера и поиск системных разделов. При успешном завершении операции вам будет предложен сценарий миграции. Если на компьютере установлено более одной операционной системы, программа предложит выбрать ОС для миграции. Если имеется более одного целевого диска, для копирования данных необходимо будет выбрать один из них.
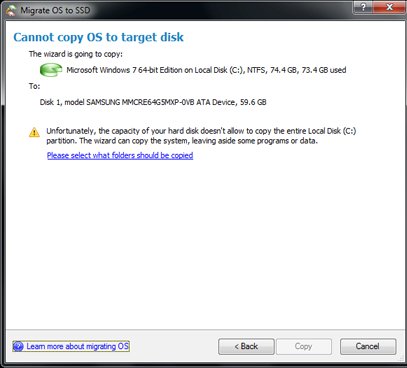
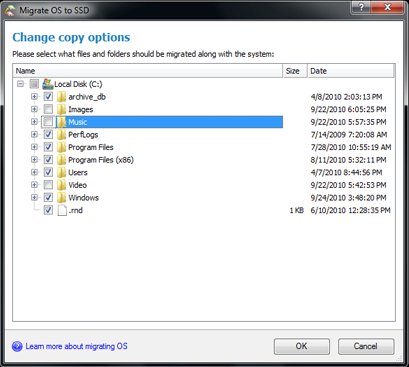
3. Обычно емкость твердотельных накопителей меньше, чем у традиционных дисковых, и если ваш диск заполнен данными, некоторые из них нужно будет исключить из процесса миграции перед началом операции. В дополнительном окне мастера можно указать, какие файлы и папки не будут участвовать в процессе миграции. Эта опция также полезна, если необходимо снизить количество используемого пространства на создаваемом разделе или скопировать систему на диск, объем которого меньше, чем у исходного.
4. После подсчета общего объема исключаемых данных программа будет готова к миграции, нажмите кнопку “Копировать”.

5. После завершения процесса миграции выключите компьютер, отключите исходный диск, установите в BIOS загрузку с нового диска и перезагрузите компьютер.
Как видите, все операции, связанные с изменением размера томов, выравниванием, исключением данных и размером кластера, автоматически выполняются программой. Вам нужно только указать, что и куда копировать.
Уже есть версия Migrate OS to SSD на английском. Русскоязычная версия выйдет этой осенью.
Источник


