- Mikrotik netinstall mac os
- Download the latest RouterOS now!
- RouterOS is the operating system of RouterBOARD
- Try RouterOS now by using our online demo routers
- Installing RouterOS on an x86 machine is very simple
- Virtual environments now have special treatment: CHR
- Learning more about our software
- Purchasing a license for RouterOS
- Netinstall
- Instructions for Windows
- Instructions for Linux
- Etherboot
- Reset button
- RouterOS
- Serial console
- Quick RouterOS script for hurricane electric 6to4 tunnel dynamic updating
- Sonoff, meet powerstrip
- Comments
Mikrotik netinstall mac os
Download the latest RouterOS now!
RouterOS is the operating system of RouterBOARD
It can also be installed on a PC and will turn it into a router with all the necessary features — routing, firewall, bandwidth management, wireless access point, backhaul link, hotspot gateway, VPN server and more.
You can compare the different license Level features on this page in our manual.
Try RouterOS now by using our online demo routers
Connect via SSH or download our graphical application WinBox (latest version). When connecting in either way, use the address demo.mt.lv or demo2.mt.lv. Username is «demo» and there is no password.
You can also open the web configuration interface in your web browser: demo.mt.lv and demo2.mt.lv

Installing RouterOS on an x86 machine is very simple
PC: Download the ISO image, burn it to CD and boot from it. Your new router will run for 24 hours without a license (turn it off to stop the timer). During this time you can try all the features of RouterOS.
Other x86: Netinstall will write RouterOS to any secondary drive you have attached to your Windows PC. Move the drive to your Router PC and boot it.
Both installation methods, plus upgrade files and more — on our download page.

Virtual environments now have special treatment: CHR
CHR, short for Cloud Hosted Router, is a new approach specifically made for Virtual Machines both locally and in the cloud. Optimised drivers, a new and more affordable licensing scheme, transferable licenses and more.
CHR is a special installation image, which is available for free on our download page, or directly in the Amazon AWS marketplace. Read mode in the PDF brochure.

Learning more about our software
RouterOS has extensive documentation and a Forum. Additionally we conduct Training and User Meetings.
Also our technical support team will try to answer your questions, and our trained consultants will help you configure your routers.

Purchasing a license for RouterOS
To use RouterOS after the free trial, a license key is required. You can obtain license keys in the MikroTik Account server. If you don’t have an account yet, click on «New Account» there in the top-right corner of this page.
When purchasing the license, a SoftID number will be asked — this can be copied from the router’s License menu.
To view license key level differences, see the comparison table.
Источник
Netinstall
Netinstall is a tool for installing and reinstalling MikroTik devices running RouterOS. Always try using Netinstall if you suspect that your device is not working properly. The tool is available for Windows (with a graphical interface) and for Linux (as a command line tool).
In short, the Netinstall procedure goes like this: Connect your PC directly to the boot port (Usually Ether1, the port labeled BOOT or as otherwise indicated in the product manual) of the device you will be reinstalling. Turn on the device while holding the reset button until it shows up in the Netinstall tool.
Careful. Netinstall re-formats the system’s drive, all configuration and saved files will be lost. Netinstall does not erase the RouterOS license key, nor does it reset RouterBOOT related settings, for example, CPU frequency is not changed after reinstalling the device.
Instructions for Windows
- Download Netinstall from the downloads page. If you are not sure which version you need, then you can always select the version that is marked as Current (stable);
Download the RouterOS Main package from the downloads page;
You must choose a RouterOS version. You can always select the version that is marked as Current . You must also select the architecture (ARM, MIPS, SMIPS, TILE, etc. ), but if you are not sure, then you can download the RouterOS package for ALL architectures, Netinstall will choose the right architecture for you.
Disconnect your computer from WiFi, Ethernet, LTE, or any other type of connection! Netinstall will only work on one active interface on your computer, it is highly recommended that you disconnect any other network interfaces in order to be sure that Netinstall will select the right network interface.
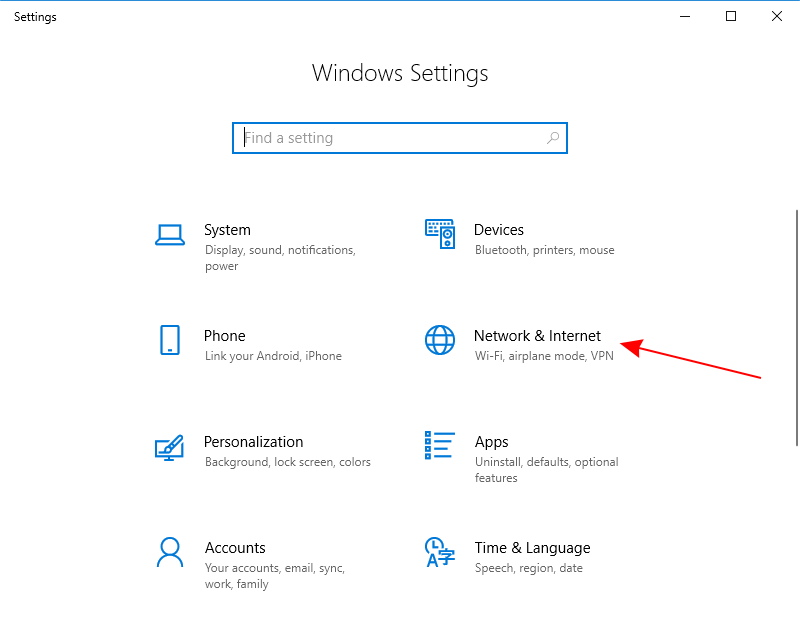
Configure a static IP address for your Ethernet interface, open Start, and select Settings :

Netinstall can run also on a local network, in such case you could skip setting a static IP address, but it is highly recommended that you set a static IP address if you are not familiar with Netinstall.
- Open Network & Internet and select Change adapter options

- Right-click on your Ethernet interface and select Properties
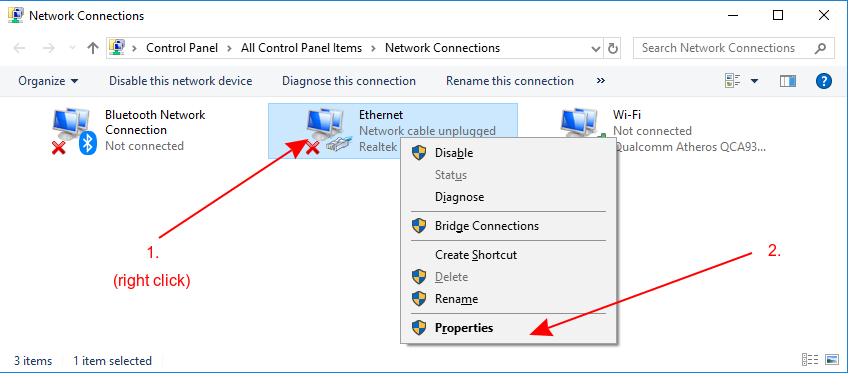
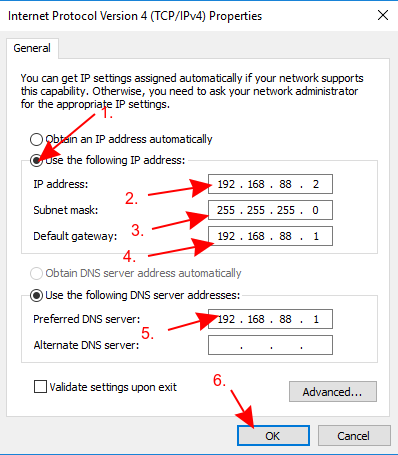
- Select Internet Protocol Version 4 (TCP/IPv4) and click Properties

- Check Use the following IP address and fill out the fields as shown in the image below
If you have a working router, then you can use it and skip the setting up a static IP part of this tutorial, but it requires you to know your LAN address since you will need to specify an unused IP address in your network for the network boot server. For this reason it is recommended to apply a static IP address and follow this guide precisely, if you are not sure how to get these parameters out of your network.
- Open your Downloads folder (or wherever you saved the downloaded files) and extract the Netinstall .zip file to a convenient place
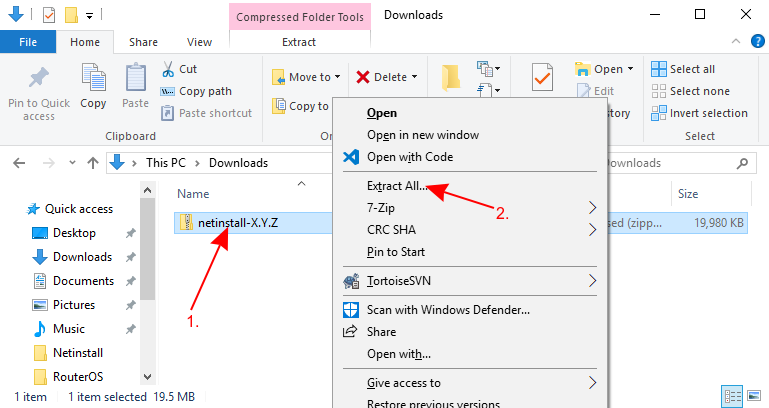

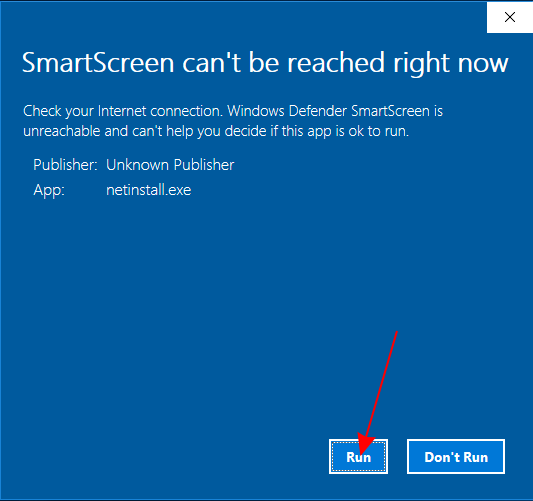
Run Netinstall.exe. If you followed the guide precisely, then you should not have any Internet connection on your computer, Windows 10 wants to verify all apps that it runs, but will not be able to do it since lack of the Internet connection, for this reason, a warning might pop up, you should click Run.
Netinstall requires administrator rights, there should be a window asking for permissions to run Netinstall, you must accept these permissions in order for Netinstall to work properly.
- Allow access for Netinstall in Public networks and configure Net booting settings and fill out the required fields as shown in the image below


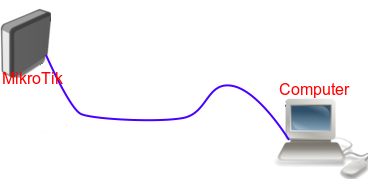
- Connect your device to your computer using an ethernet cable directly (without any other devices in-between), plug the Ethernet cable into your device’s Etherboot port.
- MikroTik devices are able to use Netinstall from their first port (Ether1), or from the port marked with «BOOT«.
Some computers have a network interface (especially USB Ethernet adapters) that tend to create an extra link flap, which is enough for Netinstall to fail to detect a device that is in Etherboot mode. In such a case you can use a switch between your device and your computer or a router in bridge mode to prevent this issue.
- Power up your device and put it into e therboot mode
There are multiple ways how to put your device into Etherboot mode. Make sure you read the Etherboot manual before trying to put the device into this mode. Methods vary between different MikroTik devices.
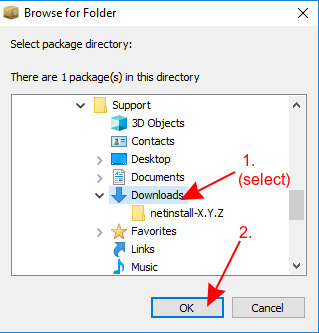
- Wait for the device to show up in Netinstall, select it and press Browse. Navigate to your Downloads folder (or wherever you saved your RouterOS packages) and press OK
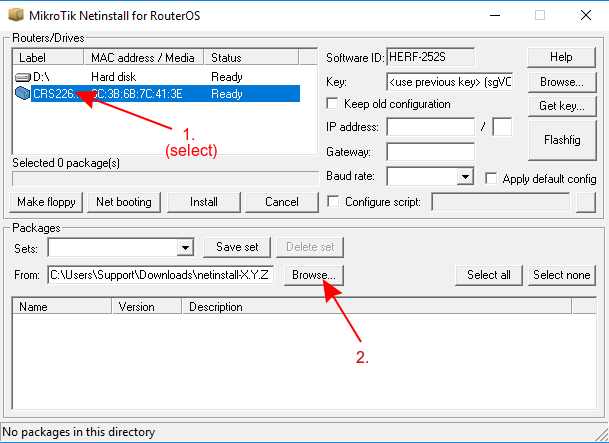
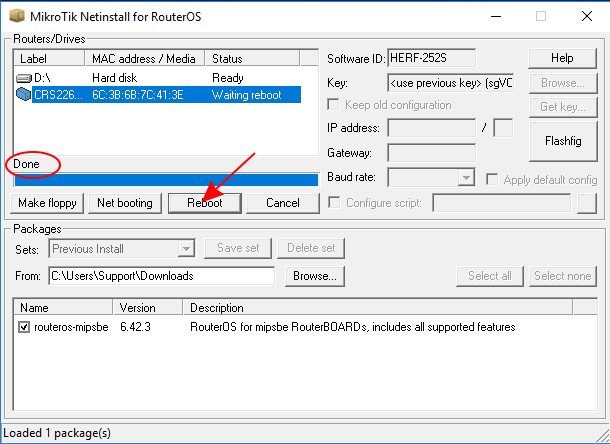
- Select your desired RouterOS version and press Install. Wait for the installation to finish and press «Reboot» (Devices without serial console have to be rebooted manually)
If you downloaded RouterOS packages for multiple architectures, then Netinstall will only show the appropriate architecture packages for your device after you have selected it. All unsupported packages will not show up in this window after you have selected a device.

If the installation does not start (progress bar is not moving or no status is shown), then you can try closing the Netinstall application and opening it up again or try to put the device into Etherboot mode again. If you are still unable to get Netinstall working, then you should try using it on a different computer since there might be an operating system’s issue that is preventing Netinstall from working properly.
- You are done! Remove the device from power, remove the Ethernet cable, place the device back in your network and your device should be running properly now!
After using Netinstall the device will be reset to defaults (unless you specified not to apply default configuration). Some devices are not accessible through ether1 port with the default configuration for security reasons. Read more about Default configuration .
When using the Configure script option, it is suggested to introduce a delay before configuration execution.
Instructions for Linux
The Linux version is a command line tool, which offers nearly the same parameters as the Windows counterpart.
Download the tool from our download page (links not literal):
The available parameters are as follows:
| Parameter | Meaning |
|---|---|
| -r | resets the configuration upon reinstallation procedure, optional |
| -k keyfile | provides the device with a license key (key file in .KEY format), optional |
| -s userscript | preconfigures the device with the provided configuration (text file in .RSC format), optional |
| uses a specific IP address that the Netinstall server will assign to the device, mandatory | |
| PACKAGE | specify a list of RouterOS.NPK format packages that Netinstall will try to install on the device, mandatory |
Etherboot
Etherboot mode is a special state for a MikroTik device that allows you to reinstall your device using Netinstall . There are several ways to put your device into Etherboot mode depending on the device you are using.
Reset button
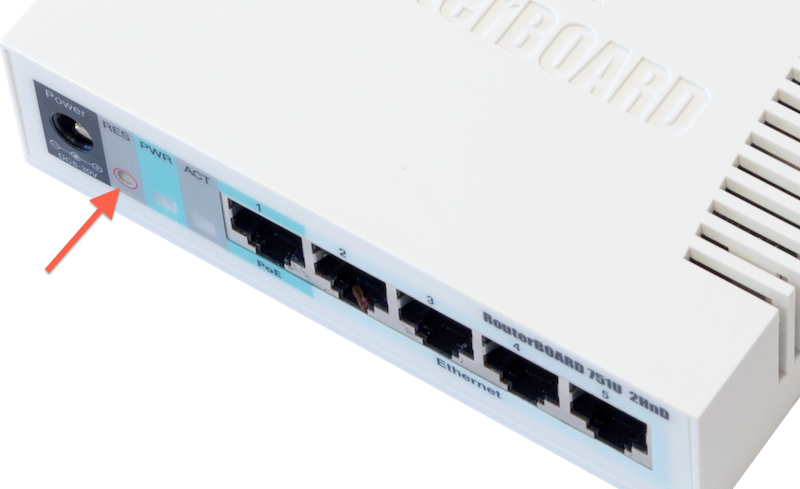
The Reset can be found on all MikroTik devices, this button can be used to put the device into Etherboot mode. An easy way to put a device into Etherboot mode using the Reset button is by powering off the device, hold the Reset button, power on the device while holding the Reset button and keep holding it until the device shows up in your Netinstalll window.
If you have set up a Protected bootloader , then the reset button’s behavior is changed. Make sure you remember the settings you used to set up the Protected bootloader, otherwise you will not be able to use Eterboot mode and will not be able to reset your device.
RouterOS
If your device is able to boot up and you are able to log in, then you can easily put the device into Etherboot mode. To do so, just connect to your device and execute the following command:
After that either reboot the device or do a power cycle on the device. Next time the device will boot up, then it will first try going into Etherboot mode. Note that after the first boot up, the device will not try going into Etherboot mode and will boot directly of NAND or of the storage type the device is using.
Serial console
Some devices come with a serial console that can be used to put the device into Etherboot mode. To do so, make sure you configure your computer’s serial console. The required parameters for all MikroTik devices (except for RouterBOARD 230 series) are as following:
For RouterBOARD 230 series devices the parameters are as following:
Make sure you are using a proper null modem cable, you can find the proper pinout here. When the device is booting up, keep pressing CTRL+E on your keyboard until the device shows that it is trying bootp protocol:
At this point your device is in Etherboot mode, now the device should show up in your Netinstall window.
Источник
I recently ‘bricked’ my Mikrotik HAP AC Lite router – the router didn’t have enough room on its flash memory to install an update, but – in an unexpected turn of events – tried to apply the firmware update anyway, and became un-bootable.
Fortunately, Mikrotik supply a bit of software (‘Netinstall’) which is able to re-flash the devices using BOOTP, but this software won’t run in Wine (it requires root to bind to the low BOOTP port, yada yada).
For Mac users, this means it’s really only possible to run it in a VM (in my case, in Windows 8.1, in Virtualbox on Mac OS 10.11 El Cap). Since this added a few additional layers of very un-wanted hassle at a quite stressful time, I thought I would leave some hints here – tips and screenshots below. Happy flashing!
- This took me some head-scratching before I remembered: make sure you disable Windows’ built-in firewall/s, for private and public networks – nothing worked until I did this.
- In Mac OS, you’ll need to set your ethernet interface to a workable IP address and subnet mask, eg 10.1.1.6/24. (It’s fine to leave it to auto-negotiate speed, though.)
- Similarly, in Windows, you’ll need to set a different IP address (eg. 10.1.1.5) in the same subnet, with the same subnet mask and a gateway.
- In Virtualbox, you’ll need to set your virtual network interface to bridge with your physical ethernet adapter, with promiscuous mode set to ‘allow all’
- Finally, in Netinstall, you’ll need to set a different IP address again (eg. 10.1.1.4).
- After booting your device with the reset button held down, release it only once the ‘ACT’ LED stops flashing, then wait for it to appear as a device in Netinstall.
- Once you click ‘install’, it will appear to freeze on ‘formatting disk’ for some time. Mine took a couple of minutes to format 16MiB or so of flash.


Quick RouterOS script for hurricane electric 6to4 tunnel dynamic updating
If your ISP doesn’t offer IPv6 you may have set up an IPv6 6to4 tunnel using Hurricane Electric’s free ‘tunnelbroker.net’ service. To operate the tunnel, tunnelbroker.net requires that you configure an IPv4 . Read more
Sonoff, meet powerstrip
I recently became super fascinated with ESP8266 hardware, and it wasn’t long before I also found out about and ordered a couple of ESP8266-based Sonoff AC switches to play with (immediately flashing them . Read more
Comments
Excellent – very helpful – thank you for posting. Worked well on a WAP Ac too
Источник


