- Minecraft Bedrock Edition – Ubuntu Dedicated Server Guide
- Features
- Requirements
- Recommended Gear
- Game Editions
- Recommended Storage (Solid State Drive)
- Computer / CPU / Memory
- Operating System
- Installation
- First Run
- Start, Stop and Restart Server
- Automatic Backups
- Installing Resource Packs / RTX Support
- Scheduled Daily Reboots
- Reconfigure / Update Scripts
- Port Forwarding
- Wired vs. Wireless
- Benchmarking / Testing Storage
- Conclusion
- Other Resources
- Minecraft bedrock server linux
Minecraft Bedrock Edition – Ubuntu Dedicated Server Guide
Minecraft Bedrock Edition is the version of Minecraft that powers the iPhone / Android versions (formerly Minecraft Pocket Edition), the Xbox / PlayStation / Nintendo Switch editions and the free Windows 10 Minecraft edition.
Mojang has released a dedicated server which is considered to be in alpha testing. I have found it to be very stable and able to run on a wide variety of hardware.
This script and guide are written to help you get a robust Minecraft Bedrock dedicated server up and running in only a few minutes!
Features
- Sets up fully operational Minecraft Bedrock edition server in a couple of minutes
- Ubuntu / Debian distributions supported
- Fully operational Minecraft Bedrock edition server in a couple of minutes
- Sets up Minecraft as a system service with option to autostart at boot
- Automatic backups when server restarts
- Supports multiple instances — you can run multiple Bedrock servers on the same system
- Updates automatically to the latest version when server is started
- Easy control of server with start.sh, stop.sh and restart.sh scripts
- Adds logging with timestamps to “logs” directory
- Optional scheduled daily restart of server using cron
Requirements
- A computer with a 64 bit processor (if you are trying to use ARM read my article on the limitations). 32 bit binaries of the official server are not available so it needs to be 64 bit!
- 1 GB of RAM or higher
- Ubuntu Server 20.04 / 18.04
- Other operating systems supported as well as long as they use systemd (for the service). The script assumes apt is installed but there are minimal dependencies so you could install these on another distro (that doesn’t have apt present) and use the script normally.
Recommended Gear
Game Editions
Minecraft: Bedrock Edition is the “Windows 10” version of Minecraft as well as the version of Minecraft on the Xbox / Playstation / Switch. The versions of Minecraft for Android and iOS are also the Bedrock edition.
All of these versions support cross-platform play with each other (but not with the Java edition).
This is the PC Minecraft for Windows 10 (Bedrock) edition of Minecraft. It is able to play cross-platform with other players on Android / iOS / Playstation / Xbox / Switch. Available as a code that is instantly activated to give you permanent access to the game!
The Sony PlayStation version of Minecraft: Bedrock edition.
This is the Nintendo Switch version of Minecraft: Bedrock edition.
This is the Microsoft Xbox version of Minecraft: Bedrock edition.
Recommended Storage (Solid State Drive)
I strongly recommend a Solid State drive (SSD) for your server. This is because Minecraft is constantly reading/storing chunks to the disk which makes I/O performance very important.
These are much cheaper than they used to be. Here’s a decent 120 GB one (higher capacity options are available) at a very low price:
The Kingston A400 has been a great drive to use for many years. It’s reliable, widely available around the world, has low power requirements and performs very well. It’s also very affordable. This drive has been benchmarked over 1000 times at pibenchmarks.com and is the #1 most popular SSD!
If you have a M.2 NVME slot in your motherboard you can go with a high end drive. This will give your server maximum performance even if a large number of players are running around on the server changing blocks and triggering disk writes.
This is the one I have in my machine. These range from 250 GB to 2 TB depending on how big your server might grow:
The Samsung 970 EVO Plus is a fantastic drive and has fallen in price substantially. This is the top performance option without going into the “Pro” series of the lineup which are much more expensive.
Computer / CPU / Memory
Almost any PC made in the last few years will be a x86_64 bit computer. If you have an older computer around that isn’t being used then it will most likely have the right CPU and amount of memory (as well as fast storage) to run a basic server.
Throwing a SSD in one of these older computers will provide an excellent server experience for small and larger player counts.
The speed of your storage will make the largest difference. Older HDDs are going to have significantly slower performance than any modern SSD even with all other hardware equal. This is because the Minecraft server is constantly reading/writing chunks of your world as well as updates to it to the disk so this tends to be the bottleneck.
Operating System
I highly recommend using Ubuntu Server to run the Minecraft dedicated server. It is available here: https://ubuntu.com/download/server
At the time of writing the current version is Ubuntu Server 20.04. This is a secure and robust operating system and will leave plenty of resources available for the server to run.
The script should run on any Debian based flavor of Linux but since the Minecraft Bedrock server is compiled natively for Ubuntu I recommend sticking with it. If you have a GUI flavor of Ubuntu and a decent PC (>= 2 GB of RAM) the server will work just fine on it.
Note: People have reported in the comments that Ubuntu 16.x is no longer working with the latest official Mojang binaries. Ubuntu 18.04 is the minimum requirement for the latest versions, and 20.04 is recommended!
Installation
Log into your Linux server either using SSH or a mouse and keyboard and paste/type the following command:
The script will setup the Minecraft sever and ask you some questions on how to configure it. I’ll explain here what they mean.
The first question will be the installation path. This is the root installation path for ALL servers you will have. If you add additional servers later you should select the exact same installation path. It should always be left as the default (
The only exception is if you have something like a completely dedicated disk for the Minecraft server. In that case you should always use the same root path of /mnt/yourdrive or wherever the path is for every new/additional server you install.
“Start Minecraft server at startup automatically (y/n)?” – This will set the Minecraft service to start automatically when your server boots. This is a great option to set up a Minecraft server that is always available.
“Automatically restart and backup server at 4am daily (y/n)?” – This will add a cron job to the server that reboots the server every day at 4am. This is great because every time the server restarts it backs up the server and updates to the latest version. See the “Scheduled Daily Reboots” section below for information on how to customize the time or remove the reboot.
That is it for the setup script. The server will finish configuring and start!
First Run
The server will start up and start displaying output to the console.
Once you see the “Server started” line you will be able to connect from the client.
To add the server to the client open Minecraft and click “Play”. Then at the top of the screen select the “Servers” tab and click “Add Server”.
This will ask you for a Server Name and Server IP Address. For the name you can put anything and for the server IP address put the address of your Linux server. Leave the port as the default 19132. For more information on how to let people from outside your network on go to the “Port Forwarding” section below.
Now choose the server you just added in the list and connect!
Start, Stop and Restart Server
The server can be started, stopped and restarted two different ways. You can use the provided scripts in the Minecraft folder or you can use systemctl. Here are the commands:
Automatic Backups
The server backs up each time it starts. This helps you recover easily if something goes wrong. This system works best if you configured the server to restart daily since it means you will have a backup every day.
To access these backups type:
When a backup is made the filename will be the date and time the backup was taken. If you need to restore a backup it’s very easy. Substitute the timestamp in my example to the backup you want to roll back to. Type:
Your world has now been restored! It’s a good idea to download these backups off the server periodically just in case the server’s storage fails.
Installing Resource Packs / RTX Support
For instructions on how to install resource packs (including optional RTX support) view my step by step Minecraft Bedrock Dedicated Server Resource Packs guide here.
Scheduled Daily Reboots
The daily reboots are scheduled using cron. It’s very easy to customize the time your server restarts.
To change the time that the server restarts type: crontab -e
This will open a window that will ask you to select a text editor (I find nano to be the easiest) and will show the cronjobs scheduled on the server. The Minecraft one will look like the following:
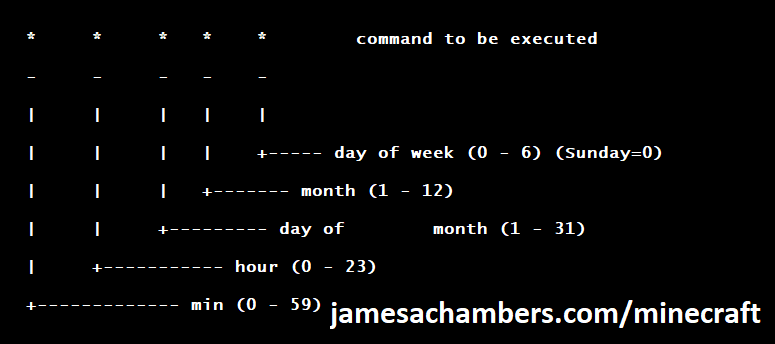 Crontab’s syntax layout
There are 5 fields here. The default restart time is set to reboot at 0 minutes of the 4th hour of the day (4 AM). The other 3 fields are left as * to represent every day of every month. Make any desired changes here and press Ctrl+X to exit nano and update the cronjob.
To remove the daily reboot simply delete the line and save.
Reconfigure / Update Scripts
The scripts can always be reconfigured and updated by downloading the latest SetupMinecraft.sh and running the installer again. It will update all of the scripts in the Minecraft directory and reinstall the startup service for you.
Running SetupMinecraft.sh again will also give you a chance to reconfigure options such as the memory dedicated to the server, daily reboots, starting the server on boot, etc.
This will not overwrite your world or any other data so it is safe to run!
Port Forwarding
If everyone on your server is on the same LAN or WiFi network as you then you don’t need to do this. If you want people to connect from outside your local network then you need to set up port forwarding on your router.
The process for this is different for every router so the best thing to do is just look at your router and find the model # and put that in google with port forwarding for easy instructions on how to do it for your specific router.
You want to forward port 19132. The type of connection is both TCP and UDP. On some routers you need to do both a TCP entry and then a second entry as UDP.
Once you do this people will be able to connect to your Minecraft server through your public IP address. This is different than your local IP which is usually a 192.x.x.x or 10.x.x.x. If you don’t know what that is just go to google and type “what’s my ip” and Google will kindly tell you!
Wired vs. Wireless
Going with an ethernet (wired) connection is going to be faster and more reliable. There’s so much wireless traffic and other interference in the air that running your server on WiFi is not recommended.
Even if it is working great 99% of the time it can ruin your experience very quickly if the WiFi drops for a couple of seconds and you get blown up by a creeper!
All that being said, the server works fine on wireless. The script will work fine as is with a wireless connection.
Benchmarking / Testing Storage
If you’re getting poor performance you may want to run my storage benchmark with:
PC results won’t show up on the site yet (it’s meant for Raspberry Pi) but it will run on Linux just fine and give you a score. If you search for the model of your drive on pibenchmarks.com you can compare your score with others and make sure the drive is performing correctly!
Conclusion
The Minecraft Bedrock Edition dedicated server runs much better than previous third party servers in the past that were missing critical features. The performance is very good even on low end hardware. It has never been easier to set up a Minecraft Bedrock server.
If you have any feedback or suggestions let me know in the comment section. A lot of the changes and developments in this script and guide are directly from readers.
Other Resources
For a guide on how to set up resource packs check out my Minecraft Bedrock Resource Pack guide
If you’re trying to run this on the Raspberry Pi check out the Raspberry Pi specific guide here
Источник
Minecraft bedrock server linux
Copy raw contents
Copy raw contents
Minecraft Bedrock Server
Sets up a Minecraft Bedrock dedicated server on Ubuntu / Debian with options for automatic updates, backups and running automatically at startup
View installation instructions at: https://jamesachambers.com/minecraft-bedrock-edition-ubuntu-dedicated-server-guide/
- Sets up the official Minecraft Bedrock Server (currently in alpha testing)
- Fully operational Minecraft Bedrock edition server in a couple of minutes
- Ubuntu / Debian distributions supported
- Sets up Minecraft as a system service with option to autostart at boot
- Automatic backups when server restarts
- Supports multiple instances — you can run multiple Bedrock servers on the same system
- Updates automatically to the latest version when server is started
- Easy control of server with start.sh, stop.sh and restart.sh scripts
- Adds logging with timestamps to «logs» directory
- Optional scheduled daily restart of server using cron
Quick Installation Instuctions
Installing Resource Packs / RTX Support
For instructions on how to install resource packs (including optional RTX support) view my step by step Minecraft Bedrock Dedicated Server Resource Packs / Optional RTX guide here.
- Ubuntu / Ubuntu Server 20.04
- Ubuntu / Ubuntu Server 18.04
- Debian Stretch / Buster
- All PC X86_64 (WORKING)
- Udoo X86 (WORKING)
- Intel Compute Stick (WORKING)
- Other X86_64 platforms (WORKING)
- ARM 64bit (WORKING — needs linker and other binaries used for emulation to be updated)
- Raspberry Pi (WORKING, SLOW, Ubuntu required, not working on Pi OS 64 bit and has segfaults)
- Tinkerboard (WORKING, SLOW)
- ARM 64bit (WORKING — needs linker and other binaries used for emulation to be updated)
Multiple Servers and Installation Paths
The server supports multiple servers at once. When you run SetupMinecraft.sh again pick the identical root path as any previous servers. The path structure of the scripts is $ROOTPATH/minecraftbe/yourservername which is why the «root» path SetupMinecraft.sh asks you for should always be the same.
The individual server folder is determined by the «server name» you enter for your server. If it’s an existing server the scripts will be safely updated. If it’s a new server then a new folder will be created under $ROOTPATH/minecraftbe/newservername.
Keep the installation the path the same for all servers and the script will manage all this for you.
Add systemd permissions (optional)
Some users track the Minecraft servers by the systemd service. If you are using the automatic daily restart feature the service will not show as «online» since restart.sh does not run as root so it doesn’t restart the systemd service.
To fix this add a line to your sudoers file (sudo visudo) like this:
Источник


