- How to make a Minecraft server on Windows, Mac, or Linux
- How to make a Minecraft server on Windows, Mac, or Linux
- Things to keep in mind before you start:
- Running a Minecraft server from home?
- What if you don’t want to host your server at home?
- Make a Minecraft server on your Windows PC
- 1. Get the latest version of Java.
- 2. Choose a location for your Minecraft server files.
- 3. Download and start the Minecraft server software.
- 4. Enable port forwarding on your router.
- 5. Start the Minecraft server.
- Make a Minecraft server on your Mac
- 1. Make sure you have Java installed.
- 2. Choose a location for your Minecraft server files.
- 3. Download the Minecraft server software.
- 4. Enable port forwarding on your router.
- 5. Start the Minecraft server.
- Make a Minecraft server on a Linux host
- 1. Install Java.
- 2. Create a location for your Minecraft server files.
- 3. Download the Minecraft server files.
- 4. Start your Minecraft server.
- 5. Point a domain at your Minecraft server.
- Additional resources for managing a Minecraft server
- Tutorials/Setting up a server
- Contents
- Warning
- OpenJDK vs OracleJDK
- JRE vs JDK
- Headless Java
- Common instructions
- Java options
- Minecraft options
- Example command line
- Windows instructions
- Installing Java
- macOS instructions
- Installing Java
- Setting up the Minecraft server
- Using Time Capsule
- Linux instructions
- Installing Java
- Solus
- Debian, Ubuntu, Raspbian
- openSUSE
- Arch Linux
- Gentoo
- Other distros
- A simple installer script (also installs Java)
- FreeBSD instructions
- Installing Java
- Launching Minecraft Server
- Plan 9
- Cloudron
- Docker
- Getting docker (for Linux, Mac & Windows)
- Docker image
- Updating Docker image
- Minecraft Versions in Docker
- Server Port
- Updating Docker image
- Configuring the environment
- Writing a script to launch the server
- On Windows
- On macOS, Linux, and FreeBSD
- On Plan 9
- Startup and maintenance script
- Port forwarding
How to make a Minecraft server on Windows, Mac, or Linux
Minecraft is the world’s second-most popular video game, having sold over 121 million copies as of February 2017.
But Minecraft is so much more than just a game. It’s also a tool for teaching kids how to code; an open platform to be expanded by mod developers; and it’s the heart of a global community of creators.
If you’re interested in the full Minecraft experience, you can take it a step further by launching your own private Minecraft server. With a private server, you’re free to create a Minecraft world of your very own.
In this article we’re going to show you exactly how to do that. We’ll look at how to make a Minecraft server on a Windows PC, on a Mac, and on a Linux hosting plan.
How to make a Minecraft server on Windows, Mac, or Linux
At a very high level, making a Minecraft server follows a few basic steps:
- Install the latest version of Java
- Install the latest version of the Minecraft server software
- Configure your server & network
- Start the server
- Check that your server is accessible
Things to keep in mind before you start:
Setting up a server takes some effort. You need a bit of technical know-how to properly configure a Minecraft server.
You should have a basic understanding of computer and networking concepts, which are fundamental to managing any kind of server.
Specifically, you should be comfortable and familiar with:
- Using the command line
- Networking (IP, DHCP, ports)
- Your system configuration
- Your network configuration
- Your router configuration (for home setups)
Running a Minecraft server from home?
You don’t need a top-of-the-line system to run a Minecraft server; a desktop computer is ideal.
While you can run a Minecraft server and play on the same machine, you’ll need a more powerful system to do it.
And lastly, use a wired ethernet connection for your server instead of wireless. A wired connection is more reliable.
What if you don’t want to host your server at home?
Hosting any kind of server from home means you’re exposing your home network to the world.
If you’d rather not take that risk, then you can use a hosting provider instead. You’ll need to pay a monthly or annual fee, but you won’t have to deal with the hassle of managing the server hardware.
A GoDaddy Virtual Private Server is a good fit if you’re just getting started. Just keep in mind that you’re sharing hardware with other users, so keep an eye on resource usage.
If you need a little more oomph and you want to hook up a lot of players, you might try a dedicated server instead.
Make a Minecraft server on your Windows PC
1. Get the latest version of Java.
Open the Windows Control Panel. Under Programs, look for Java, and click Update Now.
Open a command prompt and enter java -version . You should see a version number.
If your version is outdated, or if you don’t have Java installed, download it from the official website.
2. Choose a location for your Minecraft server files.
Before you download the Minecraft server software, choose a location on your PC where you’d like to run the server from.
When you first run the server, it’ll create a few configuration files. It’s best to have all these files stored in a dedicated folder.
You could place this folder on your Desktop, in your Documents folder, in your Programs folder, or anywhere else you’d like. It’s entirely up to you.
3. Download and start the Minecraft server software.
Download the server software from the Minecraft website. It comes as a Java .jar file. Save it to the location you chose in the previous step.
Double-click the .jar file to start the server. It’ll create the server configuration files, which need to be modified before the server is ready to use.
Accept the EULA: A text file called eula.txt was created. Open the file in a text editor and change eula=false to eula=true. Failing to accept the EULA will prevent you from starting the Minecraft server.
What if you see a “Can’t save server properties” error? Run the Minecraft server as an administrator by right clicking the .jar file and selecting “Run as administrator”.
4. Enable port forwarding on your router.
Note: Port forwarding can be a security risk.
If you’re just hosting a server for players on your local network, you don’t need to worry about port forwarding. If, however, you want to make your server accessible to the world, you’ll need to enable port forwarding on your router. (To learn more about port forwarding, check out PortForward.com for tutorials.)
Refer to your router’s documentation to find specific instructions on how to configure port forwarding for your device. For Minecraft, you’ll need to forward TCP port 25565.
You’ll also need to enter your server’s local IP address as the Output IP or Server IP for the forwarded port. This tells the router which device to point at. To find your server’s local IP, open a command prompt and enter ipconfig.
5. Start the Minecraft server.
To start the Minecraft server, open the Windows command prompt.
Navigate to the file path where the Minecraft server file (named something like “minecraft_server.1.12.2.jar”) was installed.
Start the server with the following command:
java -Xmx1024M -Xms1024M -jar
(Replace
If you’d rather use the server’s UI, exclude the “nogui” parameter:
java -Xmx1024M -Xms1024M -jar
You can also create a .bat file to batch the commands together.
Once the server is running, you can invite others to connect to your server via your local IP address if they’re on your home network, or via your external/public IP address if they’re not on your home network.
You can find your public IP address by searching for “my ip address” on Google.
To check if your server is accessible, enter your public IP address into the Minecraft Server Status Checker.
Make a Minecraft server on your Mac
1. Make sure you have Java installed.
Newer versions of MacOS includes Java by default. If you’re running an older version of MacOS (OS X), you may need to download the legacy version of Java from the Apple website.
2. Choose a location for your Minecraft server files.
Create a folder to contain your Minecraft server files. You could create the folder on your desktop, for example, but the choice is completely up to you.
3. Download the Minecraft server software.
Download the server software from the Minecraft website. It comes as a Java .jar file. Save it to the location you chose in the previous step.
Open TextEdit. Set the format to plain text. Enter the following:
exec java -Xms1G -Xmx1G -jar
(Replace
Save the file as start.command in the same folder where the server’s .jar file is located.
Open the Terminal and grant permissions for the new start.command file so it can be run. Type chmod a+x with a space after the command. Drag and drop the start.command file into the terminal window. Press Enter.
4. Enable port forwarding on your router.
Note: Port forwarding can be a security risk.
If you’re just hosting a server for players on your local network, you don’t need to worry about port forwarding. If, however, you want to make your server accessible to the world, you’ll need to enable port forwarding on your router. (To learn more about port forwarding, check out PortForward.com for tutorials.)
Refer to your router’s documentation to find specific instructions on how to configure port forwarding for your device. For Minecraft, you’ll need to forward TCP port 25565.
You’ll also need to enter your server’s local IP address as the Output IP or Server IP for the forwarded port. This tells the router which device to point at. To find your server’s local IP, open the Terminal and enter ifconfig.
5. Start the Minecraft server.
Double-click the “start.command” file you created in step 3. A Terminal window will open. You’ll probably see error messages the first time you run the server. This is normal.
Once the server is running, you can invite others to connect to your server via your local IP address if they’re on your home network, or via your external/public IP address if they’re not on your home network.
You can find your public IP address by searching for “my ip address” on Google.
To check if your server is accessible, enter your public IP address into the Minecraft Server Status Checker.
Make a Minecraft server on a Linux host
If you’re not inclined to host a Minecraft server at home, you can spin up a Linux hosting plan to do it instead. This way you’re not responsible for managing any of the hardware, plus you’re not exposing your private home network to the public.
As mentioned before, a Linux VPS hosting plan from GoDaddy is a lightweight option if you’re experimenting or not expecting a lot of players to join your server. If, however, you’re expecting a lot of players, you should look at using a dedicated Linux server instead.
To follow these steps, you’ll need to connect to your hosting with SSH. (If you’re not familiar with the process, this Help article has you covered.)
1. Install Java.
While SSH’d into your host as the root user, enter the command:
apt-cache search openjdk
This’ll list the available OpenJDK packages that can install Java. For this example we’ll select openjdk-7-jdk, which is the OpenJDK 7 Development Kit.
Update the list of available packages from the remote repositories:
Then install the selected software package:
apt-get install openjdk-7-jdk
Press “Y” when prompted to authorize the required storage space for installation. Once that’s done, verify that Java has been successfully installed:
You should see the version of Java that has just been installed.
2. Create a location for your Minecraft server files.
Create a directory on your host where the Minecraft server files will be saved, then change to that directory.
3. Download the Minecraft server files.
Within the Minecraft directory, run the wget command to download the Minecraft server files:
wget -O minecraft_server.jar https://s3.amazonaws.com/Minecraft.Download/versions/1.12.2/minecraft_server.1.12.2.jar
(Tip: Double-check the Minecraft download page for the URL to the latest version.)
Next, we’ll need to install and run “screen”, so that your server continues to run even when you’re not connected:
yum install screen
4. Start your Minecraft server.
java -Xmx512M -Xms512M -jar minecraft_server.jar nogui
(Tip: You can change the -Xmx and -Xms settings to adjust allocated memory for the Minecraft server. For example, you could enter -Xmx1G -Xmx1G to bump it up to 1GB of RAM. The available memory will depend on your hosting plan.)
To make sure everything is running correctly, stop your server with:
Then edit the “server.properties” file and set:
Save the “server.properties” file and restart your server. From there, enter your server IP address into the Minecraft Server Status Checker to see if it’s publicly accessible.
5. Point a domain at your Minecraft server.
Providing players with an easy-to-remember domain name instead of a complicated IP address makes it even easier for people to connect to your Minecraft server.
It’s super simple: Update your domain’s DNS records by adding an “A” record for your domain (using @ as hostname), or subdomain (using something like “mc” as the hostname), that points to your Minecraft server’s IP address.
Note that it can take up to
24 hours for DNS changes to take effect globally.
Additional resources for managing a Minecraft server
We’ve just scratched the surface of making a Minecraft server of your very own. Here are a few resources that dig deeper into setting up, managing, and promoting your server:
This article contains information about how to use third-party products, but GoDaddy does not endorse or directly support third-party products and is not responsible for the functions or reliability of such products. Third-party marks and logos are registered trademarks of their respective owners. All rights reserved.
Tutorials/Setting up a server
Contents
This tutorial takes you through the steps of setting up your own server using the default server software that Mojang Studios distributes free of charge. The software may be installed on most operating systems, including Windows, macOS, GNU/Linux and BSD.
For more tutorials, see the bottom of this page or the Tutorials page. For more information on Minecraft servers, see the Server page.
- Setting up a server takes some time, and some technical knowledge. Don’t try to set up a server unless you have some basic computer and networking abilities. Probably, your best bet can be to look on the Internet for a guide on how to set up a server.
- A Minecraft server does not need to be a high-end machine, but netbooks and notebooks don’t usually make for good server machines. They typically have lower-end hardware and bad I/O performance in comparison to desktop computers.
- Hosting and playing on the same machine is also possible, if your computer is powerful enough.
- Having many players in a wireless network (WLAN and especially WWAN) is not recommended. Use a wired network instead, such as Ethernet.
- If you decide you don’t want to host, but still want to play online, check out the public server options on a Minecraft server listing website.
- If you still want to manage a server, but not from home, check out the Minecraft server hosting area of the Minecraft forum or other websites. Expect to pay monthly for this type of server since finding free hosting is a rarity, but you save the hassle of constantly maintaining a server and ensure it is always online for your players.
Note: There is also custom server software available, which most large servers use, but these applications are not supported by Mojang Studios.
Warning
Since you’re about to run your own server, you should be aware of the possible dangers. Running by the instructions below should not put you at any risk, but this is a wiki which everybody is allowed to edit, and we don’t know about your system configuration, so we can’t guarantee you’ll be 100% out of danger.
In order to run your server and stay out of trouble, we highly suggest that you should at least know about the following:
- Using the command-line and editing configuration files
- Networking in general (IP, DHCP, ports, etc.)
- Your system configuration
- Your network configuration
- Your router configuration (if you want other people to connect over the Internet)
Java is a programming language designed to create programs for the Java Virtual Machine (JVM). The JVM supports many different platforms. By doing this, developers write code for the JVM and any platform supported by the JVM can run the program. Further reading.
This section is designed to answer some frequently asked questions about Java and guide you through some decisions regarding Java.
OpenJDK vs OracleJDK
OpenJDK and OracleJDK are very similar. OpenJDK is the official open source reference implementation of Java. OpenJDK is an open source codebase that almost all other JDKs are built on. Excluding packaging, cosmetic and license differences OpenJDK is the same as OracleJDK.
Do note that OracleJDK (Oracle’s «OTN») builds require a paid subscription for commercial and production purposes. This likely includes running a minecraft server even if it is non-profit. Oracle does provide its own OpenJDK builds, but they are not packed into an installer format for easy use.
JRE vs JDK
JRE stand for Java Runtime Environment. JDK stands for Java Development Kit. JRE is a package tool designed to run Java programs. JDK is a package of tools designed to develop Java programs. The JDK comes with the JRE which comes with the JVM. If you have JDK then you have JRE and JVM. Vanilla Minecraft does not need JDK, but plugins may require it.
Headless Java
A headless Java installation is a trimmed down version of Java. It does not have a GUI or mouse/keyboard support. Headless Java is frequently used in Servers or other environments where a GUI is not needed.
There are several virtual packages used in Debian for Java. These cover runtime compatibility and come in two flavors; headless (omits graphical interfaces) and normal.
Common instructions
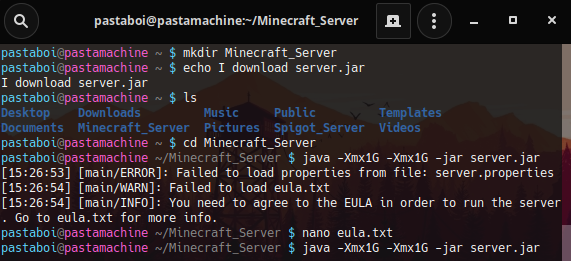
The general gist of running a minecraft server is that you will need to install java , run the server, accept the EULA, and run it again. Once you have installed java and opened up a command line, everything is basically the same.
- Check the system requirements for CPU, RAM, and disk space.
- Install Java. Use the OS-specific instructions below for this.
- Download your server jar file from the download page.
- Make a new folder for the jar file and move it there. This will be where all the configuration and the world files will be stored, so you don’t want these to just sit in «Downloads».
- Open a command prompt or a terminal interface.
- Check again if Java is available. Type java -version .
- Type cd (change directory), followed by the path to the folder where you placed your server jar file. You can drag the folder into the terminal window to get the path, if you have a GUI open.
- Run the server for the first time by typing java -jar minecraft_server.jar —nogui (replacing the jar name by whatever you named the jar file to be).
- Accept the EULA. A file called eula.txt will be generated. Open it in a text editor and change eula=false to eula=true . It signifies that you have read and understood the end user license agreement that you’ll follow when using the software. If you don’t do this, the server will shut down immediately when you try to start it.
- Now the server has been set up, and you can simply run it with java -jar minecraft_server.jar . If you don’t want a GUI for typing commands, add a space and —nogui to the command. (Some people say it makes the server much much faster.) You can also use a few other switches described below.
At this point you should have a basic server running. See Configuring the environment for more information about configuring your server. One of the things you definitely want to do is writing a script to launch the server so you don’t have to remember the command line.
Java options
Java options should be added before the -jar part on the command line.
- The most important thing for a minecraft server is memory to run with. Use the -Xmx switch to change how much memory it’s allowed to use. -Xmx2G is usually more than enough.
- -Xms (the initial memory size) does not affect performance in the long run, but you can set it too. -Xms512M should be enough.
- A «soft max heap size» ( -XX:SoftMaxHeapSize=1G ) is available for some versions of JRE. The JRE will try to only use that much memory, but will go over to a maximum of -Xmx if necessary. If you are running many things on your server, this may be useful.
- Use -d64 if your server is on a 64-bit Solarissystem using 64-bit Java.
Minecraft options
Options for the server JAR go after the -jar minecraft_server.jar part. Run with —help to see all available arguments that can be passed to the server. Below is a list of available commandline options for the server.
- —bonusChest
- If a bonus chest should be generated, when the world is first generated.
- —demo
- If the server is in demo mode. (Shows the players a demo pop-up, and players cannot break or place blocks or eat if the demo time has expired)
- —eraseCache
- Erases the lighting caches, etc. Same option as when optimizing single player worlds.
- —forceUpgrade
- Forces upgrade on all the chunks, such that the data version of all chunks matches the current server version (same as with sp worlds).
- —help
- Shows this help.
- —initSettings
- Initializes ‘server.properties’ and ‘eula.txt’, then quits.
- —nogui
- Doesn’t open the GUI when launching the server.
- —port
- Which port to listen on, overrides the server.properties value. (default: -1)
- —safeMode
- Loads level with vanilla datapack only.
- —serverId
- Gives an ID to the server. (??)
- —singleplayer
- Runs the server in offline mode (unknown where is used for, probably used internally by mojang?)
- —universe
- The folder in which to look for world folders. (default: .)
- —world
- The name of the world folder in which the level.dat resides.
Older Commandline Options
Some options worked in older versions but were removed or replaced by newer ones.
- -o true
- to tell the server to run in online mode so only authenticated users can join. (This may no longer work in newer versions)
Example command line
- Running a world found in the folder «cold» on port 1337, with 1G of RAM allowed: java -Xmx1G -jar minecraft_server.jar —port 1337 —nogui —world cold .
Windows instructions
Installing Java
The Minecraft server requires the Java Runtime Environment (also called JRE or simply Java). For your security, you should only use the most recent version of Java. To verify that you have the latest version, do one of the following:
- Open Windows Control Panel, find Java (it may be inside the Programs category), and click on Update Now.
- Visit http://java.com/en/download/installed.jsp. This will perform an automatic version check from your browser. However, the Google Chrome and Firefox browsers do not run Java content and therefore cannot check Java through the browser.
- Open a command window and enter the command java -version . If a version number is reported, then check the Java website to see what the most recent version number is.
If you don’t have Java or your version is outdated, then download it at https://adoptopenjdk.net/ (OpenJDK) or http://www.java.com/download/ (Oracle «OTN» JDK)
macOS instructions
Keep in mind that the server won’t run correctly on macOS 10.4 and earlier and may crash your machine.
Installing Java
Open the terminal.
- Check if you have java by running java -version . Make sure it’s
newer than 1.6 (best if newer than 1.8).
- If you don’t have java, you can install it via HomeBrew:
- Run /bin/bash -c «$(curl -fsSL https://raw.githubusercontent.com/Homebrew/install/master/install.sh)» to install HomeBrew first.
- Run brew cask install adoptopenjdk to install java (OpenJDK).
- Run java -version again. You should get something this time.
Setting up the Minecraft server
Using Time Capsule
Some homes use AirPort Time Capsule as a wireless router instead of other brands. This section will teach you how to set one up without messing up your file server.
NOTE: Make sure you have your admin username and password.
- Open System Preferences > Network.
- Click the Advanced button and go under TCP/IP.
- Where it says Configure IPv4, change that option to Using DHCP with manual address.
- Change the IP address to 10.0.1.x, where x is a number between the last number of the two numbers under DHCP range (i.e. 10.0.1.2 to 10.0.1.254 would be anywhere between 2 and 254).
- Now go to the Sharing section and make sure that Internet Sharing is on.
- Now, open up AirPort Utility and edit your Time Capsule settings.
- Go under Network and make sure the option Router Mode is set to DHCP and NAT. Now, click the + button under the Port Settings.
- Type in the following:
- Description: Minecraft Server (or whatever you want to call it)
- Private IP Address: The address you chose for the 4th step.
- Change everything with the word port in it to 25565.
- Now, hit Save and update the Time Capsule.
That’s it! You’re now ready to configure your server.
Linux instructions
Linux comes in many different varieties called distributions (distros). Some of these distros are designed or better suited for running a server. If you are setting up a dedicated server it is recommended to use one of these distros.
Linux, in general, is more welcoming to open source programs. So where applicable it is recommended you use open source programs, such as OpenJDK.
Installing Java
OpenJDK is in most distribution’s repositories. You can install it there. For Oracle Java refer to Oracle’s Download Page.
Note: While not affecting minecraft server, JavaFX or other proprietary aspects of Java while need to be installed separately.
Solus
Run sudo eopkg install openjdk-8 to install OpenJDK.
For OracleJDK refer to Solus Help Center
Note: OpenJDK 11 is not in Solus’ repositories.
Debian, Ubuntu, Raspbian
Note: You might need to install the package «software-properties-common» by running sudo apt-get install software-properties-common and/or «python-software-properties» by running sudo apt-get install python-software-properties to use the apt-add-repository command.
Due to licensing issues, the repository frequently used to install Oracle Java has been discontinued. It is now recommended that you install OpenJDK 8 or above.
OpenJDK can be installed with one command: sudo apt update; sudo apt-get install openjdk-8-jdk-headless
Removing the ‘headless’ part of the command will install all components of Java.
Note: Tested in Ubuntu 18.04.
openSUSE
Note: Due to possible instability openSuse Tumbleweed is not recommended as a dedicated server.
Just run the command from the terminal: sudo zypper in java-1_8_0-openjdk
Java should be installed.
Note: Tested in openSuse Leap 15.1
Arch Linux
Note: OpenJDK 7 — 12 are the only officially supported versions of Java.
Just run pacman -S jdk8-openjdk-headless . Remove «-headless» for the full JRE if you want to run with GUI.
If you encounter issues it is recommended that you refer to the ArchWiki
Gentoo
Run emerge —ask virtual/jdk
Other distros
Check your distro’s documentation. It should have information on how to install OpenJDK.
Alternatively, you can visit Java’s website directly to download the Java package for Linux. Most distros work with this (either 32 or 64-bit). Instructions for the installation of those different packages are given on the site.
If during installation, it asks for a password, enter your password. If you get asked «Is this OK [Y/N]» Enter Y and press enter if required. Java should now be installed.
A simple installer script (also installs Java)
Note: this is a very early project, designed with offline installation in mind, and will be updated periodically to make it more user friendly.
FreeBSD instructions
This part was tested with FreeBSD 10.0 amd64 and ‘jre-7u65-linux-i586.tar.gz’
Installing Java
Due to performance and crash issue with OpenJDK and Minecraft server, we will install Oracle JRE made for linux.
Before installing this JRE, you have to install the linux binary compatibility on FreeBSD, you can follow this documentation.
Jave requires some information about the proc. You have to mount linprocfs, type:
and add this line to /etc/fstab :
The Oracle JRE has a dependency marked as forbidden and the installation will fail. Go to /usr/ports/textproc/linux-f10-expat2.0.1/ and in the Makefile remove the line which starts with FORBIDDEN= .
Next you have to manually get the linux tarball due to licence issue (like `jre-7u65-linux-i586.tar.gz’) from java official web site and copy the file to /usr/ports/distfiles . Then to install the JRE, go to /usr/ports/java/linux-sun-jre17/ and run make install distclean .
Note: The previous version of this part, tested on FreeBSD 9.2 amd64, was explained like this: You may have to set JRE_UPDATE_VERSION variable in your Makefile to the actual number (e.g. 45 like in this example) and run ‘make install NO_CHECKSUM=1’.
Try running java -version . You may end up with a message that it cannot find libjli.so . One way to fix it is to add your java paths to the search explicitly. Make a symlink:
And in /compat/linux/etc/ld.so.conf.d/java.conf add:
Run /compat/linux/sbin/ldconfig . Now java -version should work.
Launching Minecraft Server
Create a folder and copy the minecraft server jar in it.
In the actual version you will get this exception syscall epoll_create not implemented if you run the server in the usual way, so we add this line to the command to fix that -Djava.nio.channels.spi.SelectorProvider=sun.nio.ch.PollSelectorProvider .
The command to launch is like:
Plan 9
Cloudron
Cloudron is a platform to self-host apps on your server. Minecraft is available as a one click app on Cloudron. It comes with a web interface to manage Minecraft from the browser. You can also have multiple installations of Minecraft on the same server. You can try a demo here (username: cloudron password: cloudron)
Docker
Docker is a free container based platform which helps to isolate instances of a Minecraft Server from each-other and from the host system. Docker and the owner of the repository of the container are not affiliated with Mojang.
Getting docker (for Linux, Mac & Windows)
Docker image
- Download the image by running docker pull sirplexus/minecraft-server-standalone:latest
- Set up the container with port 25565 open, 1G ram assigned and named «MyServer»: docker container create —publish 25565 :25565/tcp —name «MyServer» —env RAM = 1G sirplexus/minecraft-server-standalone
- Start the container: docker container start MyServer
Updating Docker image
- For updating minecraft-server-standalone run
Minecraft Versions in Docker
For a specific version, add -e VERSION= to the command. For example, use the following command to use the latest snapshot:
For version 1.7.9
Server Port
To change the port that the server is hosted on, we utilize the docker port mapping functionality. This directs some specified port on the host system to port 25565 within container. To run a server using a port other than 25565:
Updating Docker image
To update the docker image. Please note that this does not update minecraft, this updates the container itself.
Configuring the environment
Writing a script to launch the server
It’s definitely boring to have to remember the command-line options for your server every time you launch it. Luckily, we can write it down in a file and just run that instead.
On Windows
The windows version of a script is called a batch file. Create a text file in the folder where you put the jar as «start.bat», and then right click it to edit using notepad. Paste the following in:
Double click the file to start your server. You may get a «Class_Not_Found» and ServerGuiConcole error, just ignore these errors and you should see your «Server Thread/INFO» dialog start the server.
The «pause» command is there to keep the window open so you can read what happened after the server stops.
On macOS, Linux, and FreeBSD
All these systems use a common scripting language called the «POSIX shell script» on the command line. Create a text file in the folder where you put the jar as «start.sh» and write the following in:
Now save the file. Run chmod a+x start.sh (or path to wherever you put the script) to make it executable. You can now run the file by double-clicking or by running ./start.sh in the folder (or using a whole path from outside there).
If you want to add a pausing part like the Windows example, remove the exec word, and add a line of read -n 1 -p «Waiting. » to the end. This is useful if you are running the script by double-clicking on the GUI.
On Plan 9
(I don’t use Plan 9, so I have absolutely no idea how to use the rc, psh, acme, snarf magic. Someone please add it.)
Startup and maintenance script
Alternatively, you can manage/automate the startup and shutdown of the Minecraft server using a script such as the ones listed below:
- Minecraft Server Control Script (MSCS) is a server-management script for UNIX and Linux powered Minecraft servers. Features include:
- Run multiple Minecraft worlds.
- Start, stop, and restart single or multiple worlds.
- Create, delete, disable, and enable worlds.
- Includes support for additional server types: Forge, BungeeCord, SpigotMC, etc.
- Automatically backup worlds, remove backups older than X days, and restart worlds.
- Visit the Minecraft Server Control Script Github page for more information.
- Minecraft Server Manager A comprehensive startup script for Minecraft and Bukkit servers (support Debian, such as Ubuntu).
- MSM can also periodically create World Edit compatible backups.
- Keeps players informed with configurable in-game messages, such as «Shutting down in 10 seconds!»
- Expose in-game commands (such as «say», «op» and «whitelist») to the terminal.
- Tab completion on all commands makes learning easy.
- Visit Minecraft Server Manager’s GitHub page for the full list of features.
- Server startup script
- FreeBSD startup script
- OpenBSD startup script
- Ubuntu startup script
- rfwadmin startup script with web interface (for Linux servers). Nice web interface for quickly saving and loading maps.
- Minecraft Systemd Service A fully systemd-integrated minecraft service:
- Working on CentOS and Fedora
- Protecting the server with various readonly and inaccessible jails
- Safe restart and stop operations using rcon
- Can be combined with a Minecraft Command Center Script for ease of administration
- Arch Linux systemd wrapper
Port forwarding
Port forwarding is used when you have a router and you wish to let users connect to your server through it. If you wish to host your server for local reasons, it is not required that you do so. Keep in mind that port forwarding might cause security risks.
When port forwarding, it varies on how your router will ask you for the information. If you don’t understand on how your router wants you to input the information, try visiting PortForward.com for a tutorial.
Once you have managed to locate your router’s admin page, and find the Port Forwarding page; hit add new service (may not work) (if you use Belkin, this can be very difficult to perform) or custom service. When you get a page asking to setup the new rule, it should prompt you on what you want to call it. You may name it as you wish, but for simplicity, name it «minecraft«. Then, you want to look for «type». If «TCP/UDP» or «Both» isn’t an option you will have to create two rules for both protocols. For the ports (internal and external), enter 25565. If it asks for anything else other than output IP (or internal IP, server IP), leave it alone and continue.
To find your computer’s IP address, use the following steps:
 Windows Press ⊞ Win + R ; this should be up to the «Run» dialog box. Type cmd and hit ↵ Enter . This should open a command window with a black background. From there, type ipconfig and press ↵ Enter . You should be given a list of text. Scroll up to «Wireless LAN» (if using wireless) or «Ethernet» (if using a wired connection), and look at «IPv4 address». To the right of this should be a string of numbers (of the form xxx.xxx.xxx.xxx). Copy this down by right-clicking the window and selecting «Mark», then highlight the area and hit Enter. Don’t copy any parenthesis or letters.


