- [Гайд] Как устанавливать текстур-паки, моды и карты на Mac
- Minecraft Java Edition
- Информация
- Описание
- The ultimate Mac user’s guide to Minecraft on OS X — mods, skins, and more
- Sponsored Links
- How to install Minecraft mods on a Mac
- Install Forge
- Create mods folder
- Install mods
- How to Download a Minecraft Mod on a Mac
[Гайд] Как устанавливать текстур-паки, моды и карты на Mac


Здравствуйте! Сегодня я решил опубликовать на данном сайте полезную многим инструкцию про установку модов и текстур-паков на Ваш компьютер под управление операционной системы Mac OS.
Начальная настройка
1. Для начала вам нужно найти папочку «Библиотеки». Хочу заметить, что с обновления на «OS Mavericks» папочка «Библиотеки» пропадает. Вот как её вернуть:
a) Зайти в «Терминал»
b) Набрать chflags nohidden
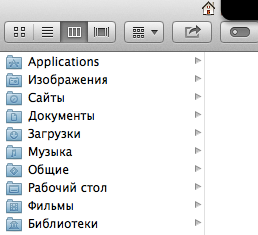
2. Найти папку «Application Support»

3. В этой папке найти другую папку «minecraft»

Установка модов
1. Скачать Forge
2. Установить Forge
3. Запустить Minecraft с Forge
4. Скачать мод
5. Кинуть его в появившуюся папочку «mods»

Установка ресурс-паков
1. Скачать текстур или ресурс пак
2. Кинуть в папку texture-packs или resourcepacks

Установка карт
1. Скачать карту
2. Кинуть в папку «saves»
Источник
Minecraft Java Edition
Информация
Описание
Minecraft — это «песочница»-конструктор, созданная Маркусом Перссоном, основателем компании «Mojang AB». Свое вдохновение при создании Майнкрафта он черпал как в своих былых не особо известных широкой публике проектах, так и в популярных играх вроде Dungeon Keeper.
Описание игрового процесса Майнкрафта можно сформулировать одним предложением: игрок путешествует по практически безграничному 3D-миру, состоящему из различных блоков, которые он может разрушать и создавать. Игру также отличает уникальный «пиксельный» графический стиль, который мгновенно запоминается, хотя многим по началу кажется непривлекательным.
Майнкрафт — это проект не про графику, а про творчество, фантазию и созидание, и как раз тот самый случай, когда в игре очень легко освоиться, но на постижение всей ее глубины требуются сотни часов.
В 2014 году компания Mojang и права на Minecraft были приобретены американской компанией Microsoft.
Minecraft предоставляет в распоряжение игрока трёхмерный процедурно генерируемый мир, полностью состоящий из кубических блоков, и даёт возможность свободно перестраивать его, создавая из блоков сложные сооружения — эта особенность игры делает Minecraft схожей с конструктором LEGO.
Игра не ставит перед игроком каких-либо однозначных целей, но предлагает ему множество возможностей и занятий: так, игрок может исследовать мир, создавать разнообразные сооружения и предметы, сражаться с различными противниками.
Minecraft является одной из самых продаваемых компьютерных игр в истории, уступающей лишь Tetris: по состоянию на октябрь 2018 года её совокупные продажи на всех платформах превысили 154 миллиона копий, а число активных игроков, запускавших игру хотя бы раз в месяц, превысило 91 миллион. Игра была удостоена множества наград, включая Spike Video Game Awards и Golden Joystick Award.
Источник
The ultimate Mac user’s guide to Minecraft on OS X — mods, skins, and more
Sponsored Links

Minecraft is an amazing game thanks largely to a massive community of creative individuals who spend their free time tweaking, modifying, and overhauling just about every aspect of the experience. The game can be played in its «vanilla» version quite easily on OS X — and to be fair the original, untouched game is still an absolute blast to play — but once you’ve gotten an eyeful of what the modding community has done to developer Mojang’s surreal sandbox, it’s hard to go back.
Unfortunately, installing these various tweaks can be an extremely confusing and tiresome endeavor if you’re not familiar with all the files, folders, and additional programs required to pull it off.
That’s where we come in.
This guide will be your one-stop shop to installing, re-skinning, modding, and reinventing Minecraft on OS X. Let’s get started!
Installing the game
If you haven’t tried Minecraft in the past, you’re really missing out. Here’s the first thing you need to do:
- Head to Minecraft.net and download the game client. A one-time payment grants you access across multiple computers and is well worth the investement.
Run the .dmg file to install Minecraft to your Applications folder.
Run the game from the Applications folder, sign into the Minecraft account you created during purchase, and you’re done.
Changing your character skin
By default, your character will have a plain, rather boring look. If you want to give him (or her) an extreme makeover you can upload a new character skin.
- Browse the web for a new skin. The Skindex has the web’s largest collection of Minecraft skins available, and there’s no chance you’ll ever get bored of them all, so find one that fits your personality.
- Download the skin you want. It’ll be a simple image file.
- Go to Minecraft.net and log into your account. Click «Profile» at the top of the page and scroll down to the «Change how you look in Minecraft» section.
- Click «Choose file» and then upload.
- Start up Minecraft and check out your new look.
Note: You can view your character from a third-person perspective and from the front by clicking the F5 key in-game.
Installing Resource Packs
The easiest way change the feel of your Minecraft experience is to give the game a whole new look. You can do this by installing a resource pack, which alters the textures used for objects in the Minecraft world. You can find these packs all over the web, including on the Minecraft Forums, but a good starting point is resourcepack.net, which compiles a list of all the most popular packs.
Download the Resource Pack you wish to use.
It will come in a compressed file, so open it using an archive utility.
Start your Minecraft client and click the Options tab from the main menu.
Click the Resource Packs tab, and then click «Open resource pack folder» on the next screen.
Place the unzipped Resource Pack folder you downloaded into the «resourcepacks» folder that pops up.
Back in the Minecraft client, you’ll now be able to select the pack from the list of Available Resource Packs.
Click Done and enter a new or existing world to see the changes you’ve made.
You can use multiple Resource Packs at once. The order in which you place them on the «Selected Resource Packs» list within the Minecraft client will determine which packs override others. Not all packs contain new textures for all items, but if there is an overlap, whichever pack is placed higher on the list will take priority.
When browsing for new Resource Packs, you’ll notice that most have a resolution in the file name — like 16X16, 32X32, or even 512X512. This is the resolution of the textures included in the pack, and the higher the number the more detailed your world will become. However, depending on your computer specs, you may find that huge resolutions hinder your gameplay experience. If your find your game becomes too laggy or slow, choose a Resource Pack with a lower resolution.
Rewinding your Minecraft version
Modders put tireless effort into their creations, and while it would be nice for all mods to work on all versions of Minecraft, the reality is that it’s just not reasonable to expect every mod to be updated in a timely manner. Depending on the mods you want to install, you may need to rollback your Minecraft version to a previous release. Thankfully, the Minecraft client makes this a pretty simple affair.
Launch Minecraft as you normally would.
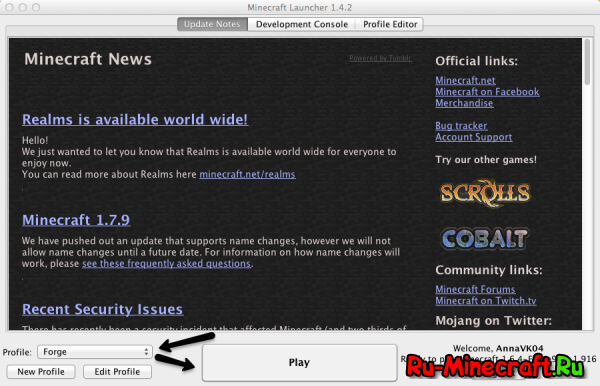
In the bottom left hand corner you will see your profile name. Click the «Edit» button.
A menu will pop up with a drop-down menu to choose which version of Minecraft you wish to launch. Select whatever version is compatible with the mod you wish to install.
Note: Most current mods are made for 1.7.2, so that’s what we’ll be using in this guide.
Installing mods
Ok, so you’ve got the game up and running, you’ve changed your character skin and given your Minecraft world a whole new look, but now it’s time to take the next step. Mods are different from the tweaks covered above in that they fundamentally alter how the game functions, instead of just upgrading its looks. Because of this, installing mods is a slightly more involved process.
The first thing you need to do is install Minecraft Forge. Minecraft Forge streamlines the installation of mods by replacing the necessary files for you, rather than requiring you to swap out all the files each time you want to try a new mod. Find the Forge version that corresponds to your Minecraft install on the Forge website and download it.
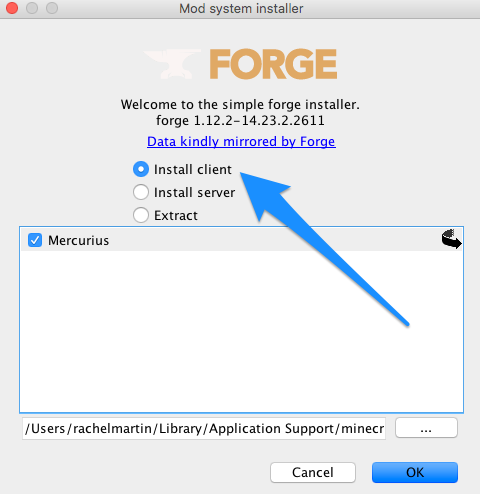
Double click the downloaded file to bring up the installer. Click «Install client» and then «OK.» Forge will install the necessary files and folders.
Now, bring up the Minecraft client and once again click «Edit» on your profile in the bottom left corner.
Click the version drop-down menu and select the «Forge» version from the list (usually located at the bottom), save your profile, and start the game.
You’ll notice that the main menu now includes a «Mods» section.
Now it’s time to find a mod that you want to install. A community-compiled list of mods on MCF Modlist is a great place to start, but you can also browse for mods on the forums or sites like Planet Minecraft. Once you’ve found a mod you want to use, download the file.
For this tutorial we’ll install a mod that gives in-game characters and animals on-screen life bars.
Once you’ve downloaded the file, you need to add it to the newly-created Mod folder. The easiest way to do this is to click «Go» on the OS X menu bar and then click «Go to Folder.»
/Library/Application Support/minecraft» and then click «Go.»
Open the «Mods» folder, and drag the mod you downloaded into it.
Now, start the game and click on the «Mods» tab on the main menu.
You’ll see the mod you just installed on the list on the left side of the screen. Click it and make sure it’s enabled.
Источник
How to install Minecraft mods on a Mac
My most popular post of all time by far is a documentation page about how to install Minecraft mods on a Mac. Nothing else I’ve ever written has come anywhere close to the popularity of that post. I guess no one really cares how I spent my weekend but clearly a lot of people want to know how to hack Minecraft.
I wrote that old post after going through the process of installing mods for my then seven-year-old son who was determined to play mods. That was almost four years ago and is now out of date so here’s an updated version. Enjoy!
There are three main steps – install Forge, create a mods folder, install mods. I’m using macOS High Sierra.
Install Forge
- Download the latest version of Minecraft Forge from here (choose the Installer): http://files.minecraftforge.net

- Navigate to the downloads folder and find the file you downloaded. It will end with xxxxx-installer.jar. Right-click the file with your mouse and choose “Open”.
- Select “Install Client” from the next screen and click OK.

Create mods folder
- Open Finder on your Mac and go to Go > Library in the menu.

Install mods
- Find the mod on the web you want to install and download the file to your computer. It will be a file ending in .jar.
- Drag and drop the downloaded file into your new mods directory in the
/Library/Application Support/minecraft/mods folder.
You’re now ready to play the new mod!
When you launch Minecraft be sure to select Forge from the Play menu.
Источник
How to Download a Minecraft Mod on a Mac
This article was written by Travis Boylls. Travis Boylls is a Technology Writer and Editor for wikiHow. Travis has experience writing technology-related articles, providing software customer service, and in graphic design. He specializes in Windows, macOS, Android, iOS, and Linux platforms. He studied graphic design at Pikes Peak Community College.
This article has been viewed 127,420 times.
This wikiHow teaches you how to download and install Minecraft mods on a Mac. Mods are unofficial add-ons and modifications that are usually created by other players. Any mods designed to work with Minecraft: Java Edition should also work for Minecraft on Mac. In order to download Minecraft mods, you first need to download and install the Minecraft Forge API program.

\u00a9 2021 wikiHow, Inc. All rights reserved. wikiHow, Inc. is the copyright holder of this image under U.S. and international copyright laws. This image is not licensed under the Creative Commons license applied to text content and some other images posted to the wikiHow website. This image may not be used by other entities without the express written consent of wikiHow, Inc.
\n

I edited this screenshot of a macOS icon.\n

\u00a9 2021 wikiHow, Inc. All rights reserved. wikiHow, Inc. is the copyright holder of this image under U.S. and international copyright laws. This image is not licensed under the Creative Commons license applied to text content and some other images posted to the wikiHow website. This image may not be used by other entities without the express written consent of wikiHow, Inc.
\n
Источник


