Minicom ��� mac os
Instead of using a GUI application, such as ZTerm, to connect to the serial interface, you can use the command line tool minicom. This has the big advantage that it can be used when connected to the computer via SSH.
You can download minicom via Fink, or compile it from the source. I used minicom-2.1, which can be found on here to compile it on Mac OS X 10.3. In the Terminal, after downloading and decompressing, do:
- sudo mkdir /var/lock
- ./configure --enable-dfl-port=/dev/tty.modem . or another tty
- make
- sudo make install
- sudo minicom -s
You can use minicom on a Mac OS X Server setup, too, but you’ll have to use /dev/tty.serial as a configuration parameter. It also works fine with the KEYSPAN Adapter USB to Serial cable (/dev/tty.USA28X2b23P1.1 on my machine).
- Currently 1.80 / 5
You rated: 2 / 5 (5 votes cast)
Hint Options
Won’t build in 10.2.8 — which is too bad because the fink version has trouble with my eMac’s modem. Always takes a couple tries before it can talk to the modem. Then it works flawlessly.
Anybody else seen this behaviour? I’ve been living with it for a year or so now.
In the past minicom haws had numerous security vulnerabilities, so if past experience is any indication I would continue to use Kermit. Besides kermit has a ton of very powerful features. (Like you can use kermit between a HP48 calculator.)
I’m curious: what are serial interfaces? What’s an example or two of the things you are talking about?
I’m curious, but I imagine this might be useful if it’s what I think it is. A coworker manages a digital closed-circuit television system that has something to do with RS-232, I hear.
The open source «screen» command is pre-installed in the Mac OS X.
Solaris users will recall the «tip» command. I use «screen» and a
USB-serial adapter when I need quick-and-dirty terminal emulation
via a serial port.
===========================================
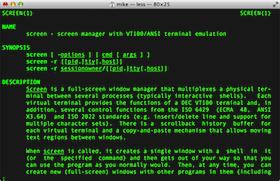
screen man page:
screen -r [[pid.]tty[.host]]
screen -r sessionowner/[[pid.]tty[.host]]
DESCRIPTION
Screen is a full-screen window manager that multiplexes a
physical terminal between several processes (typically
interactive shells). Each virtual terminal provides the
functions of a DEC VT100 terminal and, in addition, sev-
eral control functions from the ISO 6492 (ECMA 48, ANSI
X3.64) and ISO 2022 standards (e.g. insert/delete line and
support for multiple character sets). There is a scroll-
back history buffer for each virtual terminal and a copy-
and-paste mechanism that allows moving text regions
between windows.
clip
No tip in Jaguar
For the curious — the FreeBSD tip(1) source builds and runs on MacOSX as is — just remove the FreeBSD macros `__FBSDID($FREEBSD$);’ and use bsdmake(1). To attach to the modem, use `cu -l /dev/tty.modem’.
I would absolutely love to recover my old cu utility, but I searched through the FreeBSD ports database and they don’t have a specific «tip» port. Could you give us more details on how to get tip or cu to work on OSX (where to find the source, what to change in the code to get it to compile it, ect. ).
I did try to compile UUCP a while back but I was never able to squeeze a binary out of the source code.
Thanks for the «TIP»
I should not have alluded to «tip» in Solaris. it confused folks.
The command that’s pre-installed in Jaguar/Panther is «screen»
(refer to the «screen» man pages via the terminal).
I’ll leave comments about «cu» to someone else.
Could you please give the exact syntax of the screen-command you use to connect to tty.modem and to your USB-Serial-Adapter.
—
Jean-Claude Eischen
Swiss Federal Institute of Technology
Zurich — Switzerland
Thank you. I’ve been trying to figure out how to get tip/cu finctionality out of OSX. I was using zterm, but it crashes hard, and I can’t kill it, even with a «kill -9» I have a soekris Net4801 that I would like to connect to via a IOGear USB-Serial adapter. This did the trick!
FYI, the command was:
screen /dev/tty.usbserial (depends on the device your driver creates)
I just compiled minicom on an XServe. Here are a few things to be aware of re: the serial port.
1) Just like any cisco router or HP switch, etc, the XServe is configured to listen with a secure terminal on the serial port, for config purposes. Disable this before trying to use the serial port for other purposes.
You might *think* of editing /etc/ttys, but you actually want to edit /System/Library/StartupItems/SerialTerminalSupport/SerialTerminalSupport — and edit the line halfway through to say,
Once this is done, it’s easiest to just reboot the machine.
2) As mentioned above, the serial port is /dev/tty.serial. Here are some of the defaults I compiled into the program:
./configure —enable-dfl-port=/dev/tty.serial —enable-lock-dir=/var/spool/lock —enable-dfl-baud=9600
(of course, that’s because my application is to talk to a device at 9600N81, YMMV.)
3) Notice the lock dir mentioned above. There is no /usr/spool/uucp, or /var/lock, as mentioned in the man page. That’s why I compiled it with /var/spool/lock instead. I also ended up modifying the permissions on the lock directory, but there’s probably a better way to do that. Again, just FWIW.
Источник
Mac’s and serial TTY’s

Mac’s are excellent tools for accessing serial device TTY ports (to console into PBX’s, switches, and routers). You just need a serial to USB adapter, the right driver, and some Terminal software.
You can use screen, although Minicom (or a GUI program) offer more features and functionality.
Drivers:
Most Serial-to-USB adapters will work on a Mac with one of the following OS X drivers.
UPDATE: Mavericks (10.9) includes a driver for FTDI-based Serial-to-USB adapters.
➤ Prolific PL2303: PL2303_MacOSX_1_6_0.zip ➤ FTDI USB Serial: FTDIUSBSerialDriver_v2_3.zip
If your adapter doesn’t work with either of these, try the following sources:
- Silicon Labs — CP210x USB to UART Bridge Virtual COM Port (VCP) drivers.
- Belkin — USB Serial Adapters: F5U257, F5U103, F5U003 (poor OS X support).
- Keyspan serial-USB adapter drivers can be found in their Support Section.
After installing the correct driver, plug in your USB-Serial adapter, and open a Terminal session (Applications/Utilities).
Enter the command ls /dev/cu.* , and look for something like usbserial (or similar):
This indicates the USB-Serial driver is working. Select this port name in a terminal program.
You might notice that each serial device shows up twice in /dev, once as a tty.* and once as a cu.*. So, what’s the difference? Well, TTY devices are for calling into UNIX systems, whereas CU (Call-Up) devices are for calling out from them (eg, modems). We want to call-out from our Mac, so /dev/cu.* is the correct device to use.
The technical difference is that /dev/tty.* devices will wait (or listen) for DCD (data-carrier-detect), eg, someone calling in, before responding. /dev/cu.* devices do not assert DCD, so they will always connect (respond or succeed) immediately.
Software:
Having installed the right driver, our USB-Serial adapter will show up in /dev/cu.* (shown above). We now need to install some terminal emulation software before we can connect to anything.
- Two terminal methods are Screen and Minicom
- For a GUI solution, see OS X Serial Port Apps
Note: If you can’t find a driver for your adapter (eg, Belkin), try Serial which has built-in support for many USB-Serial devices.
Screen
It’s not actually necessary to download an install extra software, as you can use the Mac OS X built in Terminal and screen. Screen lacks some features, but it does include VT100/ANSI terminal emulation, and can be extremely useful.
- Open an OS X terminal session (window)
- Find the right TTY device. Type: ls /dev/cu.*
With the USB-Serial adapter plugged in, you’ll get a list, including something like this:
Type man screen in Terminal for further information on screen. (use ‘enter’ or ‘space’ to scroll, and ‘q’ to quit).
Minicom
Alternatively, if you’d like a few more features, and a retro feel, you can install minicom 2.2 .
.
Minicom supports VT100 emulation, which means it sorta kinda works with Meridian Mail (Function keys: fn + f-key).
- Download and run the minicom 2.2 package installer.
- Then manually edit your $PATH with sudo nano /private/etc/paths .
- Add the following line to the bottom of the file: /opt/minicom/2.2/bin , save and exit — then relaunch the terminal.
Run minicom -s first to configure your serial interface device name, and other options. Then, Save setup as dfl (default) and Exit. Your serial interface device name is found with ls /dev/cu.* (as shown above). Always launch minicom, with your selected serial adapter plugged in and available to avoid an error. In the example below, the serial device is /dev/cu.usbserial:

Configuration Options
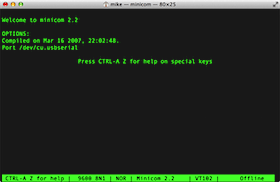
Connected to Port

Command Summary
In minicom, commands can be called by CTRL-A , for example, change your serial port settings with CTRL-A P
Press CTRL-A Z for a Command Summary, and help on special keys. Enter CTRL-A X to quit.
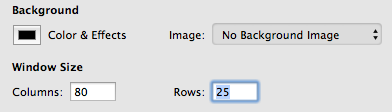
HINT: Change your OS X terminal window size to 80×25 (1 line more) so you can see the bottom Minicom status bar.
(Terminal Preferences ► Settings ► Window). Open a new window for this change to take effect.
 |
Note, the minicom installer creates /opt, and its not hidden in the OS X finder. Rectify this with: sudo chflags hidden /opt
Источник
Существует ли программа терминала OS X, которая может получить доступ к последовательным портам?
Какие программы могут выступать в роли терминала и получать доступ к последовательным портам?
Это не для терминального доступа по IP-соединению, поэтому я могу получить доступ к аппаратному устройству, подключенному к USB / последовательному конвертеру, работающему на 9600/8 / N / 1.
В магазине приложений доступно новое приложение для Mac под названием Serial . Полное раскрытие — я написал это. Основное преимущество перед другими приложениями заключается в том, что он может работать с большинством USB-устройств без последовательной установки драйверов, так как он имеет свои встроенные драйверы. Он также выполняет полную эмуляцию терминала, поэтому вы можете использовать его для работы с Linux или другими устройствами, которым это требуется. Вы также можете попробовать это бесплатно.
Кроме того, Apple начала включать свой собственный драйвер для устройств на базе FTDI в Mavericks (10,9). Таким образом, если вы используете 10.9 или более позднюю версию и ваше устройство имеет встроенную микросхему FTDI, вы можете использовать встроенную экранную команду в терминале для доступа к устройству, не беспокоясь о драйверах.
Вы можете использовать команду терминала, screen чтобы сделать это .
Мне нравится использовать [screen] для подключения к последовательным консолям, т.е.
Мне часто приходится настраивать маршрутизатор через консольный порт, поэтому для доступа я использую последовательный адаптер Keyspan. Тогда возникают две проблемы: ZTerm — ужасное приложение для Mac OS X. Он не обновлялся в течение пяти лет или около того и не является универсальным двоичным кодом. Разработчик, похоже, не спешит исправлять ситуацию. Это не стоит платы за условно-бесплатное программное обеспечение в его нынешнем виде. Minicom требует установки Fink или MacPorts и является слишком сложным. Решение: используйте экран, терминал и немного AppleScripting.
Сначала запустите редактор скриптов и введите / вставьте следующий код:
Скомпилируйте и сохраните как приложение из редактора сценариев, и у вас будет приложение с двойным щелчком для запуска последовательного сеанса терминала. Вы можете настроить это немного — вы можете изменить цвета экрана или количество столбцов или строк. Вам также может понадобиться настроить экранную команду с другим именем устройства, если вы используете что-то отличное от последовательного адаптера Keyspan (выполните ls tty * из каталога / dev /, чтобы получить правильное имя).
Экран использует Control-A, чтобы принимать команды, направленные на него. Поэтому введите Control-A, а затем Control-, чтобы выйти из сеанса экрана. Если вам не удастся сделать это и выйти из сеанса терминала, вы оставите сеанс экрана активным, а последовательный ресурс недоступен, пока не завершите сеанс экрана вручную. Экран man покажет вам дальнейшие команды для отправки на экранную сессию.
Если кто-то может ответить ссылкой на учебник о том, как обернуть интерактивное приложение Unix в Какао, это будет следующим шагом — было бы неплохо сделать это без участия Терминала. Если вы предпочитаете использовать Minicom, вы все равно можете использовать AppleScript, чтобы превратить его в хорошее запускаемое приложение — используйте этот старый совет, чтобы найти правильные команды командной строки.
Источник
Инструкция по использованию minicom в linux
Minicom — это консольная программа операционной системы linux для установки сеанса связи с устройствами через последовательный com-порт. Для подключения к com-порту программу можно запускать с заданными аргументами и использовать псевдо-графический оконный интерфейс для изменения и сохранения настроек подключения. Рассмотрим настройку программы на примере популярной операционной системы семейства linux — Ubuntu.
Установка программы в Debian/Ubuntu:
Подключение будет осуществляться к последовательному порту устройства со следующими настройками:
Скорость/Четность/Биты (Bps/Parity/Bits) = 38400 8N1.
Настройка подключения к com-порту
Запуск программы лучше выполнять в привилегированном режиме sudo, т.к. программе могут понадобиться повышенные права для доступа к порту или для сохранения настроек.
Для доступа к меню конфигурации программу minicom нужно запустить с параметром -s:

Выбираем пункт «Настройка последовательного порта».
При использовании нуль-модемного кабеля, адресом последовательного порта в linux будет /dev/ttyS0 для COM1, /dev/ttyS1 для COM2 и т.д. В случаях, когда используется адаптер USB-to-COM, в качестве порта ввода-вывода будет использоваться /dev/ttyUSB0 или /dev/ttyUSB1.
Список доступных портов можно посмотреть командой:
Настройки для подключения к последовательному порту USB-to-COM с заданными параметрами будут выглядеть примерно так:

Для выбора последовательного порта нужно нажать клавишу [A] и отредактировать значение.
Для изменения скорости нажать клавишу [E] и затем [D], чтобы выбрать скорость 38400.

Нажимаем два раза клавишу [Enter], чтобы принять изменения и вернуться в начало меню «Конфигурация».
Сохраняем настройки, выбрав пункт «Сохранить настройки как dfl». Это изменит настройки запуска программы, используемые по умолчанию.

Если выбрать пункт «Сохранить настройки как..» и указать имя файла настроек, например «cisco», то это не изменит настройки по умолчанию и в дальнейшем можно будет запускать программу с конкретными параметрами, указав имя файла с настройками.
В завершении настройки переходим к пункту «Выход» и если все настроено правильно, то будет установлен сеанс подключения по последовательному порту.
Запуск minicom с аргументами
Minicom можно запускать без выполнения настроек в оконном режиме. Для этого достаточно выполнить запуск программы с заданными аргументами.
Для подключения к устройству с помощью адаптера USB-to-COM со скоростью 38400:
Для подключения к устройству с использованием нуль-модемного кабеля:
Источник


