- Синий экран смерти. Анализ и расшифровка дампа памяти при BSOD
- Анализ дампа памяти. Расшифровываем minidump.
- Комментариев: 8
- Открываем дампы памяти DMP
- Варианты открытия DMP
- Способ 1: BlueScreenView
- Способ 2: Microsoft Debugging Tools for Windows
- Заключение
- Просмотреть Minidump после падения системы
- 1. Включить Minidump
- 2. Расшифровать Minidump
- How to read the small memory dump file that is created by Windows if a crash occurs
- Small memory dump files
- Configure the dump type
- Tools to read the small memory dump file
- Open the dump file
- Sample commands
- Examine the dump file
- Simplify the commands by using a batch file
Синий экран смерти. Анализ и расшифровка дампа памяти при BSOD
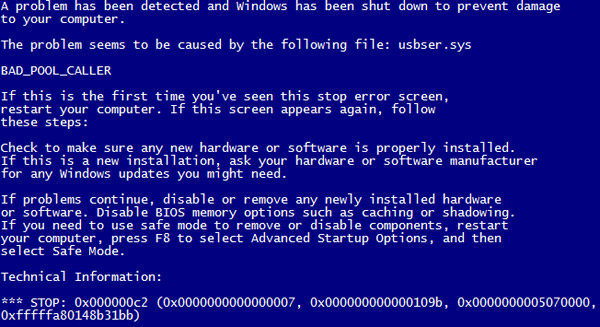
Windows вывалился в синий экран смерти. Что делать? Однозначного ответа на этот вопрос нет, так как вариантов лечения и расшифровки синих экранов смерти великое множество. Попробую рассказать как выявить причину синего экрана и диагностировать ошибку с вероятностью, близкой к 100%, а гадание оставим синоптикам.
На прошлой неделе ремонтировал компьютер на котором вылетал синий экран смерти с разными ошибками, чаще всего BAD_POOL_CALLER — stop 0x000000c2. Диагностируется данная ошибка довольно сложно, на его примере и попытаюсь рассказать как узнать причину возникновения по синего экрана смерти.
В процессе диагностики не обойтись без анализа специального файла minidump (дамп памяти) системы. Такие файлы создаются каждый раз после сбоя работы системы и содержат информацию о том, что к этому привело. Обычно все файлы minidump при BSOD сохраняются в папку C:\Windows\Minidump. Кроме того, имя файла содержит текущую дата его создания, чтобы не путаться когда возникла ошибка, если файлов много.
Проверьте, включено ли на вашем компьютере создание файлов minidump при сбое системы.
Анализ дампа памяти. Расшифровываем minidump.
Нам понадобится установить Debugging Tools for Windows и скачать утилиту непосредственно для расшифровки файла дампа kdfe.cmd
Распаковываем скрипт kdfe.cmd и кладем его непосредственно в корень диска диска C:\ или создаем каталог C:\dump. Тут уж как вам удобнее. В командной строке пишем:
Выведется список всех минидампов, из папки C:\Windows\Minidump\ и скрипт предложит указать какой именно дамп будем анализироваться, либо можно самостоятельно выбрать требуемый дамп при запуске скрипта:
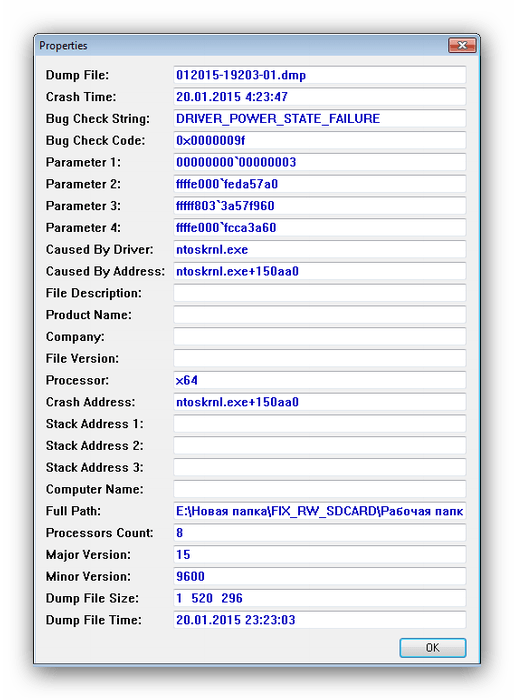
На мой взгляд первый вариант удобнее. Пример того что выдал скрипт при анализе одного из дампов памяти:
Еще одно доказательство что лучше избавляться от этих дебильных Амиго и майлру агентов. Таким же образом можно выявить и другие ошибки, приводящие к BSOD.
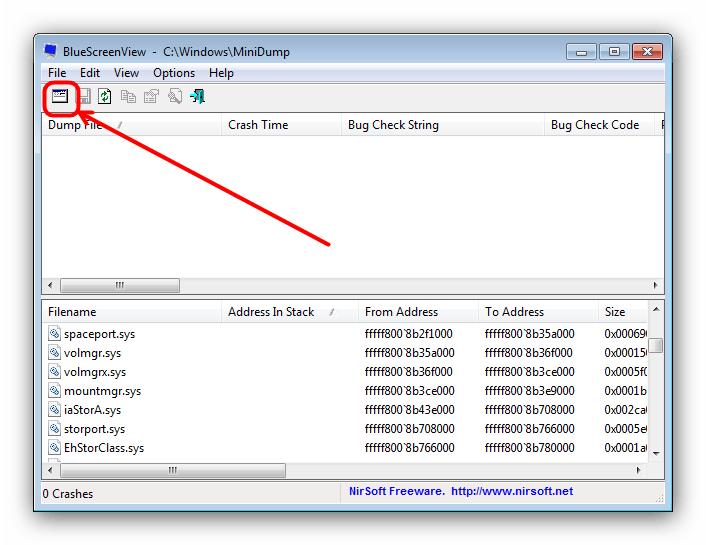
Существует еще одна интересная утилитка BlueScreenView, часто встречается на загрузочных флешках-реаниматорах, о которой я уже писал ранее на страницах блога, но на мой взгляд менее понятная для новичков.
Если считаете статью полезной,
не ленитесь ставить лайки и делиться с друзьями.
Комментариев: 8
Спасибо за детальное описание. Помогло.
Не запускается kdfe.cmd , пишет — «Ошибка в синтаксисе команды»
Просто надо изменить эту утилиту.Открыть с помощью блокнота и изменить путь Debudding Tools.Там на какой то строке меняешь в двух-четырех местах вместо program files как у себя, например program files(x86).
Не помогло так как в cmd не находит выше написанное
У меня тоже была подобная ошибка при запуске
Сам догадался посмотреть сценарий и изменить
строку в файле kdfe.cmd
Вот что надо изменить и будет работать:
Я в таких случаях переустанавливал, пока диск не истерся до нечитаемого состояния. Потом линуха поставил.
98 % летит видяшник , подключитесь к встроенной в мамку.. и станет ясно ! удачи ..мужики !
Для начала, надо переписать саму ошибку, то есть например хх. 57 или что то типа того, бывают такие поломки как, полностью выход из строя жесткого диска, в таком случае никакой дамп вы уже не прочтете, у меня так было, поломка ssd диска, там было что то типа хх. 069, благо был рядом второй комп, нашел в инете расшифровку с разными ошибками и поломками, и так быстро установил причину синего экрана, после установки другого диска с системой, пока ssd был в ремонте, проблема исчезла сама собой.
Открываем дампы памяти DMP

Варианты открытия DMP
Расширение DMP зарезервировано за файлами дампов памяти: снимков состояния RAM в определённый момент работы системы или отдельного приложения, которые нужны разработчикам для последующей отладки. Такой формат используют сотни видов ПО, и рассмотреть их все в объёмах данной статьи невозможно. Наиболее же часто встречающийся тип DMP-документа – так называемый малый дамп памяти, где записаны подробности сбоя системы, который привёл к появлению синего экрана смерти, потому на нём и сосредоточимся.
Способ 1: BlueScreenView
Небольшая бесплатная утилита от разработчика-энтузиаста, основной функцией которой является предоставление возможности просмотра DMP-файлов. Не нуждается в установке на компьютер – достаточно распаковать архив в любое подходящее место.
- Для открытия отдельного файла нажмите на кнопку с иконкой программы на панели инструментов.
В окне «Advanced Options» отметьте чекбокс «Load a single Minidump File» и нажмите «Browse».

С помощью «Проводника» перейдите к папке с DMP-файлом, выделите его и нажмите «Открыть». 
По возвращении в окно «Advanced Options» нажмите «ОК».

Утилита BlueScreenView рассчитана на продвинутых пользователей, потому её интерфейс может показаться сложным для новичка. Кроме того, доступна она только на английском языке.
Способ 2: Microsoft Debugging Tools for Windows
В составе среды разработки Windows SDK распространяется инструмент для отладки, который называется Debugging Tools for Windows. Приложение, рассчитанное на разработчиков, способно открывать в том числе и DMP-файлы.
- Для экономии места можно выбрать только Debugging Tools for Windows, отметив соответствующий пункт в процессе загрузки компонентов.

Запустить утилиту можно через «Пуск». Для этого откройте «Все программы», выберите «Windows Kits», а затем — «Debugging Tools for Windows».
Для запуска программы используйте ярлык «WinDbg». 
Внимание! Для открытия DMP-файлов используйте только x64- или x86-версии дебаггера!


Утилита Debugging Tools for Windows ещё более сложная, чем BlueScreenView, и тоже не имеет русской локализации, однако предоставляет более подробную и точную информацию.
Заключение
Как видим, основную сложность при открытии DMP-файлов составляют сами программы, рассчитанные больше на специалистов, чем на рядовых пользователей.
Просмотреть Minidump после падения системы
В Windows существует такая вещь, как minidump. Это файл, который создается после сбоя работы системы с информацией о том, что к этому привело. Но для того, чтобы просмотреть этот файл нужна специальная утилита.
О том как включить функцию Minidump и суметь прочитать его и пойдет речь в этой статье.
1. Включить Minidump
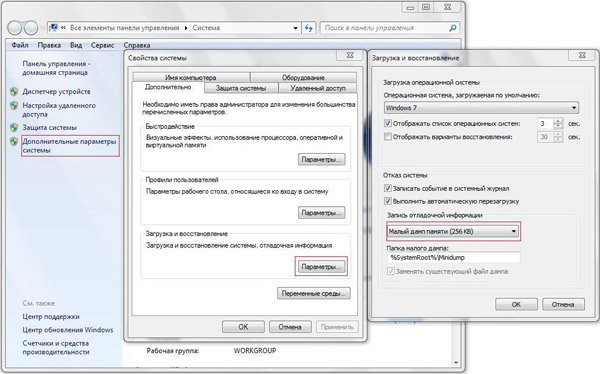
“Пуск” – “Настройка” – “Панель управления” – “Система”, переходим во вкладку “Дополнительно”, в блоке Загрузка и восстановление жмем “Параметры”. Внизу должен быть выбран “Малый дамп памяти” и указан каталог, где он будет храниться:

Теперь, если друг система падает в Синий Экран Смерти (BSoD), то в каталоге C:\Windows\Minidump создастся файл, в имени которого будет текущая дата.
2. Расшифровать Minidump
Для этого нам понадобится установить Debugging Tools for Windows и скачать утилиту непосредственно для расшифровки файла дампа kdfe.cmd
Когда установили Debugging Tools, копируем kdfe.cmd в корень диска C:\
Запускаем командную строку “Пуск” -“Выполнить”, вписываем команду cmd
Теперь в черном окне пишем следующее: C:\kdfe.cmd C:\WINDOWS\Minidump\Mini120710-01.dmp , где “Mini120710-01.dmp” – имя вашего файла дампа.
Результат выглядит так:

В моем случае сбой системы был вызван браузером Google Chrome.
How to read the small memory dump file that is created by Windows if a crash occurs
This article describes how to examine a small memory dump file. A small memory dump file can help you determine why your computer crashed.
Original product version: В Windows 10 — all editions, Windows Server 2012 R2
Original KB number: В 315263
If you are looking for debug information for Windows 8 or later, please check Debugging Tools for Windows (WinDbg, KD, CDB, NTSD). For more information about small memory dump, please check Small Memory Dump.
Small memory dump files
If your computer crashes, how can you find out what happened, fix the issue and it prevent it from happening again? You may find the small memory dump file useful in this situation. The small memory dump file contains the smallest amount of useful information that could help you identify why your computer crashed. The memory dump file contains the following information:
- The Stop message, its parameters, and other data
- A list of loaded drivers
- The processor context (PRCB) for the processor that stopped
- The process information and kernel context (EPROCESS) for the process that stopped
- The process information and kernel context (ETHREAD) for the thread that stopped
- The Kernel-mode call stack for the thread that stopped
To create a memory dump file, Windows requires a paging file on the boot volume that is at least 2 megabytes (MB) in size. On computers that are running Microsoft Windows 2000, or a later version of Windows, a new memory dump file is created each time that a computer crash may occur. A history of these files is stored in a folder. If a second problem occurs and if Windows creates a second small memory dump file, Windows preserves the previous file. Windows gives each file a distinct, date-encoded file name. For example, Mini022900-01.dmp is the first memory dump file that was generated on February 29, 2000. Windows keeps a list of all the small memory dump files in the %SystemRoot%\Minidump folder.
The small memory dump file can be useful when hard disk space is limited. However, because of the limited information that is included, errors that were not directly caused by the thread that was running at the time of the problem may not be discovered by an analysis of this file.
Configure the dump type
To configure startup and recovery options to use the small memory dump file, follow these steps.
Because there are several versions of Microsoft Windows, the following steps may be different on your computer. If they are, see your product documentation to complete these steps.
Click Start, and then click Control Panel.
Double-click System, and then click Advanced system settings.
Click the Advanced tab, and then click Settings under Startup and Recovery.
In the Write debugging information list, click Small memory dump (64k).
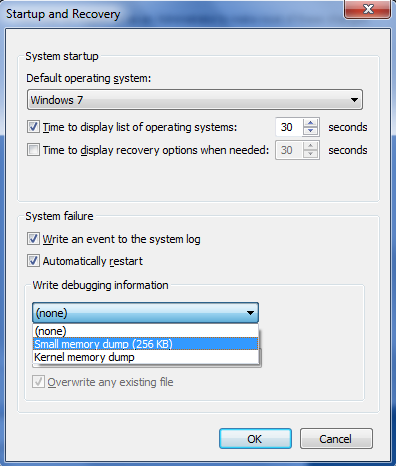
To change the folder location for the small memory dump files, type a new path in the Dump File box or in the Small dump directory box, depending on your version of Windows).
Tools to read the small memory dump file
Use the Dump Check Utility (Dumpchk.exe) to read a memory dump file or verify that the file has been created correctly.
The Dump Check Utility does not require access to debugging symbols. Symbol files hold a variety of data which are not actually needed when running the binaries, but which could be very useful in the debugging process.
For more information about how to use Dump Check Utility in Windows NT, Windows 2000, Windows Server 2003 or Windows Server 2008, see Microsoft Knowledge Base article 156280: How to Use Dumpchk.exe to check a memory dump file.
For more information about how to use Dump Check Utility in Windows XP, Windows Vista or Windows 7, see Microsoft Knowledge Base article 315271: How to use Dumpchk.exe to check a Memory Dump file.
Or, you can use the Windows Debugger (WinDbg.exe) tool or the Kernel Debugger (KD.exe) tool to read small memory dump files. WinDbg and KD.exe are included with the latest version of the Debugging Tools for Windows package.
To install the debugging tools, see the Download and Install Debugging Tools for Windows webpage. Select the Typical installation. By default, the installer installs the debugging tools in the following folder:
C:\Program Files\Debugging Tools for Windows
This Web page also provides access to the downloadable symbol packages for Windows. For more information about Windows symbols, see Debugging with Symbols, and the Download Windows Symbol Packages webpage.
For more information about dump file options in Windows, see Overview of memory dump file options for Windows.
Open the dump file
To open the dump file after the installation is complete, follow these steps:
Click Start, click Run, type cmd , and then click OK.
Change to the Debugging Tools for Windows folder. To do this, type the following at the command prompt, and then press ENTER:
To load the dump file into a debugger, type one of the following commands, and then press ENTER:
The following table explains the use of the placeholders that are used in these commands.
| Placeholder | Explanation |
|---|---|
| SymbolPath | Either the local path where the symbol files have been downloaded or the symbol server path, including a cache folder. Because a small memory dump file contains limited information, the actual binary files must be loaded together with the symbols for the dump file to be correctly read. |
| ImagePath | The path of these files. The files are contained in the I386 folder on the Windows XP CD-ROM. For example, the path may be C:\Windows\I386 . |
| DumpFilePath | The path and file name for the dump file that you are examining. |
Sample commands
You can use the following sample commands to open the dump file. These commands assume the following:
- The contents of the I386 folder on the Windows CD-ROM are copied to the C:\Windows\I386 folder.
- Your dump file is named C:\Windows\Minidump\Minidump.dmp .
Sample 2. If you prefer the graphical version of the debugger instead of the command-line version, type the following command instead:
Examine the dump file
There are several commands that you can use to gather information in the dump file, including the following commands:
- The !analyze -show command displays the Stop error code and its parameters. The Stop error code is also known as the bug check code.
- The !analyze -v command displays verbose output.
- The lm N T command lists the specified loaded modules. The output includes the status and the path of the module.
The !drivers extension command displays a list of all drivers that are loaded on the destination computer, together with summary information about their memory use. The !drivers extension is obsolete in Windows XP and later. To display information about loaded drivers and other modules, use the lm command. The lm N T command displays information in a format that is similar to the old !drivers extension.
For help with other commands and for complete command syntax, see the debugging tools Help documentation. The debugging tools Help documentation can be found in the following location:
C:\Program Files\Debugging Tools for Windows\Debugger.chm
If you have symbol-related issues, use the Symchk utility to verify that the correct symbols are loaded correctly. For more information about how to use Symchk, see Debugging with Symbols.
Simplify the commands by using a batch file
After you identify the command that you must have to load memory dumps, you can create a batch file to examine a dump file. For example, create a batch file and name it Dump.bat. Save it in the folder where the debugging tools are installed. Type the following text in the batch file:
When you want to examine a dump file, type the following command to pass the dump file path to the batch file:


