- Настройка Ministra Player (доступен архив)
- Ministra player ��� linux
- Ministra TV Platform installation
- System Requirements
- Choosing of the distribution
- Installing the Ministra TV Platform on Ubuntu 14.04
- Necessary services & packets
- Installation order
- Upgrading Ubuntu 14.04 to 16.04 with Ministra TV Platform installed
- Backing up current Ministra system
- Ministra portal update
- Installing the Ministra TV Platform on Ubuntu 16.04
- Installation order
- Configure MySQL, PHP, Node.js, Apache, Nginx
- MySQL
- For Ubuntu 14.04
- For Ubuntu 16.04
- For Ubuntu 14.04
- For Ubuntu 16.04
- Apache
- Nginx
- Updating
- Localization
- Configuration of the Storage (separate server)
- Necessary services & packets
- Installation order
- «TV archive» settings
- Security
- User identification
- Restricting access in Admin interface
- STB — Authorization
- Portal access limitation for new STBs
- Access control based on the set-top box model
- Access to portal using login&password
- Billing
- Storage configuring
- Temporary URLs
- TV channel monitoring
- Firewall
Настройка Ministra Player (доступен архив)
Ministra Player – приложение для просмотра каналов IPTV.
Простой в управлении и многофункциональный плеер для аудио и видеоконтента, предоставляемого вашим IPTV/OTT/ провайдером.
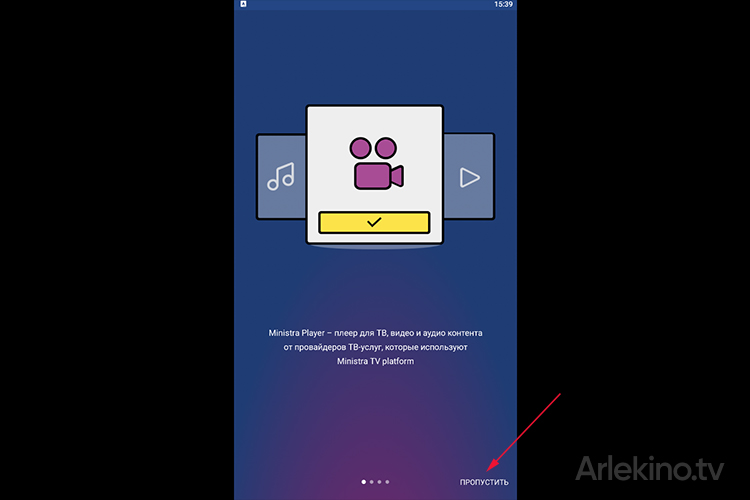
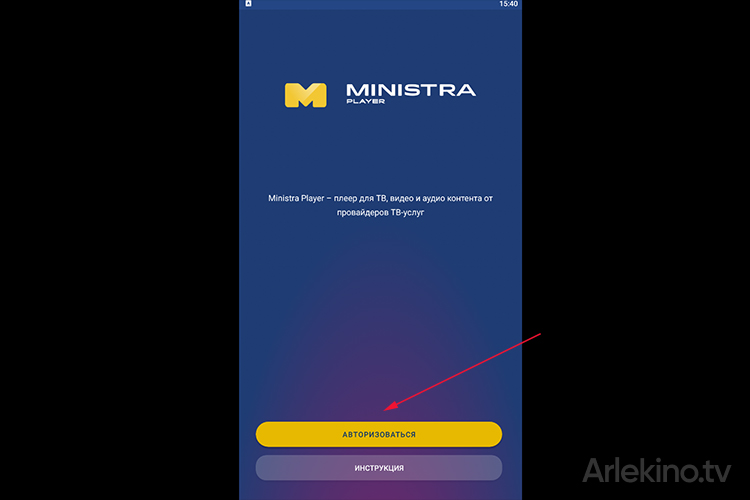
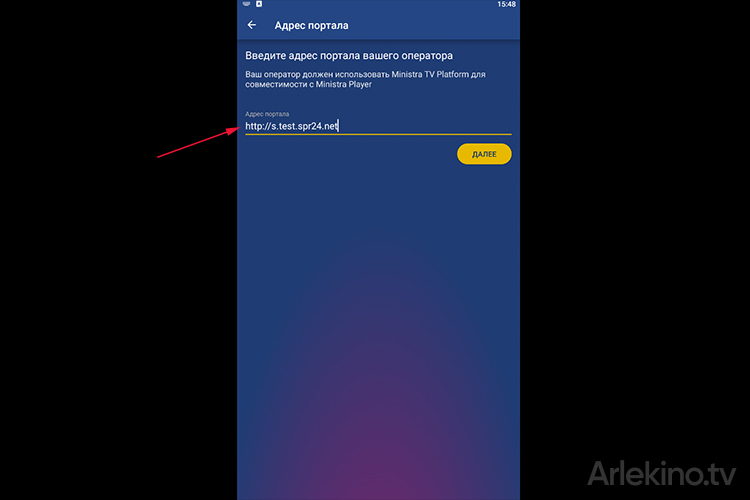
Давайте рассмотрим настройку Ministra Player по пунктам.
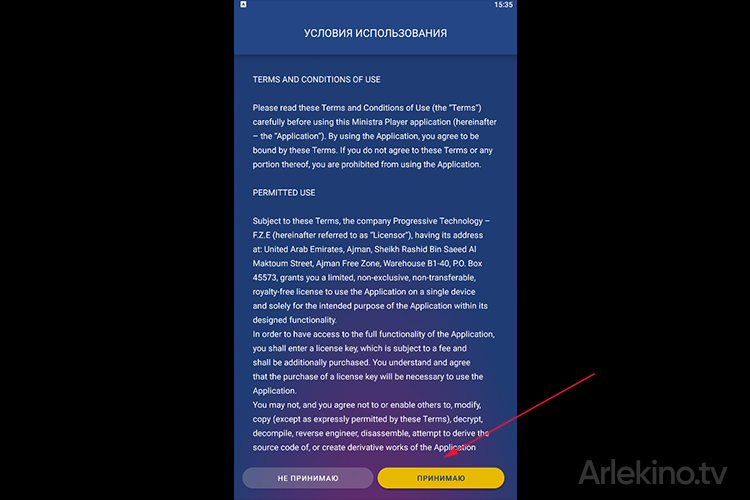
2. Жмем «Пропустить» на обучение.
3. Нажимаем «Авторизоваться».
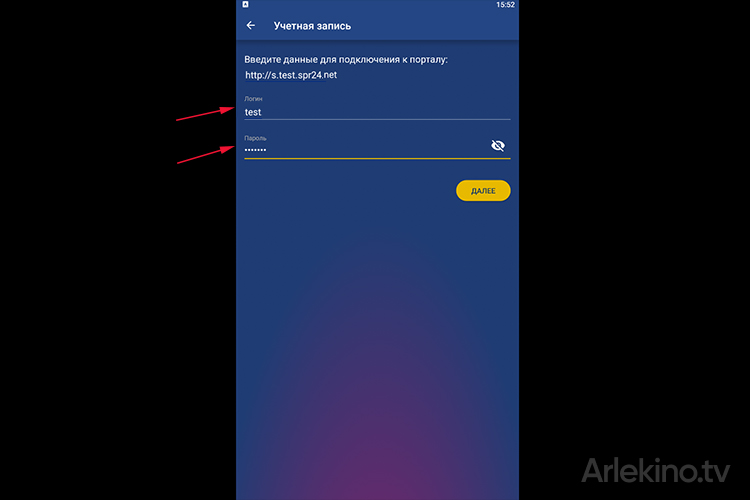
4. Прописываем адрес портала полученный в личном кабинете. Доступ к которому можно получить на сайте sharavoz.tv.
5. Вводим логин и пароль полученные там же где и адрес портала в личном кабинете. И жмем «далее»
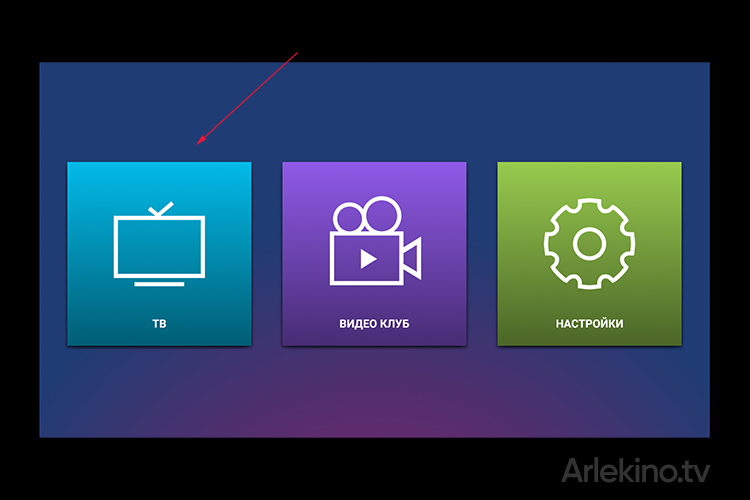
6. Если вы все сделали правильно то вы будите авторизованы и вам нужно будет перейти на вкладку «ТВ»
7. Появится меню с возможностью выбора «категорий» и каналов.
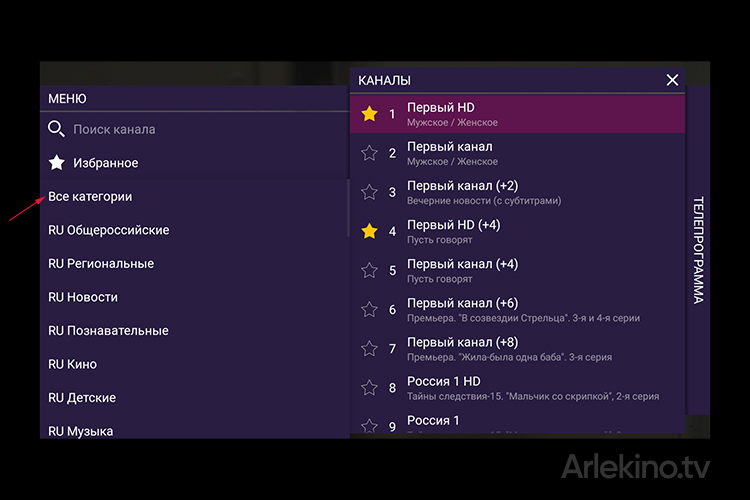
8. Выбираем интересующий нас канал. Приятного просмотра.

На данном плеере возможен просмотр архива.
Источник
Ministra player ��� linux

![]()
![]()


![]()

Auto install script it will no longer be available for free due to many abuses. Anyone who wants to use it can pay a minimum fee 0.99€
Stalker WM Portal road warrior installer for Debian, Ubuntu
This script will work on Debian, Ubuntu and probably other distros of the same families, although no support is offered for them. It isn’t bulletproof but it will probably work if you simply want to setup a Stalker WM Portal on your Debian/Ubuntu box. It has been designed to be as unobtrusive and universal as possible.
This is a free shell script under GNU GPL version 3.0 or above Copyright (C) 2017 LinuxHelps project. Feedback/comment/suggestions : https://linuxhelps.net/ Author Ivan Bachvarov a.k.a SlaSerX
![]() — You can make one-time donations via PayPal. I’ll probably buy a coffe. ☕ Thanks! ❤️
— You can make one-time donations via PayPal. I’ll probably buy a coffe. ☕ Thanks! ❤️

Script work only on Clean Debian/Ubuntu install servers
Stalker auto install script v1.3.9 — RELEASE
- Update to last version of Ministra 5.6.8
- Implemented support for Ubuntu 18.04
- Implemented support for Ubuntu 20.04
- Fix GeoIP DB
- fix problem with phing
- Patch composer
- Fix bugs
- Update links
- High Ram usage Fix
Stalker auto install script v1.3.8 — RELEASE
- Update to last version of Ministra 5.6.7
- Implemented support for Ubuntu 18.04
- Implemented support for Ubuntu 20.04
- Fix GeoIP DB
- fix problem with phing
- Patch composer
- Fix bugs
- Update links
- High Ram usage Fix
Stalker auto install script v1.3.7 — RELEASE
- Implemented support for Ubuntu 18.04
- Implemented support for Ubuntu 20.04
- Fix GeoIP DB
- fix problem with phing
- Patch composer
- Fix bugs
- Update links
- High Ram usage Fix
Stalker auto install script v1.3.6 — RELEASE
- Added support SFVIP player
- Fix Problem GeoIP DB ( Thanks to Michael Kaprielian )
- Fix bugs from Ubuntu 20
- add fail2ban Protection
- High Ram usage Fix
Stalker auto install script v1.3.5 — RELEASE
- Protect Channel from unautorized access
- Fix bugs from Ubuntu 20 (Beta)
- Update GeoIP DB
- add fail2ban Protection (Ubuntu 16)
- High Ram usage Fix
Stalker auto install script v1.3.4 — RELEASE
- Update version Ministra 5.6.6
- Added new mag devices support
- Fix bugs from Ubuntu 20.04
- Added support STB of models MAG500A, MAG520, MAG524
- Fixed disable channel filter by config option
Stalker auto install script v1.3.3 — RELEASE
- Added new mag devices support
- Fix bugs from Ubuntu 20.04
- Links for download changed
- Implemented support for Ubuntu 20.04
- fix problem with phing
- Patch composer
- Fix bugs
- Update links
Stalker auto install script v1.3.2 — RELEASE
- Implemented support for Ubuntu 20.04
- fix problem with phing
- Patch composer
- Fix bugs
- Update links
Stalker auto install script v1.3.1 — RELEASE
- fix problem with phing
- Patch composer
- Fix bugs
Stalker auto install script v1.3.0 — RELEASE
- Update Version Ministra 5.6.5
- Patch composer
- Fix bugs
Stalker auto install script v1.2.9 — RELEASE
- fix bugs
- Update Version Ministra 5.6.1
- Install Ministra 5.5.0
- Fix Smart Launcher Applications
Stalker auto install script v1.2.8 — RELEASE
- fix bugs
- Update Version Ministra 5.6.0
- add Custom.ini config
- Added Apache CloudFlare Module
- Added PHPMyadmin
Stalker auto install script v1.2.7 — RELEASE
- fix bugs
- add kernel modifications
- add new colors
Stalker auto install script v1.2.6 — RELEASE
- Add new install script for Debian 8
- Support Debian 8
- fix bugs
Stalker auto install script v1.2.5 — RELEASE
- Add new options for choice — Install Storage Server with Secure Links for VOD
- Implemented support for Let`s Encrypt SSL
- fix bugs
Stalker auto install script v1.2.4 — RELEASE
- Implemented support for Ubuntu 16.04 and PHP 7.
- Fix UTF-8 terminal support in Lion
- Add dialog menu for choice Ministra or Stalker version installing
- Checking OS Support
- fix bugs
- fix deploy
- Last Version Stalker Portal Ministra 5.5.0
- Last Version Stalker Portal 5.2.0
- fix nginx configs
- fix vendor
Stalker auto install script v1.2.3 — RELEASE
- Add dialog menu for choice Ministra or Stalker version installing
- Checking OS Support
- fix bugs
- fix deploy
- Last Version Stalker Portal Ministra 5.4.1
- Last Version Stalker Portal 5.2.0
- fix nginx configs
- fix vendor
Stalker auto install script v1.2 — RELEASE
- Add dialog menu for choice Ministra or Stalker version installing
- Checking OS Support
- fix bugs
- fix deploy
- Last Version Stalker Portal Ministra 5.3.0
- Last Version Stalker Portal 5.1.1
- fix nginx configs

![]() — You can make one-time donations via PayPal. I’ll probably buy a coffe. ☕ Thanks! ❤️
— You can make one-time donations via PayPal. I’ll probably buy a coffe. ☕ Thanks! ❤️
Please Help me with Tweet  Thanks! ❤️
Источник
Ministra TV Platform installation
We are sorry that due to the change of the Stalker Middleware product name to the Ministra TV platform, in some articles you will still see the name Stalker Middleware.
System Requirements
Approximately for 1000 subscribers
| Middlware Server with Ministra TV platform portal | |
|---|---|
| CPU | Xeon E3 1220 |
| RAM | 8Gb |
| HDD | |
| RAM | 32Gb |
| HDD | System — 2xHDD HARDWARE RAID1, Content — 12xHDD HARDWARE RAID5 |
Choosing of the distribution
The platform works in any *nix system, but we strongly recommend to use the stable 64-bit distribution of Ubuntu 16.04 LTS or Ubuntu 14.04 LTS . The work with other distributions is not guaranteed, or some of the functions of the middleware may not be available.
| Ministra TV Platform version | Recommended Operating System |
|---|---|
| 5.5.0 and higher | Ubuntu Server LTS 16.04 |
| lower than 5.5.0 | Ubuntu Server LTS 14.04 |
Installing the Ministra TV Platform on Ubuntu 14.04
Necessary services & packets
(for version >= 4.8.0) **
(for PVR management)
(for stalkerd — PVR management)
* — beginning from the version 4.8.35 they are automatically installed with phing using.
** — phing installation:
Example of installing all necessary services & packages for Ubuntu 14.04.3 LTS (performed by superuser “root”):
Installation order
When installing Ministra TV Platform on Ubuntu 14.04, we strongly recommend you to upgrade the NPM version to 2.15.11. Otherwise, it is possible to incorrectly install the list of application packages.
4. Make the necessary changes in the portal config. To change the settings/configuration you need to create a configuration file and add to it different from settings items.
Do not edit file config.ini! If you want to change some settings — create file
and add the necessary configuration.
Do not copy the entire content of config.ini in custom.ini. Add customized sections to custom.ini only. For example, if you want to change MySQL configuration, then create a file
with the following lines:
6. It is necessary to upgrade the version of NPM to 2.15.11.
If an error Error: CERT_UNTRUSTED occurs during the installation of npm, use the command:
7. Go to and run:
Upgrading Ubuntu 14.04 to 16.04 with Ministra TV Platform installed
Backing up current Ministra system
1. Create a directory for the backup files:
2. Back up the database:
- stalker — value of the mysql_user parameter in the configuration file;
- stalker_db — db_name parameter value in the configuration file;
- 1 — value of the mysql_pass parameter in the configuration file.
Note! If you use a host and port other than those specified by default, they must be specified in the command parameters.
Ministra portal update
To install Ministra TV Platform on Ubuntu 16.04, you must use Ministra TV Platform version 5.4.0 and higher. Therefore, before updating the server, you must update Ministra if the current version used is lower than 5.4.0.
2. Perform release upgrade.
Make sure you have the update-manager-core package installed:
Remove packages that are no longer required:
Run the command to update:
3. Type y to enable the run of the additional ssh daemon on port 1022. It will be required to access the system in case the update is not completed.
4. Next, you’ll be informed that do-release-upgrade is starting a new instance of sshd on port 1022.
Click Enter.
5. Type y to confirm that you want to start the upgrade.
6. Select to restart automatically the services when necessary.

7. After confirming that the services restart automatically, a few messages will appear stating that some default configuration files have been changed.
Note! You probably changed some default configuration files, so follow the instructions below and reject offers to replace the changed files.
8. Select the keep the local version currently installed option to configure unattended-upgrades.

9. On the new system, without any configuration changes, you can answer y to confirm the removal of unnecessary packages. On a system that has been significantly modified, you can answer d and view the list of packages proposed for removal in case you want to reinstall some of them later.
10. After the update is complete, you must restart the server. Enter y to continue.
11. When using SSH, a message displays:
12. You may need to type any key to exit, since the SSH session was interrupted on the server side. Wait for the system to reboot and log in again.
13. Verify that the system is updated to Ubuntu 16.04. To do this, run the following command:
14. Install the required packages.
15. Set proper MySQL sql_mode.
16. Restart MySQL service.
17. Enable PHP short tags.
18. Enable PHP mod_encrypt.
19. If necessary, install NPM 2.15.11.
20. Remove PHP5 directory.
21. Go to and run:
Installing the Ministra TV Platform on Ubuntu 16.04
Installation order
Note! To install Ministra TV Platform on Ubuntu 16.04, you must use Ministra TV Platform version 5.4.0 and higher. Versions lower than Ministra TV Platform 5.4.0 are only compatible with Ubuntu 14.04. When installing Ministra TV Platform 5.4 on Ubuntu 16.04, we strongly recommend you to downgrade the NPM version to 2.15.11. Otherwise, incorrect installation of the list of application packages is possible.
1. Install system updates:
2. Install and configure apache:
For details on how to configure Apache, see here.
3. Install the remaining packages with one command:
4. Unzip the archive with the version to the root directory of the web server /var/www/ . Project files should be available by the URL http:// /stalker_portal/ ;
5. Create MySQL user with permission to access stalker_db database only:
6. Make the necessary changes in the portal config. To change the settings/configuration you need to create a configuration file and add to it different from settings items.
8. It is necessary to downgrade the version of NPM to 2.15.11.
If the Error: CERT_UNTRUSTED error occurs during the installation of npm, use the command:
9. Go to and run:
Configure MySQL, PHP, Node.js, Apache, Nginx
MySQL
For Ubuntu 14.04
For Ubuntu 16.04
Then you need to restart MySQL server:
For Ubuntu 14.04
For Ubuntu 16.04
Apache
- Make sure that the package libapache2-mod-php5filter is not installed on the system. If necessary, remove it.
- Remove content of /etc/apache2/sites-available/000-default.conf Do not forget to make backup.
- Add next content to /etc/apache2/sites-available/000-default.conf
Nginx
- Example of configuration /etc/nginx/sites-available/default :
Admin interface will be available via URL
Default access:
login: admin
password: 1
The recommended browser for the admin interface: — Mozilla Firefox and Google Chrome
If it is necessary you can change the admin password in MySQL:
The client interface is available
.
Client interface designed for STB MAG* only.
Portal URL can be set in STB:
From Embedded portal — System Settings (press SET or SETUP) → Servers → Portals → (Portal 1 URL and/or Portal 2 URL)
Updating
- Fill the download request form for the Ministra TV Platform on the official website. Please note, that the download link for the further updates will be sent to the email specified in the form. If you don’t receipt reply to your request, please contact technical support: support@infomir.eu
Rename the folder with the previous version. For example: .
Copy file from the old version to the new one;
Copy from the old version to the new one;
Copy all files (except the file) from and
from the previous version to the corresponding directories of the new version.
Pay attention! Before upgrading to the new version, you need to install the recommended version of NPM 2.15.11.
Enter into and run command:
Localization
Ministra TV platform interface uses the following locales: Russian (RU), English (EN), Ukrainian (UK), Polish (PL), Greek (EL), Italian (IT), German (DE), Slovenian (SK), Spanish (ES). In default Ministra deducts the current localization variable from the main software and install the interface localization according to it’s variable.
To install Ministra portal localization by default it is necessary:
to create file custom.ini in directory ;
to copy in custom.ini the section from file ;
In this case Ministra portal will be loaded with English interface independently from the software locale.
Attention! The name of the locale used in the Middleware and the name of the server system locale should be the same.
For correct localization switching in Admin interface next locales should be installed on the server: , , , , , , , , , , .
Configuration of the Storage (separate server)
Necessary services & packets
(for TV recording)
(for «TV Archive», recording or VOD via HTTP)
Installation order
1. Install all necessary services & packages:
2. Add the following content to /etc/apache2/sites-available/000-default.conf
4. Make sure the package is not installed on the system.
If necessary, remove it:
6. Install Nginx:
Configuration example in /etc/nginx/sites-available/default :
7. Restart Nginx :
8. Unzip the archive with the version of the portal. Copy the contents of the directory in
9. Create directories , ,
, and set permission to them.
Create a symbolic link to the STB’s home directories in
Create a symbolic link of the folder with the archive to the root of server.
Create the necessary directories and symbolic links with one command:
10. Edit the file . The following server IP address with a portal is used as an example: 192.168.1.71. Sample file content :
where:
VIDEO_STORAGE_DIR — the directory for storing the Video club files;
KARAOKE_STORAGE_DIR — the directory for storing the Karaoke files;
RECORDS_DIR — directory with write permissions . In this directory, create a directory , where TV archive files will be created. See TV Archive settings.
NFS_HOME_PATH — STB’s home directory;
API_URL — URL to record channels from middleware. Usually it is
PORTAL_URL — portal address. It will be accessed by the storage to verify the access keys to the archive. For example,
STORAGE_NAME — the name of the storage specified in the admin interface.
To check it you can open your
is displayed on the screen.
If there is an error
, then you have the wrong configuration in
. Note!
— virtual directory! Do not create it manually!
12. In Admin interface of portal → Storage make next settings:
Name — . For example: ;
IP — IP address of storage, for example 192.168.1.100.
Read more about adding storage in the administration panel here.
«TV archive» settings
Before turning on “TV archive” option in TV channels, it is necessary to configure the «storage» . Attention! Only multicast streams can be recorded! Multicast streams should be available on the “Storage”.
Checking of the availability of multicast streams can be performed with help of
packet.
Example:
- 239.1.1.1 — IP address of multicast stream
- 1234 — port of a multicast stream
- dump239.1.1.1.ts — file name with dump of multicast stream.
Received files can be played by any player (for example: VLC).
- Make sure that memcached is installed and worked on the server.
- In Admin interface in the Storage section from the Allow TV recording drop-down list, select the server program that will be used to make the recordings on the storage server.
- While editing TV channel in Admin interface you can choose “Enable TV archive” option. See more here.
Security
User identification
First of all it is necessary to turn on module in apache. It allows seeing the real IP address of user while working in nginx and user restricting access in apache configuration file.
Turn on the module:
If you previously enabled the module, disable it:
Create the file on the path and add the following contents to it:
— address of your server.
To activate the settings of the module, you need to run the following command:
In the file, under the path replace the line:
to the following content:
Then restart apache:
Restricting access in Admin interface
To improve the security of Admin interface it is strongly recommended to use the same IP address for the opening. This can be set in apache configuration file,where portal’s host is described. After making changes it is necessary to restart apache.
STB — Authorization
Strongly recommended for the client portal’s access to use STB authorization by login/password, «Authorization with key» method.
Portal access limitation for new STBs
Beginning from 4.8.63 portal version there is option appeared, which allows closing portal access for all new STBs. To enable this option it is necessary to add in :
For old version in MySQL it is necessary to do:
After this all new STBs will have status OFF in admin interface.
Access control based on the set-top box model
Ministra allows you to differentiate the access to the portal based on set-top box model. The list of all models that are allowed access, is described in parameter of the configuration file. For example, you need to add support of WR320 model, all you need is to add in the line
For AuraHD set-top box there is a possibility of the strict model check (parameter ), in this case, it is necessary to completely specify the model. For example, access is allowed only to AuraHD International:
If the model supports recording on the local media, then you can additionally add it to the appropriate list
Access to portal using login&password
Simple authorization
Access to the portal organization for new STBs using login&password. Portal admin creates login&password and provide them to the user. While first loading there will be authorization window which requests login&password. After successful authorization MAC address will be adjust to login. Further portal loading will be without authorization.
For this it is necessary to:
2. In admin interface Users > Add — Add user, it is enough to specify login (unique) and password. MAC address field should be empty.
Authorization with key
Access to portal organization by login&password. Portal admin creates login/password and provides them to the user. While first loading there will be authorization window which request login&password. After successful authorization new key will be generating which is based on login&password. This key is stored on STB, which will validate while next portal loading. If the same login&password will be used for another STB than previous one will be un-authorized automatically.
For this it is necessary to:
In custom.ini add next
We are strongly recommend to pay attention to safety while API enable/use.
Recommendation about using:
- Authentication (login&password) for access to API.
- Strong passwords.
- Firewall.
Billing
If it is necessary to turn on API for working with external billing systems then it is strongly recommended to use authorization. Specify the login and password in .
Storage configuring
On the storages, which are used for recording, it is necessary to specify API_URL parameter with login and password (in ):
Temporary URLs
If the Wowza temporary URLs are using for playing, then it is necessary to specify the login and password for work with API in the configuration of Wowza application. It is not necessary to specify them if nginx and VLC/udpxy are used.
API address setting in configuration file of Wowza:
TV channel monitoring
In script API_URL it is necessary to specify authorization URL:
Firewall
It is recommended to make access on 88 port (apache) for local access and access from storage, which are working with temporary URLs.
On this page:
Linked articles:

Cindy is an expert on the Ministra TV platform and the author of this article.
Was this article helpful?
Sorry to hear that.
How can we improve this article?
Источник


