- Use your iPad as a second display for your Mac with Sidecar
- Extend or mirror your Mac desktop with Sidecar
- Start a Sidecar session
- Switch to screen mirroring
- End the Sidecar session
- Move a window to your iPad display
- Use the sidebar
- Use the Touch Bar
- Use gestures for scrolling and other actions
- Use Apple Pencil
- Use a keyboard, mouse, or trackpad
- Use iPad apps
- Use Sidecar preferences
- Sidecar system requirements
- Программный RAID1 (зеркало) для загрузочного GPT диска в Windows 10/ Server 2016
- Подготовка таблицы разделов для зеркала на 2 диске
- Преобразования дисков в динамические, создание зеркала
- Подготовка EFI раздела на втором диске в зеркале
- Копирование конфигурации EFI и BCD на второй диск
Use your iPad as a second display for your Mac with Sidecar
With Sidecar, you can use your iPad as a display that extends or mirrors your Mac desktop.
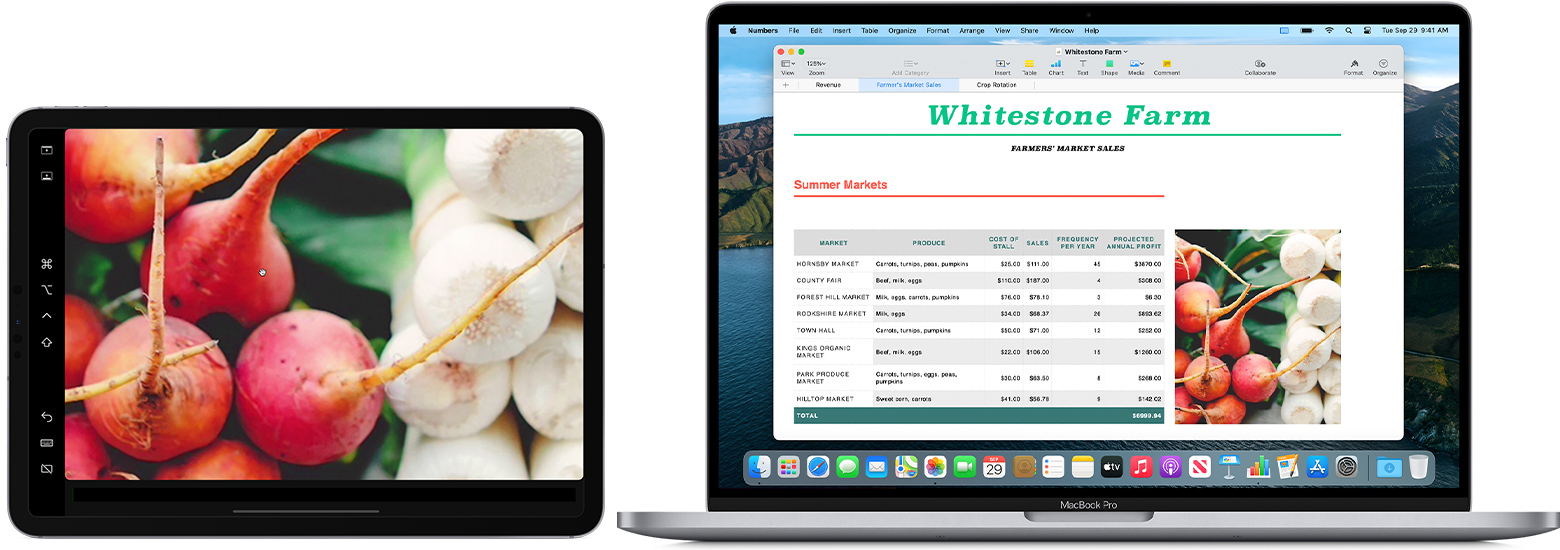
Extend or mirror your Mac desktop with Sidecar
Follow these steps on a Mac and iPad that meet the Sidecar system requirements. You can use Sidecar wirelessly, but to keep your iPad charged during use, connect it directly to your Mac with the USB charge cable that came with your iPad.
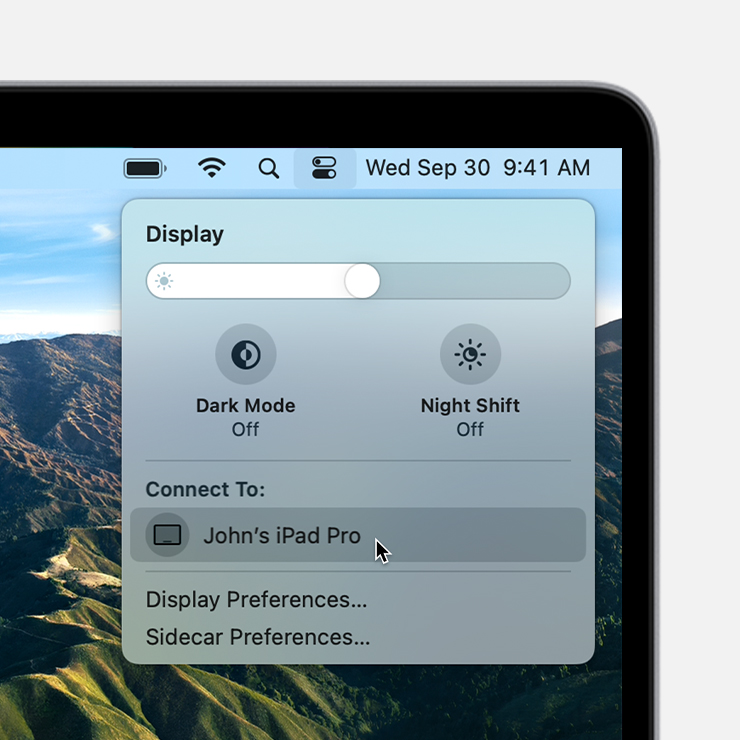
Start a Sidecar session
- If you’re using macOS Big Sur, click the Display menu in Control Center or the menu bar, then choose your iPad from the menu.

- If you’re using macOS Catalina, click the AirPlay icon in the menu bar, then choose your iPad from the menu. (If you don’t see the AirPlay icon, choose Apple menu > System Preferences, click Displays, and select “Show mirroring options in the menu bar when available”.)
- Or just move a window to your iPad, as described in next section.
- Or connect using the menu in Sidecar preferences.
Switch to screen mirroring
- By default, your iPad shows an extension of your Mac desktop. You can move windows to it and use it like any other display.
- To mirror your Mac display so that both screens show the same content, return to the Display menu or AirPlay menu, which shows a blue iPad icon while using Sidecar. Choose the option to mirror your display.
End the Sidecar session
- If you’re using macOS Big Sur, return to the Display menu in Control Center or the menu bar and choose your iPad again to disconnect from it.
- If you’re using macOS Catalina, return to the AirPlay menu and choose the option to disconnect.
- Or use the Disconnect button in the sidebar on your iPad, or in Sidecar preferences on your Mac.
Learn more about using external displays. For example, you can use Displays preferences to arrange displays so that your iPad extends the left, right, top, or bottom of your desktop.
Move a window to your iPad display
If you hover your pointer over the full-screen button of a window, you can choose to move that window to or from your iPad display. It’s faster than dragging the window, and the window is perfectly resized for your display.

Use the sidebar
The sidebar puts commonly used controls on the side of your iPad screen. It includes Command, Shift, and other modifier keys, so you can choose essential commands with your finger or Apple Pencil instead of a keyboard.
Use Sidecar preferences to turn off the sidebar or change its position.

Tap to show or hide the menu bar when viewing a window in full screen on iPad.
Show or hide your computer’s Dock on your iPad.
Command. Touch and hold to set the Command key. Double-tap to lock the key.
Option. Touch and hold to set the Option key. Double-tap to lock the key.
Control. Touch and hold to set the Control key. Double-tap to lock the key.
Shift. Touch and hold to set the Shift key. Double-tap to lock the key.
Undo the last action. Some apps support multiple undos.
Show or hide the onscreen keyboard.
Disconnect your iPad, ending the Sidecar session.
Use the Touch Bar
Many apps on Mac have Touch Bar controls that make common actions even easier. With Sidecar, you get a Touch Bar on your iPad screen even if your Mac doesn’t have a Touch Bar. Tap its controls with either your finger or Apple Pencil.
Use Sidecar preferences to turn off the Touch Bar or change its position.
If the Touch Bar doesn’t appear when using an app that offers Touch Bar controls, choose Apple menu > System Preferences, click Mission Control, then make sure that “Displays have separate Spaces” is selected.
Use gestures for scrolling and other actions
Multi-Touch gestures on iPad remain available when using Sidecar. These gestures are particularly useful with Sidecar:
- Scroll: Swipe with two fingers.
- Copy: Pinch in with three fingers.
- Cut: Pinch in with three fingers twice.
- Paste: Pinch out with three fingers.
- Undo: Swipe left with three fingers, or double-tap with three fingers.
- Redo: Swipe right with three fingers.
Use Apple Pencil
To point, click, select, and perform tasks such as drawing, editing photos, and manipulating objects on your iPad while it’s extending or mirroring your Mac display, you can use your Apple Pencil instead of the mouse or trackpad connected to your Mac. You can also use it to write, sketch, and mark up documents while seeing the updates live on your Mac.
Sidecar also supports double-tap, which you can turn on in Sidecar preferences. Double-tap enables apps that support this feature to perform custom actions when you double-tap on the side of your Apple Pencil (2nd generation).
Use a keyboard, mouse, or trackpad
During your Sidecar session, you can type using a keyboard connected to either your Mac or iPad, such as the Smart Keyboard or Magic Keyboard for iPad.
To point, click, or select with a mouse or trackpad, use the mouse or trackpad connected to your Mac, or use an Apple Pencil on your iPad.
Use iPad apps
While using Sidecar, you can switch to an iPad app, then interact with that app on your iPad as you normally would. This suspends your Sidecar session until you switch back to the Sidecar app or disconnect Sidecar. The Sidecar app appears on your home screen only while using Sidecar.
Use Sidecar preferences
Choose Apple menu > System Preferences, then click Sidecar. These preferences are available only on computers that support Sidecar.
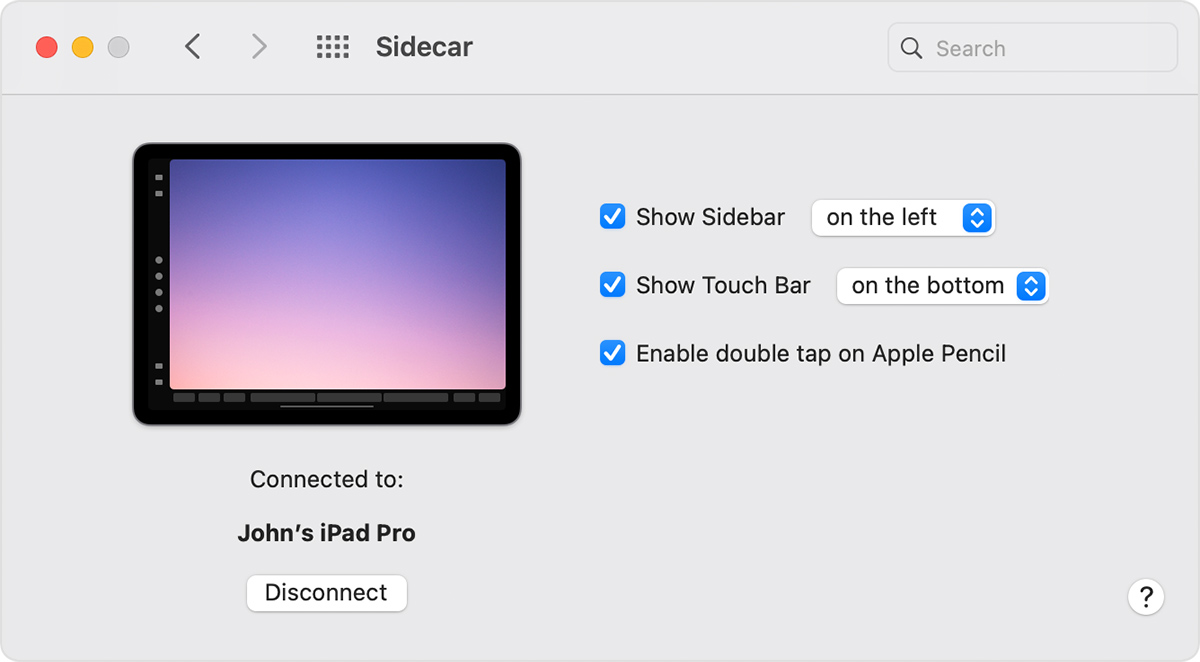
- Show Sidebar: Show the sidebar on the left or right side of your iPad screen, or turn it off.
- Show Touch Bar: Show the Touch Bar on the bottom or top of your iPad screen, or turn it off.
- Enable double tap on Apple Pencil: Allow apps that support this feature to perform custom actions when you double-tap on the side of your Apple Pencil (2nd generation).
- Connect to: Choose an iPad to connect to, or click Disconnect to stop using Sidecar.
Sidecar system requirements
Sidecar requires a compatible Mac using macOS Catalina or later and a compatible iPad using iPadOS 13 or later.
Программный RAID1 (зеркало) для загрузочного GPT диска в Windows 10/ Server 2016
В этой статье мы рассмотрим, как создать программное зеркало (RAID1) из двух GPT дисков в Windows Server 2016/Windows 10, установленных на UEFI системе. Мы рассмотрим полноценную конфигурацию BCD загрузчика, позволяющую обеспечить корректную загрузку Windows и защитить данные от выхода из строя любого диска.
Итак, у нас имеется простой компьютер UEFI-архитектуры без встроенного RAID контроллера с двумя идентичными дисками размерами по 50 Гб. Наша задача — установить на первый GPT диск ОС (Windows Server 2016, Windows 10 или бесплатного сервер Hyper-V), а затем собрать из двух дисков программное зеркало (RAID1 – Mirroring).
Запишите установочный образ Windows на DVD/ USB флешку, загрузите компьютер) с этого загрузочного устройства (в режиме UEFI, не Legacy) и запустите установку Windows Server 2016.
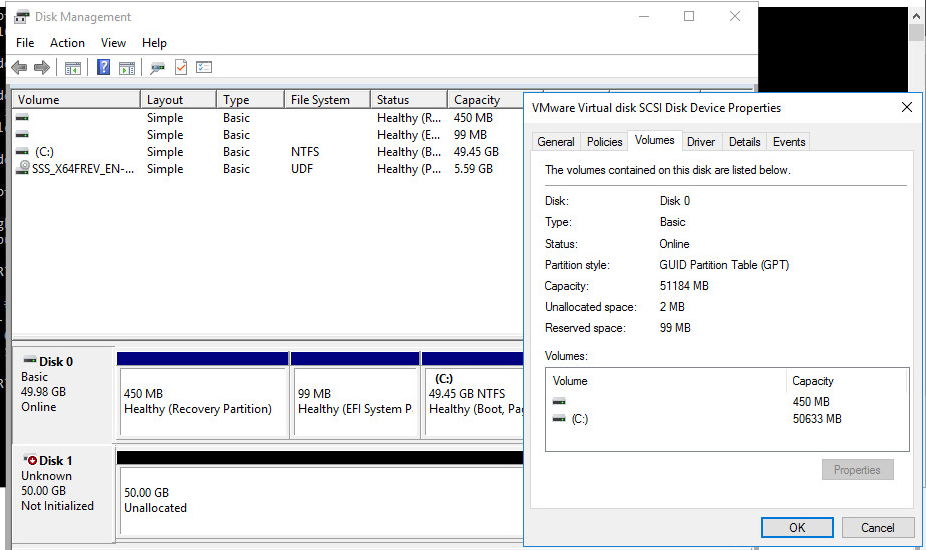
После установки, откройте консоли управления дисками (diskmgmt.msc), убедитесь, что на первом диске используется таблица разделов GPT (свойства диска -> вкладка Volumes -> Partition style –> GUID partition table), а второй диск пустой (неразмечен).
Подготовка таблицы разделов для зеркала на 2 диске
Откройте командную строку с правами администратора и выполните команду diskpart. Наберите:
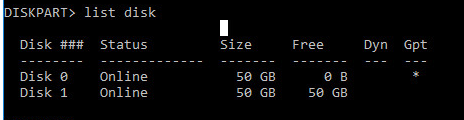
Как вы видите, в системе имеется два диска:
- Disk 0 – диск с таблицей разделов GPT, на который установлена Windows
- Disk 1 – пустой неразмеченный диск
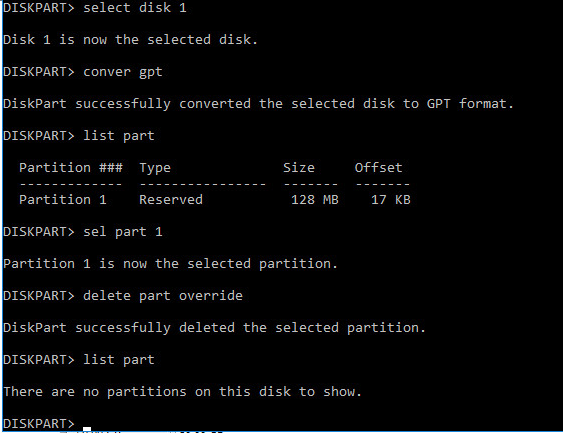
На всякий случай еще раз очистим второй диск и конвертируем его в GPT:
Введите список разделов на втором диске:
Если найдется хотя бы один раздел (в моем примере это Partition 1 – Reserved – Size 128 Mb), удалите его:
Delete partition override
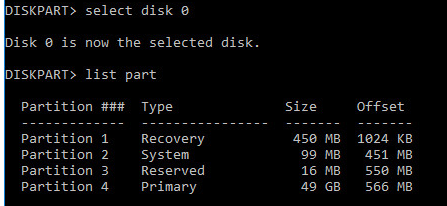
Выведите список разделов на 1 диске (disk 0). Далее вам нужно создать такие же разделы на Disk 1.
Имеется 4 раздела:
- Recovery – 450 Мб, раздел восстановления со средой WinRE
- System – 99 Мб, EFI раздел (подробнее про структуру разделов на GPT дисках)
- Reserved 16 Мб, MSR раздел
- Primary – 49 Гб, основной раздел с Windows
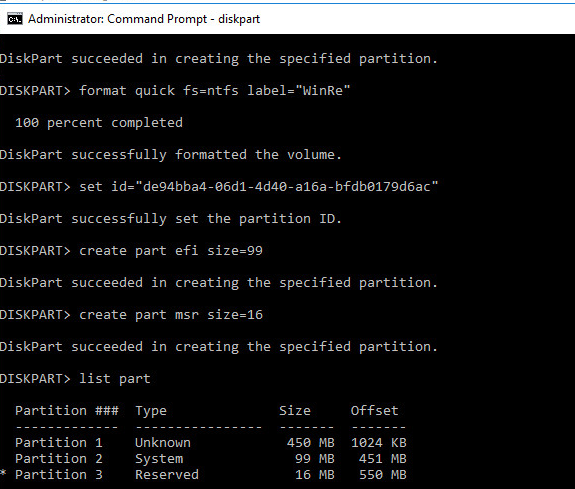
Создаем такие же разделы на Disk 1:
Create partition primary size=450
format quick fs=ntfs label=»WinRE»
create partition efi size=99
create partition msr size=16
Преобразования дисков в динамические, создание зеркала
Теперь оба диска нужно преобразовать в динамические:
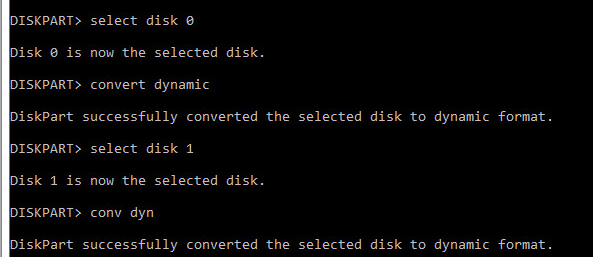
Создадим зеркало для системного диска (диск C:). Нужно выбрать раздел на первом диске и создать для него зеркало на 2 диске:
Select volume c
Add disk=1
Должно появится сообщение:
Откройте консоль управления дисками, и убедитесь, что запустилась синхронизуя раздела C на (Recynching). Дождитесь ее окончания (может занять до нескольких часов в значимости от размера раздела C: ).

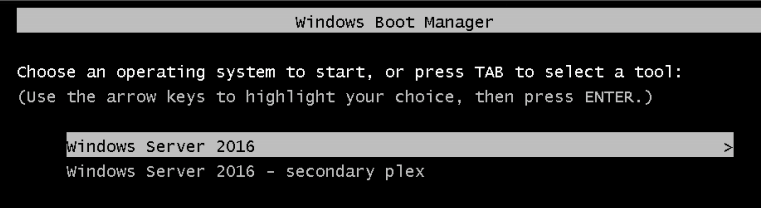
При загрузке Windows теперь будет появляться меню Windows Boot Manager с предложение выбрать с какого диска загружаться. Если не выбрать диск вручную, система через 30 секунд попытается загрузиться с первого диска:
- Windows Server 2016
- Windows Server 2016 – secondary plex
Однако проблема в том, что сейчас у вас конфигурация загрузчика хранится только на 1 диске, и при его потере, вы не сможете загрузить ОС со второго без дополнительных действий. По сути вы защитили данные ( но не загрузчик Windows) только от сбоя второго диска.
Программный RAID Windows не получится использовать для создания нормального зеркала EFI раздела. Т.к. на EFI разделе хранятся файлы, необходимые для загрузки ОС, то при выходе их строя первого диска, вы не сможете загрузить компьютер со второго диска без ручного восстановления загрузчика EFI на нем в среде восстановления. Эти операции довольно сложно сделать неподготовленному администратору, а также потребует дополнительного времени (которого может не быть, если у вас за спиной стоит толпа разгневанных пользователей).
Далее мы покажем, как скопировать EFI раздел на второй диск и изменить конфигурацию загрузчика BCD, чтобы вы могли загрузить Windows как с первого, так и со второго диска.
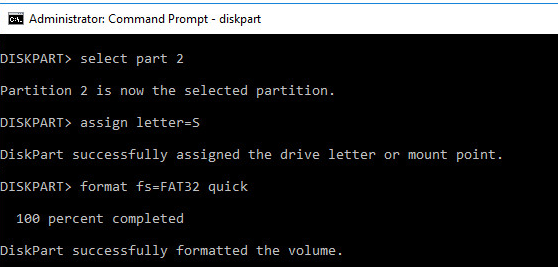
Подготовка EFI раздела на втором диске в зеркале
Теперь нужно подготовить EFI раздел на втором диске в зеркале, чтобы компьютер мог использовать этот раздел для загрузки Windows. Назначим EFI разделу на Disk 1 букву S и отформатируем его в файловой системе FAT32:
format fs=FAT32 quick
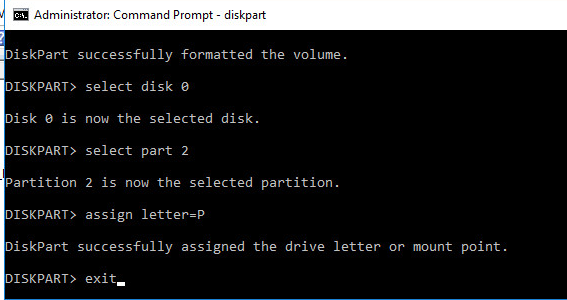
Теперь назначим букву диска P: для EFI раздела на Disk 0:
select partition 2
Копирование конфигурации EFI и BCD на второй диск
Выведите текущую конфигурацию загрузчика BCD с помощью команды:
При создании зеркала, служба VDS автоматически добавила в конфигурацию BCD запись для второго зеркального диска (с меткой Windows Server 2016 – secondary plex).
Чтобы EFI в случае потери первого диска могут загружаться со второго диска, нужно изменить конфигурацию BCD.
Для этого нужно скопировать текущую конфигурацию Windows Boot Manager
bcdedit /copy
Теперь скопируйте полученный ID конфигурации и используйте его в следующей команде:
Если все правильно, должна появится строка The operation completed successfully.

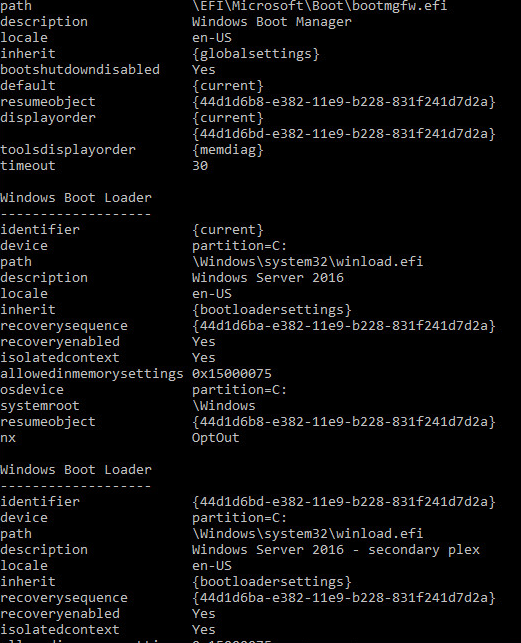
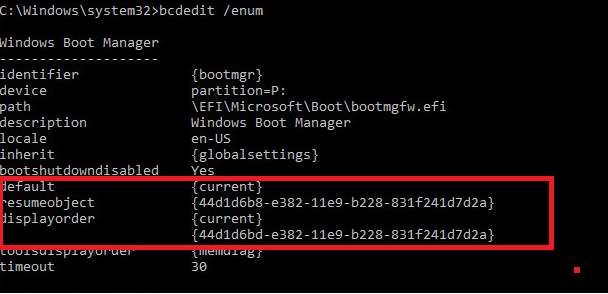
Выведите текущую конфигурацию Windows Boot Manager (bcdedit /enum). Обратите внимает, что у загрузчика теперь два варианта загрузки EFI с разных дисков (default и resume object).
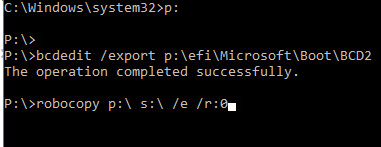
Теперь нужно сделать копию BCD хранилища на разделе EFI первого диска и скопировать файлы на второй диск:
P:
bcdedit /export P:\EFI\Microsoft\Boot\BCD2
robocopy p:\ s:\ /e /r:0
Осталось переименовать BCD хранилище на втором диске:
Rename s:\EFI\Microsoft\Boot\BCD2 BCD
И удалить копию на Disk 0:

Теперь при выходе из строя первого диска, вам нужно при загрузке компьютера выбрать устройство «Windows Boot Manager Cloned», а затем «Microsoft Windows Server 2016 — secondary plex».
При загрузке с отказавшим дисков, в диспетчере Disk Management вы увидите сообщение Failed Redndancy.
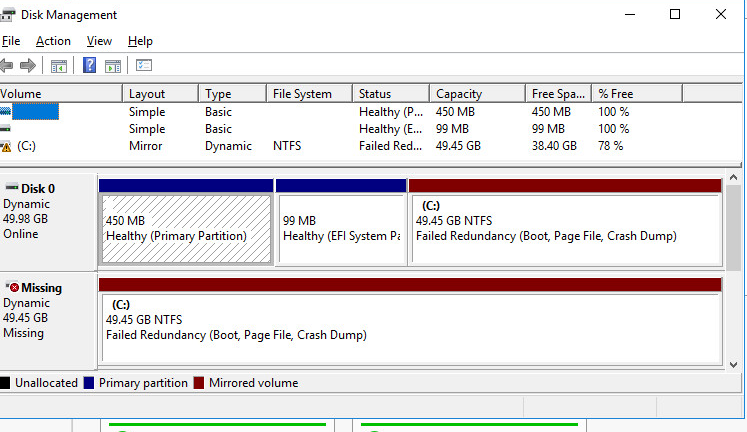
В этом случае вы должны заменить неисправный диск, удалить конфигурацию зеркала и пересоздать программный RAID с начала.


