- # Installation
- # macOS
- # Linux
- # Windows
- # Advanced Installation
- # Development Setup
- # Installation from the Python Package Index (PyPI)
- # Docker Images
- # Security Considerations for Binary Packages
- # Transparent Proxying
- # Linux
- # 1. Enable IP forwarding.
- # 2. Disable ICMP redirects.
- # 3. Create an iptables ruleset that redirects the desired traffic to mitmproxy.
- # 4. Fire up mitmproxy.
- # 5. Finally, configure your test device.
- # Work-around to redirect traffic originating from the machine itself
- # OpenBSD
- # 1. Enable IP forwarding.
- # 2. Place the following two lines in /etc/pf.conf.
- # 3. Configure pf with the rules.
- # 4. And now enable it.
- # 5. Fire up mitmproxy.
- # 6. Finally, configure your test device.
- # macOS
- # 1. Enable IP forwarding.
- # 2. Place the following line in a file called, say, pf.conf.
- # 3. Configure pf with the rules.
- # 4. And now enable it.
- # 5. Configure sudoers to allow mitmproxy to access pfctl.
- # 6. Fire up mitmproxy.
- # 7. Finally, configure your test device.
- # Work-around to redirect traffic originating from the machine itself
- # “Full” transparent mode on Linux
- # Transparently proxify virtual machines
- # 1. Configure Proxy VM
- # VirtualBox configuration
- # VM Network Configuration
- # 2. Configure DHCP and DNS
- # 3. Redirect traffic to mitmproxy
- # 4. Run mitmproxy
- Инструменты Kali Linux
- Список инструментов для тестирования на проникновение и их описание
- mitmproxy
- Описание mitmproxy
- Справка по mitmproxy
- Справка по mitmdump
- # Modes of Operation
- # Regular Proxy
- # Transparent Proxy
- Modes Transparent Wrong
- # Common Configurations
- # (a) Custom Gateway
- # Troubleshooting Transparent Mode
- # (b) Custom Routing
- # Reverse Proxy
- # Host Header
- # Caveat: Interactive Use
- # Upstream Proxy
- # SOCKS Proxy
# Installation
Please follow the steps for your operating system.
# macOS
The recommended way to install mitmproxy on macOS is to use Homebrew:
Alternatively, you can download standalone binaries on mitmproxy.org.
# Linux
The recommended way to install mitmproxy on Linux is to download the standalone binaries on mitmproxy.org.
Some Linux distributions provide community-supported mitmproxy packages through their native package repositories (e.g., Arch Linux, Debian, Ubuntu, Kali Linux, OpenSUSE, etc.). We are not involved in the maintenance of downstream packaging efforts, and they often lag behind the current mitmproxy release. Please contact the repository maintainers directly for issues with native packages.
# Windows
All the mitmproxy tools are fully supported under WSL (Windows Subsystem for Linux). We recommend to install WSL, and then follow the mitmproxy installation instructions for Linux.
We also distribute native Windows packages for all tools other than the mitmproxy console app, which only works under WSL. To install mitmproxy on Windows, download the installer from mitmproxy.org. After installation, you’ll find shortcuts for mitmweb and mitmdump in the start menu. Both executables are added to your PATH and can be invoked from the command line.
# Advanced Installation
# Development Setup
If you would like to install mitmproxy directly from source code or the GitHub master branch, please see the our README on GitHub.
# Installation from the Python Package Index (PyPI)
If your mitmproxy addons require the installation of additional Python packages, you can install mitmproxy from PyPI.
While there are plenty of options around 1 , we recommend the installation using pipx:
- Install a recent version of Python (we require at least 3.6).
- Install pipx.
- pipx install mitmproxy
To install additional Python packages, run pipx inject mitmproxy .
# Docker Images
You can use the official mitmproxy images from DockerHub.
# Security Considerations for Binary Packages
Our pre-compiled binary packages and Docker images include a self-contained Python 3 environment, a recent version of OpenSSL that support ALPN and HTTP/2, and other dependencies that would otherwise be cumbersome to compile and install.
Dependencies in the binary packages are frozen on release, and can’t be updated in situ. This means that we necessarily capture any bugs or security issues that may be present. We don’t generally release new binary packages simply to update dependencies (though we may do so if we become aware of a really serious issue). If you use our binary packages, please make sure you update regularly to ensure that everything remains current.
As a general principle, mitmproxy does not “phone home” and consequently will not do any update checks.
If you are familiar with the Python ecosystem, you may know that there are a million ways to install Python packages. Most of them (pip, virtualenv, pipenv, etc.) should just work, but we don’t have the capacity to provide support for it. ↩︎
# Transparent Proxying
When a transparent proxy is used, traffic is redirected into a proxy at the network layer, without any client configuration being required. This makes transparent proxying ideal for those situations where you can’t change client behaviour — proxy-oblivious mobile applications being a common example.
To set up transparent proxying, we need two new components. The first is a redirection mechanism that transparently reroutes a TCP connection destined for a server on the Internet to a listening proxy server. This usually takes the form of a firewall on the same host as the proxy server — iptables on Linux or pf on OSX. When the proxy receives a redirected connection, it sees a vanilla HTTP request, without a host specification. This is where the second new component comes in — a host module that allows us to query the redirector for the original destination of the TCP connection.
At the moment, mitmproxy supports transparent proxying on OSX Lion and above, and all current flavors of Linux.
# Linux
On Linux, mitmproxy integrates with the iptables redirection mechanism to achieve transparent mode.
# 1. Enable IP forwarding.
This makes sure that your machine forwards packets instead of rejecting them.
If you want to persist this across reboots, you need to adjust your /etc/sysctl.conf or a newly created /etc/sysctl.d/mitmproxy.conf (see here).
# 2. Disable ICMP redirects.
If your test device is on the same physical network, your machine shouldn’t inform the device that there’s a shorter route available by skipping the proxy.
If you want to persist this across reboots, see above.
# 3. Create an iptables ruleset that redirects the desired traffic to mitmproxy.
Details will differ according to your setup, but the ruleset should look something like this:
If you want to persist this across reboots, you can use the iptables-persistent package (see here).
# 4. Fire up mitmproxy.
You probably want a command like this:
The —mode transparent option turns on transparent mode, and the —showhost argument tells mitmproxy to use the value of the Host header for URL display.
# 5. Finally, configure your test device.
Set the test device up to use the host on which mitmproxy is running as the default gateway and install the mitmproxy certificate authority on the test device.
# Work-around to redirect traffic originating from the machine itself
Follow steps 1, 2 as above, but instead of the commands in step 3, run the following
Create a user to run the mitmproxy
Then, configure the iptables rules to redirect all traffic from our local machine to mitmproxy. Note, as soon as you run these, you won’t be able to perform successful network calls until you start mitmproxy. If you run into issues, iptables -t nat -F is a heavy handed way to flush (clear) all the rules from the iptables nat table (which includes any other rules you had configured).
This will redirect the packets from all users other than mitmproxyuser on the machine to mitmproxy. To avoid circularity, run mitmproxy as the user mitmproxyuser . Hence step 4 should look like:
# OpenBSD
# 1. Enable IP forwarding.
# 2. Place the following two lines in /etc/pf.conf.
These rules tell pf to divert all traffic from $mitm_if destined for port 80 or 443 to the local mitmproxy instance running on port 8080. You should replace $mitm_if value with the interface on which your test device will appear.
# 3. Configure pf with the rules.
# 4. And now enable it.
# 5. Fire up mitmproxy.
You probably want a command like this:
The —mode transparent option turns on transparent mode, and the —showhost argument tells mitmproxy to use the value of the Host header for URL display.
# 6. Finally, configure your test device.
Set the test device up to use the host on which mitmproxy is running as the default gateway and install the mitmproxy certificate authority on the test device.
# macOS
OSX Lion integrated the pf packet filter from the OpenBSD project, which mitmproxy uses to implement transparent mode on OSX. Note that this means we don’t support transparent mode for earlier versions of OSX.
# 1. Enable IP forwarding.
# 2. Place the following line in a file called, say, pf.conf.
This rule tells pf to redirect all traffic destined for port 80 or 443 to the local mitmproxy instance running on port 8080. You should replace en0 with the interface on which your test device will appear.
# 3. Configure pf with the rules.
# 4. And now enable it.
# 5. Configure sudoers to allow mitmproxy to access pfctl.
Edit the file /etc/sudoers on your system as root. Add the following line to the end of the file:
Note that this allows any user on the system to run the command /sbin/pfctl -s state as root without a password. This only allows inspection of the state table, so should not be an undue security risk. If you’re special feel free to tighten the restriction up to the user running mitmproxy.
# 6. Fire up mitmproxy.
You probably want a command like this:
The —mode transparent flag turns on transparent mode, and the —showhost argument tells mitmproxy to use the value of the Host header for URL display.
# 7. Finally, configure your test device.
Set the test device up to use the host on which mitmproxy is running as the default gateway and install the mitmproxy certificate authority on the test device.
# Work-around to redirect traffic originating from the machine itself
Follow steps 1, 2 as above, but in step 2 change the contents of the file pf.conf to
Follow steps 3-5 above. This will redirect the packets from all users other than nobody on the machine to mitmproxy. To avoid circularity, run mitmproxy as the user nobody . Hence step 6 should look like:
# “Full” transparent mode on Linux
By default mitmproxy will use its own local IP address for its server-side connections. In case this isn’t desired, the –spoof-source-address argument can be used to use the client’s IP address for server-side connections. The following config is required for this mode to work:
# Transparently proxify virtual machines
This walkthrough illustrates how to set up transparent proxying with mitmproxy. We use VirtualBox VMs with an Ubuntu proxy machine in this example, but the general Internet Proxy VM (Virtual) Internal Network setup can be applied to other setups.
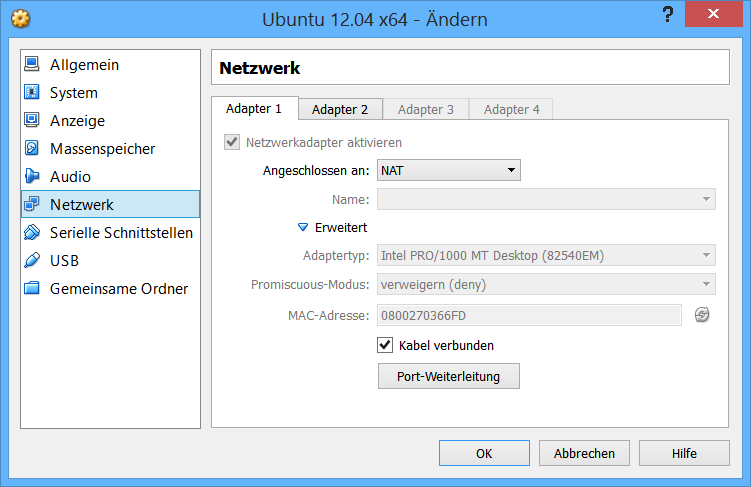
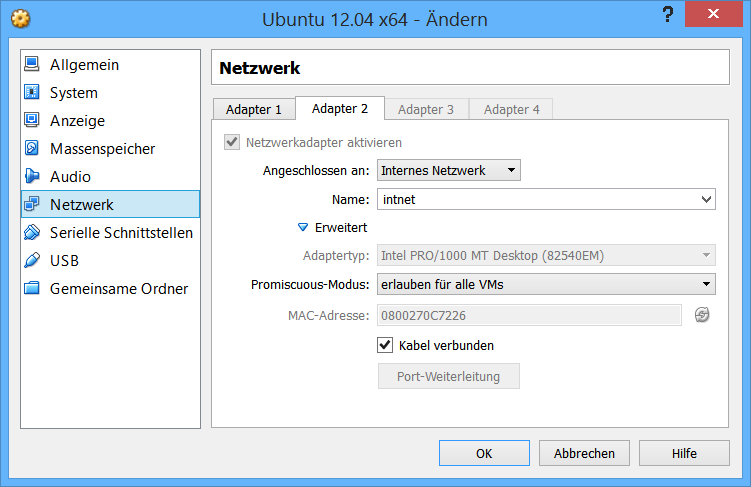
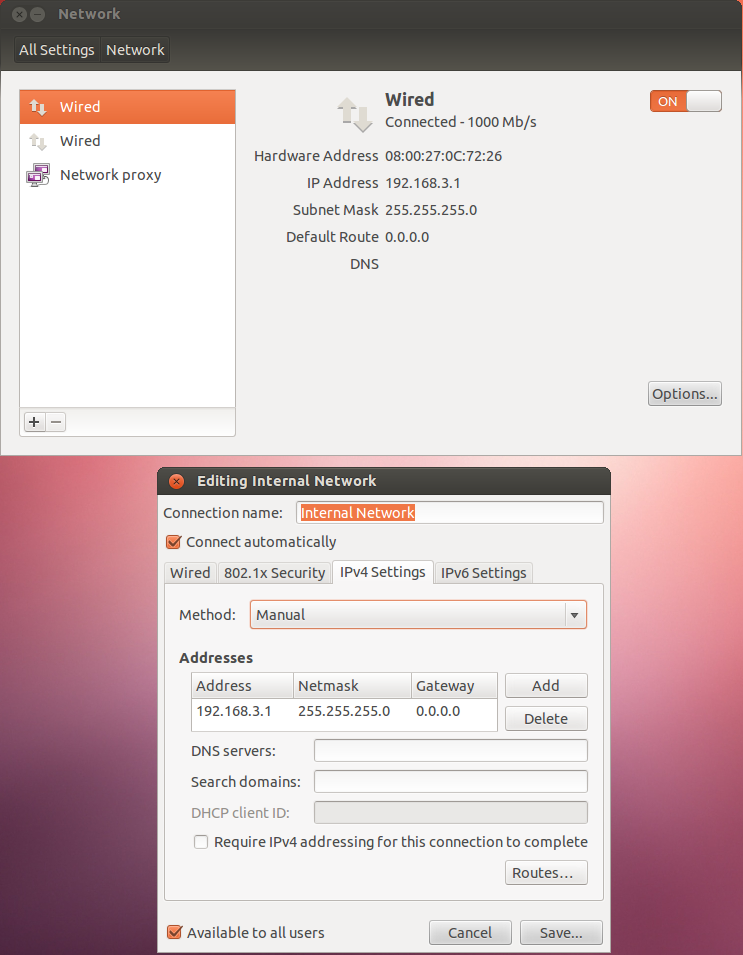
# 1. Configure Proxy VM
First, we have to find out under which name Ubuntu has mapped our network interfaces. You can find this information with:
Usually with Ubuntu and Virtualbox, eth0 or enp0s3 (Ubuntu 15.10 and newer) is connected to the internet and eth1 or enp0s8 (Ubuntu 15.10 and newer) is connected to the internal network that will be proxified and configured to use a static ip (192.168.3.1). If the names differ, use the ones you got from the ip link command.
# VirtualBox configuration
# VM Network Configuration
# 2. Configure DHCP and DNS
We use dnsmasq to provide DHCP and DNS in our internal network. Dnsmasq is a lightweight server designed to provide DNS (and optionally DHCP and TFTP) services to a small-scale network. Before we get to that, we need to fix some Ubuntu quirks: Ubuntu >12.04 runs an internal dnsmasq instance (listening on loopback only) by default [1]. For our use case, this needs to be disabled by changing dns=dnsmasq to #dns=dnsmasq in /etc/NetworkManager/NetworkManager.conf and if on Ubuntu 16.04 or newer running:
If on Ubuntu 12.04 or 14.04 running:
Now, dnsmasq can be be installed and configured:
Replace /etc/dnsmasq.conf with the following configuration:
If on Ubuntu 16.04 or newer:
If on Ubuntu 12.04 or 14.04:
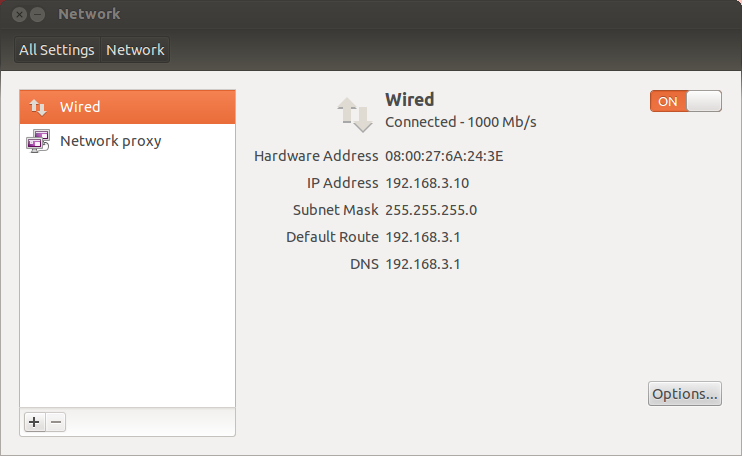
Your proxied machine in the internal virtual network should now receive an IP address via DHCP:
# 3. Redirect traffic to mitmproxy
To redirect traffic to mitmproxy, we need to enable IP forwarding and add two iptables rules:
# 4. Run mitmproxy
Finally, we can run mitmproxy in transparent mode with
The proxied machine cannot to leak any data outside of HTTP or DNS requests. If required, you can now install the mitmproxy certificates on the proxied machine.
Инструменты Kali Linux
Список инструментов для тестирования на проникновение и их описание
mitmproxy
Описание mitmproxy
mitmproxy – это интерактивная консольная программа, которая позволяет перехватывать, инспектировать, модифицировать и повторно воспроизводить поток трафика.
Пакет mitmproxy включает в себя три программы:
- Mitmproxy – это интерактивный, SSL-совместимый, человек-посередине прокси для HTTP с консольным интерфейсом.
- mitmdump – это версия командной строки mitmproxy. Вспомните tcpdump для HTTP.
- pathoc и pathod – это коварные приложения HTTP клиента и сервера, созданные чтобы позволить вам сконструировать практически любой мыслимый HTTP запрос, включая те, которые творчески нарушают стандарты.
- Перехват HTTP запросов и ответов и их модификация на лету.
- Сохранение полной HTTP беседы для последующего воспроизведения и анализа.
- Воспроизведение HTTP беседы со стороны клиента.
- Воспроизведение ранее записанных HTTP ответов сервера.
- Режим обратного прокси для перенаправления трафика на указанный сервер.
- Режим прозрачного прокси на OSX и Linux.
- Изменение HTTP трафика используя скрипты Python.
- генерируемы на лету SSL сертификаты для перехвата.
- И многое-многое другое.
Автор: Aldo Cortesi
Справка по mitmproxy
Аргументы, которые начинаются с ‘—’ (например, —version) могут быть также установлены в конфигурационном файле (
/.mitmproxy/mitmproxy.conf или указаны через —conf). Распознаваемый синтаксис пар настроек (ключ, значение) основывается на форматах INI и YAML (например, key=value или foo=TRUE). Если аргумент встречается более чем в одном месте, то значения командной строки переписывает значения конфигурационного файла, который, в свою очередь, переписывает значения по умолчанию.
Справка по mitmdump
Аргументы, которые начинаются с ‘—’ (например, —version) могут быть также установлены в конфигурационном файле (
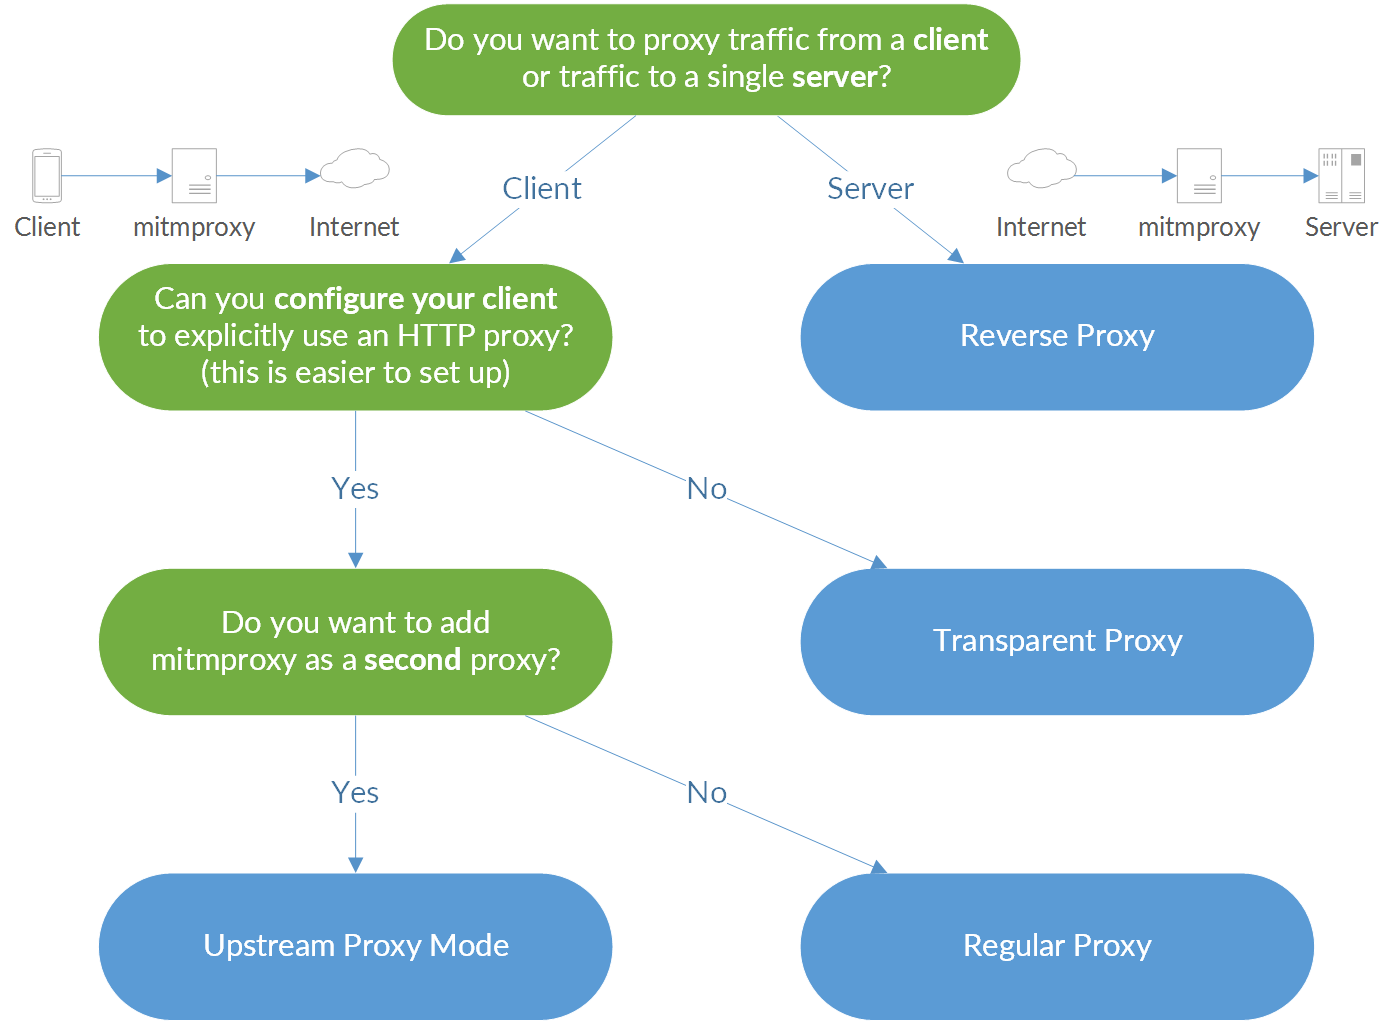
# Modes of Operation
Now, which one should you pick? Use this flow chart:
# Regular Proxy
Mitmproxy’s regular mode is the simplest and the easiest to set up.
- Start mitmproxy.
- Configure your client to use mitmproxy by explicitly setting an HTTP proxy. By default, mitmproxy listens on port 8080.
- Quick Check: You should already be able to visit an unencrypted HTTP site through the proxy.
- Open the magic domain mitm.it and install the certificate for your device.
If you are proxying an external device, your network will probably look like this:
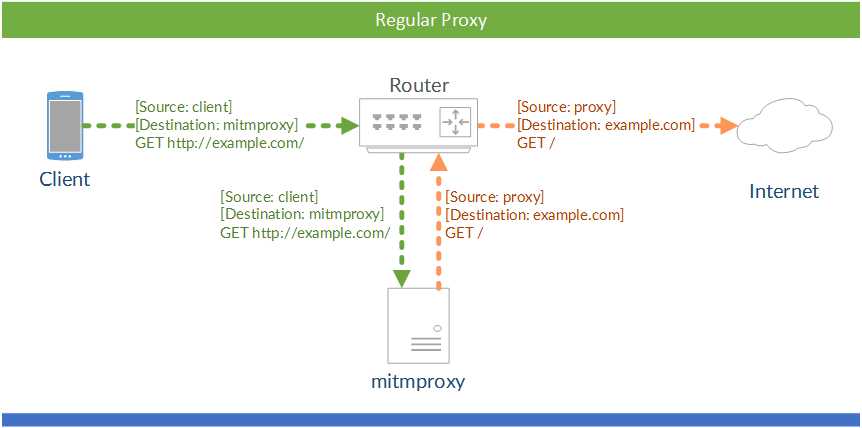
The square brackets signify the source and destination IP addresses. Your client explicitly connects to mitmproxy and mitmproxy explicitly connects to the target server.
# Transparent Proxy
In transparent mode, traffic is directed into a proxy at the network layer, without any client configuration required. This makes transparent proxying ideal for situations where you can’t change client behaviour. In the graphic below, a machine running mitmproxy has been inserted between the router and the internet:
![]()
The square brackets signify the source and destination IP addresses. Round brackets mark the next hop on the Ethernet/data link layer. This distinction is important: when the packet arrives at the mitmproxy machine, it must still be addressed to the target server. This means that Network Address Translation should not be applied before the traffic reaches mitmproxy, since this would remove the target information, leaving mitmproxy unable to determine the real destination.
![]()
Modes Transparent Wrong
# Common Configurations
There are many ways to configure your network for transparent proxying. We’ll look at two common scenarios:
- Configuring the client to use a custom gateway/router/“next hop”
- Implementing custom routing on the router
In most cases, the first option is recommended due to its ease of use.
# (a) Custom Gateway
One simple way to get traffic to the mitmproxy machine with the destination IP intact, is to simply configure the client with the mitmproxy box as the default gateway.
![]()
In this scenario, we would:
- Configure the proxy machine for transparent mode. You can find instructions in the transparent section.
- Configure the client to use the proxy machine’s IP as the default gateway.
- Quick Check: At this point, you should already be able to visit an unencrypted HTTP site over the proxy.
- Open the magic domain mitm.it and install the certificate for your device.
Setting the custom gateway on clients can be automated by serving the settings out to clients over DHCP. This lets set up an interception network where all clients are proxied automatically, which can save time and effort.
# Troubleshooting Transparent Mode
Incorrect transparent mode configurations are a frequent source of error. If it doesn’t work for you, try the following things:
- Open mitmproxy’s event log — do you see clientconnect messages? If not, the packets are not arriving at the proxy. One common cause is the occurrence of ICMP redirects, which means that your machine is telling the client that there’s a faster way to the internet by contacting your router directly (see the transparent section on how to disable them). If in doubt, Wireshark may help you to see whether something arrives at your machine or not.
- Make sure you have not explicitly configured an HTTP proxy on the client. This is not needed in transparent mode.
- Re-check the instructions in the transparent section. Anything you missed?
If you encounter any other pitfalls that should be listed here, please let us know!
# (b) Custom Routing
In some cases, you may need more fine-grained control of which traffic reaches the mitmproxy instance, and which doesn’t. You may, for instance, choose only to divert traffic to some hosts into the transparent proxy. There are a huge number of ways to accomplish this, and much will depend on the router or packet filter you’re using. In most cases, the configuration will look like this:
![]()
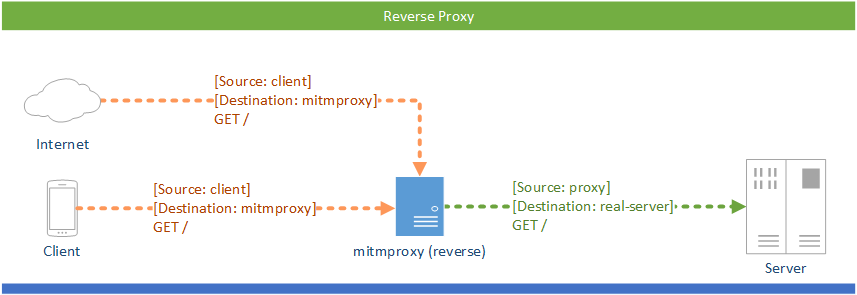
# Reverse Proxy
mitmproxy is usually used with a client that uses the proxy to access the Internet. Using reverse proxy mode, you can use mitmproxy to act like a normal HTTP server:
There are various use-cases:
- Say you have an internal API running at http://example.local/. You could now set up mitmproxy in reverse proxy mode at http://debug.example.local/ and dynamically point clients to this new API endpoint, which provides them with the same data and you with debug information. Similarly, you could move your real server to a different IP/port and set up mitmproxy in the original place to debug and or redirect all sessions.
- Say you’re a web developer working on http://example.com/ (with a development version running on http://localhost:8000/). You can modify your hosts file so that example.com points to 127.0.0.1 and then run mitmproxy in reverse proxy mode on port 80. You can test your app on the example.com domain and get all requests recorded in mitmproxy.
- Say you have some toy project that should get SSL support. Simply set up mitmproxy as a reverse proxy on port 443 and you’re done ( mitmdump -p 443 —mode reverse:http://localhost:80/ ). Mitmproxy auto-detects TLS traffic and intercepts it dynamically. There are better tools for this specific task, but mitmproxy is very quick and simple way to set up an SSL-speaking server.
- Want to add a non-SSL-capable compression proxy in front of your server? You could even spawn a mitmproxy instance that terminates SSL ( —mode reverse:http://. ), point it to the compression proxy and let the compression proxy point to a SSL-initiating mitmproxy ( —mode reverse:https://. ), which then points to the real server. As you see, it’s a fairly flexible thing.
# Host Header
In reverse proxy mode, mitmproxy automatically rewrites the Host header to match the upstream server. This allows mitmproxy to easily connect to existing endpoints on the open web (e.g. mitmproxy —mode reverse:https://example.com ). You can disable this behaviour with the keep_host_header option.
However, keep in mind that absolute URLs within the returned document or HTTP redirects will NOT be rewritten by mitmproxy. This means that if you click on a link for “http://example.com” in the returned web page, you will be taken directly to that URL, bypassing mitmproxy.
One possible way to address this is to modify the hosts file of your OS so that “example.com” resolves to your proxy’s IP, and then access the proxy by going directly to example.com. Make sure that your proxy can still resolve the original IP, or specify an IP in mitmproxy.
# Caveat: Interactive Use
Reverse Proxy mode is usually not sufficient to create a copy of an interactive website at different URL. The HTML served to the client remains unchanged — as soon as the user clicks on an non-relative URL (or downloads a non-relative image resource), traffic no longer passes through mitmproxy.
# Upstream Proxy
If you want to chain proxies by adding mitmproxy in front of a different proxy appliance, you can use mitmproxy’s upstream mode. In upstream mode, all requests are unconditionally transferred to an upstream proxy of your choice.

mitmproxy supports both explicit HTTP and explicit HTTPS in upstream proxy mode. You could in theory chain multiple mitmproxy instances in a row, but that doesn’t make any sense in practice (i.e. outside of our tests).
# SOCKS Proxy
In this mode, mitmproxy acts as a SOCKS5 proxy.


