- How to Create a New Ext4 File System (Partition) in Linux
- Creating a New Partition in Linux
- Formatting New Ext4 Partition
- Mounting New Ext4 Parition in File System
- If You Appreciate What We Do Here On TecMint, You Should Consider:
- Использование команды mkfs в Linux для форматирования файловой системы на диске или разделе
- Что такое файловая система
- Примеры команд mkfs
- mkfs без опций создает файловую систему ext2
- Укажите тип файла с помощью mkfs
- Проверьте наличие плохих блоков на устройстве
- Бонусный совет: проверьте тип файловой системы устройства
- Реальный пример использования: использование команды mkfs для создания файловой системы на USB-устройстве.
- Найди свое устройство
- Проверьте раздел
- ⌨ Как создать новую файловую систему Ext4 (раздел) в Linux
- Создание нового раздела в Linux
- Форматирование нового раздела Ext4
- Монтирование нового раздела Ext4 в файловой системе
- Using mkfs command in Linux to Format the Filesystem on a Disk or Partition
- What is a file system, again?
- mkfs command examples
- mkfs without any option creates ext2 filesystem
- Specify filetype with mkfs
- Check for bad blocks on a device
- Bonus tip: Check the filesystem type of a device
- Real life use case: Using mkfs command to create a File System on a USB device
- Find Your Device
- Verify the Partition
- Unmount
- Create the File System
- Verify the newly created filesystem
- Conclusion
How to Create a New Ext4 File System (Partition) in Linux
The ext4 or fourth extended filesystem is a widely-used journaling file system for Linux. It was designed as a progressive revision of the ext3 file system and overcomes a number of limitations in ext3.
It has significant advantages over its predecessor such as improved design, better performance, reliability, and new features. Although it is best suited for hard drives, it can also be used on removable devices.
This article will show you how to create a new ext4 file system (partition) in Linux. We will first of all look at how to create a new partition in Linux, format it with the ext4 file system and mount it.
Note: For the purpose of this article:
- We will assume that you have added a new hard drive to your Linux machine, in which you will create the new ext4 partition, and
- If you are operating the system as an administrative user, use the sudo command to gain root privileges to run the commands shown in this article.
Creating a New Partition in Linux
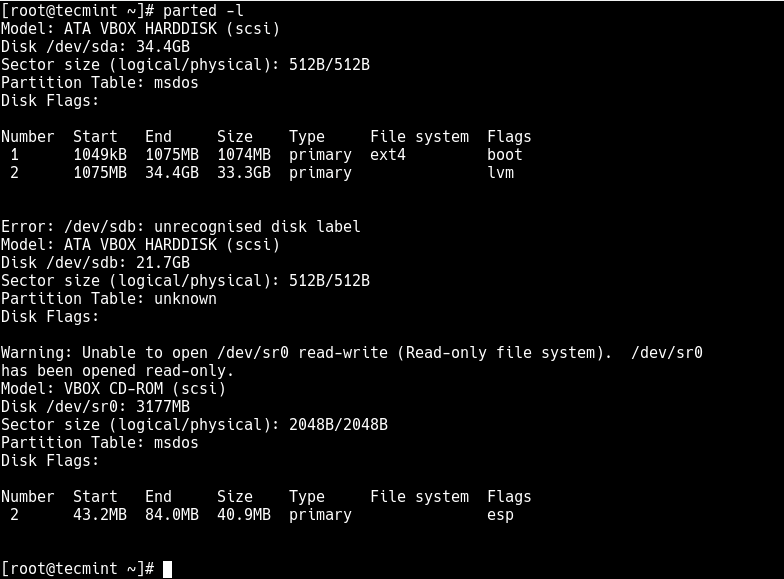
List the partitions using the fdisk -l or parted -l commands to identify the hard drive you want to partition.
![]() List Linux Partitions
List Linux Partitions
Looking at the output in the screenshot above, we have two hard disks added on the test system and we will partition disk /dev/sdb .
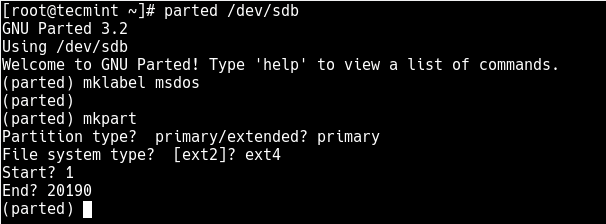
Now use parted command to start creating the partition on the selected storage device.
Then create a partition using the mkpart command, give it additional parameters like “primary” or “logical” depending on the partition type that you wish to create. Then select ext4 as the file system type, set the start and end to establish the size of the partition:
![]() Create a New Ext4 Partition
Create a New Ext4 Partition
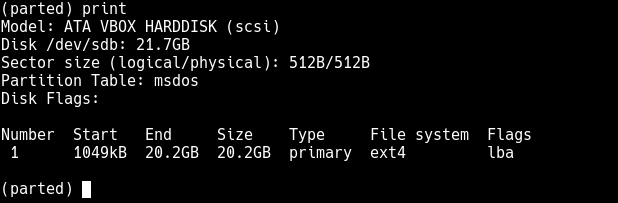
To print the partition table on the device /dev/sdb or detailed information about the new partition, run the print command.
![]() Print Partition Table
Print Partition Table
Now exit the program using the quit command.
Formatting New Ext4 Partition
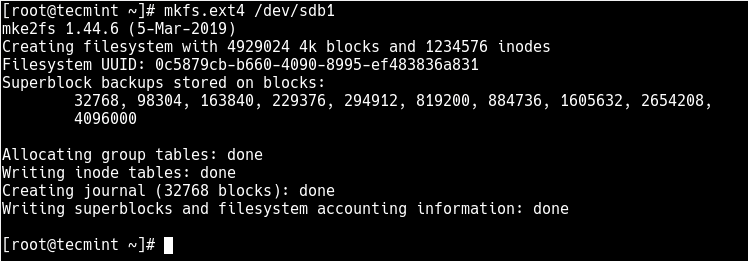
Next, you need to properly format the new partition with the ext4 file system type using the mkfs.ext4 or mke4fs command as follows.
![]() Format a New Ext4 Partition
Format a New Ext4 Partition
Then label the partition using the e4label command as follows.
Mounting New Ext4 Parition in File System
Next, create a mount point and mount the newly created ext4 partition file system.
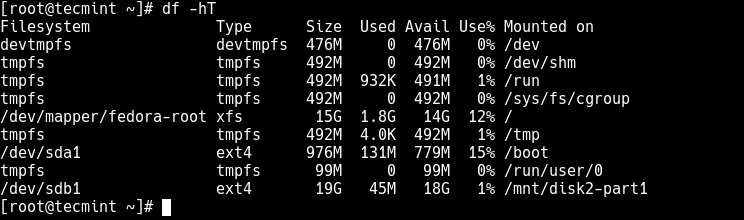
Now using the df command, you can list all file systems on your system together with their sizes in a human readable format (-h) , and their mount points and file system types (-T) :
![]() Show Linux Filesystem with Mount Points
Show Linux Filesystem with Mount Points
Lastly, add the following entry in your /etc/fstab to enable persistent mounting of the file system, even after a reboot.
You might also like to read these following related articles:
That’s all! In this article, we’ve explained how to create a new partition in Linux, format it with ext4 file system type and mount it as a filesystem. For more information or to share any queries with us, use the feedback form below.
If You Appreciate What We Do Here On TecMint, You Should Consider:
TecMint is the fastest growing and most trusted community site for any kind of Linux Articles, Guides and Books on the web. Millions of people visit TecMint! to search or browse the thousands of published articles available FREELY to all.
If you like what you are reading, please consider buying us a coffee ( or 2 ) as a token of appreciation.

We are thankful for your never ending support.
Источник
Использование команды mkfs в Linux для форматирования файловой системы на диске или разделе
Главное меню » Linux » Использование команды mkfs в Linux для форматирования файловой системы на диске или разделе

Вы также можете использовать команду mkfs следующим образом:
В этой статье мы в общих чертах расскажем, что такое файловая система. А также приведем примеры эффективного использования команды mkfs.
Поскольку команда mkfs работает с дисками и разделами, вам необходимо быть пользователем root или sudo с правами доступа для запуска команд администратора.
MKFS это мощный инструмент. Важно понимать потенциальные последствия изменения файловой системы. Выбор неправильного узла устройства удалит все данные на этом устройстве. Используйте эту команду на свой страх и риск. Вы были предупреждены
Что такое файловая система
Файловая система (fs) относится к структуре и логике, которые управляют данными на устройстве. Файловая система контролирует, как данные хранятся и извлекаются.
Существует много типов файловых систем, каждая из которых имеет свои преимущества и недостатки. Вот наиболее распространенный тип файловых систем:
Возможно, вы уже сталкивались с одним или несколькими из этих типов файловых систем. Вы можете даже связать типы с их соответствующими операционными системами.
Вообще говоря, FAT/NTFS предназначены для Windows, Ext используется с системами Linux, а APFS/HFS – файловые системы macOS. Каждый из них по-разному обращается к логике файловой структуры, что может привести к проблемам.
Вот почему важно подумать об этом перед объявлением типа файловой системы или «форматированием» вашего устройства. Каждый вариант использования индивидуален, и вам решать, какая файловая система лучше всего подходит для ваших нужд.
Примеры команд mkfs
Позвольте нам показать вам наиболее распространенное использование команды mkfs.
Пожалуйста, не пытайтесь использовать вслепую ни одну из этих команд в вашей реальной системе. Они отформатирует целевое устройство/раздел диска, удалив все данные.
mkfs без опций создает файловую систему ext2
Если вы не укажете тип файловой системы для целевого устройства, он будет использовать файловую систему ext2 по умолчанию.
Укажите тип файла с помощью mkfs
Использование ext2 не очень удобно или целесообразно. В наши дни большинство систем Linux рекомендуют использовать ext4. Вы можете указать файловую систему следующим образом:
Вы также можете использовать это так:
Проверьте наличие плохих блоков на устройстве
Вы также можете проверить наличие плохих блоков на устройстве, но имейте в виду, что проверка часто занимает много времени.
Бонусный совет: проверьте тип файловой системы устройства
Вы можете проверить тип файловой системы устройства, которое вы только что отформатировали, используя команду mkfs. Вы можете использовать команду file для этой цели.
Вот пример, который показывает, какой вывод он может показать:
Реальный пример использования: использование команды mkfs для создания файловой системы на USB-устройстве.
Теперь, когда у вас есть некоторая справочная информация, вы можете начать использовать mkfs.
Самая практическая демонстрация, которую мы можем придумать, – это форматирование USB-накопителя. Эти же принципы будут применяться к любому типу хранилища по вашему выбору.
Найди свое устройство
Сначала вам нужно будет найти свое устройство. Один метод, который вы можете использовать, это sudo fdisk -l. Это перечислит все дисковые узлы, которые в настоящее время смонтированы.
Ваш вывод, очевидно, будет различным. Пожалуйста, будьте очень осторожны при определении желаемого диска . Если вы не уверены, извлеките диск и повторите команду fdisk -l. Если у вас есть правильное устройство, оно не будет отображаться во время отключения.
Проверьте раздел
Устройство, которое мы используем, является USB-накопителем Patriot Memory, и оно находится по адресу /dev/sdb. В дополнение к определению правильного диска, вам нужно будет убедиться, что вы меняете fs нужного раздела.
Мы использовали инструменты fdisk, чтобы удалить существующие данные и написать новую таблицу разделов. Пока мы делали это, мы создали новый раздел для записи. Этот раздел будет нашей целью /dev/sdb1.
Источник
⌨ Как создать новую файловую систему Ext4 (раздел) в Linux

Ext4 – широко используемая файловая система журналирования для Linux.
Она был разработана как прогрессивная версия файловой системы ext3 и преодолевает ряд ограничений в ext3.
Она имеет значительные преимущества перед предшественником, такие как улучшенный дизайн, лучшая производительность, надежность и новые функции.
Хотя она лучше всего подходит для жестких дисков, его также можно использовать на съемных устройствах.
Эта статья покажет вам, как создать новую файловую систему ext4 (раздел) в Linux.
Сначала мы рассмотрим, как создать новый раздел в Linux, отформатировать его в файловой системе ext4 и смонтировать.
Примечание. Для целей данной статьи:
- Предположим, что вы добавили новый жесткий диск на свой компьютер Linux, на котором вы создадите новый раздел ext4, и
- Если вы работаете с системой как пользователь с правами администратора, используйте команду sudo для получения привилегий root для запуска команд, показанных в этой статье.
Создание нового раздела в Linux
Перечислите разделы с помощью команд fdisk -l или parted -l, чтобы определить жесткий диск, который вы хотите разбить на разделы.
Посмотрите на вывод на скриншоте выше, у нас есть два жестких диска, добавленных в тестовую систему, и мы разделим диск /dev/sdb.
Теперь используйте команду parted, чтобы начать создание раздела на выбранном устройстве хранения.
Теперь присвойте новому диску метку с помощью команды mklabel.
Затем создайте раздел с помощью команды mkpart, присвойте ему дополнительные параметры, такие как «основной» или «логический», в зависимости от типа раздела, который вы хотите создать.
Затем выберите ext4 в качестве типа файловой системы, установите начало и конец, чтобы установить размер раздела:
Чтобы вывести таблицу разделов на устройстве /dev/sdb или подробную информацию о новом разделе, выполните команду print
Теперь выйдите из программы, используя команду quit.
Форматирование нового раздела Ext4
Далее необходимо правильно отформатировать новый раздел с типом файловой системы ext4 с помощью команды mkfs.ext4 или mke4fs, как показано ниже.
Затем пометьте раздел с помощью команды e4label следующим образом.
Монтирование нового раздела Ext4 в файловой системе
Затем создайте точку монтирования и смонтируйте только что созданную файловую систему раздела ext4.
Теперь с помощью команды df вы можете перечислить все файловые системы в вашей системе вместе с их размерами в удобочитаемом формате (-h), а также их точки монтирования и типы файловых систем (-T):
Наконец, добавьте следующую запись в ваш /etc/fstab, чтобы включить постоянное монтирование файловой системы даже после перезагрузки.
Вы также можете прочитать следующие статьи по теме:
Источник
Using mkfs command in Linux to Format the Filesystem on a Disk or Partition
The letters in mkfs stand for «make file system». The command is commonly used for managing storage devices in Linux. You can think of mkfs as a command line tool for formatting a disk into a specific filesystem.
You can also use the mkfs command in the following fashion.
In this tutorial, I will discuss generally what a file system is. I’ll also provide examples for using the mkfs command effectively.
Since the mkfs command deals with disks and partitions, it requires you to be either root or sudo user with access to run admin commands.
mkfs is a powerful tool. It is important to understand the potential consequences of altering the filesystem. Selecting the wrong device node will erase all data on that device. Use this command at your own risk. You have been warned
What is a file system, again?
A file system (fs) refers to the structure and logic that manage data on a device. The file system controls how data is stored and retrieved.
There are many types of file systems and each has its own advantages and disadvantages. Here are the most common type of filesystems:
You have probably come across one or more of these filesystem types before. You may even associate the types with their respective operating systems.
Generally speaking, FAT/NTFS are designed for Windows, Ext is used with Linux systems, and APFS/HFS are macOS file systems. Each of these address the logic of file structure differently which can result in issues.
This is why it is crucial to think about this before declaring a filesystem type, or «formatting» your device. Each use case is different, and it is up to you to decide what filesystem works best for your needs.
mkfs command examples
Let me show you some of the most common usage of the mkfs command.
Please don’t try any of these commands on your actual system blindly. It will format the target device/disk partition erasing all the data.
mkfs without any option creates ext2 filesystem
If you don’t specify the filesystem type for the target device, it will use the default ext2 filesystem.
Specify filetype with mkfs
Using ext2 is not very convenient or advisable. Most Linux systems these days recommend using ext4. You can specify the file system in the following manner:
You can also use it like this:
Check for bad blocks on a device
You can also check for bad blocks on a device but keep in mind that the check often takes a long time.
Bonus tip: Check the filesystem type of a device
You may want to check the type of filesystem of a device that you just formatted using mkfs command. You can use the file command for this purpose.
Here’s an example that shows what kind of output it could show:
Real life use case: Using mkfs command to create a File System on a USB device
Now that you have some background information, you can start using mkfs.
The most practical demonstration I can think of is formatting a USB flash storage drive. These same principles will apply to any type of storage you choose.
Find Your Device
First you will need to find your device. One method you can use is sudo fdisk -l . This will list all disk nodes that are currently mounted.
Your output will obviously vary. Please be very careful when identifying your desired drive. If you are unsure, remove the disk and run the fdisk -l command again. If you have the correct device, it won’t be listed while disconnected.
Verify the Partition
The device I’m using is a Patriot Memory USB and it is located at /dev/sdb . In addition to identifying the correct disk, you will need to make sure that you are changing the fs of the desired partition.
I used fdisk tools to delete existing data and write a new partition table. While I was doing that, I created a new partition to write to. That partition will be our target: /dev/sdb1 .
Unmount
Before you attempt to change the file system, you will need to unmount it using the umount command.
Create the File System
Now that you have verified your target and unmounted the drive, you can proceed to create the file system.
I have added the -v verbose option here to display more information when running.
This process can take some time, but should finish in under 20 minutes unless the target is larger than 2 TB.
I had several issues with the program hanging on the last item. Unfortunately, there is no progress indicator and I had no errors thrown.
Verify the newly created filesystem
First, check the filesystem of the device you just used. Is it the one you wanted?
It is important to make sure that the device is recognized on the systems you will use it with. I created a folder called test and a file within it called test.txt.
To save time, you can copy and paste my commands here.
If everything worked, you should be able to mount the drive to your desired systems and access the files. If you cannot access the files on your system, there is probably a compatibility issue.
Conclusion
I hope you find this quick guide to mkfs command useful. If you like this tutorial, please share it on social media.
If you have any comments or questions, please leave them below. If you have any suggestions for topics you’d like to see covered, feel free to leave those as well.
Источник


