- DLL DOWNLOADER
- Download Installutillib.dll for Windows 10, 8.1, 8, 7, Vista and XP
- About Installutillib.dll link
- Table of Contents
- Operating Systems Compatible with the Installutillib.dll Library link
- Other Versions of the Installutillib.dll Library link
- How to Download Installutillib.dll link
- Methods for Fixing Installutillib.dll link
- Method 1: Copying the Installutillib.dll Library to the Windows System Directory link
- Method 2: Copying the Installutillib.dll Library to the Program Installation Directory link
- Method 3: Doing a Clean Install of the program That Is Giving the Installutillib.dll Error link
- Method 4: Fixing the Installutillib.dll Error Using the Windows System File Checker link
- Method 5: Getting Rid of Installutillib.dll Errors by Updating the Windows Operating System link
- Как исправить ошибки DLL файлов в Windows 10, 8 или 7
- Возможные причины повреждения, удаления или ошибок DLL файлов
- Способы восстановления DLL файлов в Windows 10
DLL DOWNLOADER
Download DLL and other System-Files for Windows

Download Installutillib.dll for Windows 10, 8.1, 8, 7, Vista and XP
About Installutillib.dll link
The Installutillib.dll library is 0.06 MB. The download links for this library are clean and no user has given any negative feedback. From the time it was offered for download, it has been downloaded 3090 times.
Table of Contents
Operating Systems Compatible with the Installutillib.dll Library link
Other Versions of the Installutillib.dll Library link
The latest version of the Installutillib.dll library is 2.0.50727.4927 version. Before this, there were 3 versions released. All versions released up till now are listed below from newest to oldest
How to Download Installutillib.dll link
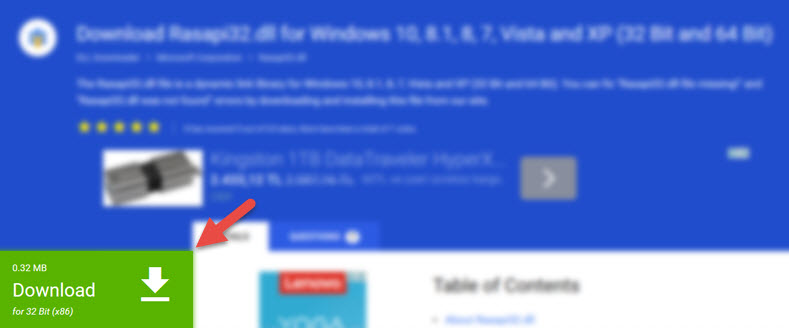
- First, click on the green-colored «Download» button in the top left section of this page (The button that is marked in the picture).
 Step 1:Start downloading the Installutillib.dll library
 - When you click the «Download» button, the «Downloading» window will open. Don’t close this window until the download process begins. The download process will begin in a few seconds based on your Internet speed and computer.
 Step 1:Start downloading the Installutillib.dll library
Methods for Fixing Installutillib.dll link
ATTENTION! Before starting the installation, the Installutillib.dll library needs to be downloaded. If you have not downloaded it, download the library before continuing with the installation steps. If you don’t know how to download it, you can immediately browse the dll download guide above.
Method 1: Copying the Installutillib.dll Library to the Windows System Directory link
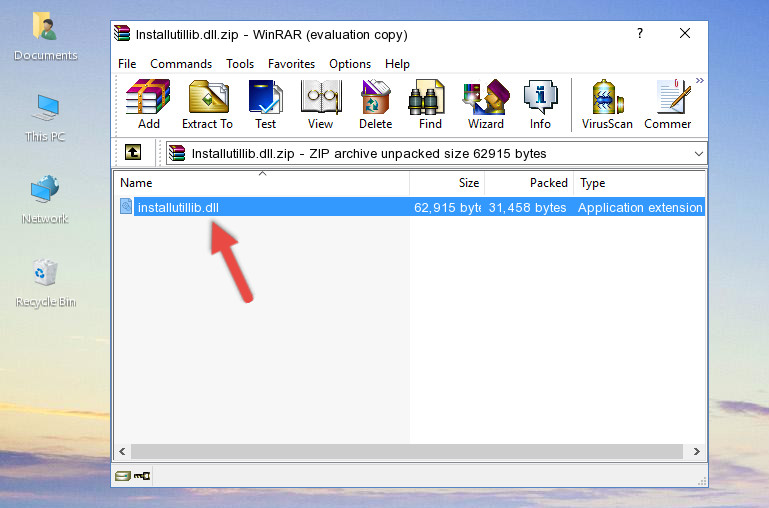
- The file you are going to download is a compressed file with the «.zip» extension. You cannot directly install the «.zip» file. First, you need to extract the dynamic link library from inside it. So, double-click the file with the «.zip» extension that you downloaded and open the file.
- You will see the library named «Installutillib.dll» in the window that opens up. This is the library we are going to install. Click the library once with the left mouse button. By doing this you will have chosen the library. Step 2:Choosing the Installutillib.dll library
- Click the «Extract To» symbol marked in the picture. To extract the dynamic link library, it will want you to choose the desired location. Choose the «Desktop» location and click «OK» to extract the library to the desktop. In order to do this, you need to use the Winrar program. If you do not have this program, you can find and download it through a quick search on the Internet. Step 3:Extracting the Installutillib.dll library to the desktop
- Copy the «Installutillib.dll» library you extracted and paste it into the «C:\Windows\System32» directory. Step 4:Copying the Installutillib.dll library into the Windows/System32 directory
- If your operating system has a 64 Bit architecture, copy the «Installutillib.dll» library and paste it also into the «C:\Windows\sysWOW64» directory.
 Step 2:Choosing the Installutillib.dll library
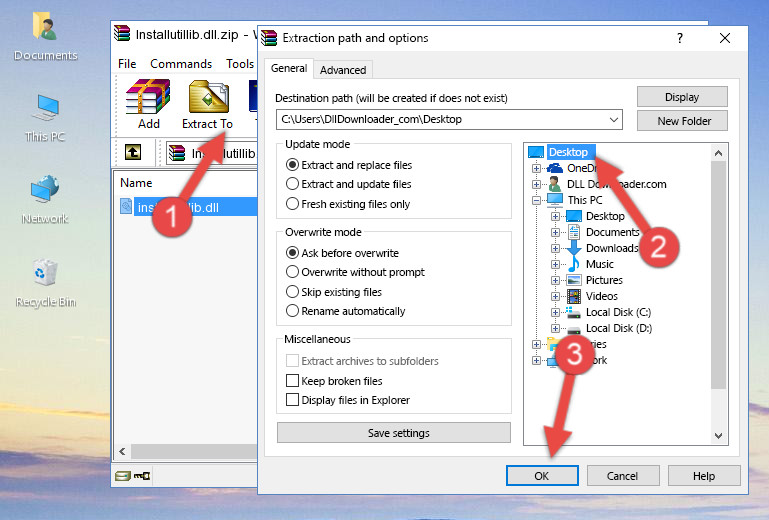 Step 3:Extracting the Installutillib.dll library to the desktop
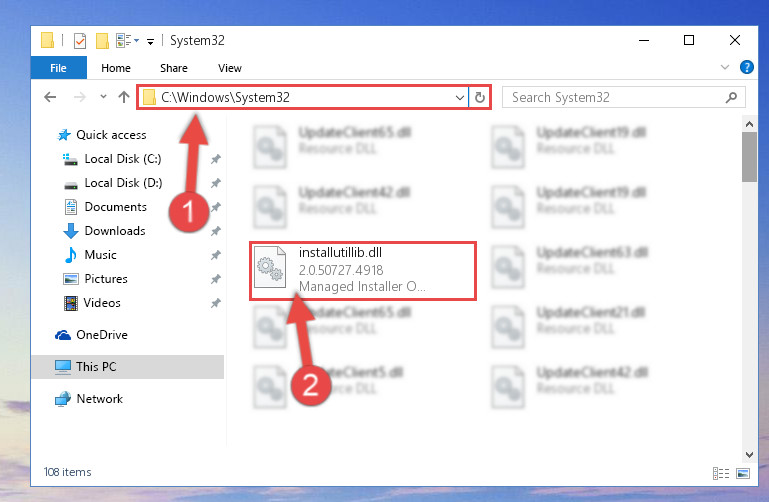 Step 4:Copying the Installutillib.dll library into the Windows/System32 directory
NOTE! On 64 Bit systems, the dynamic link library must be in both the «sysWOW64» directory as well as the «System32» directory. In other words, you must copy the «Installutillib.dll» library into both directories.
NOTE! In this explanation, we ran the Command Line on Windows 10. If you are using one of the Windows 8.1, Windows 8, Windows 7, Windows Vista or Windows XP operating systems, you can use the same methods to run the Command Line as an administrator. Even though the pictures are taken from Windows 10, the processes are similar.
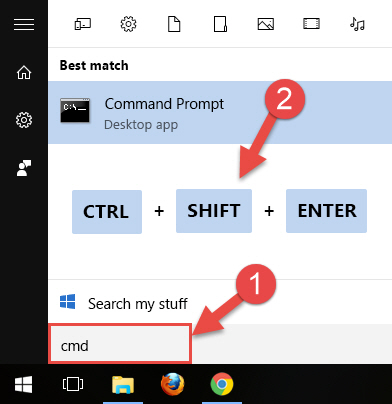
- First, open the Start Menu and before clicking anywhere, type «cmd» but do not press Enter.
- When you see the «Command Line» option among the search results, hit the «CTRL» + «SHIFT» + «ENTER» keys on your keyboard.
- A window will pop up asking, «Do you want to run this process?«. Confirm it by clicking to «Yes» button.
 Step 6:Running the Command Line as an administrator
%windir%\System32\regsvr32.exe /u Installutillib.dll
%windir%\System32\regsvr32.exe /i Installutillib.dll
%windir%\SysWoW64\regsvr32.exe /i Installutillib.dll
Method 2: Copying the Installutillib.dll Library to the Program Installation Directory link
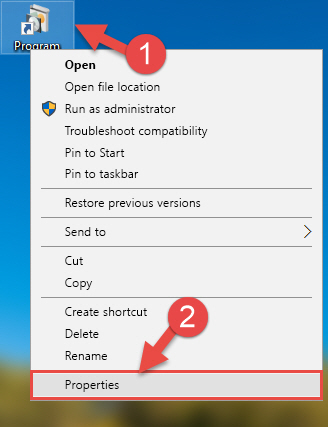
- In order to install the dynamic link library, you need to find the installation directory for the program that was giving you errors such as «Installutillib.dll is missing«, «Installutillib.dll not found» or similar error messages. In order to do that, Right-click the program’s shortcut and click the Properties item in the right-click menu that appears. Step 1:Opening the program shortcut properties window
- Click on the Open File Location button that is found in the Properties window that opens up and choose the folder where the application is installed. Step 2:Opening the installation directory of the program
- Copy the Installutillib.dll library into the directory we opened up. Step 3:Copying the Installutillib.dll library into the program’s installation directory
- That’s all there is to the installation process. Run the program giving the dll error again. If the dll error is still continuing, completing the 3rd Method may help fix your issue.
 Step 1:Opening the program shortcut properties window
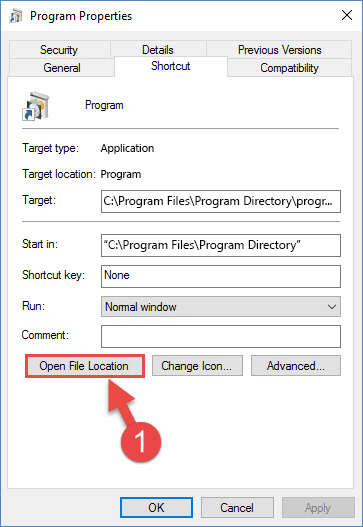 Step 2:Opening the installation directory of the program
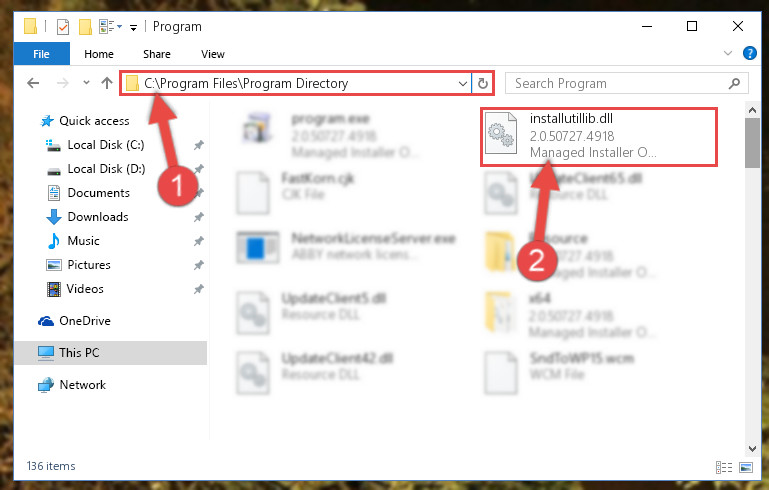 Step 3:Copying the Installutillib.dll library into the program’s installation directory
Method 3: Doing a Clean Install of the program That Is Giving the Installutillib.dll Error link
- Open the Run tool by pushing the «Windows» + «R» keys found on your keyboard. Type the command below into the «Open» field of the Run window that opens up and press Enter. This command will open the «Programs and Features» tool.
Method 4: Fixing the Installutillib.dll Error Using the Windows System File Checker link
- In order to run the Command Line as an administrator, complete the following steps.
NOTE! In this explanation, we ran the Command Line on Windows 10. If you are using one of the Windows 8.1, Windows 8, Windows 7, Windows Vista or Windows XP operating systems, you can use the same methods to run the Command Line as an administrator. Even though the pictures are taken from Windows 10, the processes are similar.
- First, open the Start Menu and before clicking anywhere, type «cmd» but do not press Enter.
- When you see the «Command Line» option among the search results, hit the «CTRL» + «SHIFT» + «ENTER» keys on your keyboard.
- A window will pop up asking, «Do you want to run this process?«. Confirm it by clicking to «Yes» button.
Step 1:Running the Command Line as an administrator
Method 5: Getting Rid of Installutillib.dll Errors by Updating the Windows Operating System link
Some programs require updated dynamic link libraries from the operating system. If your operating system is not updated, this requirement is not met and you will receive dll errors. Because of this, updating your operating system may solve the dll errors you are experiencing.
Most of the time, operating systems are automatically updated. However, in some situations, the automatic updates may not work. For situations like this, you may need to check for updates manually.
For every Windows version, the process of manually checking for updates is different. Because of this, we prepared a special guide for each Windows version. You can get our guides to manually check for updates based on the Windows version you use through the links below.
Как исправить ошибки DLL файлов в Windows 10, 8 или 7
Читайте, как восстановить сбойные DLL библиотеки в Windows 10, 8 или 7 . Какие причины повреждения, удаления или ошибок DLL файлов. Сами по себе DLL файлы не являются исполняемыми файлами, но они используются в работе другими программами. Часто несколько программ или драйверов могут использовать DLL файл совместно, поэтому удаление или обновление одной программы может вывести из строя другие.
Если вы получаете сообщения: «DLL файл не найден или отсутствует» , «не удалось зарегистрировать DLL библиотеку» , «отсутствует необходимый компонент» или «необходима повторная установка приложения» , то наша инструкция будет полезна для вас. Такие сообщения могут возникать во время запуска любого приложения или игры, во время установки, обновления или старта системы Windows 10, 8 или 7.
Для выявления причины ошибки и получения рекомендаций по её устранению можно использовать Журнал событий системы. Особенно полезно это будет если ошибка блокирует загрузку системы или вызывает синий экран смерти (BSOD) .
Если вы не можете запустить систему из-за ошибки в обычном режиме, используйте загрузку в безопасном режиме .
Возможные причины повреждения, удаления или ошибок DLL файлов
- Непреднамеренное удаление DLL файлов по ошибке.
- Перезапись системных DLL файлов устаревшими версиями.
- Заражение вирусами или вредоносным ПО.
- Повреждение жесткого диска.
- Отсутствие или повреждение драйверов оборудования.
- В Windows находятся несовместимые версии файлов, которые принадлежат к различным приложениям.
- Отсутствие необходимых компонентов Windows: DirectX, C++ Runtime Library, .NET Framework.
- Автоматические обновления Windows и драйверов системы.
- Использование устаревших или не правильных драйверов.
- Повреждение или удаление критически важных веток реестра.
Способы восстановления DLL файлов в Windows 10
- Если Windows перестала загружаться, или были повреждены или удалены системные файлы, вы можете воспользоваться инструментами среды восстановления.
- Так же в Windows 10, 8 или 7 присутствует инструмент для автоматического восстановления системных файлов или библиотек из командной строки.
- Ошибки, связанные c отсутствием необходимых библиотек DirectX или C++ Runtime Library являются наиболее часто встречаемыми проблемами в Windows.
Вам необходимо установить совместимую версию DirectX, если игра вылетает с ошибкой: “Запуск программы не возможен, так как на компьютере отсутствует файл DLL. Попробуйте переустановить программу” , или в тексте ошибки указаны следующие библитеки: d3dx9_43.dll, xinput1_3.dll, d3dx9_31.dll, d3dx9_34.dll, xinput1_2.dll, d3d11.dll, d3dx9_35.dll, dxgi.dll, d3dx9_25.dll, d3d11.dll, d3dx9.dll, d3dx9_43.dll, d3dx10_43.dll, d3dx9_26.dll, d3dx9_30.dll, d3dx9_27.dll, d3dx11_43.dll, d3dcompiler_43.dll, d3d10.dll, xinput1_3.dll, d3dx9_31.dll, xinput1_2.dll, d3dx9_31.dll, d3dx9_34.dll, d3dx9_42.dll, x3daudio1_7.dll, x3daudio1_6.dll, xrsound.dll . Для этого необходимо воспользоваться Web инсталлятором DirectX от Microsoft .
Установите необходимую версию C++ Runtime Library, если в тексте ошибки указаны библитеки содержащие слова MSVCR или RUNTIME: MSVCR120.dll, MSVCP120.dll, MSVCR110.dll, MSVCP110.dll, MSVCR100.dll, MSVCP100.dll, MSVCR90.dll, MSVCP90.dll, MSVCR80.dll, MSVCP80.dll, VCRUNTIME140.dll, runtime-x64.dll, runtime-x32.dll, runtime.dll, runtime-110.dll и т.д.
Найдите в системных требованиях к программе какая версия библиотек C++ Runtime Dll необходима для работы и установите нужную:
Переустановите программу, ссылающуюся на DLL файл. Причиной ошибки DLL файла может быть ошибка в работе использующей его программы.


