- 20 Command Line Tools to Monitor Linux Performance
- 1. Top – Linux Process Monitoring
- 2. VmStat – Virtual Memory Statistics
- 3. Lsof – List Open Files
- 4. Tcpdump – Network Packet Analyzer
- 5. Netstat – Network Statistics
- 6. Htop – Linux Process Monitoring
- 7. Iotop – Monitor Linux Disk I/O
- 8. Iostat – Input/Output Statistics
- 9. IPTraf – Real Time IP LAN Monitoring
- 10. Psacct or Acct – Monitor User Activity
- 11. Monit – Linux Process and Services Monitoring
- 12. NetHogs – Monitor Per Process Network Bandwidth
- 13. iftop – Network Bandwidth Monitoring
- 14. Monitorix – System and Network Monitoring
- 15. Arpwatch – Ethernet Activity Monitor
- 16. Suricata – Network Security Monitoring
- 17. VnStat PHP – Monitoring Network Bandwidth
- 18. Nagios – Network/Server Monitoring
- 19. Nmon: Monitor Linux Performance
- 20. Collectl: All-in-One Performance Monitoring Tool
- If You Appreciate What We Do Here On TecMint, You Should Consider:
- Перекрестное опыление: управляем Linux из-под Windows, и наоборот
- Microsoft Loves Linux
- Магомед не идет к горе
- Гора идет к Магомету
- В хозяйстве пригодится
20 Command Line Tools to Monitor Linux Performance
It’s really very tough job for every System or Network administrator to monitor and debug Linux System Performance problems every day. After being a Linux Administrator for 5 years in IT industry, I came to know that how hard is to monitor and keep systems up and running. For this reason, we’ve compiled the list of Top 20 frequently used command line monitoring tools that might be useful for every Linux/Unix System Administrator. These commands are available under all flavors of Linux and can be useful to monitor and find the actual causes of performance problem. This list of commands shown here are very enough for you to pick the one that is suitable for your monitoring scenario.
![]() Linux Command Line Monitoring
Linux Command Line Monitoring
1. Top – Linux Process Monitoring
Linux Top command is a performance monitoring program which is used frequently by many system administrators to monitor Linux performance and it is available under many Linux/Unix like operating systems. The top command used to dipslay all the running and active real-time processes in ordered list and updates it regularly. It display CPU usage, Memory usage, Swap Memory, Cache Size, Buffer Size, Process PID, User, Commands and much more. It also shows high memory and cpu utilization of a running processess. The top command is much userful for system administrator to monitor and take correct action when required. Let’s see top command in action.
![]() Top Command Example
Top Command Example
For more examples of Top command read : 12 TOP Command Examples in Linux
2. VmStat – Virtual Memory Statistics
Linux VmStat command used to display statistics of virtual memory, kernerl threads, disks, system processes, I/O blocks, interrupts, CPU activity and much more. By default vmstat command is not available under Linux systems you need to install a package called sysstat that includes a vmstat program. The common usage of command format is.
For more Vmstat examples read : 6 Vmstat Command Examples in Linux
3. Lsof – List Open Files
Lsof command used in many Linux/Unix like system that is used to display list of all the open files and the processes. The open files included are disk files, network sockets, pipes, devices and processes. One of the main reason for using this command is when a disk cannot be unmounted and displays the error that files are being used or opened. With this commmand you can easily identify which files are in use. The most common format for this command is.
More lsof command usage and examples : 10 lsof Command Examples in Linux
4. Tcpdump – Network Packet Analyzer
Tcpdump one of the most widely used command-line network packet analyzer or packets sniffer program that is used capture or filter TCP/IP packets that received or transferred on a specific interface over a network. It also provides a option to save captured packages in a file for later analysis. tcpdump is almost available in all major Linux distributions.
For more tcpdump usage read : 12 Tcpdump Command Examples in Linux
5. Netstat – Network Statistics
Netstat is a command line tool for monitoring incoming and outgoing network packets statistics as well as interface statistics. It is very useful tool for every system administrator to monitor network performance and troubleshoot network related problems.
6. Htop – Linux Process Monitoring
Htop is a much advanced interactive and real time Linux process monitoring tool. This is much similar to Linux top command but it has some rich features like user friendly interface to manage process, shortcut keys, vertical and horizontal view of the processes and much more. Htop is a third party tool and doesn’t included in Linux systems, you need to install it using YUM package manager tool. For more information on installation read our article below.
![]() Htop Command Example Screenshot
Htop Command Example Screenshot
7. Iotop – Monitor Linux Disk I/O
Iotop is also much similar to top command and Htop program, but it has accounting function to monitor and display real time Disk I/O and processes. This tool is much useful for finding the exact process and high used disk read/writes of the processes.
![]() Iotop Command Example Screenshot
Iotop Command Example Screenshot
For Ioptop installation and usage read : Install Iotop in Linux
8. Iostat – Input/Output Statistics
IoStat is simple tool that will collect and show system input and output storage device statistics. This tool is often used to trace storage device performance issues including devices, local disks, remote disks such as NFS.
For more Iostat usage and examples visit : 6 Iostat Command Examples in Linux
9. IPTraf – Real Time IP LAN Monitoring
IPTraf is an open source console-based real time network (IP LAN) monitoring utility for Linux. It collects a variety of information such as IP traffic monitor that passes over the network, including TCP flag information, ICMP details, TCP/UDP traffic breakdowns, TCP connection packet and byne counts. It also gathers information of general and detaled interface statistics of TCP, UDP, IP, ICMP, non-IP, IP checksum errors, interface activity etc.
![]() IP Traffic Monitor
IP Traffic Monitor
For more information and usage of IPTraf tool, please visit : IPTraf Network Monitoring Tool
10. Psacct or Acct – Monitor User Activity
psacct or acct tools are very useful for monitoring each users activity on the system. Both daemons runs in the background and keeps a close watch on the overall activity of each user on the system and also what resources are being consumed by them.
These tools are very useful for system administrators to track each users activity like what they are doing, what commands they issued, how much resources are used by them, how long they are active on the system etc.
For installation and example usage of commands read the article on Monitor User Activity with psacct or acct
11. Monit – Linux Process and Services Monitoring
Monit is a free open source and web based process supervision utility that automatically monitors and managers system processes, programs, files, directories, permissions, checksums and filesystems.
It monitors services like Apache, MySQL, Mail, FTP, ProFTP, Nginx, SSH and so on. The system status can be viewed from the command line or using it own web interface.
![]() Monit Linux Process Monitoring
Monit Linux Process Monitoring
12. NetHogs – Monitor Per Process Network Bandwidth
NetHogs is an open source nice small program (similar to Linux top command) that keeps a tab on each process network activity on your system. It also keeps a track of real time network traffic bandwidth used by each program or application.
![]() NetHogs Linux Bandwidth Monitoring
NetHogs Linux Bandwidth Monitoring
13. iftop – Network Bandwidth Monitoring
iftop is another terminal-based free open source system monitoring utility that displays a frequently updated list of network bandwidth utilization (source and destination hosts) that passing through the network interface on your system. iftop is considered for network usage, what ‘top‘ does for CPU usage. iftop is a ‘top‘ family tool that monitor a selected interface and displays a current bandwidth usage between two hosts.
![]() iftop – Network Bandwidth Monitoring
iftop – Network Bandwidth Monitoring
14. Monitorix – System and Network Monitoring
Monitorix is a free lightweight utility that is designed to run and monitor system and network resources as many as possible in Linux/Unix servers. It has a built in HTTP web server that regularly collects system and network information and display them in graphs. It Monitors system load average and usage, memory allocation, disk driver health, system services, network ports, mail statistics (Sendmail, Postfix, Dovecot, etc), MySQL statistics and many more. It designed to monitor overall system performance and helps in detecting failures, bottlenecks, abnormal activities etc.
![]() Monitorix Monitoring
Monitorix Monitoring
15. Arpwatch – Ethernet Activity Monitor
Arpwatch is a kind of program that is designed to monitor Address Resolution (MAC and IP address changes) of Ethernet network traffic on a Linux network. It continuously keeps watch on Ethernet traffic and produces a log of IP and MAC address pair changes along with a timestamps on a network. It also has a feature to send an email alerts to administrator, when a pairing added or changes. It is very useful in detecting ARP spoofing on a network.
16. Suricata – Network Security Monitoring
Suricata is an high performance open source Network Security and Intrusion Detection and Prevention Monitoring System for Linux, FreeBSD and Windows.It was designed and owned by a non-profit foundation OISF (Open Information Security Foundation).
17. VnStat PHP – Monitoring Network Bandwidth
VnStat PHP a web based frontend application for most popular networking tool called “vnstat“. VnStat PHP monitors a network traffic usage in nicely graphical mode. It displays a total IN and OUT network traffic usage in hourly, daily, monthly and full summary report.
18. Nagios – Network/Server Monitoring
Nagios is an leading open source powerful monitoring system that enables network/system administrators to identify and resolve server related problems before they affect major business processes. With the Nagios system, administrators can able to monitor remote Linux, Windows, Switches, Routers and Printers on a single window. It shows critical warnings and indicates if something went wrong in your network/server which indirectly helps you to begin remediation processes before they occur.
19. Nmon: Monitor Linux Performance
Nmon (stands for Nigel’s performance Monitor) tool, which is used to monitor all Linux resources such as CPU, Memory, Disk Usage, Network, Top processes, NFS, Kernel and much more. This tool comes in two modes: Online Mode and Capture Mode.
The Online Mode, is used for real-time monitoring and Capture Mode, is used to store the output in CSV format for later processing.
![]() Nmon Monitoring
Nmon Monitoring
20. Collectl: All-in-One Performance Monitoring Tool
Collectl is a yet another powerful and feature rich command line based utility, that can be used to gather information about Linux system resources such as CPU usage, memory, network, inodes, processes, nfs, tcp, sockets and much more.
![]() Collectl Monitoring
Collectl Monitoring
We would like to know what kind of monitoring programs you use to monitor performance of your Linux servers? If we’ve missed any important tool that you would like us to include in this list, please inform us via comments and please don’t forget to share it.
If You Appreciate What We Do Here On TecMint, You Should Consider:
TecMint is the fastest growing and most trusted community site for any kind of Linux Articles, Guides and Books on the web. Millions of people visit TecMint! to search or browse the thousands of published articles available FREELY to all.
If you like what you are reading, please consider buying us a coffee ( or 2 ) as a token of appreciation.

We are thankful for your never ending support.
Перекрестное опыление: управляем Linux из-под Windows, и наоборот

В прошлой статье я обещал рассмотреть механизм удаленного подключения с Windows на серверы под управлением *nix, и наоборот при помощи PowerShell. Обещанного обычно ждут три года, но я успел чуть раньше. Что ж, если хочется с верного макбука управлять гетерогенной инфраструктурой, или наоборот ― с Surface Pro рулить Linux-серверами без всяких putty, ― прошу под кат.
Microsoft Loves Linux
Еще в 2015 году Microsoft торжественно объявила о запуске программы «Microsoft Linux». Сюда вошла как банальная поддержка гостевых *nix-like OS на Hyper-V, так и встроенная в Windows 10 Ubuntu и возможность запуска в Docker продуктов Microsoft, таких как SQL Server.
Компания также опубликовала исходный код PowerShell, что позволило запускать «Ракушку Мощи» не только на Windows. Из-под одноименного аккаунта на Github, помимо исходного кода, выложены и бинарники под большинство современных систем (лицензия MIT).
Это позволяет настроить удаленное управление с помощью единого инструмента ― PowerShell. Помимо подключения к консоли компьютера, можно запускать отдельные команды, в том числе и на нескольких серверах одновременно. Довольно удобно для автоматизации задач администрирования, таких как массовое изменение настроек, инвентаризация, сбор логов.
Порой удобно совмещать традиционные консольные команды со вставками PowerShell:
Для подключения к Windows-машинам при помощи PowerShell используется протокол WS-Man. Для GNU\Linux привычен SSH. Так как сегодня становятся универсальными оба протокола, разберем их подробнее.
PowerShell 6.0 под Windows и *nix, пока еще находится в бете. Поэтому не рекомендую без хорошего тестирования применять на боевых серверах описанное ниже.
Магомед не идет к горе
Когда технология удаленного доступа при помощи PowerShell только набирала обороты, единственным универсальным способом подключения к разным системам был протокол WS-Man. Для тестового стенда я взял Windows Server 2016 и Centos 7, для которых и буду настраивать возможность удаленного подключения и выполнения команд при помощи этого протокола.
Для начала установим на Centos свежий PowerShell:
После установки появилась возможность запускать привычные Windows-администратору командлеты. Например, посмотрим версию PS и получим список запущенных процессов командлетами $PSVersionTable и Get-Process:
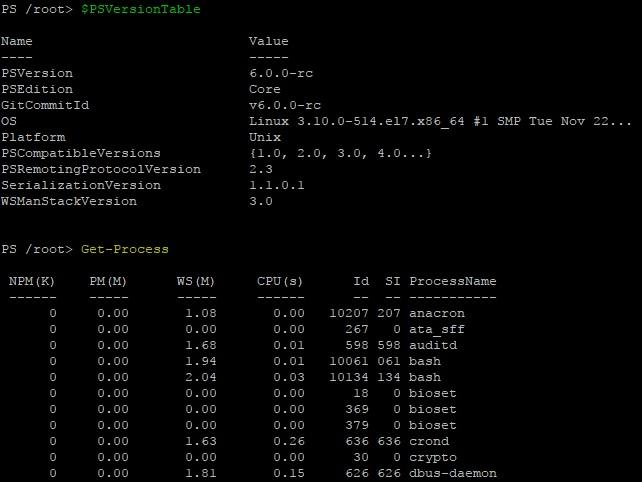
Работаем в консоли PowerShell на CentOS.
Чтобы подключаться к Linux-машине с консоли Windows, нам понадобится установить и настроить:
- OMI (Open Management Infrastructure) ― адаптация WMI, которую также можно использовать для управления компьютерами с ОС, отличными от Windows;
- PSRP (PowerShell Remoting Protocol) ― библиотека, необходимая для удаленного подключения PowerShell.
Подробно с работой и эволюцией OMI и PSRP можно ознакомиться в отличном материале от Matt Wrock, я же просто установлю OMI командой:
Далее нужно настроить порты и аутентификацию в конфигурационном файле /etc/opt/omi/conf/omiserver.conf, после чего перезапустить сервер командой:
Для упрощения эксперимента я не буду настраивать ни NTLM-аутентификацию, ни Kerberos. Еще и шифрование отключу ― разумеется, в боевой среде делать этого не стоит. Для включения текстовой аутентификации и шифрования на стороне Windows в работе winrm достаточно выполнить следующие команды:
После настройки можно проверить работу OMI из консоли Windows:

Подключаемся к CentOS из cmd.
Теперь проверим работу обратным подключением ― из Linux к Windows:

… а затем с CentOS подключаемся к Windows.
После того, как WMI\OMI заработал, нужно установить и настроить PSRP. К сожалению и вопреки инструкции, бинарник отсутствует. Библиотеку пришлось компилировать, долго и нудно исправляя возникающие ошибки зависимостей:
Теперь мы сможем подключаться с Windows на Linux и наоборот при помощи PowerShell. Начнем с Windows на Linux:

С Windows на Linux.
Аналогичным образом можно провести и обратное подключение.
Invoke-Command можно «натравить» на список компьютеров, и с рабочей станции Windows создать пользователя на всех серверах Linux командой вида:
Надо сказать, что способ не самый удобный и эффективный. Минусов добавляет компиляция библиотек, разнообразные баги ― например, на момент написания статьи PSRP не позволял нормально подключиться из Linux в Windows.
Да и сами разработчики рекомендуют не плясать вокруг WS-Man, а обратиться к проверенному способу ― SSH. Что ж, попробуем и его.
Гора идет к Магомету
На этот раз машина с Windows получит чуть больше специфической подготовки ― нужно установить свежий PowerShell и OpenSSH.
После можно проверить синтаксис командлета New-PSSession. Если все произошло как надо, то командлет, помимо привычного параметра ComputerName, будет поддерживать и HostName.
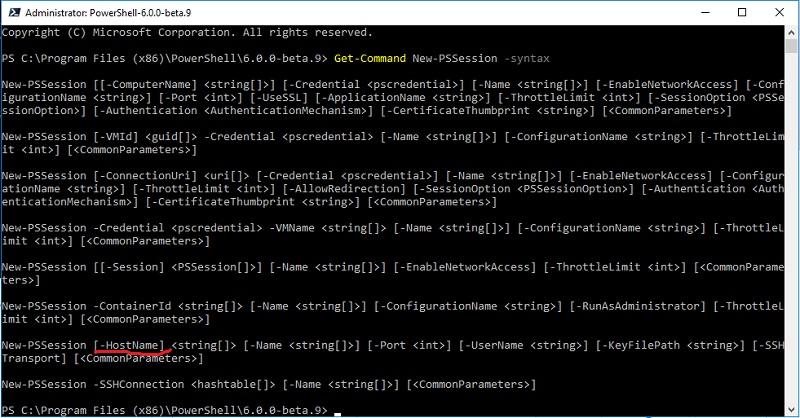
PowerShell 6.0.0-beta.9 и обновленный синтаксис командлета.
Качаем последний релиз или используем пакет из репозитория Chocolatey. Все это разархивируем в \Program Files\OpenSSH.
В консоли с правами администратора переходим в папку с разархивированным содержимым и запускаем установку командой:
Теперь генерируем ключи:
В тестовой среде мы будем использовать парольную аутентификацию, поэтому стоит убедиться что она включена в файле sshd_config:
Если вы также хотите автоматически запускать PowerShell при подключении по SSH, то в параметре subsystem нужно прописать путь к желаемой версии PS:
Для работы клиента SSH нужно добавить директорию в %PATH% любым удобным способом. Например, таким:
Остается только настроить и запустить службы:
После установки уже можно наслаждаться подключением к серверу Windows по ssh.
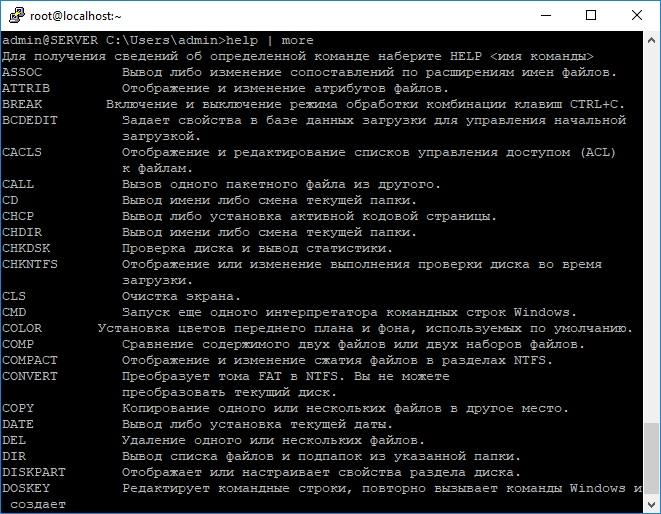
C Windows через Putty на Linux, с Linux обратно на Windows по SSH.
На достигнутом останавливаться не будем и перейдем к настройке Linux. При настройке сервера SSH по умолчанию достаточно прописать PowerShell в Subsystem:
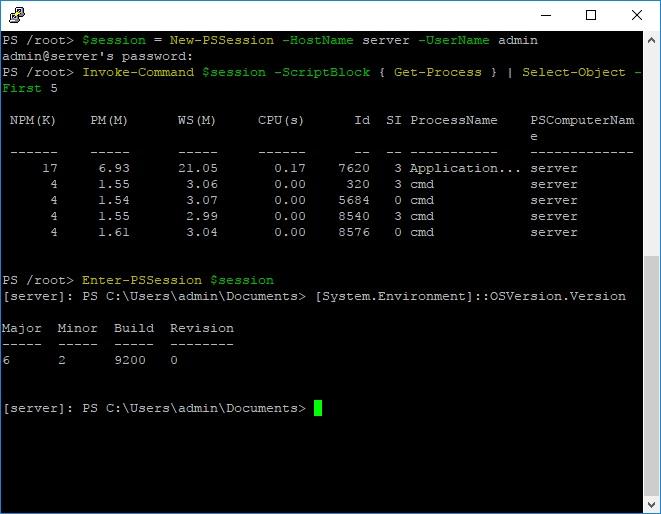
Теперь проверим подключение через командлет New-PSSession и Invoke-Command.
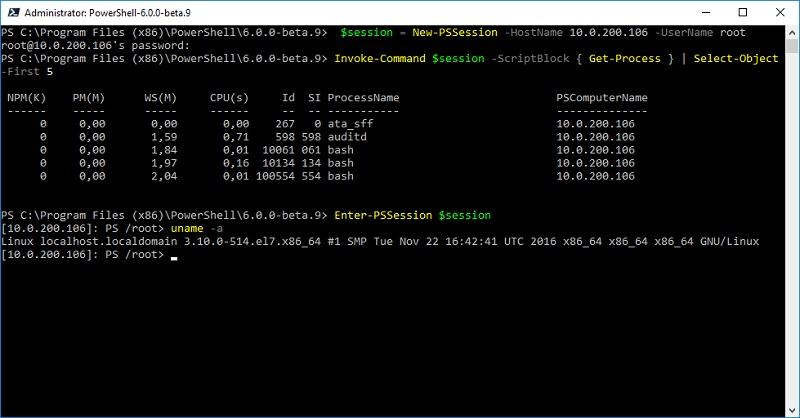
Работаем из PowerShell с Linux-сервером.
Теперь подключимся из Linux к Windows:
Работаем из PowerShell с Windows-сервером.
В отличие от WS-Man, SSH настраивается намного проще и работает стабильнее. Да и беспарольное подключение по ключам настраивать привычнее.
В хозяйстве пригодится
С однозначным «советом потребителю» все опять сложно: SSH проще в настройке и стабильнее, но WS-Man использует API и позволяет применять инструменты вроде JEA. На боевых серверах использовать WS-Man я бы не стал однозначно, а вот реализация OpenSSH в Windows как сервера, так и клиента мне понравилась. Для самопальной автоматизации вполне подойдет даже без PowerShell.
В любом случае, границы между Linux и Windows хоть и медленно, но начинают стираться, что безусловно радует.


