- Troubleshoot external monitor connections in Windows 10
- Troubleshoot issues that occur when setting up external monitors
- Troubleshoot issues that are occurring with an existing setup
- How to use multiple monitors in Windows 10
- Video: Connecting a monitor
- Before you start
- Rearrange your displays
- Identify a display
- Detect a display
- Arrange your displays
- Change display options
- Change orientation
- Choose a display option
- Related topics
- How to Change the Primary Monitor on Windows 10
- For Windows 7
- For Windows 10
- How to change monitor refresh rates in Windows 10
- How to set a different screen refresh rate in Windows 10
- More Windows 10 resources
- Halo: MCC’s live service elements make it better, not worse
- Microsoft’s Surface Duo is not ‘failing up’
- Here’s what you can do if Windows 10 update KB5001330 is causing issues
- These are the best PC sticks when you’re on the move
Troubleshoot external monitor connections in Windows 10
Before considering troubleshooting options, make sure your device is up to date. Select Start > Settings > Update & Security > Windows Update , then select Check for updates. If you need help setting up your external monitors, see How to use multiple monitors in Windows 10.
Note: If you’re having trouble setting up multiple monitors on Surface, see Troubleshoot connecting Surface to a second screen.
Troubleshoot issues that occur when setting up external monitors
If you are trying to set up an external monitor and it’s not working, press the Windows logo key + P to make sure that the Extend option is selected. If the Extend option is selected, try the following troubleshooting tips.
If you’re not seeing what you expect on the external monitor, start with basic hardware troubleshooting:
Disconnect all accessories from your PC. Connected docks, dongles, adapters and other hardware can cause conflicts.
Make sure the cable connecting your PC to your external monitor is secure.
Try changing the cable connecting the external monitor. If the new one works, you know the previous cable was faulty.
Try using the external monitor with a different system. This can help to isolate whether the issue is with the monitor or the primary system
If those didn’t work, here are more possibilities:
If your system has more than one video output port, try plugging your external monitor into one of the other video output ports. Typical ports are HDMI, VGA, DVI, and DisplayPort.
If your system has more than one display adapter, also called a graphics card, you can try switching your system’s default display adapter. For example, on some systems, you can right click your desktop and select the software associated with your additional display adapter. Steps to change the default display adapter vary by device, so contact the manufacturer for more information.
First, to confirm that one external monitor does work with your system, see the above info about using only one.
If you’re able to use one external monitor, but have issues using more than one, it’s possible that your display adapter (also called a graphics card) can’t support more than one monitor. For information on how many monitors your display adapter can support, contact its manufacturer.
Note: If you are trying to use a display splitter extend your display to more than one external monitor, you won’t be able to. The splitter is duplicating the same signal instead of creating two independent signals.
If your device only has one video output port, then by default, you can only support a single external monitor. You’ll need one of the following to support more than one external monitor:
Docking station – To find out if there are docking stations available for your PC, contact the manufacturer of your PC.
USB adapter – If you have a USB-C port, you may be able to use a USB adapter to give your device an additional video output port.
Troubleshoot issues that are occurring with an existing setup
If your setup has been working well, then suddenly stopped, here are a few things you can try.
In some cases, pressing Windows logo Key + Ctrl + Shift + B may fix your issue. If this does not work, see if restarting helps.
To restart your device, select Start , then select Power > Restart.
If that doesn’t work, select Start , then select Power > Shut Down. Then, turn your device back on.
If you are experiencing issues after an update, returning, or rolling back, to a previous version of your display driver may solve the issue. To roll back the driver:
In the search box on the taskbar, enter device manager.
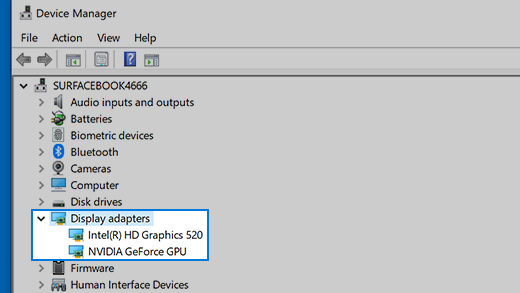
Select Device Manager from the list to open it. Then, select the arrow to expand the Display adapters section.
Right-click your display adapter and select Properties and the Driver tab, and then select Roll Back Driver. If you don’t see a roll back option, reinstall your display driver.
If none of the previous steps work, reinstall your display driver. Here’s how:
In the search box on the taskbar, enter device manager.
Select Device Manager from the list to open it. Then, select the arrow to expand the Display adapters section.
Right click your display adapter, and then select Uninstall device and delete the driver software for this device, then select Uninstall.
You may be asked to restart your computer. Make sure to write down the remaining instructions before you restart.
Open Device Manager again and expand the Display adapters section.
Right click your display adapter and select Update driver.
Select Search automatically for updated driver software and follow the remaining installation instructions.
In the search box on the taskbar, enter device manager.
Select Device Manager from the list to open it. Then, select the arrow to expand the Display adapters section.
You’ll see the manufacturer’s name and the name of your adapter or adapters.
If you’ve tried the steps in this article or don’t see a solution to the problem, use Windows Feedback Hub to file a bug.
Include details about what you were doing or specific steps you were taking when the issue occurred. Log in to the Feedback Hub and follow the instructions to summarize and describe your problem. Next, select your category and then add enough additional info to recreate the problem. Your information helps Microsoft determine the root cause of this issue.
How to use multiple monitors in Windows 10
After you’ve connected your Windows 10 PC to external displays, you can adjust the settings for each one.
Video: Connecting a monitor
Here’s a video on the basics of connecting to an external monitor.

Before you start
Before changing settings for your external displays, make sure everything is connected properly. Here’s what you can do:
Make sure your cables are properly connected to your PC or dock.
Check for Windows updates. To check for updates, select Start > Settings > Updates & Security > Windows Update > Check for updates.
Tip: If you’re using a wireless display adapter, connect to an HDMI port on newer TVs, then wirelessly connect your PC to it. After connecting your wireless display adapter to your TV, go to your Windows 10 PC and select Start > Settings > System > Display, then select Connect to a wireless display.
Rearrange your displays
You’ll see this option when Windows detects more than one display. Each display will be numbered to help you identify them more easily.
Identify a display
To see which number corresponds to a display, select Start > Settings > System > Display > Rearrange your displays, then select Identify. A number appears on the screen of the display it’s assigned to.
Detect a display
If you connected another display and it isn’t showing in Settings, select Start > Settings > System > Display > Rearrange your displays, then select Detect.
Arrange your displays
If you have multiple displays, you can change how they’re arranged. This is helpful if you want your displays to match how they’re set up in your home or office. In Display settings, select and drag the display to where you want. Do this with all the displays you want to move. When you’re happy with the layout, select Apply. Test your new layout by moving your mouse pointer across the different displays to make sure it works like you expect.
Change display options
After you’re connected to your external displays, you can change settings like your resolution, screen layout, and more. To see available options, select Start > Settings > System > Display.
Change orientation
Windows will recommend an orientation for your screen. To change it in Display settings, go to Scale and Layout, then choose your preferred Display orientation. If you change the orientation of a monitor, you’ll also need to physically rotate the screen. For example, you’d rotate your external display to use it in portrait instead of landscape.
Choose a display option
To change what shows on your displays, press Windows logo key + P. Here’s what you can choose.
See things on one display only.
See the same thing on all your displays.
See your desktop across multiple screens. When you have displays extended, you can move items between the two screens.
See everything on the second display only.
Second screen only
Related topics
Simply Windows on Youtube — These videos are only available in English
How to Change the Primary Monitor on Windows 10
All versions of the Windows Operating System that are currently supported by Microsoft have dual monitor and even multiple monitor support. This means that you can have more than one monitor not only connected to your computer but also display whatever you want it to display in order to increase productivity and improve ease of use. Windows 10, the latest and greatest in a long line of Windows Operating Systems, also has multiple monitor support. In fact, Windows 10 is rather good at handling more than one monitor. Multiple monitor support is a godsend for power users as most power users out there have more than one monitors connected to their computers.
When you connect more than just one monitor to a computer running on the Windows Operating System, Windows makes one of the monitors the primary monitor (in almost all cases, this is the monitor that was connected to the computer first) and the rest of the monitors the secondary, tertiary and so on monitors. The primary monitor is the default monitor Windows displays everything on, which is why being able to determine which monitor connected to your computer you want to be the primary monitor is immensely important. Thankfully, Windows 10 not only allows users with multiple monitors to choose their primary monitor at any given time but the process used to do so is also pretty simple.
For Windows 7
To change the primary monitor on a computer running on Windows 7 with more than one monitor connected to it, you need to simply:
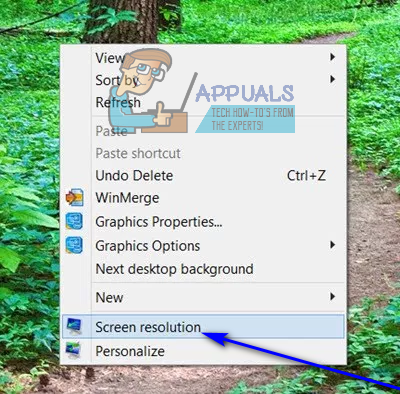
- Right-click on an empty space on your Desktop.
- Click on Screen resolution.

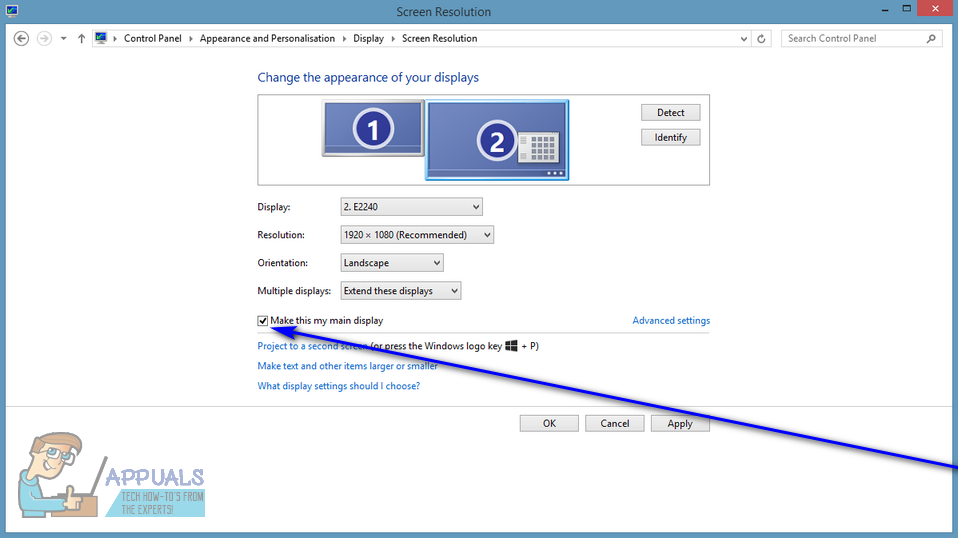
- In the space underneath Change the appearance of your display, all of the computers connected to your computer will be visible, each represented as a screen with a number in the middle. The screen that has the number 1 at its center is the monitor that is currently configured as your computer’s primary monitor. Click on the monitor that you would like to make your computer’s primary monitor to select it.
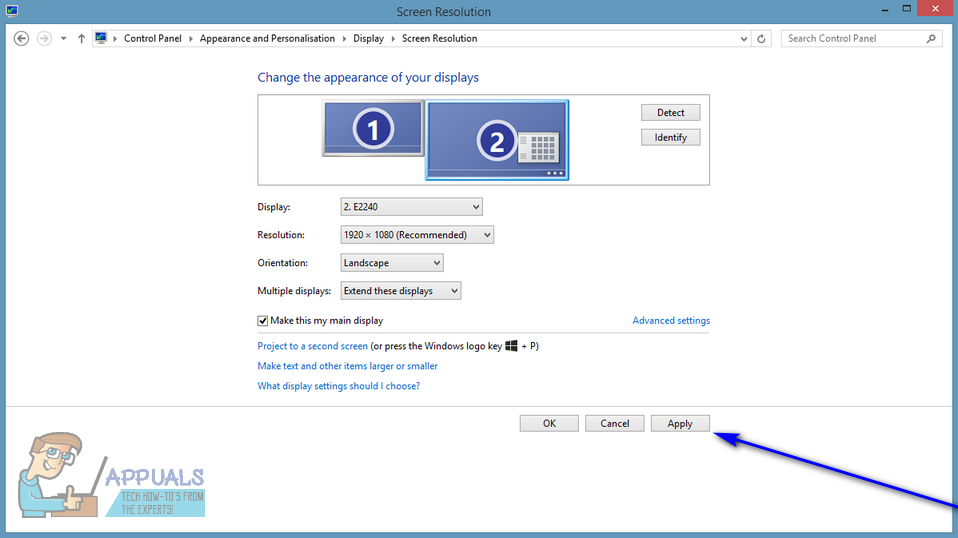
- Check the checkbox beside the Use this device as the primary monitor option (or the Make this my main display option, depending on the iteration of Windows you are using) to enable it. Doing so will tell Windows 10 to change the primary display to the monitor you have just chosen.
- Click on Apply, and the change you have made to your computer’s display configuration will be applied.
- Click on OK and close the Screen Resolution window.
For Windows 10
In Windows 10, the steps are slightly a little different. Some names are changed here and there but the main method is the same.
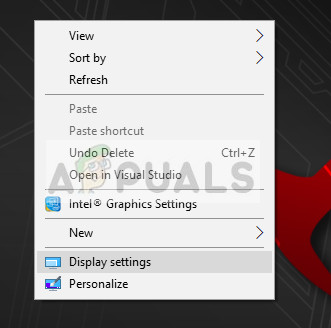
- Right-click anywhere in the Desktop and select Display Settings.
 Display Settings – Win 10 home screen
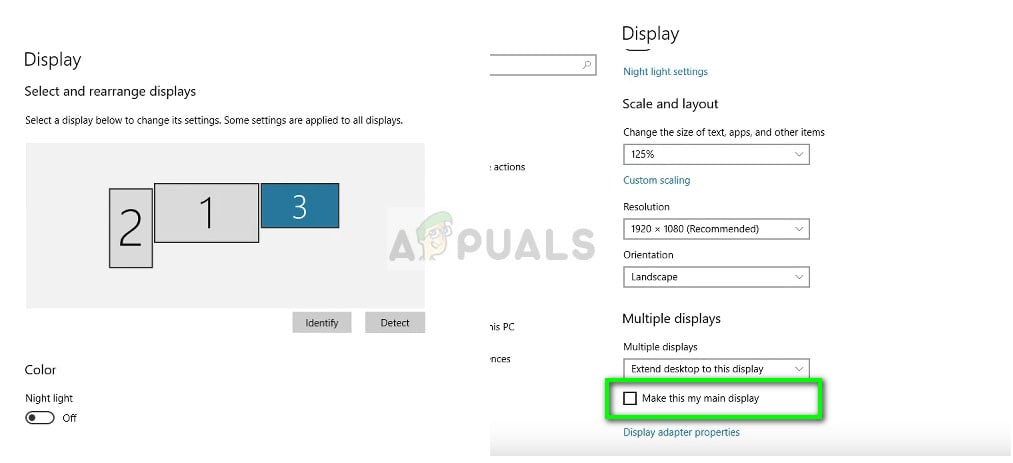
- Here all the displays will be shown in graphical shapes. You can easily distinguish the screens from one another. Now select the display which you want to set as the primary display. Now navigate down at the screen and select Make this my main display.
 Settings screen as the primary display
- If you see the Make this main display greyed out, it probably means that the current monitor which you are trying to set as the primary display is set already.
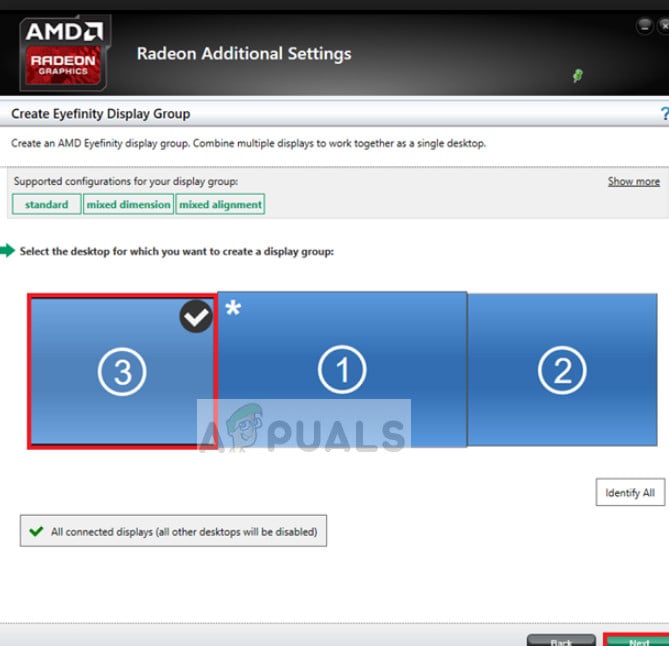
Note: If you have graphics hardware installed on your computer, it is likely that the graphical application’s settings are overriding the system’s default display settings. In that case, open the application and select the primary display from there in the settings.
 Primary display in graphic settings – AMD
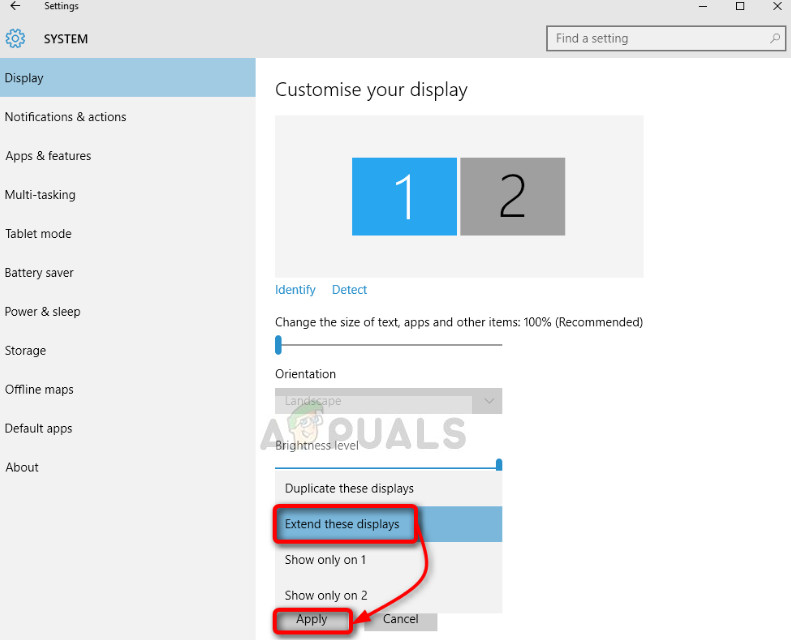
Furthermore, you should also make sure that the displays are extended. If you have not extended the displays, there will be no option of making a primary monitor as all monitors will be treated alike. You can change the setting to Extend these displays from the display settings in Windows 10.
 Extending screen – Win 10 settings
Note: Try to Connect your HDMI cable to the monitor which you want to use as primary because some users have reported that the monitor that is connected using the HDMI cables is actually recognized as the primary monitor. This might not be the case with all of you but it might still help some people.
How to change monitor refresh rates in Windows 10

Refresh rate refers to the number of times per second an image refreshes on the screen — in a process measured in Hertz (Hz). The higher the refresh rate, the better the experience, while lower refresh rate usually results on screen flickering, and it can cause eye strain and headaches.
Typically, a refresh rate of 60Hz is good enough for everyday computing tasks. You’ll notice some jitters while moving the mouse on the screen, but it’s an optimal rate. If you drop below 60Hz, that’s when you’ll start experiencing problems.
If you’re a gamer, things are a bit different. Although 60Hz should provide a good experience, using a higher screen refresh rate of 144Hz or even 240Hz will offer a much better and smoother gaming experience.
Depending on the monitor, resolution, and graphics card you’re using, on Windows 10, it’s possible to adjust the refresh rate manually for a sharper and smoother viewing experience.
In this Windows 10 guide, we’ll walk you through the steps to change the screen refresh rate on a monitor using the Settings app.
How to set a different screen refresh rate in Windows 10
If you’re experiencing monitor issues because of the refresh rate configuration, use these steps to set the most accurate rate:
- Open Settings.
- Click on System.
- Click on Display.
Click the Advanced display settings link.

Click the Display adapter properties for Display 1 link.
Quick Tip: Alongside resolution, bit depth, and color format, in this page, you can also see the refresh rate currently set on your monitor.
Under «Monitor Settings,» use the drop-down menu to select the refresh rate you wish.
![]()
Once you’ve completed the steps, the monitor should start using the new refresh rate that you’ve applied.
The rates you can select will always depend on the monitor, graphics adapter, and resolution your device is using.
If your display supports a higher refresh rate, but the option is not available, make sure to re-install the latest graphics driver. Also, you can try setting a lower resolution as many times displays can support higher refresh rate but on a lower resolution.
In the case that you’re changing the screen refresh rate from 59 to 60 Hertz, but the refresh rate reverts to 59 Hertz, this is an expected behavior, and no additional action is required.
The reason for this behavior is that specific displays will only report 59.94 Hertz, and when this happens, Windows will display two frequencies, including 59Hz and 60Hz for compatibility reasons. However, both 59 to 60 Hertz will set the refresh rate to 59.94 Hertz.
More Windows 10 resources
For more helpful articles, coverage, and answers to common questions about Windows 10, visit the following resources:
![]()
Halo: MCC’s live service elements make it better, not worse
Halo: The Master Chief Collection is more popular than ever, but some fans don’t agree with the live service approach 343 Industries has taken with it. Here’s why those elements are, at the end of the day, great for the game and for Halo overall.
![]()
Microsoft’s Surface Duo is not ‘failing up’
Microsoft announced this week that it was expanding Surface Duo availability to nine new commercial markets. While Surface Duo is undoubtedly a work in progress, this is not a sign of a disaster. It’s also doesn’t mean that Surface Duo is selling a ton either. Instead, the reason for the expansion is a lot more straightforward.
![]()
Here’s what you can do if Windows 10 update KB5001330 is causing issues
In this guide, we’ll show you the steps to get rid of the update KB5001330 to fix profile, gaming, and BSoD problems with the Windows 10 October 2020 Update and May 2020 Update.
![]()
These are the best PC sticks when you’re on the move
Instant computer — just add a screen. That’s the general idea behind the ultra-portable PC, but it can be hard to know which one you want. Relax, we have you covered!


