- Download
- Source
- Binary Installation
- Windows
- Linux distributions with snap support
- Debian
- Raspberry Pi
- Ubuntu
- Mosquitto Enhancements
- Как установить Mosquitto MQTT на Ubuntu 20.04 LTS
- Как установить Mosquitto MQTT на Ubuntu 20.04 LTS
- Установите Mosquitto MQTT на Ubuntu 20.04 LTS Focal Fossa
- Шаг 1. Во-первых, убедитесь, что все ваши системные пакеты обновлены, выполнив следующие apt команды в терминале.
- Шаг 2. Установка Mosquitto MQTT на Ubuntu 20.04.
- Шаг 3. Настройте Mosquitto MQTT.
- Шаг 4. Создайте служебный файл Systemd для Mosquitto MQTT.
- Шаг 5. Тестирование Mosquitto MQTT.
- How to Install Mosquitto MQTT Broker/Server on Ubuntu 16.04
- Prerequisites
- Step One: Install Mosquitto Broker
- Step Two: Install the Clients and Test
- Install MQTT clients
- Subscribe to topic «test»
- Publish a message to topic «test»
- Step Three: Secure with a Password
- Conclusion
- How to Install The Mosquitto MQTT Broker on Linux
- Stopping and Starting
- Testing The Install
- Testing Using Mosquitto
- Starting Mosquitto Using a Configuration file
- Verbose Mode
- Mosquitto 2..0.2 and above
- Connection Limits
- Running Multiple Mosquitto Brokers
- Mosquitto Client Scripts
- Other Tools
Download
Source
Older downloads are available at https://mosquitto.org/files/
Binary Installation
The binary packages listed below are supported by the Mosquitto project. In many cases Mosquitto is also available directly from official Linux/BSD distributions.
Windows
- mosquitto-2.0.12-install-windows-x64.exe (64-bit build, Windows Vista and up, built with Visual Studio Community 2019)
- mosquitto-2.0.12-install-windows-x32.exe (32-bit build, Windows Vista and up, built with Visual Studio Community 2019)
See also README-windows.md after installing.
Mosquitto can be installed from the homebrew project. See brew.sh and then use brew install mosquitto
Linux distributions with snap support
Debian
- Mosquitto is now in Debian proper. There will be a short delay between a new release and it appearing in Debian as part of the normal Debian procedures.
- There are also Debian repositories provided by the mosquitto project, as described at https://mosquitto.org/2013/01/mosquitto-debian-repository
Raspberry Pi
Mosquitto is available through the main repository.
There are also Debian repositories provided by the mosquitto project, as described at https://mosquitto.org/2013/01/mosquitto-debian-repository/
Ubuntu
Mosquitto is available in the Ubuntu repositories so you can install as with any other package. If you are on an earlier version of Ubuntu or want a more recent version of mosquitto, add the mosquitto-dev PPA to your repositories list — see the link for details. mosquitto can then be installed from your package manager.
- sudo apt-add-repository ppa:mosquitto-dev/mosquitto-ppa
- sudo apt-get update
Mosquitto Enhancements
These projects can be used to add extra features to Mosquitto.
- Management Center: A web UI for managing Mosquitto instances. In particular, this offers a convenient UI for managing clients, groups and roles as in the new Dynamic Security plugin.
- mosquitto-go-auth: A flexible authentication and authorisation plugin, with many different backends and features.
- Mosquitto-PHP: A PHP wrapper for the libmosquitto client library, to allow creating MQTT clients in PHP.
Источник
Как установить Mosquitto MQTT на Ubuntu 20.04 LTS

Как установить Mosquitto MQTT на Ubuntu 20.04 LTS
В этом руководстве мы покажем вам, как установить Mosquitto MQTT на Ubuntu 20.04 LTS. Для тех из вас, кто не знал, MQTT, аббревиатура от Message Queue Telemetry Transport, представляет собой облегченный протокол связи, основанный на концепции издателя / подписчика. Он представляет собой альтернативу классической архитектуре клиент / сервер, широко используемой в Интернете вещей. Он обычно используется для гео-отслеживания парка транспортных средств, домашней автоматизации, сетей датчиков окружающей среды и сбора данных в масштабах коммунальных предприятий.
В этой статье предполагается, что у вас есть хотя бы базовые знания Linux, вы знаете, как использовать оболочку, и, что наиболее важно, вы размещаете свой сайт на собственном VPS. Установка довольно проста и предполагает, что вы работаете с учетной записью root, в противном случае вам может потребоваться добавить ‘ sudo ‘ к командам для получения привилегий root. Я покажу вам пошаговую установку Mosquitto MQTT на Ubuntu 20.04 (Focal Fossa). Вы можете следовать тем же инструкциям для Ubuntu 18.04, 16.04 и любого другого дистрибутива на основе Debian, например Linux Mint.
Установите Mosquitto MQTT на Ubuntu 20.04 LTS Focal Fossa
Шаг 1. Во-первых, убедитесь, что все ваши системные пакеты обновлены, выполнив следующие apt команды в терминале.
Шаг 2. Установка Mosquitto MQTT на Ubuntu 20.04.
Сначала мы создаем пользователя с именем mosquito, который используется для выполнения приложения MQTT:
Теперь скачиваем установочные пакеты MQTT с официальной страницы:
Затем перейдите в каталог и при компиляции также установите сервер MQTT в вашу систему:
Шаг 3. Настройте Mosquitto MQTT.
Пришло время настроить сервер MQTT. Мы создадим пользователя с именем , этот пользователь — система, используемая для запуска сервера Mosquitto, который будет использоваться для установления соединения от клиента. На этом шаге нам будет предложено создать новый пароль: mqtt — infoit
Затем создайте файл конфигурации для Mosquitto MQTT Server:
Добавьте следующие строки:
Сохраните и закройте, затем запустите sudo ldconfig командную строку:
Шаг 4. Создайте служебный файл Systemd для Mosquitto MQTT.
Теперь создайте файл systemd юнита Mosquitto , создав новый файл. /etc/ systemd / system / mosquitto . service :
Добавьте следующую строку:
Сохраните и закройте файл. Затем перезагрузите systemd демон с помощью следующей команды:
Шаг 5. Тестирование Mosquitto MQTT.
После успешной установки мы создали простое тестирование, которое запускается на консоли сервера, где есть сервер и клиент для использования серверной службы:
- Сервер
На сервере мы создадим тему с помощью командной строки: mosquitto_sub — v — t ‘chedelics/test’ — u mqtt — infoit — P ( your — password ) - Клиент
Отправка сообщения с той же темой, что и у сервера. Отправка командной строки:: mosquitto_pub — t ‘chedelics/test’ — u mqtt — infoit — P ( your — password )
Поздравляю! Вы успешно установили Mosquitto. Благодарим за использование этого руководства для установки Mosquitto MQTT в системе Ubuntu 20.04 LTS Focal Fossa. Для получения дополнительной помощи или полезной информации мы рекомендуем вам посетить официальный сайт Mosquitto .
Источник
How to Install Mosquitto MQTT Broker/Server on Ubuntu 16.04
Archived content
This article is outdated and may not work correctly for current operating systems or software.
MQTT is a publish/subscribe model based, «lightweight» messaging protocol over TCP/IP for communication between «Internet of Things» devices such as ESP8266, Raspberry Pi, etc. It is very popular with low resources and battery powered applications such as home automation, security alarm systems and battery-powered sensor networks.
Mosquitto is an open source message broker (or server) that implements MQTT protocols. With its good community support, documentation, and ease of installation it has become one of the most popular MQTT brokers.
Prerequisites
- An Ubuntu 16.04 server with root access
- Open port TCP:1883 on firewall
Step One: Install Mosquitto Broker
Update Ubuntu’s package list and install the latest Mosquitto Broker available from it
The Mosquitto service will start after installation.
Step Two: Install the Clients and Test
Install MQTT clients
Mosquitto clients help us easily test MQTT through a command line utility. We will use two command windows, one to subscribe to a topic named «test» and one to publish a message to it.
Topics are labels used by the broker to filter messages for each connected client. A client program subscribed to a topic «Home1/BedroomTemp» will only listen to messages published to the same topic by other clients.
Subscribe to topic «test»
Mosquito_sub is a subscribe client we installed in the previous command. Here we are specifying » -t » followed by a topic name.
Publish a message to topic «test»
Login to the terminal as a second instance and publish a message to the «test» topic.
Here the additional parameter » –m » is followed by the message we want to publish. Hit » Enter » and you should see a message from mosquitto_pub client displayed in other terminal where mosquito_sub client is running.
Step Three: Secure with a Password
Mosquitto comes with a password file generating utility called mosquitto_passwd .
Create a configuration file for Mosquitto pointing to the password file we have just created.
This will open an empty file. Paste the following into it.
Save and exit the text editor with » Ctrl+O «, » Enter » and » Ctrl+X «.
Now restart Mosquitto server and test our changes.
In the subscribe client window, press » Ctrl+C » to exit the subscribe client and restart it with following command.
Note the capital -P here.
In the publish client window, try to publish a message without a password.
The message will be rejected with following error message.
Now publish a message with the username and password .
Hit » Enter » and you will see the message in subscribe client window, as in Step Two.
Conclusion
We have now set up a password protected MQTT server. You can use the Public IP of your Ubuntu server as an MQTT broker for your projects.
Источник
How to Install The Mosquitto MQTT Broker on Linux
In this tutorial we will look at how you install and run the mosquitto MQTT broker on a Linux server running for example Raspberry Pi or Ubuntu.
Here are the steps I used on Ubuntu.
- sudo apt-add-repository ppa:mosquitto-dev/mosquitto-ppa
- sudo apt-get update
- sudo apt-get install mosquitto
- sudo apt-get install mosquitto-clients
- sudo apt clean
For Raspberry Pi the instructions are taken from here:
Then make the repository available :
Then , depending on which version of debian you are using:
sudo wget http://repo.mosquitto.org/debian/mosquitto-jessie.list
sudo wget http://repo.mosquitto.org/debian/mosquitto-stretch.list
sudo wget http://repo.mosquitto.org/debian/mosquitto-buster.list
Then update apt information:
sudo apt-get update
sudo apt-get install mosquitto
sudo apt-get install mosquitto-clients
Upgrading on Pi
sudo apt-get install mosquitto
should update the existing installation but it may not upgrade as it is dependent on the repository which is different for the version of PI you are Running.
Stopping and Starting
Mosquitto is installed as a service and should start automatically after install
To Stop and start the service I needed to use
- sudo service mosquitto stop
- sudo service mosquitto start #see note later
Most sites I discovered where using the format.
- sudo /etc/init.d/mosquitto stop
However it seems newer installations use upstart initialization system instead of the init.d initialization system.
The stop/start scripts start the mosquitto broker in the background and also use the default mosquitto.conf file in the /etc/mosquitto/ folder.
The mosquitto binary is located in the /usr/sbin folder
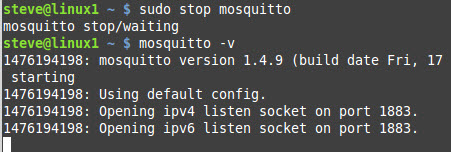
If you want to see the control messages on the console then you need to start the mosquitto broker manually from a command line.
You first need to to stop the broker from running, and then type:
mosquitto -v
Testing The Install
To test it is running use command:
- netstat –at
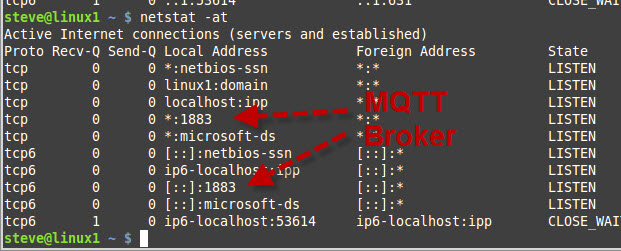
You should see the Mosquitto broker running on port 1883 as shown in the screen shot above.
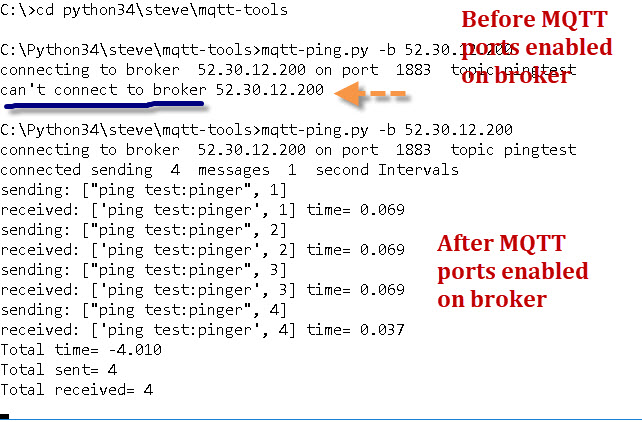
Below is a screen shot showing testing using the mqtt-ping command
Testing Using Mosquitto
If you are doing tests with mosquito then I recommend you stop the installed service and run mosquito manually from the command line.
If you do it this way you can create various configuration files for testing.
In addition, I would recommend you place the test configuration files and other files like password files in the local use folder as it avoids any permission errors, and they are easily edited without requiring root permissions.
Starting Mosquitto Using a Configuration file
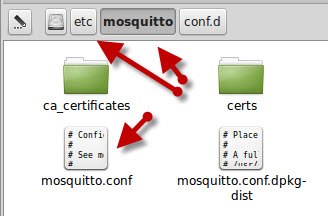
The configuration file (mosquitto.conf) that comes with the install is mainly completely commented out as mosquitto doesn’t need a configuration file to start.
This file is loaded by the mosquitto when starting as a service.
Before you edit the default configuration file it is a good idea to create a copy of this file.
However I wouldn’t use this file as a basis for you own as if you do it is difficult to find any of you changes that a buried inside this file.
If you have done this then you might find my python configuration file tool useful.
To start mosquitto using a configuration file use the following command:
- mosquitto -c filename
You can find the mosquitto.conf template file in the /etc/mosquitto/ folder.
It is a good idea to create a copy of this file before editing it.
Note: For testing it is easier to use a configuration file in your home directory rather than the /etc/mosquitto folder as you need root permissions to edit files in this folder.
I use: /home/steve/mos/mosquitto.conf
Verbose Mode
This is useful for troubleshooting use
mosquitto -v
Mosquitto 2..0.2 and above
Mosquitto v2 introduced some important changes that affect first time users in particular.
By default it requires authentication and doesn’t listen on a network address.
The following simple configuration file will make mosquitto start like previous versions:
Connection Limits
You can limit the number of client connections in the mosquitto.conf file but the default configuration doesn’t impose limits.
However the OS does and it is 1024 for each user. This limit is the max number of open files allowed.
This can be changed for each user by editing the limits.conf file (/etc/security/limits.conf).

Note: You will need to restart the system for the setting to take affect
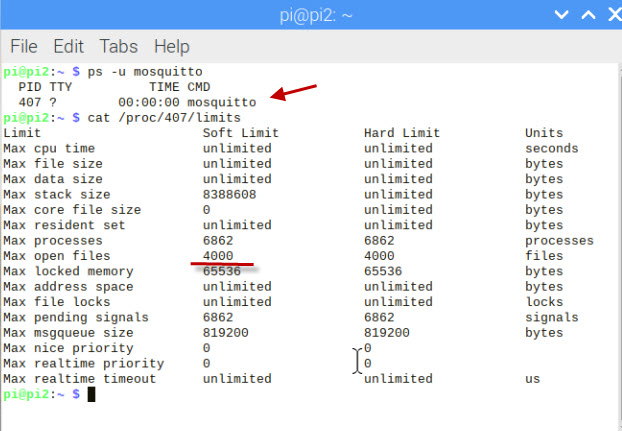
You can check the limits by using the ulimit -Sn (soft) or ulimit -Hn (hard command as shown above.
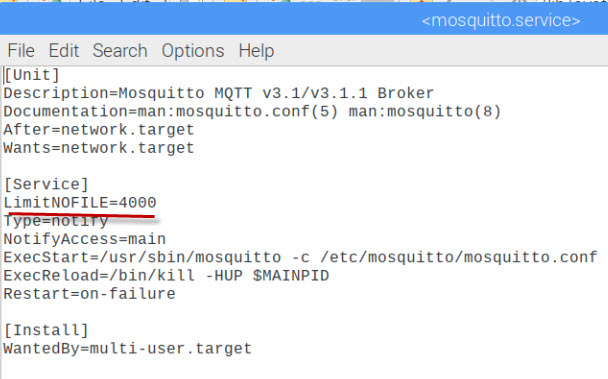
However this only affects mosquitto started from the command line. If you start mosquitto as a service then you need to edit the /lib/systemd/system/mosquitto.service file.
and adding the line
Note: You will need to restart the system for the setting to take affect
If you the go to the command line you can check the limits by getting the process id and using the command:
Running Multiple Mosquitto Brokers
You can configure a broker to listen on several ports, but to create multiple brokers with their own configurations then you will need to start multiple instances of mosquitto.
Examples:
Start mosquitto and listen on port 1883
mosquitto -p 1883
Start mosquitto as a daemon and listen on port 1884
mosquitto -p 1884 -d
Start mosquitto as a daemon and use the mosquitti-2.conf file.
mosquitto -c /etc/mosquitto/mosquitto-2.conf -d
Useful Linux Commands
To stop Mosquitto when running as a daemon:
ps -aux | grep mosquitto
pgrep mosquitto
kill -9 PID (that you get from above command)
Mosquitto Client Scripts
On Linux they need to be installed using
- sudo apt-get install mosquitto-clients
There is a simple subscriber client
mosquitto_sub
and a publisher client
mosquitto_pub
mosquitto_sub –help
They are useful for some quick tests and troubleshooting.
Other Tools
 MQTTlens is also very useful for troubleshooting and quick testing. It is an add-on for the chrome browser.
It lets you publish and subscribe to topics using a web interface, and is much easier to use than the command line clients.
MQTT-Ping -Python Tool written by me that works like the traditional IP ping command tool.
Note: Starting will mosquitto version 1.6 mosquitto now supports MQTT v5.
Mosquitto Configuration Tutorials
Other Related Articles and Resources:
Источник


