- Customize the list of recently used files in Office apps
- Pin a file to the recently used files list
- Remove an individual file from the recently used file list
- Change the number of files that appear in the list of recently used files
- Clear unpinned files from the list of recently used files
- What if old, or unexpected, files suddenly appear on my recently used list?
- Pin a file to the recently used files list
- Track recently used files and folders
- Prerequisites
- Add a picked file to the MRU
- Use a token to retrieve an item from the MRU
- Removing items from the MRU when it’s full
- Future-access list
- Edit the Windows registry to clear the list of most recently used files in Office
- Summary
- Delete the Most Recently Used files list in Office
- Troubleshooting
Customize the list of recently used files in Office apps
Microsoft Office programs display the last few documents you opened in that program so that you can use those links to quickly access the files. This feature is turned on by default, but you can turn it off, turn it back on, clear, or adjust the number of files that it displays.
If this feature was turned off and you subsequently turn it back on, only the files that you open and save after you turn it on are listed.
If you close a file, and then move it to another location, such as by using Windows Explorer, the link to that file in the program in which you created it no longer works. You must choose the location from File > Open and browse to the file to open it. After you’ve opened the file from its new location, that link is added to the list. For more information on opening a file this way see: Open files from the File menu.
Pin a file to the recently used files list
Click the File tab.
Click Open to see a list of the recently used files.
Hover your mouse over the file you want to pin and click Pin this item to the list  (on the right end of the file listing).
When a file is pinned to the list, the pin icon looks like this:  In older versions of Office, it looks like this:
Tip: Click the pin button again to unpin the file.
Files pinned to the list are displayed in chronological order, with the most recently used file at the top.
Remove an individual file from the recently used file list
If there are files on your recently used list that you’d like to remove, simply right-click them and choose Remove from list.
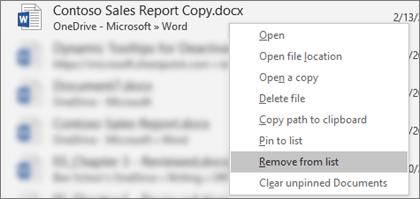
Caution: Make sure you click Remove from List and not Delete file unless you want to actually remove the file from your entire system.
Change the number of files that appear in the list of recently used files
Click the File tab.
Under Display, in the Show this number of Recent Documents list, click the number of files that you want to display.
Tip: To not see any files in the recently used files list, set the Show this number of Recent Documents list to zero.
Clear unpinned files from the list of recently used files
Click the File tab.
Right click a file in the list, and then click Clear unpinned Documents.
Click Yes to clear the list.
What if old, or unexpected, files suddenly appear on my recently used list?
Starting with Office 2013, your recently used files list synchronizes with your Microsoft Account. That’s handy because it means that if you sign in on multiple devices (desktop and laptop, for example) you have the same files listed in both places for easy access.
If you have an older machine that hasn’t been turned on in a while, however, when you bring it online it may synchronize and it’s possible that some of the documents from its old list might end up on your current recently used list.
Another way we sometimes see this happen is if somebody else, like a family member, uses your computer. If they’re signed in as you, any documents they work on would then appear on your recently used list.
The best way to remove these unexpected files is to follow the procedure above, under «Remove an individual file from the recently used file list». Right-click the unexpected files and choose Remove from list.
Pin a file to the recently used files list
Click the File tab.
Click Recent to see a list of the recently used files.
Right click the file you want to keep, and then select Pin to list, or click the pin icon:  .
.
When a file is pinned to the list, the pin icon looks like a push pin viewed from the top: .
Click the pin button again to unpin the file.
Click the File tab.
Under Help, click Options.
Under Display, in the Show this number of Recent Documents list, click the number of files that you want to display.
Note: These steps do not apply to InfoPath 2010.
Click the File tab.
Select the check box to Quickly access this number of recent documents: and choose how many files you want to see.
Links to those files will appear above Info in the navigation bar, regardless of where you are in the Backstage View.
Note: Clearing the check box removes the list.
Click the File tab.
Right click a file in the list and select Clear unpinned items.
Click Yes to clear the list.
Note: Setting the number of recent files to zero also clears the list. To turn the feature back on, set the number to something other than zero. Update the list by opening the files again and resetting the pins.
Track recently used files and folders
Important APIs
Track files that your user accesses frequently by adding them to your app’s most recently used list (MRU). The platform manages the MRU for you by sorting items based on when they were last accessed, and by removing the oldest item when the list’s 25-item limit is reached. All apps have their own MRU.
Your app’s MRU is represented by the StorageItemMostRecentlyUsedList class, which you obtain from the static StorageApplicationPermissions.MostRecentlyUsedList property. MRU items are stored as IStorageItem objects, so both StorageFile objects (which represent files) and StorageFolder objects (which represent folders) can be added to the MRU.
В For complete samples, see the File picker sample and the File access sample.
Prerequisites
Understand async programming for Universal Windows Platform (UWP) apps
You can learn how to write asynchronous apps in C# or Visual Basic, see Call asynchronous APIs in C# or Visual Basic. To learn how to write asynchronous apps in C++, see Asynchronous programming in C++.
Access permissions to the location
Picked files are often the same files that users return to again and again.
Add a picked file to the MRU
The files that your user picks are often files that they return to repeatedly. So consider adding picked files to your app’s MRU as soon as they are picked. Here’s how.
StorageItemMostRecentlyUsedList.Add is overloaded. In the example, we use Add(IStorageItem, String) so that we can associate metadata with the file. Setting metadata lets you record the item’s purpose, for example «profile pic». You can also add the file to the MRU without metadata by calling Add(IStorageItem). When you add an item to the MRU, the method returns a uniquely identifying string, called a token, which is used to retrieve the item.
You’ll need the token to retrieve an item from the MRU, so persist it somewhere. For more info about app data, see Managing application data.
Use a token to retrieve an item from the MRU
Use the retrieval method most appropriate for the item you want to retrieve.
Here’s how to get back the file we just added.
Here’s how to iterate all the entries to get tokens and then items.
The AccessListEntryView lets you iterate entries in the MRU. These entries are AccessListEntry structures that contain the token and metadata for an item.
Removing items from the MRU when it’s full
When the MRU’s 25-item limit is reached and you try to add a new item, the item that was accessed the longest time ago is automatically removed. So, you never need to remove an item before you add a new one.
Future-access list
As well as an MRU, your app also has a future-access list. By picking files and folders, your user grants your app permission to access items that might not be accessible otherwise. If you add these items to your future-access list then you’ll retain that permission when your app wants to access those items again later. Your app’s future-access list is represented by the StorageItemAccessList class, which you obtain from the static StorageApplicationPermissions.FutureAccessList property.
When a user picks an item, consider adding it to your future-access list as well as your MRU.
- The FutureAccessList can hold up to 1000 items. Remember: it can hold folders as well as files, so that’s a lot of folders.
- The platform never removes items from the FutureAccessList for you. When you reach the 1000-item limit, you can’t add another until you make room with the Remove method.
—>
Edit the Windows registry to clear the list of most recently used files in Office
Office 365 ProPlus is being renamed to Microsoft 365 Apps for enterprise. For more information about this change, read this blog post.
Summary
You can edit a single registry entry to clear the most recently used files list that appears in most Microsoft Office programs.
Many Office programs maintain a list of the most recently used (MRU) files. Additionally, the programs display this list on the File menu and in several other locations. These locations include the Open dialog box, the Save As dialog box, and the Insert Hyperlink dialog box.
The purpose of this feature is to provide quick access to files that a user is working on. In the interest of enhanced privacy, many users and administrators prefer not to have these files listed.
Although you can prevent this list from being shown on the File menu in the programs, there is no built-in method for removing the list or for preventing its display in other locations. You can, however, edit the Microsoft Windows registry to clear the list of the most recently used files.
This article describes how to delete the files that are listed when you click File, click Open or Save As, and then look under the File name box. After following the steps listed in this article, no files will be listed under the File name box.
This article does not discuss how to delete the files that are listed on the File menu. To do this, you must change the File menu settings in the Office or Office XP program.
This article does not discuss how to prevent shortcuts for recently used files from being saved in the location that is specified by the HKEY_CURRENT_USER\Software\Microsoft\Office\11.0\Common\General\RecentFiles registry entry. By default, that location is C:\Documents and Settings\user profile\Application Data\Microsoft\Office\Recent.
Delete the Most Recently Used files list in Office
When the Recently used file list option is not checked on the General tab of the Options dialog box in Office 2000, in Office XP, or in Office 2003 programs, Word continues to save shortcuts in the default location. The default location is as follows:
C:\Documents and Settings\user profile\Application Data\Microsoft\Office\Recent
The default location is specified by the following registry entry:
To delete the most recently used files list in Microsoft Office XP or in Microsoft Office 2003, follow these steps:
- Start the program that you want to modify.
- On the Tools menu, click Options.
- On the General tab, click to clear the Recently used file list check box, and then click OK.
To delete the most recently used files list in the 2007 Microsoft Office suites, follow these steps:
Start the program that you want to modify.
Click the Microsoft Office Button, and then click Program Name Options.
Program Name is the name of the program that you want to modify.
In the Display area, click to select the number of files in the Show this number of Recent Documentslist.
Type the number of files that you want to display, and then click OK.
If you do not want to display any files, type 0.
To modify the registry key and to clear the most recently used files list in a program in Office, follow these steps.
This section, method, or task contains steps that tell you how to modify the registry. However, serious problems might occur if you modify the registry incorrectly. Therefore, make sure that you follow these steps carefully. For added protection, back up the registry before you modify it. Then, you can restore the registry if a problem occurs. For more information about how to back up and restore the registry, see How to back up and restore the registry in Windows.
Click Start, click Run, type regedit in the Open box, and then click OK.
Locate the following registry key, as appropriate for your version of Office:
2007 Office suite
HKEY_CURRENT_USER\Software\Microsoft\Office\12.0\Common\Open Find
HKEY_CURRENT_USER\Software\Microsoft\Office\11.0\Common\Open Find
HKEY_CURRENT_USER\Software\Microsoft\Office\10.0\Common\Open Find
In the Open Find subkey, locate the program for which you want to clear the most recently used files list.
In each program subkey, you find another subkey that is named Settings. In that subkey, you find several additional subkeys. Each of these subkeys contains a most recently used files list.
For example, the Microsoft Office Word\Settings subkey contains subkeys such as Insert File, Save As, Open, or Modify Location. These keys may vary depending on the past actions that were performed in Microsoft Word.
Under each subkey is another subkey that is named File Name MRU.
To delete a specific list of most recently used files, delete the Value entry in any File Name MRU subkey.
Troubleshooting
Office rebuilds the File Name MRU subkey after you delete it, and begins to track the most recently used files again. Therefore, you must periodically delete the list.
You can also create a registry file (.reg) by exporting that subkey of the registry in Registry Editor. Use that registry file to automatically apply the registry settings (in this case, the deletion of the most recently used files list).
You can also delete the whole Open Find subkey (or create a registry file to do it for you automatically) to remove all most recently used files lists at the same time.


