- Free up storage space on your Mac
- Find out how much storage is available on your Mac
- Manage storage on your Mac
- Store in iCloud
- Optimize Storage
- Empty Trash Automatically
- Reduce Clutter
- Where to find the settings for each feature
- Other ways that macOS helps automatically save space
- How to free up storage space manually
- Move your content to a new Mac
- Get ready
- Use Migration Assistant
- On your new Mac
- On your old Mac
- On your new Mac
- On your old Mac
- Display Menu 4+
- Milch im Gemüsefach
- Screenshots
- Description
- What’s New
- Ratings and Reviews
- Works great with 1x4K 2xHD Monitors with LandingZone Dock
- This App Saved Me Big $$$ and Time
- Five Stars Free, Five Stars PRO
Free up storage space on your Mac
Save space by storing your content in iCloud or using built-in tools to find and remove large or unneeded files.
The Optimized Storage features of your Mac help you save storage space by storing your content in iCloud and making it available on demand:
- When storage space is needed, files, photos, movies, email attachments, and other files that you seldom use are stored in iCloud automatically.
- Each file stays right where you last saved it, and downloads when you open it.
- Files that you’ve used recently remain on your Mac, along with optimized versions of your photos.
If you haven’t yet upgraded to macOS Sierra or later, learn about other ways to free up storage space.
Find out how much storage is available on your Mac
Choose Apple menu > About This Mac, then click Storage. Each segment of the bar is an estimate of the storage space used by a category of files. Move your pointer over each segment for more detail.
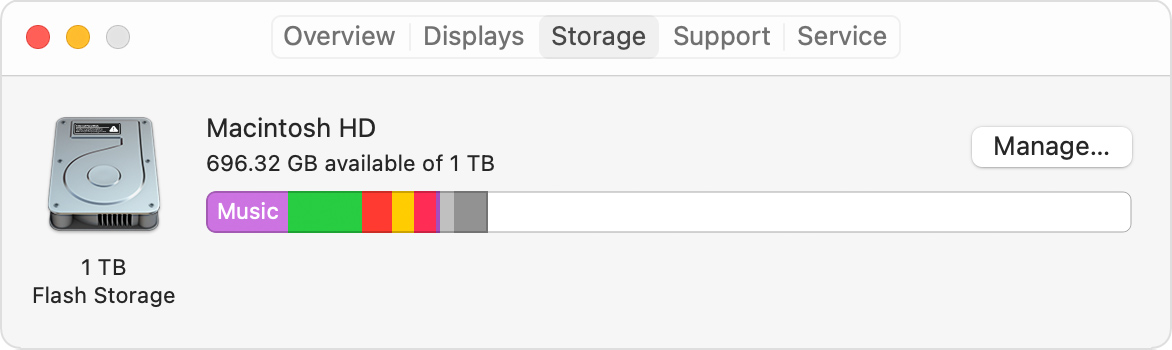
Click the Manage button to open the Storage Management window, pictured below.
Manage storage on your Mac
The Storage Management window offers recommendations for optimizing your storage. If some recommendations are already turned on, you will see fewer recommendations.
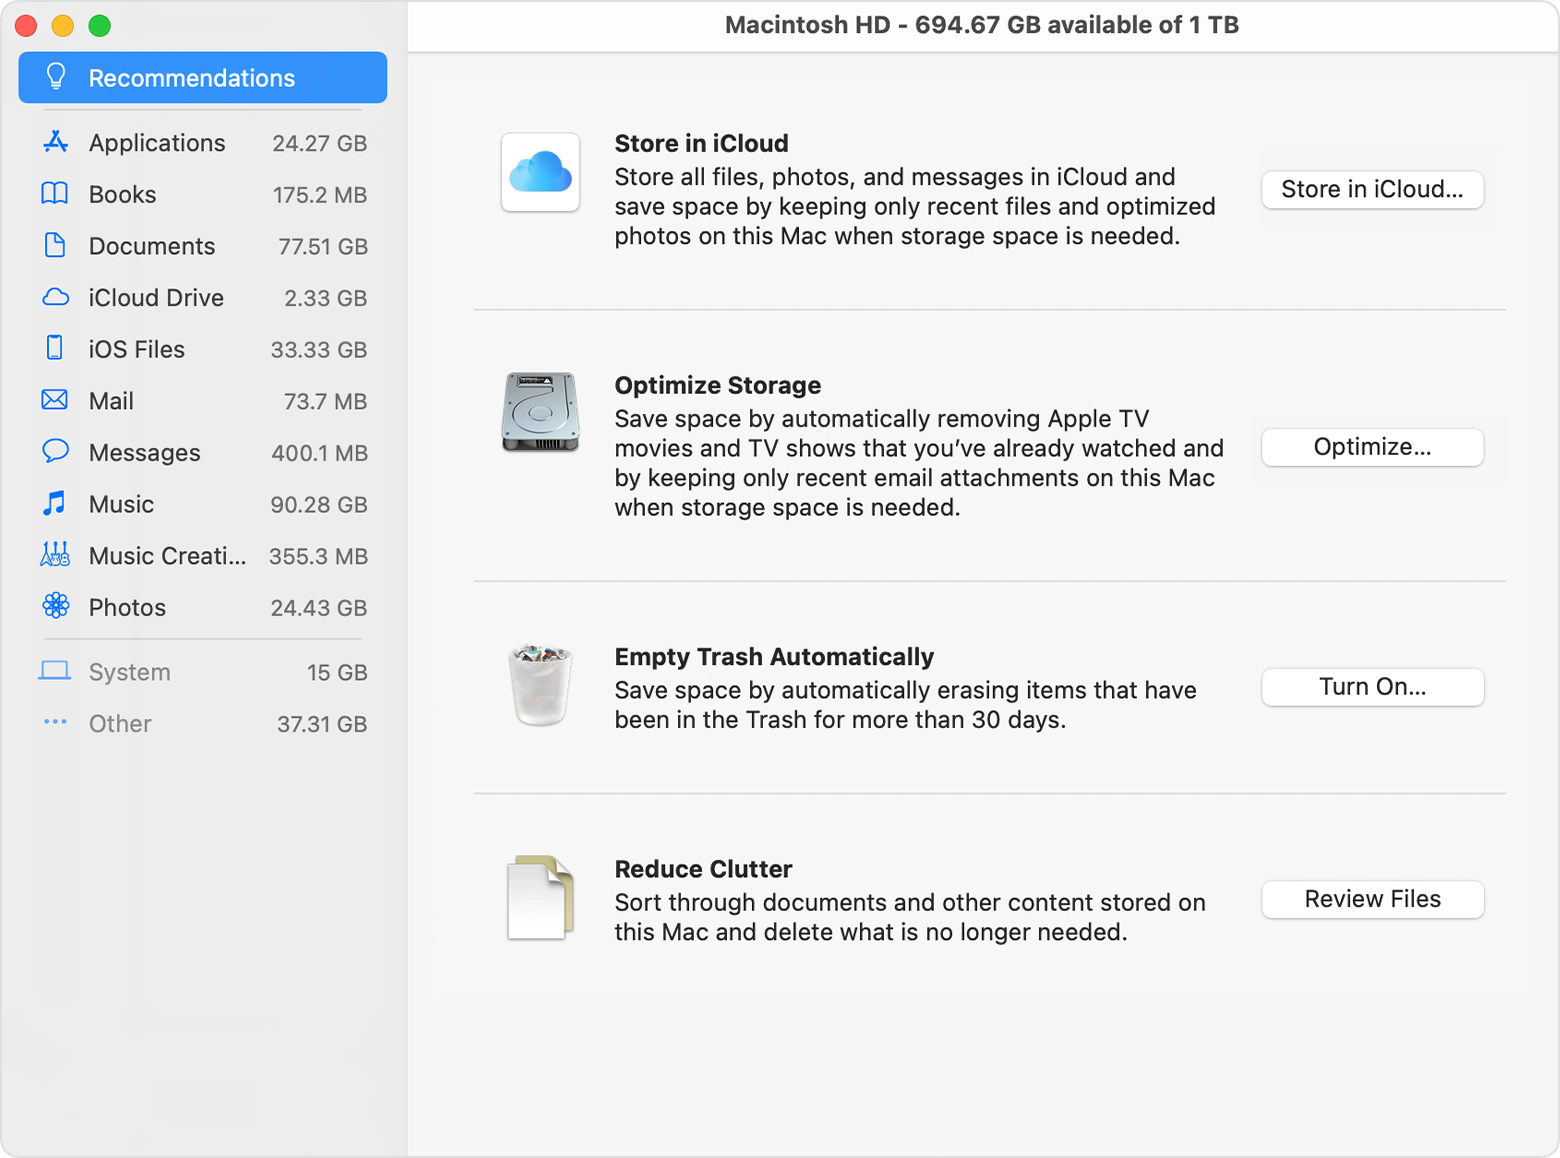
Store in iCloud
Click the Store in iCloud button, then choose from these options:
- Desktop and Documents. Store all files from these two locations in iCloud Drive. When storage space is needed, only the files you recently opened are kept on your Mac, so that you can easily work offline. Files stored only in iCloud show a download icon , which you can double-click to download the original file. Learn more about this feature.
- Photos. Store all original, full-resolution photos and videos in iCloud Photos. When storage space is needed, only space-saving (optimized) versions of photos are kept on your Mac. To download the original photo or video, just open it.
- Messages. Store all messages and attachments in iCloud. When storage space is needed, only the messages and attachments you recently opened are kept on your Mac. Learn more about Messages in iCloud.
Storing files in iCloud uses the storage space in your iCloud storage plan. If you reach or exceed your iCloud storage limit, you can either buy more iCloud storage or make more iCloud storage available. iCloud storage starts at 50GB for $0.99 (USD) a month, and you can purchase additional storage directly from your Apple device. Learn more about prices in your region.
Optimize Storage
Click the Optimize button to save space by automatically removing watched movies and TV shows. When storage space is needed, movies or TV shows that you purchased from Apple and already watched are removed from your Mac. Click the download icon next to a movie or TV show to download it again.
Your Mac will also save space by keeping only recent email attachments on this Mac when storage space is needed. You can manually download any attachments at any time by opening the email or attachment, or saving the attachment to your Mac.
Optimizing storage for movies, TV shows, and email attachments doesn’t require iCloud storage space.
Empty Trash Automatically
Empty Trash Automatically permanently deletes files that have been in the Trash for more than 30 days.
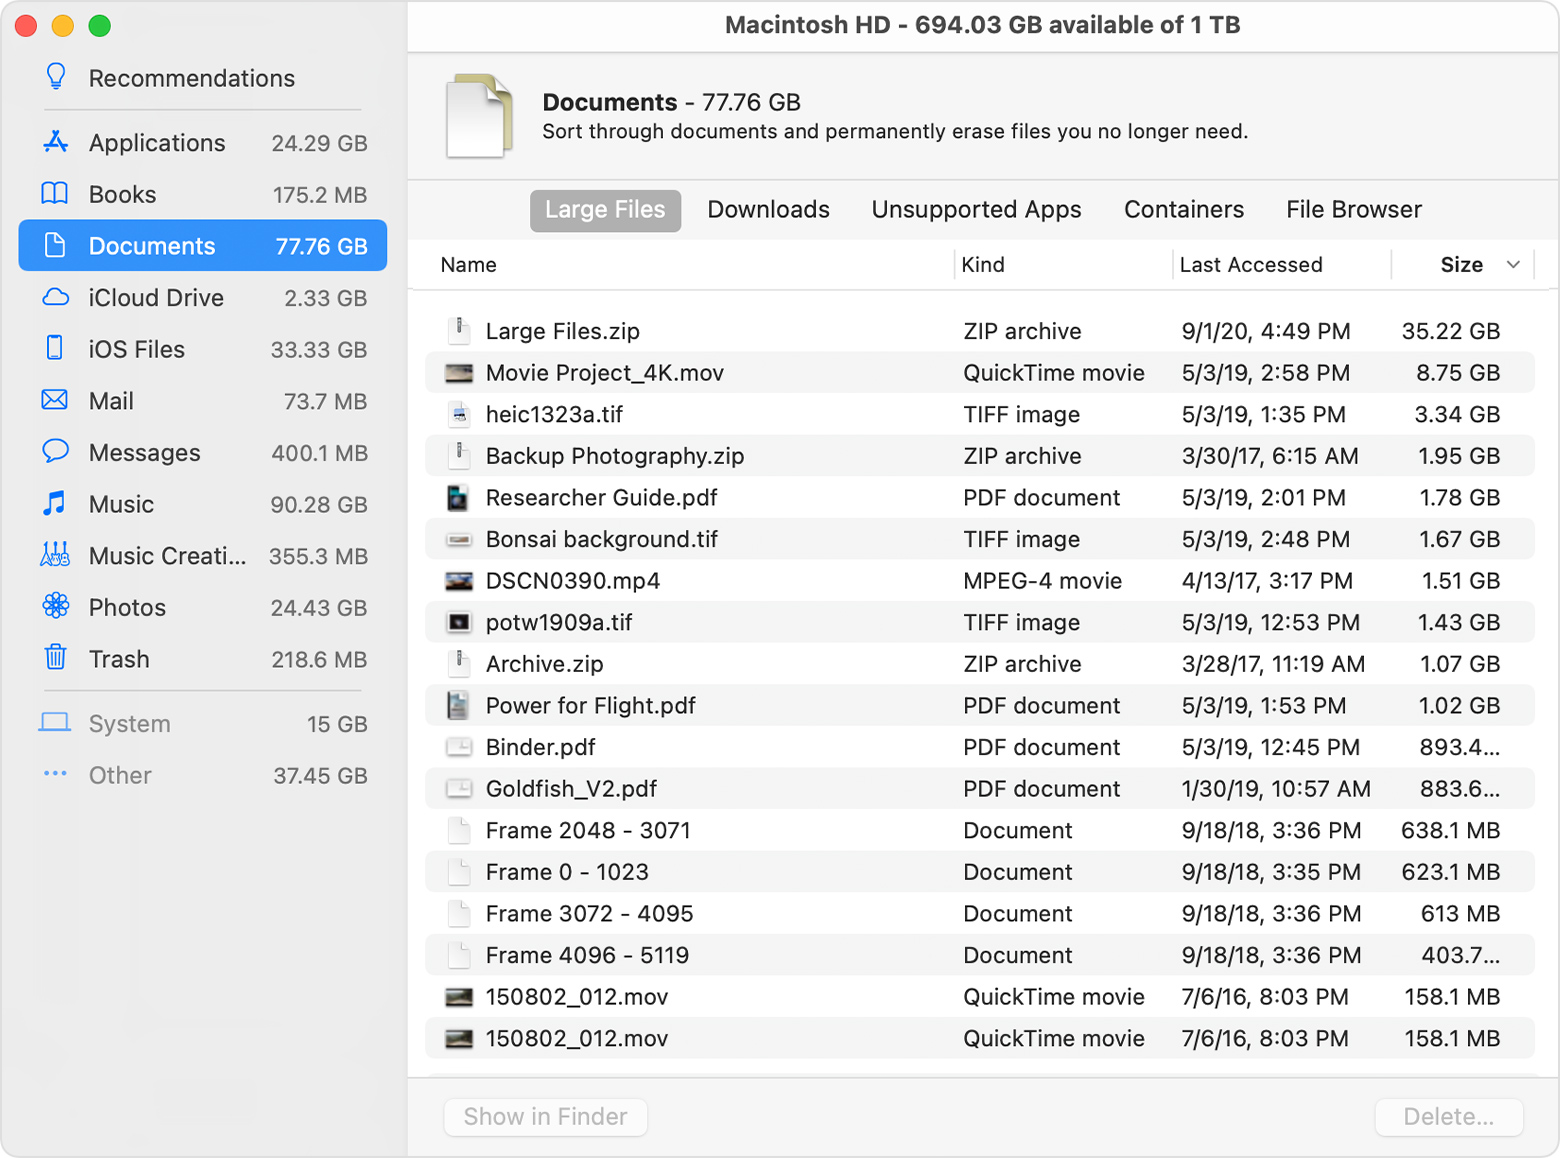
Reduce Clutter
Reduce Clutter helps you identify large files and files you might no longer need. Click the Review Files button, then choose any of the file categories in the sidebar, such as Applications, Documents, Music Creation, or Trash.
You can delete the files in some categories directly from this window. Other categories show the total storage space used by the files in each app. You can then open the app and decide whether to delete files from within it.
Where to find the settings for each feature
The button for each recommendation in the Storage Management window affects one or more settings in other apps. You can also control those settings directly within each app.
- If you’re using macOS Catalina or later, choose Apple menu > System Preferences, click Apple ID, then select iCloud in the sidebar: Store in iCloud turns on the Optimize Mac Storage setting on the right. To turn off iCloud Drive entirely, deselect iCloud Drive.
- If you’re using macOS Mojave or earlier, choose Apple menu > System Preferences, click iCloud, then click Options next to iCloud Drive. Store in iCloud turns on the Desktop & Documents Folders and Optimize Mac Storage settings.
- In Photos, choose Photos > Preferences, then click iCloud. Store in iCloud selects iCloud Photos and Optimize Mac Storage.
- In Messages, choose Messages > Preferences, then click iMessage. Store in iCloud selects Enable Messages in iCloud.
- If you’re using macOS Catalina or later, open the Apple TV app, choose TV > Preferences from the menu bar, then click Files. Optimize Storage selects “Automatically delete watched movies and TV shows.”
- In you’re using macOS Mojave or earlier, open iTunes, choose iTunes > Preferences from the menu bar, then click Advanced. Optimize Storage selects “Automatically delete watched movies and TV shows.”
- In Mail, choose Mail > Preferences from the menu bar, then click Accounts. In the Account Information section on the right, Optimize Storage sets the Download Attachments menu to either Recent or None.
Empty Trash Automatically: From the Finder, choose Finder > Preferences, then click Advanced. Empty Trash Automatically selects “Remove items from the Trash after 30 days.”
Other ways that macOS helps automatically save space
With macOS Sierra or later, your Mac automatically takes these additional steps to save storage space:
- Detects duplicate downloads in Safari, keeping only the most recent version of the download
- Reminds you to delete used app installers
- Removes old fonts, languages, and dictionaries that aren’t being used
- Clears caches, logs, and other unnecessary data when storage space is needed
How to free up storage space manually
Even without using the Optimized Storage features described in this article, you can take other steps to make more storage space available:
- Music, movies, and other media can use a lot of storage space. Learn how to delete music, movies, and TV shows from your device.
- Delete other files that you no longer need by moving them to the Trash, then emptying the Trash. The Downloads folder is good place to look for files that you might no longer need.
- Move files to an external storage device.
- Compress files.
- Delete unneeded email: In the Mail app, choose Mailbox > Erase Junk Mail. If you no longer need the email in your Trash mailbox, choose Mailbox > Erase Deleted Items.
Источник
Move your content to a new Mac
Use Migration Assistant to copy all of your documents, apps, user accounts, and settings to a new Mac from another computer.
Migration Assistant copies all of your files from your old Mac to your new Mac so that you don’t have to copy them manually.
- If your files are currently on a PC, follow the PC migration steps instead.
- If you’re moving content from a Time Machine backup, follow the steps to restore your Mac from a backup instead.
Get ready
- Install all available software updates on both computers. If your old Mac isn’t using OS X Lion or later, and your new Mac isn’t using OS X Mavericks or later, follow the Mountain Lion migration steps instead.
- If both computers are using macOS Sierra or later, place them near each other with Wi-Fi turned on. If either one is using OS X El Capitan or earlier, make sure that both are on the same network.
- On your old Mac, choose Apple menu > System Preferences, then click Sharing. Make sure that a name appears in the Computer Name field.
Use Migration Assistant
You’re now ready to use Migration Assistant to move your files from the old Mac to the new one.
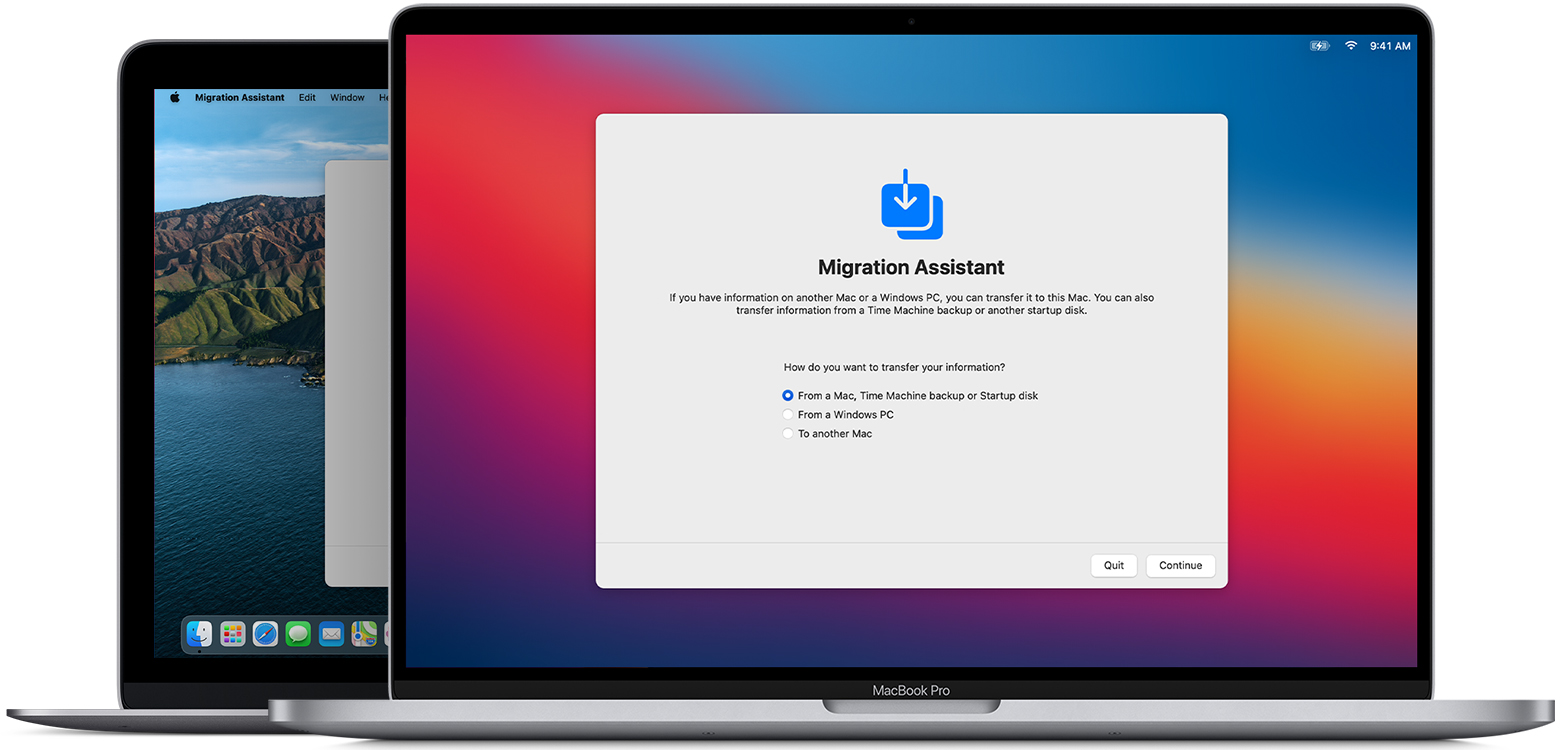
On your new Mac
- Open Migration Assistant, which is in the Utilities folder of your Applications folder. Then click Continue.
- When asked how you want to transfer your information, select the option to transfer from a Mac, Time Machine backup, or startup disk. Then click Continue.

On your old Mac
- Open Migration Assistant, then click Continue.
- When asked how you want to transfer your information, select the option to transfer to another Mac. Then click Continue.
On your new Mac
When asked to select a Mac, Time Machine backup, or other startup disk, select the other Mac. Then click Continue.
![]()
On your old Mac
If you see a security code, make sure that it’s the same code shown on your new Mac. Then click Continue.
Источник
Display Menu 4+
Milch im Gemüsefach
-
- 4.1 • 247 Ratings
-
- Free
- Offers In-App Purchases
Screenshots
![]()
![]()
![]()
Description
Display Menu shows a status item in your menu bar that lets you change your display settings with a single click.
Depending on your display setup, you can set the screen resolution, toggle mirroring, and adjust the refresh rates.
You can enable additional features like Retina resolutions (on Retina Displays), AppleScript support, and resolution bookmarks as a paid upgrade.
What’s New
Version 2.2.3 added access to our FAQ to Display Menu and fixed some minor issues.
If you have feature requests or if you find any bugs, please report them to us via our website or Twitter @DisplayMenu.
If you happen to like Display Menu, please leave a positive review on the App Store!
With version 2.0 we have added a number of great new features to our Display Menu software! From the large collection of emails we have received from you over the last year, we have distilled the three most wanted and, hopefully, most useful bits of added functionality and implemented them. While we are pretty happy how the new features have turned out, it was still a lot of work: apart from solving a number of technical difficulties, we went through a long design process to include the new functionality but, at the same time, keep Display Menu’s UI streamlined and uncluttered. This is also the reason why we decided to bundle the *new* features only with the new ‘Pro’ version of Display Menu. The basic free version of version 2.0 still contains all the features from version 1.4; the Pro version is a paid upgrade that you can purchase from within the App.
Ratings and Reviews
Works great with 1x4K 2xHD Monitors with LandingZone Dock
The free version works great with 4 screen, I have a 4K monitors with 2 additional 1080p Monitors, with this software, I can ensure my external 4K running @ 60 Hz, and able to adjust resolution during persentation in just 1 mouse click since most ppl can not see 4k high resolution text during onine presentation time due to video compression over the network. Anyway, I was trying to find an alternative without the need to have the display menu running all time but so far, this is the free and best I use so far. This also works with Landingzone docking station. By the way, the software can be quit or uninstall once you setup the resolution porperly. Plus, since Mac OS able to remember all the monitors resolution and position, so even after quit the software or uninstall this software, MAC OS still able to use the cusome setting, of cause I can no longer update the dispaly setting. Therefore, if you need more memory , just setup the proper screen position and screen solution , follow by select «Quit Display Menu Pro»
This App Saved Me Big $$$ and Time
I was installing a new Mac in an auditorium this weekend to be connected to an existing projector with a 100 foot VGA cable. We have to use a VGA amplifier to get a high quality signal. That amplifier prevented the Mac Mini from seeing the projector resolution info. My only choice was to use a 1280 x 1024 resolution that was the wrong aspect ratio. I was wondering If I needed to install a new cable, or use a different projector. With no time or money to do either, I tried this $2 app. It worked flawlessly! Just a click from the menu bar I can set the resolution to whatever I want it to be. I cannot imagine what I would have had to do without this app. I bought another copy for my personal Mac. I will do all by display res switching from this little app from now on.
I purchased the pro version. If you need this app, it is well worth $2. I did not try using just the free version.
I rated it 5 starts. I would have given it 10 stars if I could have. Thank you the developers for a great little app that just works!
Five Stars Free, Five Stars PRO
This is *just* what the doctor ordered. I need to take non-Retina screenshots on my MBP (scaling won’t do), and the free version of this enabled the full resolution without a fuss, and I didn’t even have to disable System Integrity Protection!
I almost instantly upgraded to the Pro version, mostly because without it you can’t use the menu to go back to the “native” Retina resolutions offered by Mac OS X, although you can go back to it in display preferences. This is a little unclear in the documentation, but shouldn’t be a deal killer for you if you’re contemplating the free version. However as an app developer myself, I need to go back and forth all the time and so the upgrade was worth it.
Actually the upgrade offers bookmarks, too. Now I’ve got the two resolutions I most need: native from non-Retina screenshots, and and my preferred “More Space” Retina resolution.
I’ve not tried the AppleScript yet, but assuming it works I won’t come back and deduct a star. Trying this feature actually kind of excites me because I use AppleScript within my own apps to take the screenshots, and so switching resolution in my existing screenshot script is just another added bonus.
I’m REALLY glad I found this app. No more having to VPN into one of my Mac minis in order to take non-Retina screen shots.
Источник


