- mount_afp — Man Page
- Synopsis
- Description
- Examples
- See Also
- History
- Return Values
- ОС Mac OS X: подключение общих папок с помощью URL-адреса afp:// или команды mount_afp
- Дополнительная информация
- Информация для ОС Mac OS X версий 10.6–10.6.6
- Mount afp mac os
- Hint Options
- Installing macOS on a separate APFS volume
- What you need
- Back up your Mac
- Add an APFS volume
- Install macOS on the volume
- Switch between macOS versions
- Keep the macOS on each volume up to date
- Learn more
mount_afp — Man Page
mount an afp (AppleShare) filesystem using FUSE
Synopsis
| mount_afp | [-o options ] afp_url node |
Description
The mount_afp command mounts the AFP volume denoted by the afp_url afp://[user[;AUTH=uamname][:password]@]host[:port]/volumename at the mount point indicated by node.
This is normally a symlink to the afp_client(1) executable, which is a full implementation to mount AFP volumes using the FUSE infrastructure. It communicates with afpfsd, a daemon that manages AFP sessions. The arguments and options are:
Options passed to mount(2) are specified with the -o option followed by a comma separated string of options. man page for possible options and their meanings. Additional options supported by the AFP Client are as follows:
The only available option is «-o volpassword=XXX» to set the volume password (since there is no facility for that in an AFP URL).
Mount the volume as writeable. This is the default, so it has no effect.
Mount the volume as readonly.
Mount the volume as groupname.
Mount the volume as username.
There are two forms of afp URL, one for TCP/IP and one for AppleTalk:
Denotes the afp server and sharepoint to mount. It may also contain the username & password required to log into the server. uamname is the protocol name of the authentication method. If port is not specified, then port 548 is used.
Path to mount point, which must be a directory that the user has write permissions for.
Examples
The following example illustrates how to mount the afp volume server.company.com/volumename/ at the mount point /Volumes/mntpnt:
This example shows the proper url to use to mount the volume guestVolume from the afp server myserver as guest:
mkdir /Volumes/mntpnt mount_afp afp://user::name:p@@ssword@server.company.com/volumename/ /Volumes/mntpnt
This example shows the proper url to use to mount the volume myVolume from the afp server myserver using Kerberos authentication:
See Also
afp_client(1) (for a more AFP commands), afpcmd(1) (for a non-FUSE command line AFP client),
History
The mount_afp command first appeared Mac OS X version 10.0. Kerberos authentication was added in Mac OS X version 10.2. This syntax (and manpage) was used for afpfs-ng’s fuse implementation.
Return Values
mount_afp successfully mounted the volume directory.
Источник
ОС Mac OS X: подключение общих папок с помощью URL-адреса afp:// или команды mount_afp
Подключить общий том на сервере AFP можно с помощью URL-адреса типа afp://myserver.mydomain.com/Sharepoint/Folder или команды mount_afp в программе «Терминал».
Если в программе Mail.app или браузере Safari выбрать URL-адрес типа afp://myserver.mydomain.com/Sharepoint/Folder, программа Finder подключит том с именем Sharepoint на сервере AFP myserver.mydomain.com, после чего откроется окно с содержимым каталога Folder. Если перетянуть текст URL-адреса на рабочий стол, создается AFP-ссылка. Чтобы открыть эту папку, дважды щелкните ссылку.
Чтобы подключить общую папку на сервере AFP, используйте команду mount_afp в окне программы «Терминал» или shell-скрипте. Для получения дополнительной информации введите следующую команду в окне программы «Терминал»:
Дополнительная информация
Информация для ОС Mac OS X версий 10.6–10.6.6
Путь для подключения общей папки в ОС Mac OS X версий 10.6–10.6.6 отличается от используемого в других версиях Mac OS X.
URL-адрес, ведущий к файлу на сервере, (например, afp://myserver.mydomain.com/Sharepoint/Folder/File.txt) не сработает. Эта проблема решена в ОС Mac OS X 10.6.7 и более поздних версий.
Если URL-адрес или команда mount_afp в ОС Mac OS X версий 10.6–10.6.6 указывает на папку в точке подключения, такая папка подключается. В ОС Mac OS X версий 10.0–10.5 и Mac OS X 10.6.7 или более поздних (, в том числе ОС OS X Lion), устанавливается соединение с точкой подключения.
Пример: afp://myserver.mydomain.com/Sharepoint/Folder.
При открытии этой ссылки в ОС Mac OS X версий 10.0–10.5, 10.6.7 и более поздних программа Finder подключает том Sharepoint. Локальный путь к общей папке будет /Volumes/Sharepoint/Folder/.
При открытии этой ссылки в ОС Mac OS X версий 10.6–10.6.6 программа Finder подключает подкаталог Folder. Локальный путь к общей папке будет /Volumes/Folder/.
В ОС Mac OS X 10.5, 10.6.7 или более поздних версий с помощью этой команды подключается том Sharepoint в /Volumes/mntpnt. Локальный путь к общей папке будет /Volumes/mntpnt/Folder/.
В ОС Mac OS X версий 10.6–10.6.6 с помощью этой команды подключается подкаталог Folder в /Volumes/mntpnt. Локальный путь к общей папке будет /Volumes/mntpnt/.
Источник
Mount afp mac os
This one’s really handy.
First make a directory in /Volumes for the volume you wish to mount, say idisk, for example. You could mount it anywhere, but /Volumes is the logical spot for it:then mount the volume. That’s it! To unmount, use the umount command:[Editor’s note: This can be very useful when you connect remotely and then realize you need to put something on your iDisk.]
- Currently 3.40 / 5
You rated: 1 / 5 (5 votes cast)
Hint Options
apple implemented a mount script called «mount_afp» located in /sbin. sadly they got no man-page for it, so i cannot imagine what they mean with -o [option].
mount_afs, mount_nfs, mount_ufs, etc. come from the BSD world. mount(1) is just a wrapper that calls one of these based on how you’ve set the ‘-t’ flag. It’s there for conveinence’s sake.
mount_afp is a program launched by mount when specified witht the afp type. I’d suppose the options are the same as the mount options (for example, read-only access, etc.). From the man page for mount:
If the type is not one of the internally known types, mount will
attempt to execute a program in /sbin/mount_XXX where XXX is re-
placed by the type name. For example, nfs filesystems are mount-
ed by the program /sbin/mount_nfs.
mount_afs, mount_nfs, mount_ufs, etc. come from the BSD world. mount(1) is just a wrapper that calls one of these based on how you’ve set the ‘-t’ flag. It’s there for conveinence’s sake.
This is a GREAT tip. The only problem I’m having with it is that it doesn’t seem to allow the finder to ‘see’ the volumes. I have tried messing with the privleges and owner using chown and chmod, but nothing seems to allow me to view the file server in the finder and have it show up like a server would if I mounted it through the finder. Does anyone have any ideas on how to make this happen? I’ve tried various combinations of chown and chmod, but to no avail.
Run ‘disktool -r’ after mounting the AFP volume. This causes the Disk Arbitration system
to refresh its volume list, which then causes the Finder to update.
Thanks to Xil for the missing piece. now I have a little script that rudimentarily allows me to mount my local server. Theoretically, this could be put in Startup items and run automatically, though I’m planning on adding some checking to make sure that the server is not already mounted. (Right now its blind setup and will give errors). At any rate, I thought I’d pass it on to anyone who might be interested. Basically, this is a perl script that can be created by naming it according to the server you attach to (mine is called ‘homemount’ .) So, copy the following, then go to the unix command line, type pico homemount, do a paste, change the variables appropriately, save and quit, do a ‘chmod +x homemount’ , and you should be able to load that server with one command. (since it is a bad idea to hard code your server password in, the program prompts you for that)
I’ll repost later when I get around to adding in all the checking that probably should be here, but if anyone else wants to do it, I’d be grateful.
#!/usr/bin/env perl
##script mounts server volumes
##all variables are right now defined statically, except server password
##which is passed as argument
##from unix command line
## mountserver.pl _serverpassword_
###
###
$local_mount_point=’/Volumes/server-drive’;
$local_user=’eric’;
$local_group=’admin’;
$server_user=»eric»;
$server_mountpoint=»/server»;
$server_ip=»10.0.2.5″;
$server_volume=»server»;
system («sudo mkdir $local_mount_point»);
system («sudo chown $local_user:$local_group $local_mount_point»);
system («chmod +rwx $local_mount_point»);
system («sudo mount -t afp afp://$server_user:$server_pass@$server_ip/$server_volume $local_mount_point»);
system («disktool -r»);
To add to this great hint, the above examples mount the remote volume as root, and as available to everyone.
Note that you don’t have to do it this way.
For example, you could mount a remote volume that’d be only accessible by yourself.
here’s how to do this with a directory called disk that’s at the root of your home directory.
mkdir disk
mount -t afp afp://user:pass@ip.adress.server/volume_to_mount
see how there is no sudo involved in the mount command.
Here, I get a few kextload warnings, but don’t mind them.
PS the non-accessibility of
/disk depends on the permission you’ve set to your home directory 😉
Note, I get a different error depending on how I enter my password. I’ve mounted nfs volumes successfully on a different computer at work and never ran into this problem. Any ideas?
I tested this hint to mount AFP Volumes of OS9 Mac via terminal:
% mount_afp -i afp://at_node@xxx.xxx.xxx.xxx/Volume_name
at the promt type password, no password type enter; then:
you can see the files of Volume_name, to unmount:
/afptemp will be deteted.
where «at_name» can be found with atlookup command:
ff94.f9.30 pippo:Multi-User Client
ff94.f9.04 pippo:Workstation
ff94.f9.04 pippo:ShareWayIP
ff94.f9.f8 pippo:AFPServer
One can mount into a user writable folder (like home folder) this way, sudo command (and password typing) is not necessary and it’s easier to script ( => it’s not interactive)
I can’t get any of this to work. It looks like it works (I don’t get any errors or anything), but nothing shows up. No connections. 🙁
Источник
Installing macOS on a separate APFS volume
APFS makes it easier than ever to switch between versions of macOS, including a beta (prerelease) version of macOS.
If you install macOS on an additional volume of your startup disk, you can switch between that macOS and the macOS on your other volume, as if each were on a separate disk. And because storage space is shared across APFS volumes, you don’t need to reserve space for the new volume. Its size automatically adjusts to fit your content.
What you need
Your Mac must already be using macOS High Sierra or later on an APFS-formatted startup disk. Find out which format your startup disk is using.
You don’t need to reserve storage space for the new volume, but macOS needs as much as 20GB of available space to install, depending on the version of macOS. If you don’t have enough space, the installer will let you know.
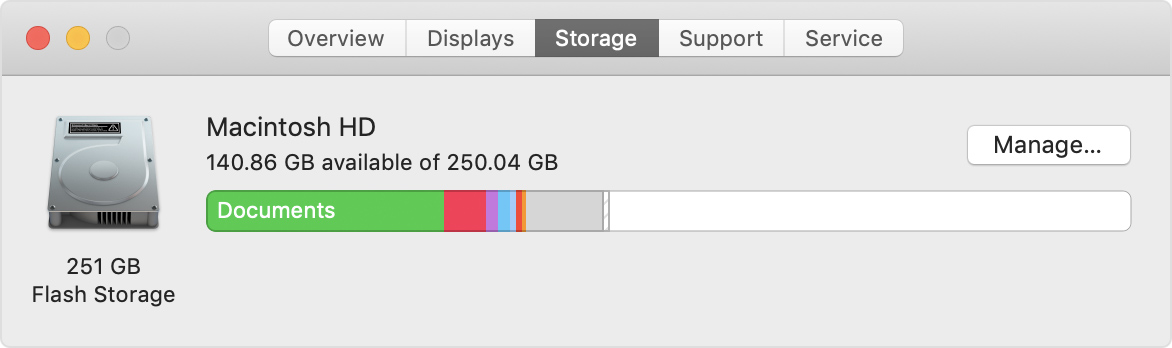
About This Mac includes a storage overview: Choose Apple () menu > About This Mac, then click Storage.

Back up your Mac
It’s a good idea to back up your Mac first, especially if you’re installing a beta version of macOS. Beta software is software that is still in development, so some apps and services might not work as expected.
Add an APFS volume
- Open Disk Utility, which is in the Utilities folder of your Applications folder.
- In the sidebar, select your existing APFS volume.
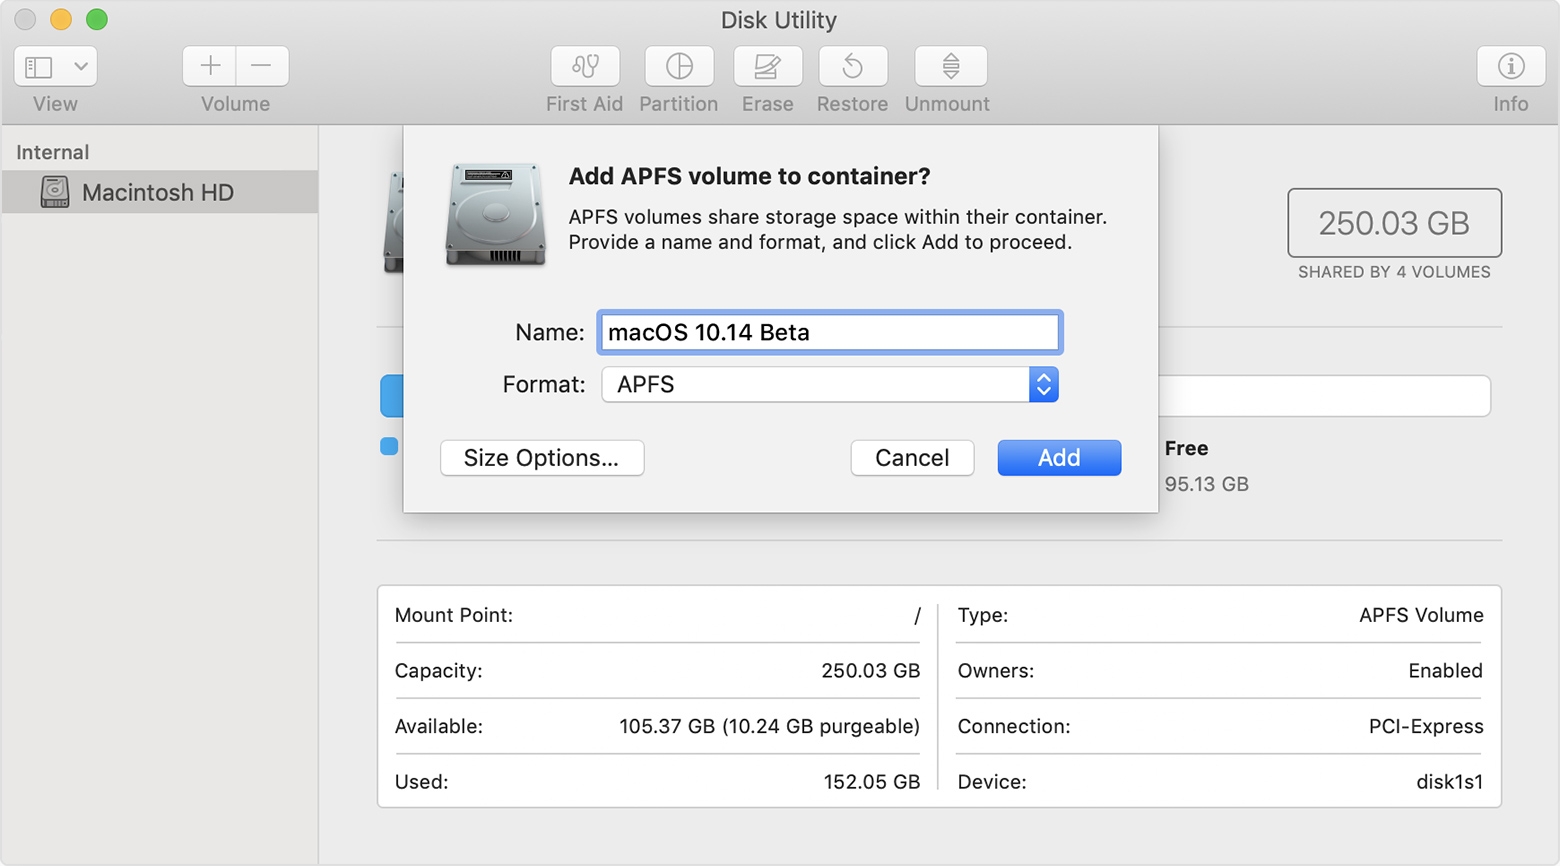
- Choose Edit > Add APFS Volume from the menu bar, or click in the Disk Utility toolbar. These options are available only when an APFS volume is selected.
- Type any name for the new APFS volume, then click Add:

- Disk Utility should now show the new volume in the sidebar. The new volume will also appear in the Finder, as if it were a separate disk. You can now quit Disk Utility.
Install macOS on the volume
Choose an installation method:
- To install a beta (prerelease) version of macOS, enroll in the Apple Beta Software Program and follow the installation instructions on the program website.
- To install a release version of macOS, you can use macOS Recovery. The keys you press at startup determine which macOS is installed.
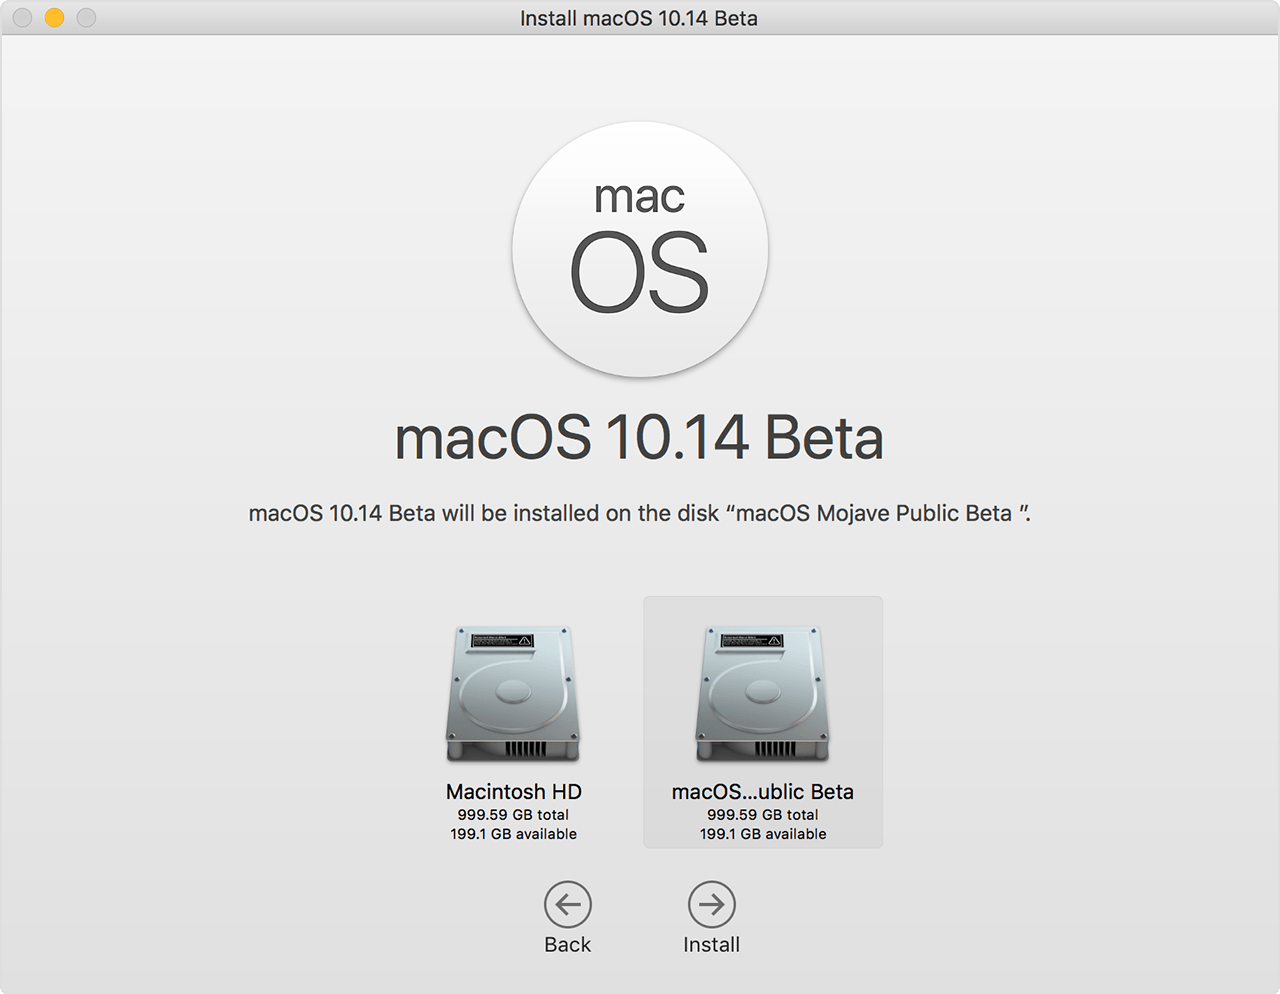
When the installer opens and you’re asked to choose where to install, click Show All Disks, then select the new volume.
Switch between macOS versions
After installation is complete, you can use Startup Disk preferences or Startup Manager to quickly switch between each macOS:
- Choose Apple () menu > Startup Disk, then click and enter your administrator password. Select the volume that you want to use, then click Restart.
- Or press and hold the Option key during startup. When prompted, choose the volume that you want to start up from.
 and enter your administrator password. Select the volume that you want to use, then click Restart.
Keep the macOS on each volume up to date
To find the latest updates for each version of macOS, check for software updates, then start up from the other volume and check for software updates again.
Learn more
If your Mac is using macOS Sierra or earlier, or the startup disk is formatted as Mac OS Extended instead of APFS, you can create a new partition instead. The space it occupies doesn’t automatically adjust to fit your content, so you must manually size the partition. Learn how to add a volume to a device formatted as Mac OS Extended.
Источник


