- WinPE: Mount and Customize
- Common customizations:
- Get the Windows Assessment and Deployment Kit with Windows PE tools
- Create a set of either 32-bit or 64-bit Windows PE files
- Mount the Windows PE boot image
- Add customizations
- Add device drivers (.inf files)
- Add packages/languages/optional components/.cab files
- Add files and folders
- Add a startup script
- Add an app
- Add temporary storage (scratch space)
- Replace the background image
- Set the power scheme to high performance
- Add answer file settings
- Add updates to WinPE (if needed)
- Unmount the Windows PE image and create media
- Troubleshooting
- To delete a working directory:
- Windows mounted Devices
- 1 Answer 1
- How to mount drive on Windows 10
- How to mount drive on Windows 10
- Mount drive with Disk Management
- Mount drive with mountvol
- Mount drive with DiskPart
- How to unmount drive on Windows 10
- Unmount drive with Disk Management
- Unmount drive with mountvol
- Unmount drive with DiskPart
- More Windows 10 resources
- The Dell XPS 15 is our choice for best 15-inch laptop
- Halo: MCC’s live service elements make it better, not worse
- Microsoft’s Surface Duo is not ‘failing up’
- These are the best PC sticks when you’re on the move
WinPE: Mount and Customize
WinPE ships as a .wim file. Mounting and customizing a WinPE image is the same process as any other Windows image. WinPE also has some customizations that are specific to it. This topic covers the common ways to customize a WinPE image.
Common customizations:
- Device drivers (.inf files). You can customize device drivers, such as drivers that support network cards or storage devices.
- Packages (.cab files, also known as WinPE optional components) Add languages, hotfixes, or support for features like PowerShell and the HTML Application Language (HTA).
- Languages. To run WinPE in multiple languages, add the packages (optional components) for those languages.
- Add files and folders. These can be added directly to the WinPE image.
- DISM: Use a newer version. When new versions of Windows require features from the latest version of DISM, you can add DISM directly into WinPE.
- Startup scripts. Examples include setting up a network connection, or adding a custom application, such as diagnostic software.
- Apps. Note, WinPE only supports legacy apps.
- Temporary storage (scratch space). If your application requires temporary file storage, you can reserve extra memory space in RAM.
- Background image
- Power scheme
- WinPE settings
- Windows updates
Get the Windows Assessment and Deployment Kit with Windows PE tools
- Install the WindowsВ Assessment and Deployment Kit (WindowsВ ADK) Technical Reference, with WindowsВ Preinstallation Environment. If you’re using the ADK for Windows 10, version 1809, you’ll have to download and install the WinPE addon after you install the ADK. Previous versions of the ADK include Windows Preinstallation Environment in the ADK installer.
Create a set of either 32-bit or 64-bit Windows PE files
Before you can customize WinPE, you need to have a WinPE image to work with. If you need to get a WinPE image, see WinPE: Create USB bootable drive to learn how.
Mount the Windows PE boot image
Use DISM to mount the WinPE image into a temporary location on your technician PC:
Add customizations
Add device drivers (.inf files)
Use DISM /add-driver to add a device driver to your WinPE image.
You can add multiple drivers to an image by using one command, but it’s often easier to troubleshoot problems if you add each driver package individually.
To learn more about drivers, see Add device drivers (.inf files). To see all available DISM driver servicing options, see DISM driver servicing command-line options.
Add packages/languages/optional components/.cab files
WinPE has packages that you can add with DISM to enable additional features and languages. Use DISM /add-package to add optional components to your image. When you add a WinPE optional component, make sure that you add both the optional component and its associated language packs.
To learn more about available optional components and languages, see WinPE: Add packages (Optional Components Reference).
Add files and folders
Copy files and folders into the C:\WinPE_amd64\mount folder. These files will show up in the X:\ folder in WinPE.
Don’t add too many files, as these will slow down WinPE and can fill up the available memory in the default RAMDisk environment.
Add a startup script
Modify Startnet.cmd to include your customized commands. This file is located in your mounted image at C:\WinPE_amd64\mount\Windows\System32\Startnet.cmd .
You can also call other batch files or command line scripts from this file.
For Plug and Play or networking support, make sure that you include a call to wpeinit in your customized Startnet.cmd script. For more info, see Wpeinit and Startnet.cmd: Using WinPE Startup Scripts.
Add an app
Create an app directory inside the mounted WinPE image.
Copy the necessary app files to the local WinPE directory.
Test the app later by booting WinPE and running the application from the X: directory.
If your app requires temporary storage, or if WinPE becomes unresponsive when it runs an app, you may need to increase the amount of temporary storage (scratch space) allocated to WinPE.
To automatically launch a shell or application that runs when WinPE starts, add the path location to the Winpeshl.ini file. For more info, see Winpeshl.ini Reference: Launching an app when WinPE starts.
Add temporary storage (scratch space)
WinPE reserves memory on the X: drive to unpack the WinPE files, plus additional temporary file storage, known as scratch space, that can be used by your applications. By default, this is 512MB for PCs with more than 1GB of RAM, otherwise the default is 32MB. Valid values are 32, 64, 128, 256, or 512.
Replace the background image
If you’ve got multiple versions of WinPE, you can set the background image so you can instantly tell which version of WinPE is running.
Change the security permissions of the WinPE background image file ( \windows\system32\winpe.jpg ). This allows you to modify or delete the file.
In Windows Explorer, navigate to C:\WinPE_amd64\mount\windows\system32 .
Right-click the C:\WinPE_amd64\mount\windows\system32\winpe.jpg file, and select Properties > Security tab > Advanced.
Next to Owner, select Change. Change the owner to Administrators.
Apply the changes, and exit the Properties window to save changes.
Right-click the C:\WinPE_amd64\mount\windows\system32\winpe.jpg file, and select Properties > Security tab > Advanced.
Modify the permissions for Administrators to allow full access.
Apply the changes, and exit the Properties window to save changes.
Replace the winpe.jpg file with your own image file.
Set the power scheme to high performance
Note: Using the high performance power scheme can make the device run hotter than usual.
In Notepad, edit the file: C:\WinPE_amd64\mount\windows\system32\startnet.cmd , adding a command to set the power scheme to High Performance.
Add answer file settings
- Some WinPE settings can be managed by using an answer file, such as firewall, network, and display settings. Create an answer file, name it unattend.xml, and add it to the root of the WinPE media to process these settings. For more information, see Wpeinit and Startnet.cmd: Using WinPE Startup Scripts.
Add updates to WinPE (if needed)
You can apply updates to your WinPE image, but you’ll only need to for certain situations.
If you’ve been instructed to apply an update to your WinPE image, you’ll have to first download the latest update for your WinPE version from the Microsoft update catalog. Updates for WinPE are included in updates for the matching version of Windows 10. You can find information about the latest available updates for Windows 10 at Windows 10 update history.
Download the latest update.
Apply the update to your mounted WinPE image.
Where Windows10.0-kbxxxxx.msu is the name of the update file
Lock in the update:
Unmount the Windows PE image and create media
Unmount the WinPE image, committing changes.
Create bootable media, such as a USB flash drive.
Boot the media. WinPE starts automatically. After the WinPE window appears, the wpeinit command runs automatically. This may take a few minutes. Verify your customizations.
Troubleshooting
- WinPE won’t boot? See the troubleshooting tips at the end of the topic: WinPE: Create USB Bootable drive
- For tips on connecting to a network, see WinPE Network Drivers: Initializing and adding drivers.
- If the WinPE image becomes unserviceable, you may need to clean up the images before you can mount the image again. For information, see Repair a Windows Image.
To delete a working directory:
In some cases, you may not be able to recover the mounted image. DISM protects you from accidentally deleting the working directory, so you may have to try the following steps to get access to delete the mounted directory. Try each of the following steps:
Try remounting the image:
Try unmounting the image, discarding the changes:
Try cleaning up the resources associated with the mounted image:
Windows mounted Devices
This is an example of a mounted USB key under Linux. It’s a file that can be viewed as hexa, edited, .. etc, but not used to manipulate device via serial communication protocol.
Simply, Can you provide me with a same path under Windows ?
In other words, where does windows saving mounted devices files !
1 Answer 1
Can you provide me with a same path under Windows ?
Not all programs can access such paths, however. I’ve been using HxD myself.
See also this answer for more detailed information on how Windows treats disks.
Every disk, partition, and volume has several names under \Device in the NT namespace. For example:
- (NT) \Device\Harddisk0\DR0 – first hard disk (entire disk)
- (NT) \Device\Harddisk0\Partition0 – first hard disk (entire disk)
- (NT) \Device\Harddisk1\Partition1 – second hard disk, first partition
- (NT) \Device\Floppy0 – first floppy drive
- (NT) \Device\HarddiskVolume1 – first volume (usually a partition, but it’s possible to have a single volume spanning multiple disks, similar to LVM in Linux)
- (NT) \ArcName\multi(0)disk(0)rdisk(1)partition(3) – second hard disk, third partition (using an ARC name)
They are accessible from Win32 device namespace by prefixing \\.\GLOBALROOT , such as \\.\GLOBALROOT\Device\Floppy0 and so on.
The Win32 device namespace, \\.\ , also has symbolic links to specific devices, for more convenient usage. For example:
- (Win32) \\.\C: – volume by its drive letter
- (Win32) \\.\Volume <93e657ad-64a8-11df-b394-806d6172685f>– volume by its GUID
- (Win32) \\.\PhysicalDrive0 – entire physical disk
(The paths which point to volumes also work in the Win32 file namespace \\?\ : for example, \\?\Volume<93e657ad-64a8-11df-b394-806d6172685f>\WINDOWS\Notepad.exe or \\?\C:\Program Files . The Win32 file namespace can be used to bypass the 253 character limit in file names, as described in the namespace article.)
You can see the NT namespace with WinObj. (The Win32 device namespace is accessible in WinObj too, in the directory (NT) \GLOBAL??\ .)
How to mount drive on Windows 10
 Source: Windows Central
Although Windows 10 can automatically mount a drive, the ability to mount and unmount a drive manually can come in handy in many scenarios. For example, when the system does not automatically assign a drive letter upon connecting a new storage device. You formatted a drive using commands, and you did not specify a mount point. Or you need to unmount a device’s storage to make it permanently inaccessible to users.
Whatever the reason it might be, Windows 10 allows you to quickly mount or unmount a drive using a graphical interface with Disk Management or with command-line using the mountvol and DiskPart tools in Command Prompt.
In this Windows 10 guide, we will walk through the steps to mount and unmount a drive (or volume) using the Disk Management graphical console and mountvol and DiskPart command-line tools available with Command Prompt.
How to mount drive on Windows 10
On Windows 10, when you mount a drive manually, you will create a mount point with a drive letter that will make the storage available to users and allow the system to automatically mount the drive with the same drive letter.
You can complete this process in at least three ways with the Disk Management console and the mountvol and DiskPart command-line tools.
Mount drive with Disk Management
To use Disk Management to mount a drive on Windows 10, use these steps:
- Open Start.
- Search for Create and format hard disks partitions and click the top result to open Disk Management.
Right-click the drive and select the Change Drive Letter and Path option.
 Source: Windows Central
Click the Add button.
Source: Windows Central
Select the Assign the following drive letter option.
 Source: Windows Central
Use the drop-down menu and select one of the available letters.
Quick tip: When assigning a letter manually, it’s best to start with the last available letter to have a point of reference to determine if the volume was mounted manually or automatically.
Once you complete the steps, the drive will mount and appear in the system to store data.
Mount drive with mountvol
To use mountvol to mount a drive, use these steps:
- Open Start.
- Search for Command Prompt, right-click the top result, and select the Run as administrator option.
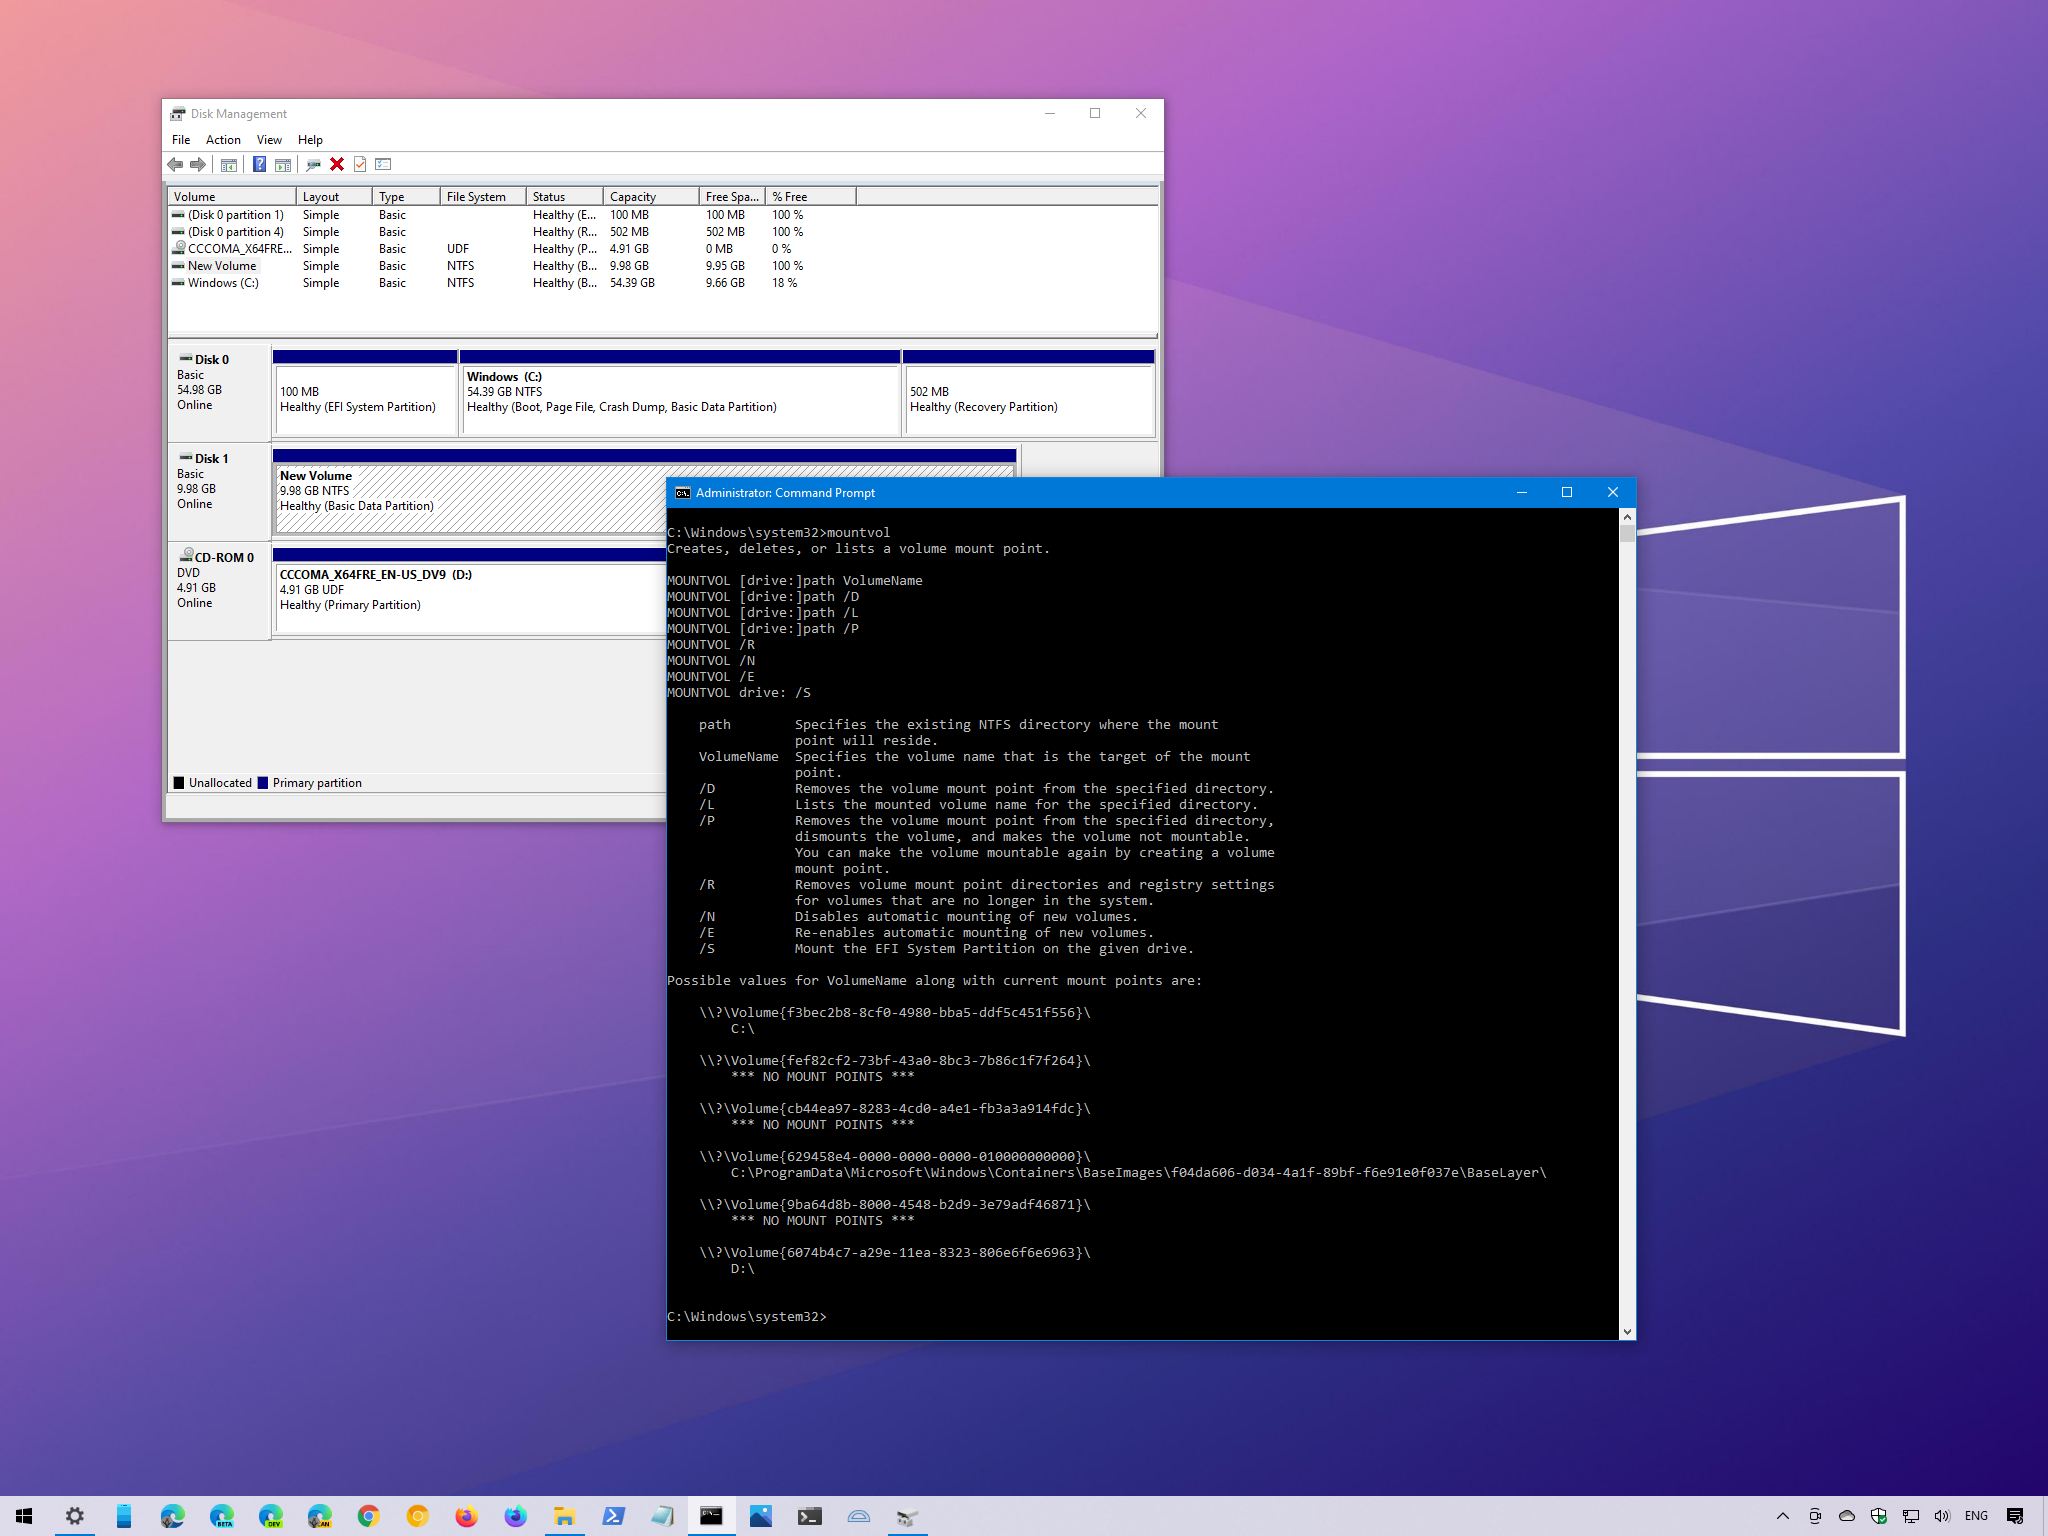
Type the following command to list all the available mount points and press Enter:
![]() Source: Windows Central
Source: Windows Central
Select the mount point path to copy the information to the clipboard.
Quick note: Usually, the volume may or may not be listed with the «Not mountable until a volume mount point is created» label. If you cannot identify the volume, then use the Disk Management console instead.
Type the following command to mount the volume and press Enter:
mountvol DRIVE-LETTER:\ VOLUME-NAME
In the command, make sure to replace DRIVE-LETTER and VOLUME-NAME with the appropriate information.
For example, this command mounts the \\?\Volume
 Source: Windows Central
After you complete the steps, the volume will be accessible through File Explorer and across the experience.
Mount drive with DiskPart
Alternatively, you can also accomplish the task using DiskPart with these steps:
- Open Start.
- Search for Command Prompt, right-click the top result, and select the** Run as administrator** option.
Type the following command to start the tool and press Enter:
Type the following command to list all the available volumes and press Enter:
Type the following command to select the drive and press Enter:
select volume VOLUME-NUMBER
In the command, replace VOLUME-NUMBER with the number of the drive (volume) you want to mount.
For example, this command selects volume number four:
select volume 4
Source: Windows Central
Type the following command to mount the drive on Windows 10 and press Enter:
assign letter DRIVE-LETTER
In the command, replace DRIVE-LETTER with the letter you want to mount and access the storage.
For example, this command mounts the drive and assigns the e drive letter:
assign letter e
How to unmount drive on Windows 10
When you unmount a drive manually, you will remove the mount point making the storage inaccessible. Also, the system will no longer try to mount it automatically. If you want to make the drive mountable again, you will need to revert the changes (see above steps).
If you want to unmount a drive, you can also use the same Disk Management, mountvol, and DiskPart tools.
Unmount drive with Disk Management
To unmount a drive with Disk Management, use these steps:
- Open Start.
- Search for Create and format hard disks partitions and click the top result to open Disk Management.
Right-click the drive and select the Change Drive Letter and Path option.
Source: Windows Central
Click the Remove button.
Source: Windows Central
Once you complete the steps, the drive will no longer be accessible on Windows 10.
Unmount drive with mountvol
To dismount a drive (or volume) with mountvol, use these steps:
- Open Start.
- Search for Command Prompt, right-click the top result, and select the Run as administrator option.
Type the following command to list all the available mount points and press Enter:
Source: Windows Central
Type the following command to dismount a drive and press Enter:
mountvol DRIVE-LETTER:\ /p
In the command, make sure to change DRIVE-LETTER with the correct drive letter of the mount point you are trying to dismount.
For example, this command unmounts the e:\ mount point:
Source: Windows Central
Quick note: The /p option will unmount the drive and remove the drive letter. The tool also offers the /d option, but it is only meant to remove mount points individually.
After you complete the steps, the mount points will be removed, making the storage inaccessible to users.
Unmount drive with DiskPart
You can also dismount a drive with DiskPart using these steps:
- Open Start.
- Search for Command Prompt, right-click the top result, and select the** Run as administrator** option.
Type the following command to start the tool and press Enter:
Type the following command to list all the available volumes and press Enter:
Type the following command to select the drive and press Enter:
select volume VOLUME-NUMBER
In the command, replace VOLUME-NUMBER with the number of the drive (volume) you want to mount.
For example, this command selects volume number four:
select volume 4
Source: Windows Central
Type the following command to unmount the drive on Windows 10 and press Enter:
remove letter DRIVE-LETTER
In the command, replace DRIVE-LETTER with the letter of the storage you want to unmount.
For example, this command dismounts the e drive:
remove letter e
Also, do not confuse mounting a drive with mounting a drive as a folder, which is something different. You can use these instructions to mount a drive as a folder.
More Windows 10 resources
For more helpful articles, coverage, and answers to common questions about Windows 10, visit the following resources:
![]()
The Dell XPS 15 is our choice for best 15-inch laptop
For a lot of people, a 15-inch laptop is a perfect size that offers enough screen for multitasking, and in a lot of cases, some extra performance from powerful hardware. We’ve rounded up the best of the best at this size.
![]()
Halo: MCC’s live service elements make it better, not worse
Halo: The Master Chief Collection is more popular than ever, but some fans don’t agree with the live service approach 343 Industries has taken with it. Here’s why those elements are, at the end of the day, great for the game and for Halo overall.
![]()
Microsoft’s Surface Duo is not ‘failing up’
Microsoft announced this week that it was expanding Surface Duo availability to nine new commercial markets. While Surface Duo is undoubtedly a work in progress, this is not a sign of a disaster. It’s also doesn’t mean that Surface Duo is selling a ton either. Instead, the reason for the expansion is a lot more straightforward.
![]()
These are the best PC sticks when you’re on the move
Instant computer — just add a screen. That’s the general idea behind the ultra-portable PC, but it can be hard to know which one you want. Relax, we have you covered!


