- How to Mount IMG Files in Linux
- Method 1: Mount With Graphical Menus
- Method 2: Via the Loopback Device
- pashamray / gist:7866f21d2e1925f72132415903c45db0
- Монтирование iso, nrg, mdf, bin, img образов в Linux
- Монтирование образов дисков
- Содержание
- Подключение стандартного ISO-образа
- Используя графический интерфейс
- Thread: How to mount .img file
- How to mount .img file
- Re: How to mount .img file
- Re: How to mount .img file
- Re: How to mount .img file
How to Mount IMG Files in Linux
ISO images are often used to contain CD-ROM or DVD data, but Linux users will occasionally find themselves working with IMG files instead. These contain direct disk images, which can be worked with in a similar way. At one point these were generally used for writing an entire file system directly to a discrete diskette, but few people would ever wish to do that in today’s world. There are two major reasons modern Linux users would need to work with them, however. One is if an IMG file was used to distribute a driver or other piece of an operating system that needed to be restored. The IMG file can be mounted and the individual file from inside of it’s contained system could then be copied over to a booted file structure. The other reason, which is becoming extremely popular, is for working with virtual machines and other forms of hardware virtualization.
Linux provides several different ways to work with these contained structures. Depending on your distribution, you might be able to work with them in a purely graphical environment. The same CLI tools that mount ISO images could also mount IMG if this isn’t possible for you, however.
Method 1: Mount With Graphical Menus
If you’re using PCManFM or another file manager that supports mounting an image directly via the /media folder with a menu driven system such as some versions of Nautilus, then you should hold launch your manager to start. You’ll either need to launch this from the Panel Menu in LXDE or from the Applications menu in GNOME. Once you’re open, navigate to the Downloads folder by clicking the link in the left panel and then right click on the disk image you downloaded. It’s generally smart to have ensured that your browser didn’t detect any malware before proceeding.
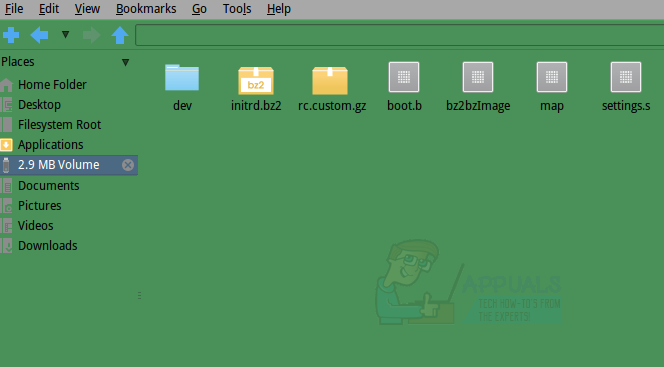
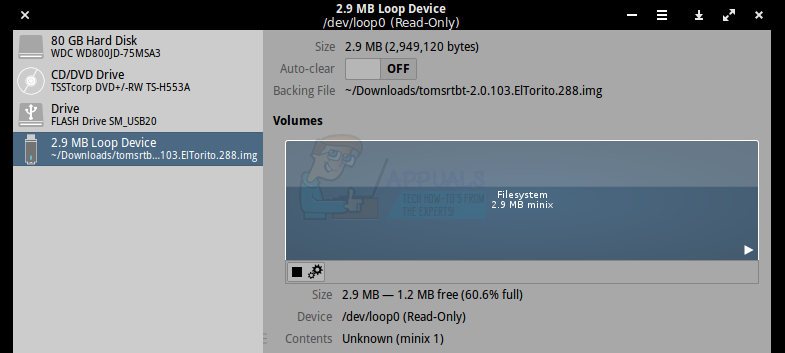
Once the context menu appears, select the “mount disk image” option. The label for this command will change depending on your particular distribution. The image will automatically mount at /media/USERNAME/disk, with USERNAME being replaced with your actual user name. Click on the left panel of the file manager where it reads the size of the image in question. In our example we used an image of an older Linux distribution called tomsrtbt (pronounced Tom’s Root Boot), which fit an entire operating system in less than three megabytes. Hence the “2.9 MB Volume” label refers to the image in question.
You may now drag or right click and copy any of these files to any other section of your file system for safekeeping. When you’re done you can click on the X logo next to the label to close it. If you’re using a file manager that doesn’t support this method of unmounting an image, then start the GNOME Disks utility from the Panel Menu or the Applications tab. Click on the device that has the same name as the label from the file manager and then click on the square stop button to close down the file system.
Method 2: Via the Loopback Device
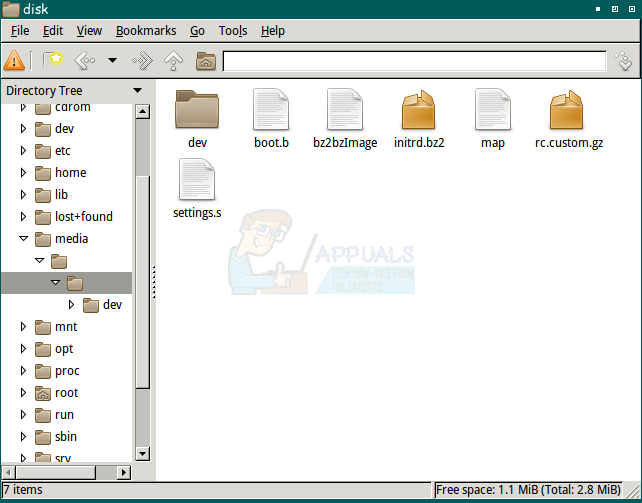
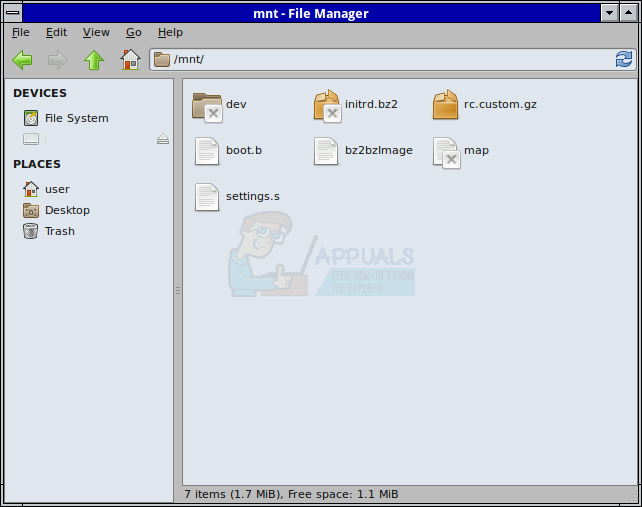
Disk images could be mounted via the loopback device as well, in much the same way as ISO images can be. This technique will be necessary if you use Thunar, Konqueror or any other file manager that doesn’t support direct mounting via graphical techniques. If you haven’t been able to mount an image graphically, then hold down CTRL, ALT and T at the same time. Type ls /mnt to make sure your /mnt directory is empty. If it’s not or if you don’t feel comfortable using it directly, then you can use sudo mkdir /mnt/toms to create a mountable directory. You could theoretically call the directory whatever you’d like. Type sudo mount -o loop tomsrtbt-2.0.103.ElTorito.288.img /mnt and press enter. You will be prompted to enter your password, which you will be required to do. The /mnt directory can then be explored via the CLI or the file manager you prefer. Naturally you’ll need to replace tomsrtbt-2.0.103.ElTorito.288.img with the image you’re using and /mnt with the directory tree segment you’re using.
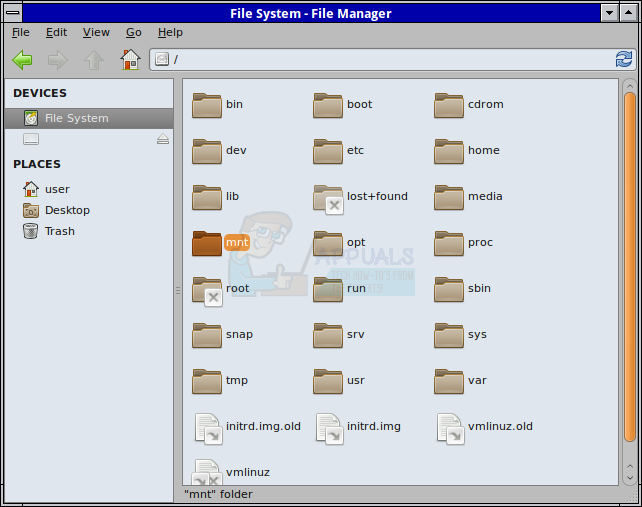
Hold down CTRL and E to open your graphical manager or start it from the Applications or Whisker menu depending on which desktop environment you are using. Select the File System option from the left pain, navigate to /mnt and then select the /mnt folder. You’ll now be able to examine the contents of the image file.
At the CLI type sudo umount /mnt and press enter to umount the image. You would need to substitute whatever mount point you used for /mnt when you do so.
Источник
pashamray / gist:7866f21d2e1925f72132415903c45db0
| Первый шаг, получить список разделов в образе: |
| fdisk -l hive-0.5-12-20171211.img |
| Диск hive-0.5-12-20171211.img: 7 GiB, 7549747200 байтов, 14745600 секторов |
| Единицы измерения: секторов из 1 * 512 = 512 байтов |
| Размер сектора (логический/физический): 512 байт / 512 байт |
| I/O size (minimum/optimal): 512 bytes / 512 bytes |
| Тип метки диска: dos |
| Идентификатор диска: 0x244b7fbe |
| Устр-во Загрузочный Start Конец Секторы Size Id Тип |
| hive-0.5-12-20171211.img1 2048 43007 40960 20M e W95 FAT16 (LBA) |
| hive-0.5-12-20171211.img2 * 43008 14690303 14647296 7G 83 Linux |
| Второй шаг, найти отступ в байтах до нужного раздела. Для этого стартовое значение сектора умножаем на размер сектора: |
| hive-0.5-12-20171211.img2 * 43008 14690303 14647296 7G 83 Linux |
| 43008 * 512 = 22020096 |
| Шаг третий, монтирование образа: |
| sudo mount -o loop,offset=22020096 hive-0.5-12-20171211.img /mnt/tmp |
| Шаг четвертый, проверка: |
| ➜ tmp pwd |
| /mnt/tmp |
| ➜ tmp ls |
| bin dev hive hive-drivers-pack lib lost+found mnt proc run srv tmp var |
| boot etc hive-config home lib64 media opt root sbin sys usr |
You can’t perform that action at this time.
You signed in with another tab or window. Reload to refresh your session. You signed out in another tab or window. Reload to refresh your session.
Источник
Монтирование iso, nrg, mdf, bin, img образов в Linux
Дата добавления: 21 мая 2010
-Эти команды смотрируют образ имя_образа в каталог /mnt/ (стандартный каталог для примонтированных устройств).
Для просмотра и работы с содержимом можно использовать команду:
cd /mnt && ls
Или зайти в коренная папка -> mnt через графический файловый менеджер. Также в качестве последнего аргумента команды mount можно указать свой путь для монтирования.
Монтируем nrg
Если у вас образ nrg, то рекомендую переконвертировать его в iso и смонтировать способом для iso, либо воспользоваться утилитой AcetoneISO.
Для переконвертирования в iso необходимо установить пакет (должен присутствовать в репозитории) nrg2iso .
После этого можно использовать эту утилиту в терминале:
nrg2iso имя_образа.nrg имя_переконвертированного_образа.iso
AcetoneISO — монтирование практически всех образов через графический интерфейс.
AcetoneISO предоставляет графический интерфейс для монтирования или создания образов.
Для получения программы установите пакет acetoneiso .
Программа проста в работе и не требует пояснений.
С ее помощью можно монтировать ISO BIN NRG MDF IMG.
Gmountiso
Также есть более легковесная утилита gmountiso которая позволяет монтировать iso образы через графический интерфейс.
P.S AcetoneISO на Qt; Gmountiso на GTK.
Автор: Sveolon, дата: 29 мая 2010 , время: 09:23:01 (MSK).
nrg можно смонтировать или сконвертить в iso безо всяких утилит.
mount -t udf,iso9660 -o loop,ro,offset=307200 file.nrg /каталог/монтирования
dd if=[твой .nrg образ] of=[выходной .iso образ] skip=307200 bs=1
Автор: mi, дата: 03 июня 2017 , время: 17:55:15 (MSK).
Чему вы учите людей? Бездумному тупому запоминанию никому непонятных символов?
что значит «-о», что значит «-t» может как-то будете разъяснять что это, что бы люди ронимали что это и зачем?
Источник
Монтирование образов дисков
Содержание
Подключение стандартного ISO-образа
Используя графический интерфейс
Для монтирования образов дисков в Gnome имеется множество графических утилит:
ISOmorphin — программа написанная на языке Python. Для работы необходимо закачать и распаковать архив в любое удобное место, а затем запустить файл isomorphin.py в папке.
Gmount-iso — Маленькая и довольно удобная программка, позволяющая монтировать ISO образы в произвольную папку, а также отмонтировать уже подключённые образы. Добавлена возможность расчета md5 суммы и объема образа. Интерфейс программы прост до безобразия и в пояснениях не нуждается.  Для установки используйте команду:
Данная программа будет доступна в меню: Приложения→Системные→gISOMountUsage.
Furius ISO Mount — автоматически создает точку монтирования в домашней папке пользователя и удаляет ее при размонтировании, позволяет записывать образы в форматах ISO и IMG. А так же рассчитывать контрольные суммы Md5 и SHA1. 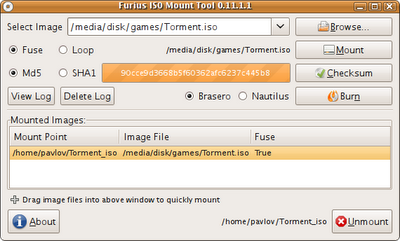
AcetoneISO — графическое приложение, написанное на Qt, для работы с образами CD/DVD дисков (клон Daemon Tools для Linux с новыми возможностями). На сайте заявлены следующие возможности:
Источник
Thread: How to mount .img file
Thread Tools
Display
![]()
How to mount .img file
Hey, after searching online I can’t seem to find anything on .img files.
I can mount .iso fine because I use a GUI, haha, but I don’t know how to mount .img files. is there a GUI for that or some simple command? (Only simple commands because really, I don’t like to use the terminal if I can help it!) 
![]()
Re: How to mount .img file
If I’m not mistaken, Acetoneiso can mount (or convert) .img files:
It will need some dependencies which won’t get resolved automatically (at least not last time i checked), andwhich I don’t quite remember. If you do dpkg -i the deb file it will tell you the dependencies (which you can then install from the repos).
You’ll probably neven need any image mounting software afther this.
![]()
Re: How to mount .img file
You can mount it if it was TAO:
(12:25:08 PM) sabdfl: if Linux is just another way to run Windows apps, we can’t win
(12:25:13 PM) sabdfl: OS/2 tried that
![]()
Re: How to mount .img file
If I’m not mistaken, Acetoneiso can mount (or convert) .img files:
It will need some dependencies which won’t get resolved automatically (at least not last time i checked), andwhich I don’t quite remember. If you do dpkg -i the deb file it will tell you the dependencies (which you can then install from the repos).
You’ll probably neven need any image mounting software afther this.
Hey thanks! This works great!
The dependencies installed automatically, so was no hassle! I had fun playing the game I wanted to mount. hehe!
Thanks for all the suggestions.
Источник


