Mount img file windows
Обработка (распаковка и сборка) прошивок и образов (*.img, *.bin) строго под WINDOWS
Эта тема создана для продолжения обсуждения и помощи в обработке различных образов под Windows, начало было положено в другой теме, но автор негативно воспринял обсуждения, не касающиеся его средства, предложил обсуждать в личке или завести другую тему. Я категорически против общения по личке, поскольку много народу не увидит обсуждаемой информации, которая может оказаться очень полезной, и не сможет внести свою лепту в обсуждение. Поэтому пришел к решению создать эту тему. В ней хочу предложить свои утилиты для распаковки образов формата EXT2\EXT3\EXT4\SPARSE\YAFFS2, свой вариант кухни для распаковки\запаковки полных прошивок под Rockchip, MTK (в виде файлов *.img или архивов *.tar(rar)) и содержащихся внутри прошивок отдельных образов типа system, kernel, recovery, boot. Это то что уже сделано и работает, в ближайших планах подружить распаковщик с образами *.SIN (формат для Sony Xperia)
Обновлено: 30.07.2014 пересобранная make_ext4fs — утилита для сборки образов в формате EXT4 и SPARSE EXT4 (добавлен способ сборки system через ‘таскание мышкой’)
AndImgTool (Android Image Tool) — утилита для распаковки и обратной сборки загрузочных образов типа BOOT и RECOVERY для ARM-платформы, неважно какой проц устройства (рокчип, медиатек и т.д. и т.п.), важно какого стандарта придерживался производитель! На данный момент поддерживаются следующие форматы: Android Boot Image (так же и с оберткой MTK внутренних блоков кернела и рамдиска и с новым блоком DTB), KRNL Image, UBOOT Image (форматы паковки: none, LZMA, GZIP), распаковка\запаковка полных прошивок для RockChip (RKFW\RKAF)
Подробнее про утилиту, список протестированных устройств , инструкция, скрины и логи тут.
AndImgTool версия 1.3.0 Обновлено: 30.12.2014 релиз и подробности тут
— Добавлена поддержка распаковки\запаковки x86 загрузочных образов (функционал перенесен из утилиты xImgTool)
AndImgTool версия 1.2.3  AndImgTool_1_2_3.rar ( 196,69 КБ )
Обновлено: 13.11.2014 — обновление функционала, подробности тут
Пробуйте и отписывайтесь о результатах, если все удачно распаковалось и собралось в рабочий вариант напишите производителя и модель устройства (добавлю в список проверенных устройств), если утилита не справилась с образом, то ко всему вышеперечисленному в своем сообщении прикрепите этот проблемный образ (вряд ли они будут больше 20 мегабайт).
ImgExtractor — основная утилита для распаковки образов файловых систем типа system, userdata, cache, secro (расширение может быть любое, например img или ext4).
Поддерживаются следующие форматы файловых систем: EXT2\EXT3\EXT4\YAFFS2\CRAMFS, форматы структуры образов (обертки) SPARSE\SIN( 1, 2 и 3 версии)\MOTO, поддерживается конвертация образа файловой системы формата EXT4 из обертки SIN или SPARSE непосредственно в EXT4, реализован вывод информации о суперблоке для образов файловых систем, дальше будет развиваться именно эта утилита.
ImgExtractor версия 1.3.7 Обновлено: 13.02.2015 релиз и подробности тут
— добавлена поддержка распаковки образов SPARSE-Marvell для MOTO
— исправлено падение утилиты при распаковке образов содержащих файлы с символами «?»
— добавлена идентификация формата UBIFS и обертки MOTO внутри SPARSE формата
— добавлена конвертация образов из EXT3\EXT4 в SPARSE с разбиением на файлы меньшего размера


xImgTool — утилита для распаковки\запаковки загрузочных образов (IMG, BIN) и контейнеров (INB, SZB, QSB ) для устройств на базе x86 Android Platform (Lenovo K900, Ramos i9, Asus ZenFone 4,5,6, ZTE Geek)
xImgTool версия 1.3.32xImgTool_1_3_32.rar ( 40,86 КБ )
ОБНОВЛЕНО: 06.11.2014
— поддержка нового размера блока bootstub
— сохранение новых атрибутов в блоке размеров
— при распаковке контейнера QSB части, участвующие при объединении в один файл, сохраняются в отдельной папке в оригинальном виде (особенно касается образов system и userdata)
В связи с тем, что основной функционал кухни перешел в единую утилиту AndImgTool, не требующую для своей работы никаких дополнительных CYGWIN DLL, настоятельно рекомендую использовать для работы с загрузочными образами именно AndImgTool (для образов файловых систем есть единая утилита ImgExtractor), поскольку пересборок кухни больше не планируется.
Мой вариант кухни для распаковки целиковых прошивок под Rockchip, MTK и их содержимого. Изначально делал эту модификацию под себя — для удобства вытаскивания файлов system из разных прошивок, оригинальная версия тут.
17.05.2014 ОБНОВЛЕНО Пересобранная версия genext2fs для малого размера оперативной памяти
24.02.2014 ОБНОВЛЕНО
— Обновлена утилита ImgExtractor (текущая версия 1.3.4), использующаяся для распаковки system.img в форматах EXT2\EXT3\EXT4\SPARSE\YAFFS2\CRAMFS
— Обновлена CYGWIN-утилита genext2fs, использующаяся при сборке образов в формате EXT2\EXT3\EXT4 ( основное исправление — старая версия не позволяла собирать образы больше 671087616 байт подробнее тут), так же добавил еще несколько изменений, про которые отпишусь тут.
— Добавлена утилита CYGWIN-утилита sparse2img для конвертации SPARSE образов в обычные IMG, собрана на основе simg2img, но основное отличие от оригинала — возможность «наката» SPARSE на уже сущестующий образ IMG, это актуально при конвертации образов system от MOTO G, которые разбиты на несколько частей. Подробнее тут.
— Добавлено логирование сборки образа EXT3\EXT4 (для активного проекта создается файл log.txt)
— Добавлены скрипты (BAT-файлы в папке RKwinToolsMod_v2_8\Scripts\): ConvertMotoG.bat — для облегчения конвертации system от MOTO G и CreateFSimage.bat — для облегчения сборки любого образа в EXT3\EXT4 (ранее был выложен тут)
RKwinToolsMod версия 2.8 RKwinToolsMod_v2_8.rar ( 6,43 МБ )
RKwinToolsMod версия 2.7 RKwinToolsMod_v2_7.rar ( 6,38 МБ )
13.02.2014 ОБНОВЛЕНО
— Обновлена утилита ImgExtractor (текущая версия 1.3.1), использующаяся для распаковки system.img в форматах EXT2\EXT3\EXT4\SPARSE\YAFFS2\CRAMFS
— Исправлена проблема с правами (владельцем и группами) при сборке образов в формате YAFFS2 ( про обнаруженные проблемы и их решение можно прочитать тут и тут)
RKwinToolsMod версия 2.6 RKwinToolsMod_v2_6.rar ( 6,38 МБ )
Блог бородатого сисадмина
Компьютеры, железо и программное обеспечение, а также интересности и всякие разности
среда, 5 декабря 2012 г.
Монтирование образов дисков в Windows
Сам процесс монтирования подразумевает подключение устройства или файла-архива с определенной файловой системой.
Например: Сделанный нами образ CD\DVD диска и сохраненный на жестком диске, хранится как файл, файл — внутри которого есть своя файловая система и те же файлы которые находились на физическом диске. При записи образа на физический CD\DVD происходит воспроизведение файловой системы и структуры файлов и каталогов такой же как и на оригинальном CD\DVD.
К таким образам могут относится следующие форматы:
- Формат образа CD\DVD дисков — ISO, BIN, MDF, NRG, UIF, DMG
- Формат образа Floppy дискет — IMG, IMA, FLP
- Формат образа HDD жестких дисков — VHD, VMDK, Qcow2
Это далеко не полный перечень всех существующих форматов образов, но пожалуй это самые используемые.
Иногда появляется необходимость достать что нибудь из файла-образа или просмотреть его структуру, конечно с этой задачей может справится и архиватор, например тот же IZArc (см. предыдущую статью об архиваторе IZArc). Но что делать, если стоит задача чтобы операционная система обратилась на прямую к данному файлу-архиву как устройству? Правильно, проэмулировать это устройство (привод, жесткий диск, флоппи дисковод, usb-устройство), а за тем подключить образ, чтоб он был виден операционной системе как настоящий носитель информации.
Всем отлично известны такие программы как например Alcohol 120%, Daemon Tools и т.д. Это конечно хороший выход, но как правило такие программы не позволяют обрабатывать образы жестких дисков или образы съемных носителей.
Для этого замечательно подойдет бесплатная программа-драйвер под названием «ImDisk Virtual Disk Driver».
Системные требования программы Windows NT 3.51/NT 4.0/2000/XP/Server 2003/Vista/Server 2008, both 32-bit и 64-bit
После установки в контекстном меню мышки при правом щелчке на любом образе появится пункт «Mount as ImDisk Virtual Disk» — что в переводе означает смонтировать как виртуальный диск:

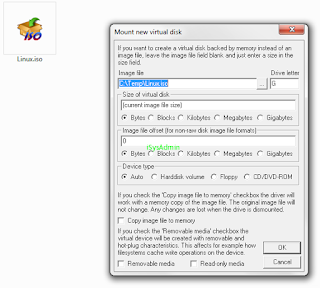
— Drive Letter (Устройство после) — т.е. как его увидим после монтирования, например это может быть диск E, D, F и т.д. Еще такие виртуальные устройства с монтированным диском называют «Точка монтирования» или «Mount Point».
— Size of virtual disk (Размер виртуального диска) — можем указать размер нашего виртуального диска.
— Image file offset — (Смещение файла образа) — позволяет указать размер файла самого образа.
— Device type — тип устройства: CD-DVD, Floppy, Hard Disk. Вообще не припоминается случая в котором программа не смогла бы в режиме Auto определить формат образа, и с настройками по умолчанию открыть то что нужно.
— Copy image file to a memory — копировать файл образ в оперативную память.
— Removable media (Съемное устройство) — эмуляция USB-устройства.
— Read-only media (Только чтение) — если внутри образа произошли изменения, образ не будет перезаписан.
Для того чтобы вернуть все как было до монтирования, достаточно на виртуальном (монтированном) диске при щелчке правой кнопкой выбрать пункт «Unmount ImDisk Virtual Disk» (Размонтирование виртуального диска):

И есть еще очень полезная функция в данной программе — создание образов физических дисков.
На физическом устройстве правой клавишей, выбрать пункт «Save disk content as image file» (Сохранить содержимое диска как файл образ):


ImDisk так же поддерживает работу из командной строки CMD, что актуально при использовании утилиты в MS Windows Server Core
Синтаксис параметров и команд консоли CMD, man на английском, но думаю тем кто пользуется командной строкой он и не нужен:
Control program for the ImDisk Virtual Disk Driver.
For copyrights and credits, type imdisk —version
imdisk -a -t type -m mountpoint [-n] [-o opt1[,opt2 . ]] [-f|-F file]
[-s size] [-b offset] [-v partition] [-S sectorsize] [-u unit]
[-x sectors/track] [-y tracks/cylinder] [-p «format-parameters»]
imdisk -d|-D [-u unit | -m mountpoint]
imdisk -l [-u unit | -m mountpoint]
imdisk -e [-s size] [-o opt1[,opt2 . ]] [-u unit | -m mountpoint]
-a Attach a virtual disk. This will configure and attach a virtual disk
with the parameters specified and attach it to the system.
-d Detach a virtual disk from the system and release all resources.
Use -D to force removal even if the device is in use.
-e Edit an existing virtual disk.
Along with the -s parameter extends the size of an existing virtual
disk. Note that even if the disk can be extended successfully, the
existing filesystem on it can only be extended to fill the new size
without re-formatting if you are running Windows 2000 or later and the
current filesystem is NTFS.
Along with the -o parameter changes media characteristics for an
existing virtual disk. Options that can be changed on existing virtual
disks are those specifying wether or not the media of the virtual disk
should be writable and/or removable.
-t type
Select the backingstore for the virtual disk.
vm Storage for this type of virtual disk is allocated from virtual memory
in the system process. If a file is specified with -f that file is
is loaded into the memory allocated for the disk image.
file A file specified with -f file becomes the backingstore for this
virtual disk.
proxy The actual backingstore for this type of virtual disk is controlled by
an ImDisk storage server accessed by the driver on this machine by
sending storage I/O request through a named pipe specified with -f.
-f file or -F file
Filename to use as backingstore for the file type virtual disk, to
initialize a vm type virtual disk or name of a named pipe for I/O
client/server communication for proxy type virtual disks. For proxy
type virtual disks «file» may be a COM port or a remote server
address if the -o options includes «ip» or «comm».
Instead of using -f to specify ‘DOS-style’ paths, such as
C:\dir\image.bin or \\server\share\image.bin, you can use -F to
specify ‘NT-style’ native paths, such as
\Device\Harddisk0\Partition1\image.bin. This makes it possible to
specify files on disks or communication devices that currently have no
drive letters assigned.
-l List configured devices. If given with -u or -m, display details about
that particular device.
-n When printing ImDisk device names, print only the unit number without
the \Device\ImDisk prefix.
-s size
Size of the virtual disk. Size is number of bytes unless suffixed with
a b, k, m, g, t, K, M, G or T which denotes number of 512-byte blocks,
thousand bytes, million bytes, billion bytes, trillion bytes,
kilobytes, megabytes, gigabytes and terabytes respectively. The suffix
can also be % to indicate percentage of free physical memory which
could be useful when creating vm type virtual disks. It is optional to
specify a size unless the file to use for a file type virtual disk does
not already exist or when a vm type virtual disk is created without
specifying an initialization image file using the -f or -F. If size is
specified when creating a file type virtual disk, the size of the file
used as backingstore for the virtual disk is adjusted to the new size
specified with this size option.
The size can be a negative value to indicate the size of free physical
memory minus this size. If you e.g. type -400M the size of the virtual
disk will be the amount of free physical memory minus 400 MB.
-b offset
Specifies an offset in an image file where the virtual disk begins. All
offsets of I/O operations on the virtual disk will be relative to this
offset. This parameter is particularily useful when mounting a specific
partition in an image file that contains an image of a complete hard
disk, not just one partition. This parameter has no effect when
creating a blank vm type virtual disk. When creating a vm type virtual
disk with a pre-load image file specified with -f or -F paramters, the
-b parameter specifies an offset in the image file where the image to
be loaded into the vm type virtual disk begins.
Specify auto as offset to automatically select offset for a few known
non-raw disk image file formats. Currently auto-selection is supported
for Nero .nrg and Microsoft .sdi image files.
-v partition
Specifies which partition to mount when mounting a raw hard disk image
file containing a master boot record and partitions.
Specify number 1-4 to mount a partition from the primary partition
table and 5-8 to mount a partition from an extended partition table.
-S sectorsize
Sectorsize to use for the virtual disk device. Default value is 512
bytes except for CD-ROM/DVD-ROM style devices where 2048 bytes is used
by default.
-x sectors/track
See the description of the -y option below.
-y tracks/cylinder
The -x and -y options can be used to specify a synthetic geometry.
This is useful for constructing bootable images for later download to
physical devices. Default values depends on the device-type specified
with the -o option. If the ‘fd’ option is specified the default values
are based on the virtual disk size, e.g. a 1440K image gets 2
tracks/cylinder and 18 sectors/track.
-p «format-parameters»
If -p is specified the ‘format’ command is invoked to create a
filesystem when the new virtual disk has been created.
«format-parameters» must be a parameter string enclosed within
double-quotes. The string is added to the command line that starts
‘format’. You usually specify something like «/fs:ntfs /q /y», that
is, create an NTFS filesystem with quick formatting and without user
interaction.
-o option
Set or reset options.
ro Creates a read-only virtual disk. For vm type virtual disks, this
option can only be used if the -f option is also specified.
rw Specifies that the virtual disk should be read/writable. This is the
default setting. It can be used with the -e parameter to set an
existing read-only virtual disk writable.
rem Specifies that the device should be created with removable media
characteristics. This changes the device properties returned by the
driver to the system. For example, this changes how some filesystems
cache write operations.
fix Specifies that the media characteristics of the virtual disk should be
fixed media, as opposed to removable media specified with the rem
option. Fixed media is the default setting. The fix option can be used
with the -e parameter to set an existing removable virtual disk as
fixed.
saved Clears the ‘image modified’ flag from an existing virtual disk. This
flag is set by the driver when an image is modified and is displayed
in the -l output for a virtual disk. The ‘saved’ option is only valid
with the -e parameter.
Note that virtual floppy or CD/DVD-ROM drives are always read-only and
removable devices and that cannot be changed.
cd Creates a virtual CD-ROM/DVD-ROM. This is the default if the file
name specified with the -f option ends with either .iso, .nrg or .bin
extensions.
fd Creates a virtual floppy disk. This is the default if the size of the
virtual disk is any of 160K, 180K, 320K, 360K, 640K, 720K, 820K, 1200K,
1440K, 1680K, 1722K, 2880K, 123264K or 234752K.
hd Creates a virtual fixed disk partition. This is the default unless
file extension or size match the criterias for defaulting to the cd or
fd options.
ip Can only be used with proxy-type virtual disks. With this option, the
user-mode service component is initialized to connect to an ImDisk
storage server using TCP/IP. With this option, the -f switch specifies
the remote host optionally followed by a colon and a port number to
connect to.
comm Can only be used with proxy-type virtual disks. With this option, the
user-mode service component is initialized to connect to an ImDisk
storage server through a COM port. With this option, the -f switch
specifies the COM port to connect to, optionally followed by a colon,
a space, and then a device settings string with the same syntax as the
MODE command.
-u unit
Along with -a, request a specific unit number for the ImDisk device
instead of automatic allocation. Along with -d or -l specifies the
unit number of the virtual disk to remove or query.
-m mountpoint
Specifies a drive letter or mount point for the new virtual disk, the
virtual disk to query or the virtual disk to remove. When creating a
new virtual disk you can specify #: as mountpoint in which case the
first unused drive letter is automatically used.


