- How to mount an ISO image/file under Linux
- How to Mount ISO File on Linux
- More about loop devices on Linux
- Procedure to mount ISO file/images under Linux
- How do I unmount the ISO image on Linux?
- How to mount an ISO file using a GUI app on Linux
- How to install furiusisomount app
- Mounting ISO Files using Linux Gnome or KDE GUI
- Conclusion
- Mounting an ISO Image in Linux
- Create a Mount Point for ISO Image
- Mount an ISO File in Linux
- Verify that ISO File is Mounted
- Unmount an ISO File in Linux
- Монтирование образов дисков
- Содержание
- Подключение стандартного ISO-образа
- Используя графический интерфейс
- Ubuntu Documentation
- Introduction
- Graphical Interface
- From the Command Line (Normal Superuser Mount)
- From the Command Line (As a Regular User)
- Manipulating Other Formats
- See Also
How to mount an ISO image/file under Linux
H ow do you mount ISO file on Linux using the CLI and GUI app? First, try to understand an ISO image. It is an archive file (disk image) of an optical disc using a conventional ISO (International Organization for Standardization) format. ISO image files typically have a file extension of .ISO. The name “ISO” comes from the ISO 9660 file system used with CD-ROM or DVD media, but an ISO image can also contain UDF file system because UDF is backward-compatible to ISO 9660. You can mount an ISO file or images via the loop device under Linux. It is possible to specify transfer functions (for encryption/decryption or other purposes) using loop device. This page explains how to mount ISO files on Linux.
How to Mount ISO File on Linux
- Create the mount point directory on Linux: sudo mkdir /mnt/iso
- Mount the ISO file on Linux: sudo mount -o loop /path/to/my-iso-image.iso /mnt/iso
- Verify it, run: mount OR df -H OR ls -l /mnt/iso/
- Unmount the ISO file using: sudo umount /mnt/iso/
More about loop devices on Linux
The loop device is a block device that maps its data blocks not to a physical device such as a hard disk or optical disk drive, but to the blocks of a regular file in a filesystem or to another block device. This can be useful for example to provide a block device for a filesystem image stored in a file, so that it can be mounted with the mount command.
A loop device is a pseudo-device that makes a file accessible as a block device. Loop devices are often used for CD ISO images and floppy disc images. Mounting a file containing a filesystem via such a loop mount makes the files within that filesystem accessible. They appear in the mount point directory using following Linux commands. So, how do you mount an ISO image file under Linux? You need to use the mount commandas follows:
Let us see all commands and examples in details.
Procedure to mount ISO file/images under Linux
First, you must login as a root user, if not root user then switch to root user using the su command:
$ su —
One can use the sudo command:
$ sudo -i
Next, create the directory i.e. mount point using the mkdir command, run:
# mkdir -p /mnt/disk
Finally, use the mount command as follows to mount iso file called disk1.iso:
# mount -o loop disk1.iso /mnt/disk
OR
# mount -o loop /path/to/disk1.iso /mnt/disk
Verify it with the df command or mount command:
# df -H
# mount
# ls -l /mnt/disk/
Change directory to list files stored inside an ISO image:
# cd /mnt/disk/
# ls -l
To copy files using the cp command:
$ cp file1 file2 /home/vivek/Downloads
Mounting ISO files on Linux using mount command
How do I unmount the ISO image on Linux?
Use the following command to unmount the ISO file/image on Linux:
$ sudo umount /mnt/disk/
OR
$ sudo umount /path/to/disk1.iso
Verify it:
$ df -H
$ mount
$ ls -l /mnt/disk/
How to mount an ISO file using a GUI app on Linux
Not a fan of the CLI? Try image management utility called furiusisomount:
Furius ISO Mount is a simple application for mounting ISO, IMG, BIN, MDF and NG image files even without burning them to disk. It provides the following features:
1. Automatically Mounts ISO, IMG, BIN, MDF and NRG image files.
2. Creates a mount point in your home directory.
3. Unmounts the Image files and mnd more.
How to install furiusisomount app
Type the following apt-get command/apt command on a Debian/Ubuntu/Mint Linux:
$ sudo apt install furiusisomount
Start furiusisomount:
$ furiusisomount &
Sample outputs:
Mount an ISO file on Linux using Furius ISO Mount GUI app
Just select an ISO image an click on the mount button. Open your file browser:
- No ads and tracking
- In-depth guides for developers and sysadmins at Opensourceflare✨
- Join my Patreon to support independent content creators and start reading latest guides:
- How to set up Redis sentinel cluster on Ubuntu or Debian Linux
- How To Set Up SSH Keys With YubiKey as two-factor authentication (U2F/FIDO2)
- How to set up Mariadb Galera cluster on Ubuntu or Debian Linux
- A podman tutorial for beginners – part I (run Linux containers without Docker and in daemonless mode)
- How to protect Linux against rogue USB devices using USBGuard
Join Patreon ➔
View mounted iso image in Ubuntu Linux file manager
Mounting ISO Files using Linux Gnome or KDE GUI
Conclusion
You learned how to use the mount, unmount command and GUI apps for mounting the ISO9660 images or files. For more information see:
| Category | List of Unix and Linux commands |
|---|---|
| Documentation | help • mandb • man • pinfo |
| Disk space analyzers | df • duf • ncdu • pydf |
| File Management | cat • cp • less • mkdir • more • tree |
| Firewall | Alpine Awall • CentOS 8 • OpenSUSE • RHEL 8 • Ubuntu 16.04 • Ubuntu 18.04 • Ubuntu 20.04 |
| Linux Desktop Apps | Skype • Spotify • VLC 3 |
| Modern utilities | bat • exa |
| Network Utilities | NetHogs • dig • host • ip • nmap |
| OpenVPN | CentOS 7 • CentOS 8 • Debian 10 • Debian 8/9 • Ubuntu 18.04 • Ubuntu 20.04 |
| Package Manager | apk • apt |
| Processes Management | bg • chroot • cron • disown • fg • glances • gtop • jobs • killall • kill • pidof • pstree • pwdx • time • vtop |
| Searching | ag • grep • whereis • which |
| Shell builtins | compgen • echo • printf |
| Text processing | cut • rev |
| User Information | groups • id • lastcomm • last • lid/libuser-lid • logname • members • users • whoami • who • w |
| WireGuard VPN | Alpine • CentOS 8 • Debian 10 • Firewall • Ubuntu 20.04 |
Comments on this entry are closed.
Cheers, worked like a charm 🙂
Quick comment:
You need the kernel module loop for it; people that get the error about it in mount should get the latest copy of the linux source and proceed to compile the correct module which is under block devices
Other than that it works 😉
Just what i needed, mahalo!
Thanks! This was very very easy to find and follow. I’m new to linux and this is the reason I made the swicth, the help that everyone give make learning linux easy and fun. Thank you for your time, thank you!
sweet! worked cleanly, no stupid paid software for windows needed to do such a simple task!
Looks like we cant mount it for RW. Bloody well then.
You’d have to finalize the RW disc so that it becomes an iso image. You can still erase the disc later.
I think he means mounting the iso file for reading and writing.
This tip was a great help! I only need to read the iso for installations so thanks a heap!
richard, to edit bootable ISO mount it as it’s described here, copy it’s contents to some directory, edit files you need and generate new ISO by command:
sudo mkisofs -o /tmp/new.iso -b isolinux/isolinux.bin -c isolinux/boot.cat -no-emul-boot -boot-load-size 4 -boot-info-table -J -R -V “new iso name” .
Works like a charm. It kept me from Burning a DVD for a computer that didn’t read DVDs. I did a Net Install of Linux over FTP. I copied the File to a Linux FTP Server, mounted the ISO and did an install. Sweet.
But what if I don’t have root? Or am too lazy to su or sudo?
Источник
Mounting an ISO Image in Linux
You can easily access an ISO image of a CD or DVD (e.g. RHEL DVD) from the command line in Linux.
To access an ISO disc image, you have to create a mount point (empty folder that will be used as a root filesystem) and mount an ISO file to it.
In this article, i’ll show how to Mount and Unmount an ISO file from the Linux Command Line (CentOS, RHEL, Fedora, Ubuntu, Debian, Mint etc.).
To mount an ISO image in Linux, you must be a root or use sudo.
Create a Mount Point for ISO Image
A mount point – is a directory (typically an empty folder) from which the content of an ISO disc image will be accessible.
Create a mount point:
Mount an ISO File in Linux
Mount an ISO file /home/user/disk.iso to the mount point /mnt/mount_point :
After ISO disk is mounted, you will receive the following message: ‘mount: warning: /mnt/mount_point seems to be mounted read-only‘.
You can ignore it, because according to the ISO 9660 standard, ISO images are always mounted in read-only mode.
Verify that ISO File is Mounted
List mounted devices to verify that ISO image has successfully been mounted:
Below you should see a line like the following:
Now you can access the mount point and list the files stored on the ISO disk image:
Unmount an ISO File in Linux
Use the following command to unmount an ISO disc image:
Источник
Монтирование образов дисков
Содержание
Подключение стандартного ISO-образа
Используя графический интерфейс
Для монтирования образов дисков в Gnome имеется множество графических утилит:
ISOmorphin — программа написанная на языке Python. Для работы необходимо закачать и распаковать архив в любое удобное место, а затем запустить файл isomorphin.py в папке.
Gmount-iso — Маленькая и довольно удобная программка, позволяющая монтировать ISO образы в произвольную папку, а также отмонтировать уже подключённые образы. Добавлена возможность расчета md5 суммы и объема образа. Интерфейс программы прост до безобразия и в пояснениях не нуждается.  Для установки используйте команду:
Данная программа будет доступна в меню: Приложения→Системные→gISOMountUsage.
Furius ISO Mount — автоматически создает точку монтирования в домашней папке пользователя и удаляет ее при размонтировании, позволяет записывать образы в форматах ISO и IMG. А так же рассчитывать контрольные суммы Md5 и SHA1. 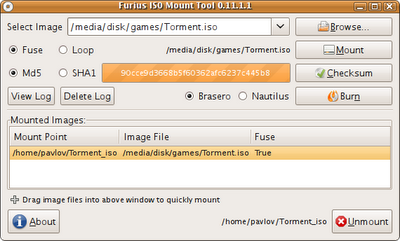
AcetoneISO — графическое приложение, написанное на Qt, для работы с образами CD/DVD дисков (клон Daemon Tools для Linux с новыми возможностями). На сайте заявлены следующие возможности:
Источник
Ubuntu Documentation
Introduction
For an introductory explanation of ISO images, instructions for creating and also burning them see IsoImage.
The mounting of images is a very useful operation. It can allow a user to easily access data on an ISO without the need to burn and waste a disc. It also is much faster when dealing with the need to manage many images at once. These operations can be performed from a graphical user interface (GUI) or from a standard Terminal.
Graphical Interface
gISOMount is a graphical utility for mounting and managing ISO images with the added ability to calculate md5sums and read volume information.
To get gISOMount ensure Universe section of the Ubuntu repositories is enabled in your Software Sources. Then to install this software in Ubuntu, install the following package: gisomount.
The program can then be launched from Applications -> System Tools -> gISOMountUsage.
Usage is straightforward, simply browse to an ISO image on your hard drive and then either mount, calculate the md5 for comparison with a reference, or burn it to a disc. Additionally, once an image is select, the program can read off volume information in the pane. A favourites functionality allows commonly used images to be pulled up quickly.
From the Command Line (Normal Superuser Mount)
The default mount point for Ubuntu is under /media. It is recommended a user create subdirectories to this folder for mounting to keep things organized. There is no physical limitation preventing mounting to any other directory on a drive.
To Mount
To mount the image to a directory is a simple two step procedure. Sudo is required because we are working in directories owned by root. First make a directory with a name that identifies the contents of the ISO, usually its name.
Then mount the file with the following command to the newly created directory. In the following example, it is assumed that NameOfISO.iso is in the users working directory, if not replace with the absolute path to the file.
To mount the image so that it can be written to, use the following mount command instead:
To Unmount
Umounting media is simply the reverse. First unmount the image, then remove the directory it was mounted to. Unmounting is universal, it doesn’t matter what image was mounted it can be unmounted this way.
From the Command Line (As a Regular User)
The fuseiso program, along with the FUSE package, allows you to mount an ISO image as a regular user. You still need administrator rights to set it up, but you don’t need to enter your password every time you use it.
First you must install the fuseiso package (install fuseiso now):
See FuseIso for a more detailed explanation of fuseiso. This also describes how to configure the permissions on fuseiso. To make the permissions permanent, you must add your userid to the fuse group, and add fuse to the /etc/modules file (both these actions require sudo access, but this is a one-off).
To Mount
When you use FUSE (via fuseiso in this case) to mount a filesystem, the logged in user must have write access to the directory on which the filesystem is to be mounted. For instance, you could create a new, empty directory in your home directory.
To Unmount
Manipulating Other Formats
See Also
cdemu is a kernel module for mounting Cue/Bin files directly. To install it you would have to setup linux headers, compile the module and modprobe it in. This is out of the scope of this page. There is a script under development in the Ubuntu forums for automating the building of cdemuLocated Here (Use this at your own risk.)
«Mount and Unmount ISO images without burning them» has a nice step-by-step explanation (with screen shots) showing how to mount and unmount ISO images.
MountIso (последним исправлял пользователь bobjohnbowles 2012-11-12 22:05:40)
The material on this wiki is available under a free license, see Copyright / License for details
You can contribute to this wiki, see Wiki Guide for details
Источник


