- Access Linux filesystems in Windows and WSL 2
- Getting started
- Accessing these files with File Explorer
- Limitations
- Give us your feedback!
- Начало работы с подключением диска Linux в WSL 2 (Предварительная версия) Get started mounting a Linux disk in WSL 2 (preview)
- Подключение несекционированного диска Mounting an unpartitioned disk
- Указание диска Identify the disk
- Подключение диска Mount the disk
- Подключение секционированного диска Mounting a partitioned disk
- Указание диска Identify the disk
- Список и выбор секций для подключения в WSL 2 List and select the partitions to mount in WSL 2
- Определение типа файловой системы Identifying the filesystem type
- Подключить выбранные секции Mount the selected partitions
- Доступ к содержимому диска Access the disk content
- Отключение диска. Unmount the disk
- Подключение виртуального жесткого диска в WSL Mount a VHD in WSL
- Справочник по командной строке Command line reference
- Подключение определенной файловой системы Mounting a specific filesystem
- Подключение определенного раздела Mounting a specific partition
- Указание параметров подключения Specifying mount options
- Подключение диска без подключения Attaching the disk without mounting it
- Отсоединение диска Detaching a disk
- Ограничения Limitations
- Get started mounting a Linux disk in WSL 2 (preview)
- Prerequisites
- Mounting an unpartitioned disk
- Identify the disk
- Mount the disk
- Mounting a partitioned disk
- Identify the disk
- List and select the partitions to mount in WSL 2
- Identifying the filesystem type
- Mount the selected partitions
- Access the disk content
- Unmount the disk
- Mount a VHD in WSL
- Command line reference
- Mounting a specific filesystem
- Mounting a specific partition
- Specifying mount options
- Attaching the disk without mounting it
- Detaching a disk
- Limitations
Access Linux filesystems in Windows and WSL 2
September 10th, 2020
Starting with Windows Insiders preview build 20211, WSL 2 will be offering a new feature: wsl —mount . This new parameter allows a physical disk to be attached and mounted inside WSL 2, which enables you to access filesystems that aren’t natively supported by Windows (such as ext4).
So, if you’re dual booting with Windows & Linux using different disks, you can now access your Linux files from Windows!
Getting started
To mount a disk, open a PowerShell window with administrator privileges and run:
To list the available disks in Windows, run:
To unmount and detach the disk from WSL 2, run
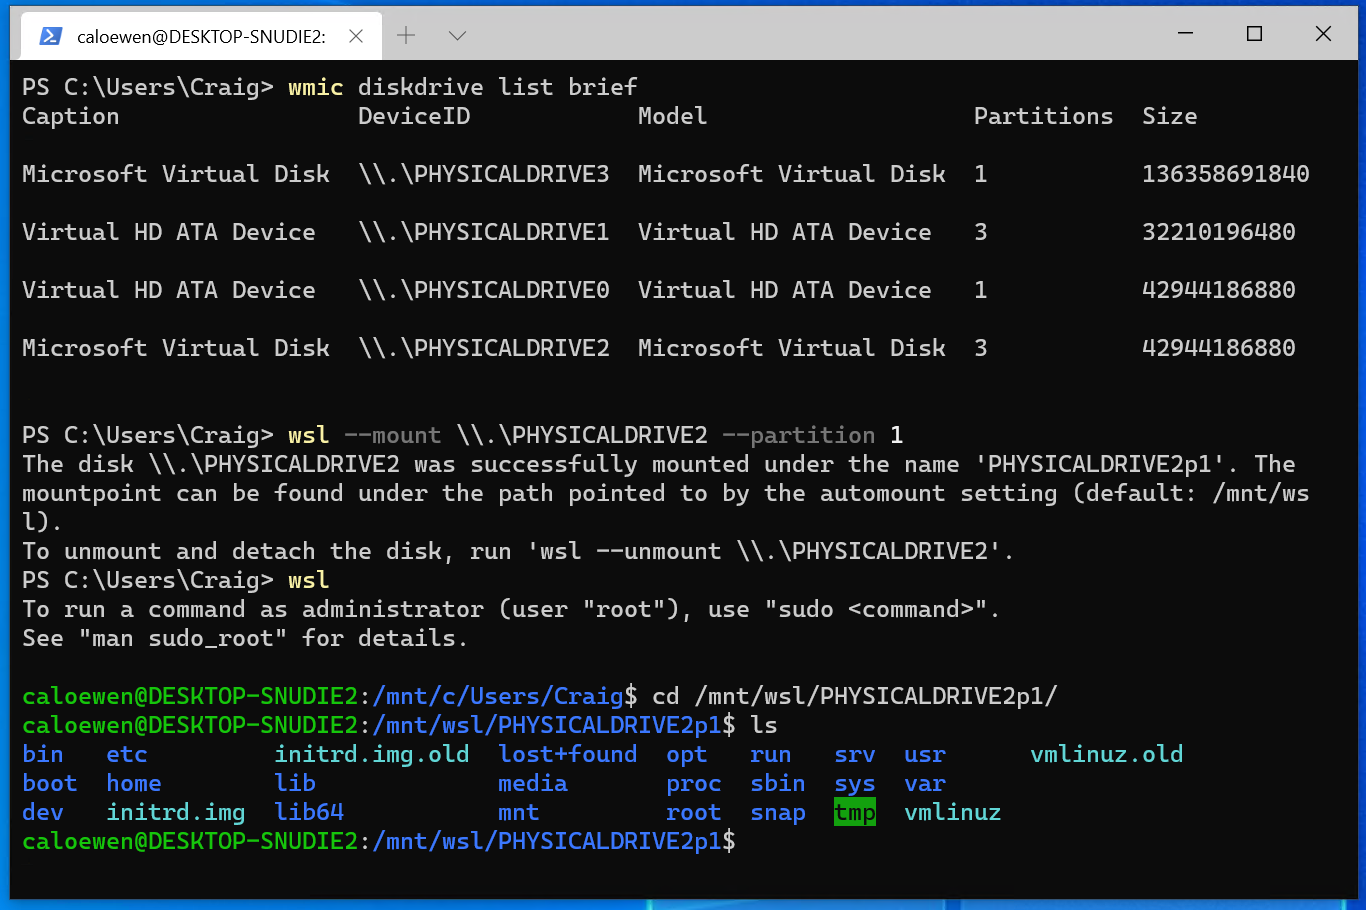
The disks paths are available under the ‘DeviceID’ columns. Usually under the \\.\\\.\PHYSICALDRIVE* format. Below is an example of mounting a specific partition of a given hard disk into WSL and browsing its files.
Accessing these files with File Explorer
Once mounted, it’s also possible to access these disks through the Windows explorer by navigating to \wsl$ and then to the mount folder.
Limitations
By default, wsl —mount attempts to mount the disk as ext4. To specify a filesystem, or for more advanced scenarios, check out Mount a disk in WSL 2.
Also please note that this feature comes with the limitation that only physical disks can be attached to WSL 2. At this time, it’s not possible to attach a single partition. More details on the limitations here.
Give us your feedback!
If you run into any issues, or have feedback for our team please file an issue on our Github , and if you have general questions about WSL you can find all of our team members that are on Twitter on this twitter list.
Начало работы с подключением диска Linux в WSL 2 (Предварительная версия) Get started mounting a Linux disk in WSL 2 (preview)
Если вы хотите получить доступ к формату диска Linux, который не поддерживается Windows, можно использовать WSL 2 для подключения диска и доступа к его содержимому. If you want to access a Linux disk format that isn’t supported by Windows, you can use WSL 2 to mount your disk and access its content.
В этом учебнике рассматриваются шаги по определению диска и раздела для подключения к WSL2, их подключению и доступу. This tutorial will cover the steps to identify the disk and partition to attach to WSL2, how to mount them, and how to access them.
Чтобы получить доступ к этой функции, необходимо использовать Windows 10 Build 20211 или более поздней версии. You will need to be on Windows 10 Build 20211 or higher to access this feature. Вы можете присоединиться к программе «предварительные оценки Windows » для получения последних предварительных сборок. You can join the Windows Insiders Program to get the latest preview builds. Для подключения диска к WSL 2 требуется административный доступ. Administrator access is required to attach a disk to WSL 2.
Подключение несекционированного диска Mounting an unpartitioned disk
В этом простом случае, если у вас есть диск, на котором нет разделов, его можно подключить напрямую с помощью wsl —mount команды. In this simplest case, if you have a disk that doesn’t have any partitions, you can mount it directly using the wsl —mount command. Сначала необходимо опознать диск. First you need to identify the disk.
Указание диска Identify the disk
Чтобы получить список доступных дисков в Windows, выполните команду: To list the available disks in Windows, run:
Пути к дискам доступны в столбцах «DeviceID». The disks paths are available under the ‘DeviceID’ columns. Обычно под \\.\PHYSICALDRIVE* форматом. Usually under the \\.\PHYSICALDRIVE* format.
Подключение диска Mount the disk
Затем в PowerShell можно подключить диск, используя обнаруженный выше путь к диску. Then in Powershell you can mount the disk using the Disk path discovered above.

Подключение секционированного диска Mounting a partitioned disk
Если у вас есть диск, в котором нет уверенности в том, в каком формате находится файл, или какие разделы он содержит, можно выполнить следующие действия, чтобы подключить его. If you have a disk that you aren’t sure what file format it is in, or what partitions it has, you can follow the steps below to mount it.
Указание диска Identify the disk
Чтобы получить список доступных дисков в Windows, выполните команду: To list the available disks in Windows, run:
Пути к дискам доступны в столбцах «DeviceID». The disks paths are available under the ‘DeviceID’ columns. Обычно под \\.\PHYSICALDRIVE* форматом Usually under the \\.\PHYSICALDRIVE* format
Список и выбор секций для подключения в WSL 2 List and select the partitions to mount in WSL 2
После идентификации диска выполните: Once the disk is identified, run:
Это сделает диск доступным в WSL 2. This will make the disk available in WSL 2.
После подключения раздел можно вывести в список, выполнив следующую команду в WSL 2: Once attached, the partition can be listed by running the following command inside WSL 2:
Будут отображены доступные блочные устройства и их разделы. This will display the available block devices and their partitions.
В Linux блочное устройство определяется как /dev/
. Inside Linux, a block device is identified as /dev/
. Например,/dev/sdb3 — это раздел номер 3 диска sdb . For example, /dev/sdb3, is the partition number 3 of disk sdb .
Выходные данные примера: Example output:
Определение типа файловой системы Identifying the filesystem type
Если вы не знакомы с типом файловой системы диска или раздела, можно использовать следующую команду: If you don’t know the type of filesystem of a disk or partition, you can use this command:
Будет выведен обнаруженный тип файловой системы (в TYPE=» » формате). This will output the detected filesystem type (under the TYPE=» » format).
Подключить выбранные секции Mount the selected partitions
Определив разделы, которые необходимо подключить, выполните следующую команду в каждом разделе: Once you have identified the partitions you want to mount, run this command on each partition:
Если вы хотите подключить весь диск как один том (т. е. Если диск не секционируется), —partition можно опустить. If you wish to mount the entire disk as a single volume (i.e. if the disk isn’t partitioned), —partition can be omitted.
Если этот параметр опущен, то типом файловой системы по умолчанию будет «ext4». If omitted, the default filesystem type is «ext4».
Доступ к содержимому диска Access the disk content
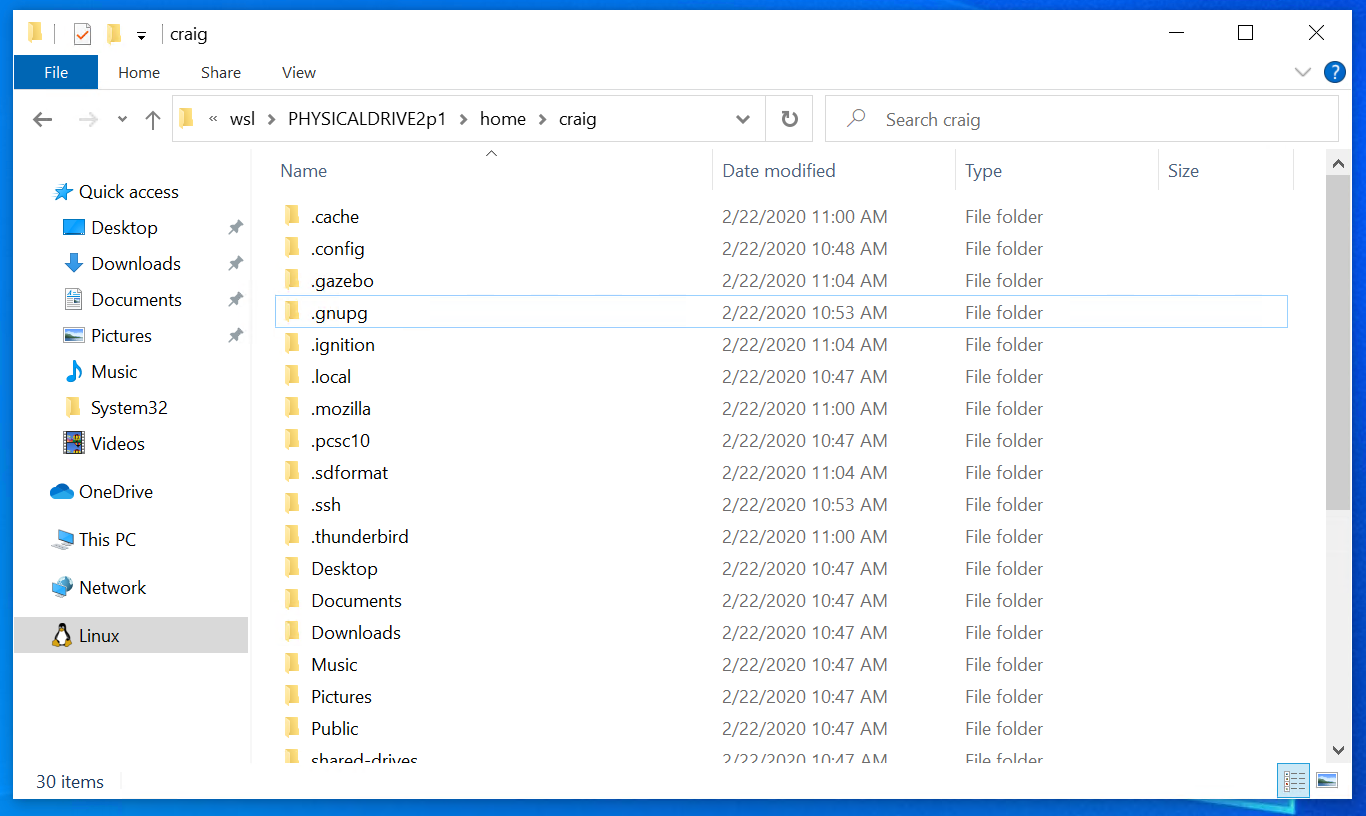
После подключения доступ к диску можно получить по пути, на который указывает значение конфигурации: automount.root . Once mounted, the disk can be accessed under the path pointed to by the config value: automount.root . Значение по умолчанию — /mnt/wsl . The default value is /mnt/wsl .
В Windows доступ к диску можно получить из проводника, перейдя к: \\wsl$\\ \\ (выберите любой дистрибутив Linux). From Windows, the disk can be accessed from File Explorer by navigating to: \\wsl$\\ \\ (pick any Linux distribution).
Отключение диска. Unmount the disk
Если необходимо отключить диск от WSL 2 и отсоединить его от него, выполните команду: If you want to unmount and detach the disk from WSL 2, run:
Подключение виртуального жесткого диска в WSL Mount a VHD in WSL
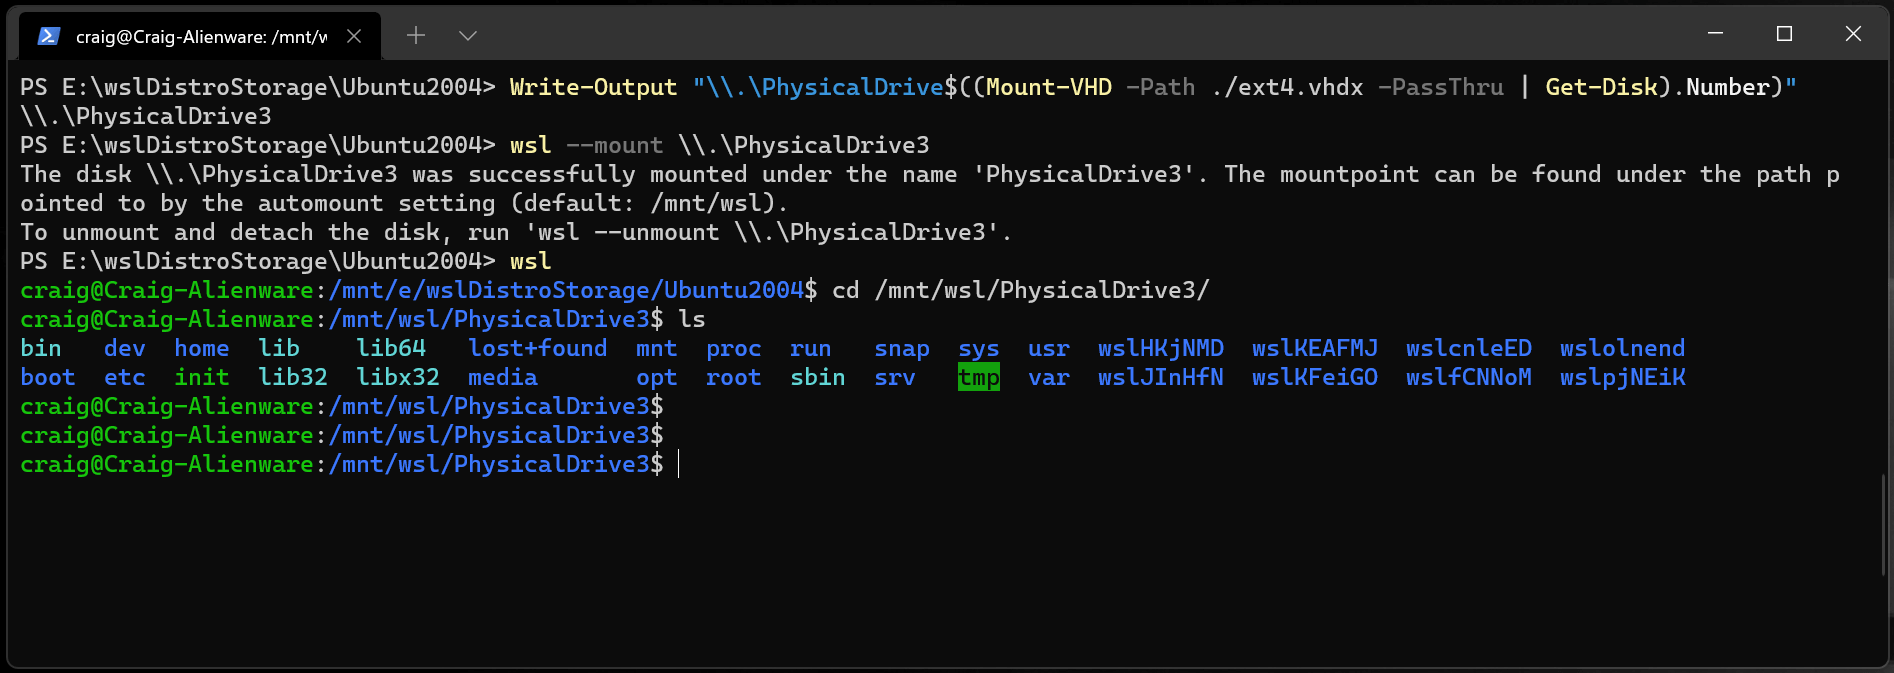
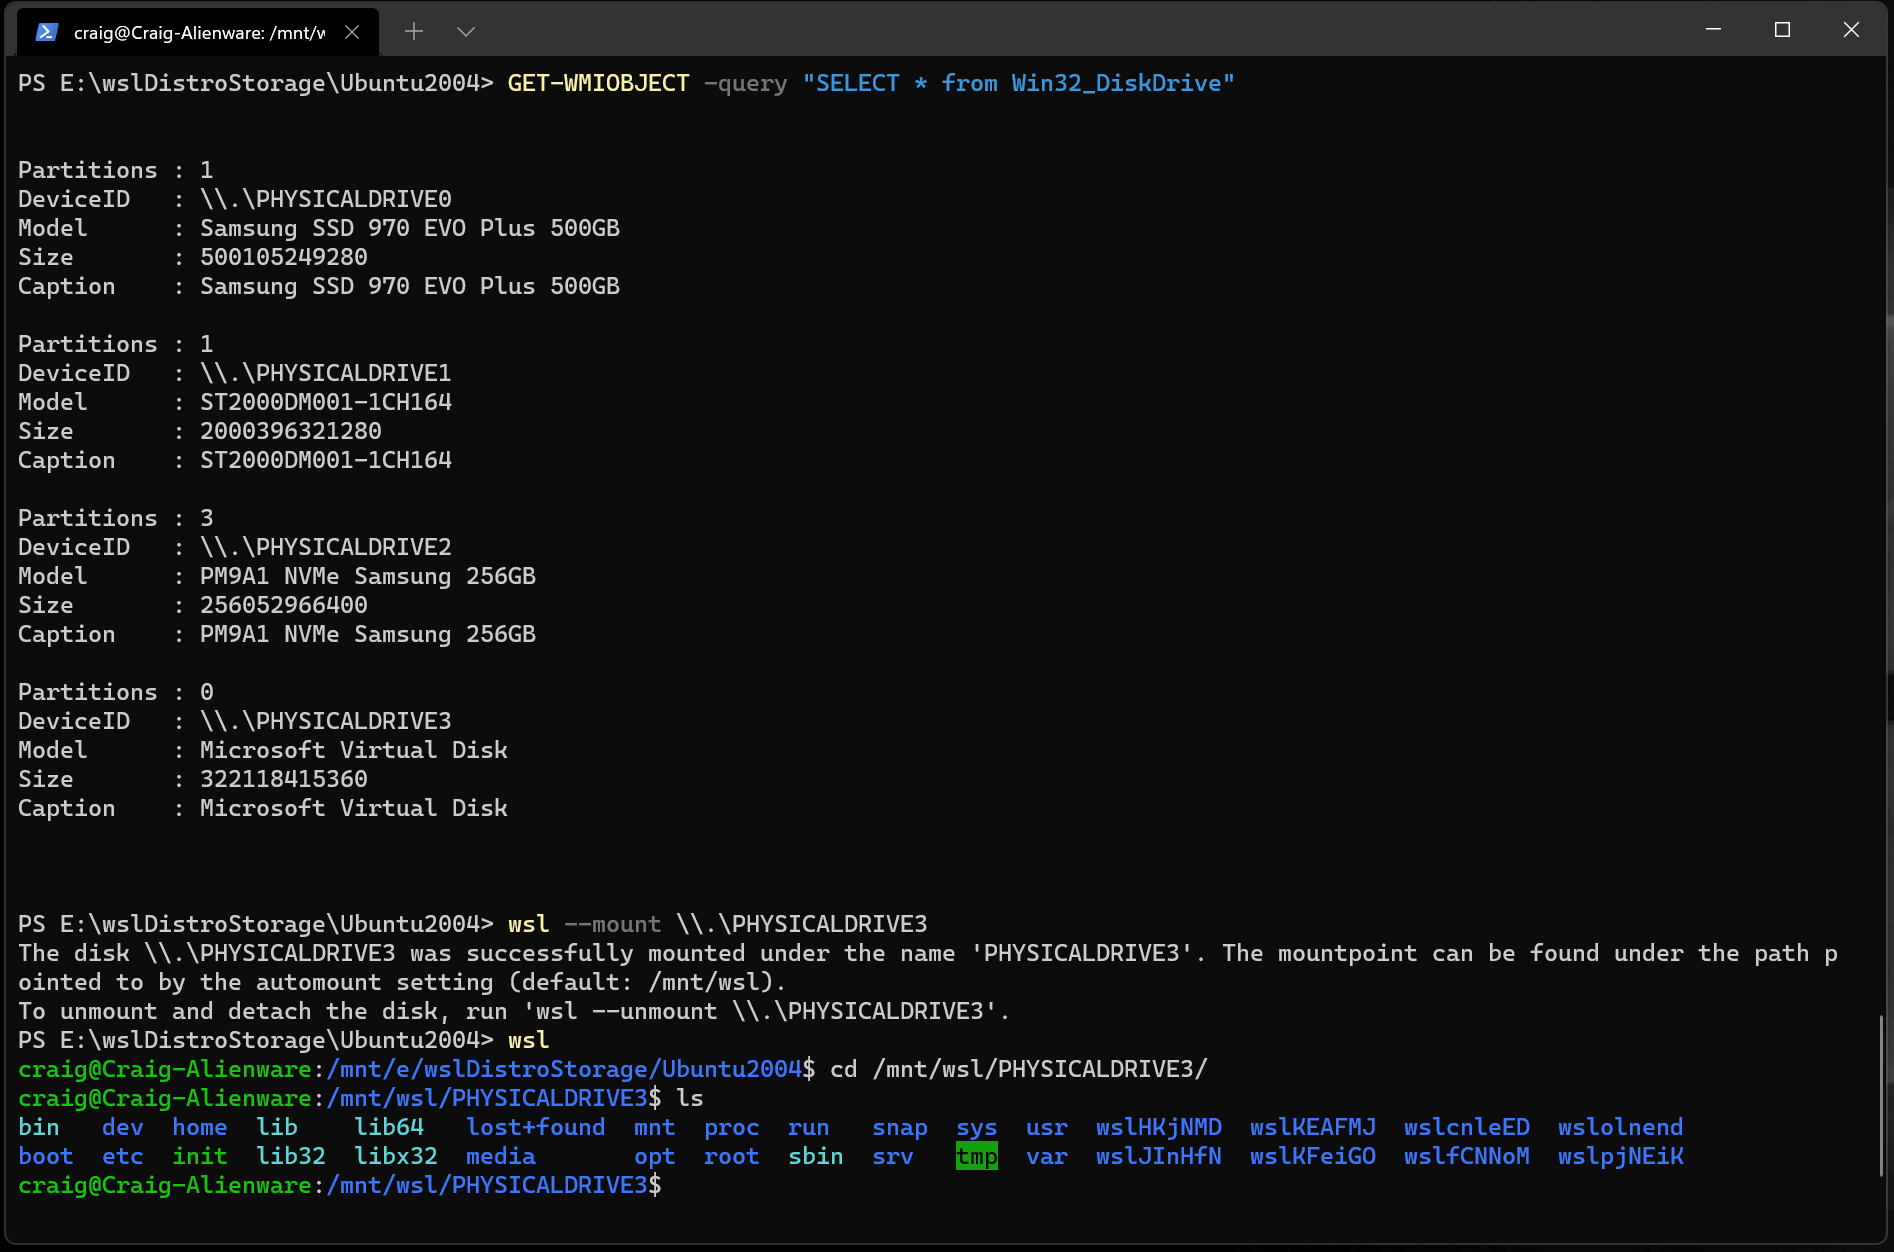
Вы также можете подключить файлы виртуального жесткого диска (VHD) к WSL с помощью wsl —mount . You can also mount virtual hard disk files (VHD) into WSL using wsl —mount . Для этого сначала необходимо подключить виртуальный жесткий диск к Windows с помощью Mount-VHD команды в Windows. To do this, you first need to mount the VHD into Windows using the Mount-VHD command in Windows. Не забудьте выполнить эту команду с правами администратора. Be sure to run this command with administrator privileges. Ниже приведен пример, в котором мы используем эту команду, а также выводится путь к диску. Below is an example where we use this command, and also output the disk path. Обязательно замените
фактический путь VHD. Be sure to replace
with your actual VHD path.
Вы можете использовать приведенные выше выходные данные, чтобы получить путь к диску для этого виртуального жесткого диска и подключить его к WSL, следуя инструкциям из предыдущего раздела. You can use the output above to obtain the disk path for this VHD and mount that into WSL following the instructions in the previous section.
Эту методику также можно использовать для подключения и взаимодействия с виртуальными жесткими дисками других WSL дистрибутивов, так как каждый WSL 2 дистрибутив хранится с помощью файла виртуального жесткого диска с именем: ext4.vhdx . You can also use this technique to mount and interact with the virtual hard disks of other WSL distros, as each WSL 2 distro is stored via a virtual hard disk file called: ext4.vhdx . По умолчанию виртуальные жесткие диски для WSL 2 дистрибутивов хранятся по этому пути: C:\Users\[user]\AppData\Local\Packages\[distro]\LocalState\[distroPackageName] , будьте внимательны при доступе к этим системным файлам, это рабочий процесс Power User. By default the VHDs for WSL 2 distros are stored in this path: C:\Users\[user]\AppData\Local\Packages\[distro]\LocalState\[distroPackageName] , please exercise caution accessing these system files, this is a power user workflow. wsl —shutdown Прежде чем использовать этот диск, убедитесь, что он не используется. Make sure to run wsl —shutdown before interacting with this disk to ensure the disk is not in use.
Справочник по командной строке Command line reference
Подключение определенной файловой системы Mounting a specific filesystem
По умолчанию WSL 2 будет пытаться подключить устройство как ext4. By default, WSL 2 will attempt to mount the device as ext4. Чтобы указать другую файловую систему, выполните команду: To specify another filesystem, run:
Например, чтобы подключить диск в файловой системе FAT, выполните команду: For example, to mount a disk as fat, run:
Чтобы получить список доступных файловых систем в WSL2, выполните команду: cat /proc/filesystems To list the available filesystems in WSL2, run: cat /proc/filesystems
Подключение определенного раздела Mounting a specific partition
По умолчанию WSL 2 пытается подключить весь диск. By default, WSL 2 attempts to mount the entire disk. Чтобы подключить конкретный раздел, выполните команду: To mount a specific partition, run:
Это работает только в том случае, если диск является основной загрузочной записью (MBR) или GPT (таблица разделов GUID). This only works if the disk is either MBR (Master Boot Record) or GPT (GUID Partition Table). Узнайте о стилях разделов — MBR и GPT. Read about partition styles — MBR and GPT.
Указание параметров подключения Specifying mount options
Чтобы указать параметры подключения, выполните: To specify mount options, run:
В настоящее время поддерживаются только параметры файловой системы. Only filesystem specific options are supported at this time. Универсальные параметры, такие как ro, rw, noatime, . , не поддерживаются. Generic options such as ro, rw, noatime, . are not supported.
Подключение диска без подключения Attaching the disk without mounting it
Если схема диска не поддерживается ни одним из указанных выше параметров, можно подключить диск к WSL 2 без подключения к нему, выполнив: If the disk scheme isn’t supported by any of the above options, you can attach the disk to WSL 2 without mounting it by running:
Это сделает блочное устройство доступным в WSL 2, чтобы его можно было подключить вручную. This will make the block device available inside WSL 2 so it can be mounted manually from there. Используйте lsblk для перечисления доступных блочных устройств в WSL 2. Use lsblk to list the available block devices inside WSL 2.
Отсоединение диска Detaching a disk
Чтобы отсоединить диск от WSL 2, выполните команду: To detach a disk from WSL 2, run:
Если Diskpath параметр не указан, все подключенные диски отключаются и отсоединяются. If Diskpath is omitted, all attached disks are unmounted and detached.
Если не удается отключить один диск, WSL 2 можно принудительно завершить, выполнив команду wsl —shutdown , которая отключит диск. If one disk fails to unmount, WSL 2 can be forced to exit by running wsl —shutdown , which will detach the disk.
Ограничения Limitations
В настоящее время к WSL 2 можно подключить только целые диски. Это означает, что невозможно присоединить только один раздел. At this time, only entire disks can be attached to WSL 2, meaning that it’s not possible to attach only a partition. В частности, это означает, что невозможно использовать wsl —mount для чтения раздела на устройстве загрузки, так как это устройство не может быть отсоединено от Windows. Concretely, this means that it’s not possible to use wsl —mount to read a partition on the boot device, because that device can’t be detached from Windows.
Флэш-накопители USB и SD-карты в настоящее время не поддерживаются и не могут быть подключены к WSL 2. USB flash drives and SD cards are not supported at this time and will fail to attach to WSL 2. Хотя диски USB поддерживаются. USB disks are supported though.
Только системные системы, которые изначально поддерживаются в ядре, могут быть подключены wsl —mount . Only filesystems that are natively supported in the kernel can be mounted by wsl —mount . Это означает, что невозможно использовать установленные драйверы FileSystem (например, NTFS-3G), вызвав wsl —mount . This means that it’s not possible to use installed filesystem drivers (such as ntfs-3g for example) by calling wsl —mount .
Get started mounting a Linux disk in WSL 2 (preview)
If you want to access a Linux disk format that isn’t supported by Windows, you can use WSL 2 to mount your disk and access its content. This tutorial will cover the steps to identify the disk and partition to attach to WSL2, how to mount them, and how to access them.
Administrator access is required to attach a disk to WSL 2. The WSL 2 mount command does not support mounting a disk (or partitions that belong to the disk) that is currently in use. wsl —mount always attaches the entire disk even if only a partition is requested. You can’t mount the Windows installation disk.
Prerequisites
You will need to be on Windows 10 Build 20211 or higher to access this feature. You can join the Windows Insiders Program to get the latest preview builds.
Mounting an unpartitioned disk
In this simplest case, if you have a disk that doesn’t have any partitions, you can mount it directly using the wsl —mount command. First you need to identify the disk.
Identify the disk
To list the available disks in Windows, run:
The disks paths are available under the ‘DeviceID’ columns. Usually under the \\.\PHYSICALDRIVE* format.
Mount the disk
Then in Powershell you can mount the disk using the Disk path discovered above.
Mounting a partitioned disk
If you have a disk that you aren’t sure what file format it is in, or what partitions it has, you can follow the steps below to mount it.
Identify the disk
To list the available disks in Windows, run:
The disks paths are available under the ‘DeviceID’ columns. Usually under the \\.\PHYSICALDRIVE* format
List and select the partitions to mount in WSL 2
Once the disk is identified, run:
This will make the disk available in WSL 2.
Once attached, the partition can be listed by running the following command inside WSL 2:
This will display the available block devices and their partitions.
Inside Linux, a block device is identified as /dev/
. For example, /dev/sdb3, is the partition number 3 of disk sdb .
Identifying the filesystem type
If you don’t know the type of filesystem of a disk or partition, you can use this command:
This will output the detected filesystem type (under the TYPE=» » format).
Mount the selected partitions
Once you have identified the partitions you want to mount, run this command on each partition:
If you wish to mount the entire disk as a single volume (i.e. if the disk isn’t partitioned), —partition can be omitted.
If omitted, the default filesystem type is «ext4».
Access the disk content
Once mounted, the disk can be accessed under the path pointed to by the config value: automount.root . The default value is /mnt/wsl .
From Windows, the disk can be accessed from File Explorer by navigating to: \\wsl$\\ \\ (pick any Linux distribution).
Unmount the disk
If you want to unmount and detach the disk from WSL 2, run:
Mount a VHD in WSL
You can also mount virtual hard disk files (VHD) into WSL using wsl —mount . To do this, you first need to mount the VHD into Windows using the Mount-VHD command in Windows. Be sure to run this command with administrator privileges. Below is an example where we use this command, and also output the disk path. Be sure to replace
with your actual VHD path.
You can use the output above to obtain the disk path for this VHD and mount that into WSL following the instructions in the previous section.
You can also use this technique to mount and interact with the virtual hard disks of other WSL distros, as each WSL 2 distro is stored via a virtual hard disk file called: ext4.vhdx . By default the VHDs for WSL 2 distros are stored in this path: C:\Users\[user]\AppData\Local\Packages\[distro]\LocalState\[distroPackageName] , please exercise caution accessing these system files, this is a power user workflow. Make sure to run wsl —shutdown before interacting with this disk to ensure the disk is not in use.

Command line reference
Mounting a specific filesystem
By default, WSL 2 will attempt to mount the device as ext4. To specify another filesystem, run:
For example, to mount a disk as fat, run:
To list the available filesystems in WSL2, run: cat /proc/filesystems
Mounting a specific partition
By default, WSL 2 attempts to mount the entire disk. To mount a specific partition, run:
This only works if the disk is either MBR (Master Boot Record) or GPT (GUID Partition Table). Read about partition styles — MBR and GPT.
Specifying mount options
To specify mount options, run:
Only filesystem specific options are supported at this time. Generic options such as ro, rw, noatime, . are not supported.
Attaching the disk without mounting it
If the disk scheme isn’t supported by any of the above options, you can attach the disk to WSL 2 without mounting it by running:
This will make the block device available inside WSL 2 so it can be mounted manually from there. Use lsblk to list the available block devices inside WSL 2.
Detaching a disk
To detach a disk from WSL 2, run:
If Diskpath is omitted, all attached disks are unmounted and detached.
If one disk fails to unmount, WSL 2 can be forced to exit by running wsl —shutdown , which will detach the disk.
Limitations
At this time, only entire disks can be attached to WSL 2, meaning that it’s not possible to attach only a partition. Concretely, this means that it’s not possible to use wsl —mount to read a partition on the boot device, because that device can’t be detached from Windows.
USB flash drives and SD cards are not supported at this time and will fail to attach to WSL 2. USB disks are supported though.
Only filesystems that are natively supported in the kernel can be mounted by wsl —mount . This means that it’s not possible to use installed filesystem drivers (such as ntfs-3g for example) by calling wsl —mount .


