- ОС Mac OS X: подключение общих папок с помощью URL-адреса afp:// или команды mount_afp
- Дополнительная информация
- Информация для ОС Mac OS X версий 10.6–10.6.6
- Mounty for NTFS
- Easy: A menu icon
- Light: A simple design
- Get: Click to install
- A bit of background
- Some questions that might come up
- My NTFS disk disappears from Desktop when using Mounty
- My USB stick will not re-mount. An alert is popping up telling me to re-attach the stick, but this doesn’t help.
- Suddenly all my files disappeared — please help!
- Sometimes the files are grayed out and cannot be modified anymore.
- Unable to re-mount in read/write mode when trying to mount Windows 10 partition
- Mounty will not recognize a drive or re-mount read/write even if the drive is NTFS formatted actually
- Version History
- Version 1.12 — 6th of February 2021
- Version 1.11 — 24th of Jan 2021
- Version 1.10 — 29th of Nov 2020, this version is only compatible with macOS 11 Big Sur and up
- Version 1.9 — 21th of Sep 2018, last version compatible with macOS Catalina and earlier
- Version 1.8 — 12th of Sep 2018
- Version 1.7 — 4th of Nov 2017
- Version 1.6 — 2th of June 2017
- Version 1.5 — 26th of May 2017
- Version 1.4 — 25th of May 2017
- Version 1.3 — 29th of January 2017
- Version 1.2 — 9th of November 2015
- Version 1.1 — 27th of July 2014
- Подключить и размонтировать диски из командной строки в Mac OS X
- Отключите диск из командной строки
- Установите привод из командной строки
- Отключить и перезагрузить диск / том в одной команде
ОС Mac OS X: подключение общих папок с помощью URL-адреса afp:// или команды mount_afp
Подключить общий том на сервере AFP можно с помощью URL-адреса типа afp://myserver.mydomain.com/Sharepoint/Folder или команды mount_afp в программе «Терминал».
Если в программе Mail.app или браузере Safari выбрать URL-адрес типа afp://myserver.mydomain.com/Sharepoint/Folder, программа Finder подключит том с именем Sharepoint на сервере AFP myserver.mydomain.com, после чего откроется окно с содержимым каталога Folder. Если перетянуть текст URL-адреса на рабочий стол, создается AFP-ссылка. Чтобы открыть эту папку, дважды щелкните ссылку.
Чтобы подключить общую папку на сервере AFP, используйте команду mount_afp в окне программы «Терминал» или shell-скрипте. Для получения дополнительной информации введите следующую команду в окне программы «Терминал»:
Дополнительная информация
Информация для ОС Mac OS X версий 10.6–10.6.6
Путь для подключения общей папки в ОС Mac OS X версий 10.6–10.6.6 отличается от используемого в других версиях Mac OS X.
URL-адрес, ведущий к файлу на сервере, (например, afp://myserver.mydomain.com/Sharepoint/Folder/File.txt) не сработает. Эта проблема решена в ОС Mac OS X 10.6.7 и более поздних версий.
Если URL-адрес или команда mount_afp в ОС Mac OS X версий 10.6–10.6.6 указывает на папку в точке подключения, такая папка подключается. В ОС Mac OS X версий 10.0–10.5 и Mac OS X 10.6.7 или более поздних (, в том числе ОС OS X Lion), устанавливается соединение с точкой подключения.
Пример: afp://myserver.mydomain.com/Sharepoint/Folder.
При открытии этой ссылки в ОС Mac OS X версий 10.0–10.5, 10.6.7 и более поздних программа Finder подключает том Sharepoint. Локальный путь к общей папке будет /Volumes/Sharepoint/Folder/.
При открытии этой ссылки в ОС Mac OS X версий 10.6–10.6.6 программа Finder подключает подкаталог Folder. Локальный путь к общей папке будет /Volumes/Folder/.
В ОС Mac OS X 10.5, 10.6.7 или более поздних версий с помощью этой команды подключается том Sharepoint в /Volumes/mntpnt. Локальный путь к общей папке будет /Volumes/mntpnt/Folder/.
В ОС Mac OS X версий 10.6–10.6.6 с помощью этой команды подключается подкаталог Folder в /Volumes/mntpnt. Локальный путь к общей папке будет /Volumes/mntpnt/.
Источник
Mounty for NTFS
A tiny tool to re-mount write-protected NTFS volumes under macOS in read-write mode.
Supports macOS from version 10.9 Mavericks till 11 Big Sur. Latest version: 1.12
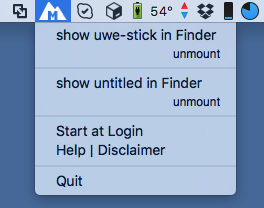
Easy: A menu icon
Start the program and see it in action:
You will be notified if there is any volume connected to the computer which is NTFS formatted and ready to re-mount in read-write mode.
Light: A simple design
Mounty for NTFS comes without any decorations.
No additional driver will be installed. It simply makes use of the build-in mechanisms already provided by macOS — no strings attached.
Get: Click to install
If you prefer Homebrew , you’ll probably know what to do: brew install —cask mounty
From the icon in menu bar you can always bring a finder window to front to manage the contents of the mounted drive.
The colour of menu icon reports the current state:
 — inactive — nothing to mount
- — active — Volume available to re-mount
- — working — Mounty is operating
- — idle — Volume writable mounted
- — error — mount failed
 — inactive — nothing to mount
 — active — Volume available to re-mount
 — working — Mounty is operating
 — idle — Volume writable mounted
 — error — mount failed
A bit of background
Occasionally I need to share files with my colleagues via USB sticks. Since we are working on different platforms the sticks might be NTFS-formatted. No problem so far, there are several resources out to the web describing to accomplish this task, e.g.
I personally have chosen the more pragmatic way, just open a terminal and issue some mount commands like:
However, tired of typing this over and over, I have written Mounty to accomplish exactly this — but in a much more convenient fashion. So, under the hood, it happens an unmount and a remount short after, followed by opening a Finder window pointing to the hidden mount point.
Please let me know if this tool is also useful to you; and do not hesitate to ask a question that might appear using Mounty.
Some questions that might come up
My NTFS disk disappears from Desktop when using Mounty
Unfortunately this is by design.
Mounty is using the Apple kernel driver. It allows read/write mount of NTFS drives only with the «nobrowse» option. The mount point becomes hidden and disappears from Desktop and Finder menu. To make it easier to re-locate the drive I have added the «Show in Finder» option in Mounty menu.
My USB stick will not re-mount. An alert is popping up telling me to re-attach the stick, but this doesn’t help.
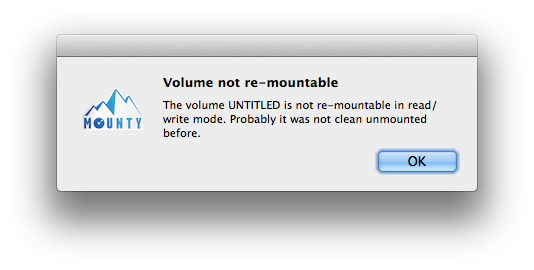
This can happen when the USB stick is not cleanly unmounted from the Windows PC. If you simply unplug the USB stick from PC without using the little tray icon to detach the hardware correctly, the volume will be marked as «not cleanly unmounted». There might be some dirty sectors left and Mac OS X will not be able to re-mount in read-write mode for that reason.
Suddenly all my files disappeared — please help!
This is usually happen when not all files are written properly due to an unmount operation not finishing. The NTFS partition might be marked as «dirty» and the Apple NTFS driver cannot recover from that situation. Mounty will not delete anything by itself, please try to restore your files on a Windows PC using usual recovery s/w, i.e. chkdsk command line utility or professional tools like GetDataBack for Windows. If you do not own any Windows you can use tools for macOS that can deal with NTFS partition maintenance, like Paraogn Harddisk Manager or Tuxera Disk Manager.
Sometimes the files are grayed out and cannot be modified anymore.
This is because the file has extended attributes, refer to the Manpage of xattr for further explanation. If you open the file path in terminal application, you can list the attributes with ls -l@ , and remove those attributes with xattr -d com-apple. , i.e.: xattr -d com.apple.FinderInfo testfile.txt
Unable to re-mount in read/write mode when trying to mount Windows 10 partition
If you try to mount a Windows System partition, Mounty might fail when Hibernation feature is enabled. There is a Fast Start feature in Windows which might be enabled by default, and this is causing the drive to be locked. Within Windows running, you need to run the command powercfg /hibernate off in an admin powershell and restart Windows to disable this feature and remove the lock to enable it for Mounty. Thanks to Art Schultz pointing that out.
Mounty will not recognize a drive or re-mount read/write even if the drive is NTFS formatted actually
We have seen that certain third-party NTFS tools will re-name the volume kind property of an NTFS drive to something other than «ntfs». In this case it might happen that the macOS kernel driver ist not able to re-mount in read/write mode anymore. Thanks to Giovanni for his patience to reveal this issue during a remote debug session 🙂
Version History
Version 1.12 — 6th of February 2021
- when macOS appearance switched between light and dark, the status icon was not updated accordingly, this is fixed now
- the dark appearance icons are dimmed a bit now
- added tolerance to volume kind label if its not exactly written as «ntfs» but contains the «ntfs» string
Version 1.11 — 24th of Jan 2021
- new icons for dark appearance
- compiled as universal binary including both x86_64 and arm64 architectures to run natively on Intel and Apple Silicon
- notifications were not thrown because the authorisation request was missing, this is fixed now
Version 1.10 — 29th of Nov 2020, this version is only compatible with macOS 11 Big Sur and up
- remove deprecations: update of notification framework
- added disclaimer on first startup
Version 1.9 — 21th of Sep 2018, last version compatible with macOS Catalina and earlier
- bug fix for crash when Volume does not contain UUID (e.g. MBR Disk)
- Note: Old devices which does not contain UUID cannot be tracked for auto-mount
- Russian Credits Page added (again, thanks to Anton)
Version 1.8 — 12th of Sep 2018
- Added Russian Localization (thanks to Anton)
- Added feature to automount volumes (without the notification)
- fixed equal volume name bug
Version 1.7 — 4th of Nov 2017
- Localizations updates ane new ones:
- — Portuguese (thanks to Carlos)
— Chinese corrections, thanks to Barry
— new Chinese Traditional, thanks to Barry
— Brazilian (thanks to Bruno)
— Spanish (thanks to Daniel)
— Korean (thanks to Kim Jinbong) - As far as I have tested, this version runs perfectly on Mac OS High Sierra.
Version 1.6 — 2th of June 2017
- Localizations Updates:
- Thanks to the community, bunch of corrections were made to improve the Google translations of
— Chinese (thanks to Gerald and Yang)
— Italian (thanks to Emanuelle and Helmo)
— French (thanks to Dominique)
— new: Dutch (thanks to Ferdi)
Version 1.5 — 26th of May 2017
- Localizations (incomplete and made by Google. If you want to contribute, please download the Localization String File, correct it, and send new version to me).
Version 1.4 — 25th of May 2017
- Compatibility update to fix an issue with macOS 10.12.5
- Added new status: Mounts is operating: The re-mount of larger volumes can take a while. When mounts is working you cannot accidentally issue another action anymore.
Version 1.3 — 29th of January 2017
- Smaller tray icon
- Fixed some possible memory leaks
- Added modal alert when drive has spaces in names: I am using DADiskMountWithArguments API from Disk Arbitration framework and when there are spaces in volume name the remount action will fail with unknown error. If you have an idea how to solve it, please let me know.
Version 1.2 — 9th of November 2015
- Fixed a problem where volumes appears as not re-mountable by mistake intermittently.
Version 1.1 — 27th of July 2014
The Appstore Sandbox restrictions does not allow sandboxed apps to re-mount external volumes. We have rejected Mounty from Mac Appstore for that reason and decided to distribute it for free, without Sandbox capability.
Mounty uses Apple’s Notification Center to issue notification whenever a NTFS volume to re-mount is detected. If you want to re-mount a volume from a notification please change the alert style to «Alert» for Mounty from Notification Center Settings in System Settings application.
Источник
Подключить и размонтировать диски из командной строки в Mac OS X
Отключите диск из командной строки
Давайте сначала рассмотрим размонтирование дисков. Для этого вам понадобится другой том, подключенный или подключенный к Mac в той или иной форме, затем запустите Terminal для запуска (находится в / Applications / Utilities /).
1: Список всех дисков
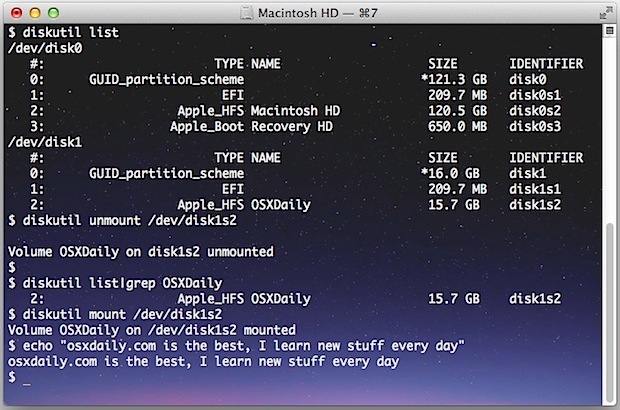
Первое, что вам нужно сделать, это перечислить подключенные диски. Это предоставит список всех дисков, подключенных к Mac, которые монтируются и размонтируются, и все их соответствующие разделы. Мы делаем это, чтобы мы могли получить идентификатор диска, который обычно похож на disk1s2 или disk2s2 и т. Д.
Результат будет выглядеть примерно так:
$ diskutil list
/ DEV / disk0
#: ИДЕНТИФИКАТОР РАЗМЕР ИМЕНИ ТИПА
0: GUID_partition_scheme * 121.3 GB disk0
1: EFI 209,7 МБ disk0s1
2: Apple_HFS Macintosh HD 120.5 GB disk0s2
3: Apple_Boot Recovery HD 650.0 МБ disk0s3
/ DEV / disk1
#: ИДЕНТИФИКАТОР РАЗМЕР ИМЕНИ ТИПА
0: GUID_partition_scheme * 16.0 GB disk1
1: EFI 209,7 МБ disk1s1
2: Apple_HFS OSXDaily 15,7 ГБ disk1s2
Ради этого примера мы сосредоточимся на подключенном диске с именем «OSXDaily», который, как представляется, является внешним флэш-накопителем USB, который отображается последним в списке. Обратите внимание, что идентификатор для этого диска — «disk1s2», и мы перенесем его на следующую последовательность команд для размонтирования и повторной установки.
Вероятно, стоит упомянуть, что диски всегда будут находиться в / dev /, и поэтому / dev / всегда будет прикрепляться к идентификатору.
2: Отключите указанный диск
Все еще используя команду diskutil, мы укажем ее на соответствующий диск, чтобы размонтировать.
diskutil unmount / dev / disk1s2
Это приведет к отмене именованного тома, и местоположение было размонтировано, например:
$ diskutil unmount / dev / disk1s2
Объем OSXDaily на диске1s2 размонтирован
Вот и все. Вы заметите, что диск больше не доступен в Finder, но он все равно будет отображаться через diskutil из командной строки или более привычное приложение Disk Utility в графическом интерфейсе OS X.
Установите привод из командной строки
Если вы можете отключить диск, вы, конечно же, можете установить или перемонтировать его. Последовательность команд очень похожа; найдите громкость, затем смонтируйте диск.
1: найдите привод на гору
Если вы уже знаете, где находится тома, вы можете игнорировать часть 1 и перейти прямо к части 2, но в любом случае давайте обнуляем получение идентификатора тома. На этот раз мы немного сократим его, потому что предположим, что мы знаем имя диска для монтирования, поэтому нам нужно всего лишь найти идентификатор. Мы сделаем это, используя grep, чтобы сократить выход команды diskutil следующим образом:
$ diskutil list | grep OSXDaily
2: Apple_HFS OSXDaily 15,7 ГБ disk1s2
Этот вывод, очевидно, намного короче, чем полный вывод списка diskutil, который мы показали выше.
В этом примере диск «OSXDaily» по-прежнему находится на / dev / disk1s2, и это то, что мы будем монтировать.
2: Установите (или перемонтируйте) привод
Чтобы смонтировать (или перемонтировать) диск, мы будем использовать ту же команду diskutil с новым флагом и вводами:
diskutil mount / dev / disk1s2
Используя те же примеры, что и в других местах, вот что будет выглядеть команда и вывод:
$ diskutil mount / dev / disk1s2
Объем OSXDaily на / dev / disk1s2 установлен
Это, очевидно, снова подключит накопитель, а также снова добавит смонтированный том в OS X Finder и приложениях с графическим интерфейсом в различных диалоговых окнах Open или Save.
Отключить и перезагрузить диск / том в одной команде
Хотите быстро размонтировать и перемонтировать один и тот же объем, в основном, питание, связанное с подключением к Mac? Вы можете сделать это в одной команде, наведя два вместе так:
diskutil unmount / dev / disk1s2; diskutil mount / dev / disk1s2; echo «Remounted Volume»
Это будет выглядеть следующим образом:
$ diskutil unmount / dev / disk1s2; diskutil mount / dev / disk1s2; echo «Remounted Volume»
Объем OSXDaily на диске1s2 размонтирован
Объем OSXDaily на / dev / disk1s2 установлен
Повторный объем
Если вы наблюдали за томом в Finder во время этого процесса, вы бы обнаружили, что он исчезнет ненадолго, а затем снова появится почти сразу. Последняя часть эха является необязательной, но делает все командное действие еще более подробным.
Источник


