- Подключаем NFS шару в Windows Server 2012 R2
- Как подключить NFS каталог в Windows 10
- Установка клиента NFS (службы для NFS)
- Как разрешить запись в NFS каталог анонимному пользователю
- Как подключить NFS каталог в Windows 10
- How to mount a an NFS Share in Windows Server 2019
- Installing the Client for NFS
- Mounting the share
- Mount nfs share from windows
- Asked by:
- Question
- All replies
Подключаем NFS шару в Windows Server 2012 R2
Сегодня мы разберемся, как установить и настроить клиент NFS (Network File System) в Windows Server 2012 R2 / Windows 8. Итак, чтобы подключить каталог (шару) с NFS сервера в Windows Server 2012 R2 / Win 8, нужно, как и в предыдущих версиях Windows, установить отдельный компонент — клиент NFS (Client for NFS). Дополнительно, для возможности управления настройками NFS подключения, можно установить компонент служб NFS (Services for Network File System).
Клиент NFS входит в состав ОС Microsoft, начиная с Windows 7. В Windows 2012 / 8 клиент NFS получил небольшие изменения. Теперь NFS клиент поддерживает аутентификацию по протоколу Krb5p — Kerberos версии 5 (в дополнение к Krb5 и Krb5i, поддержка которых появилась еще в Windows 7), поддерживаются большие NFS пакеты – до 1024KB (в Win 7 максимальный размер пакета 32KB)
Клиент NFS можно установить через GUI или с помощью Powershell. Для установки в графическом режиме, откройте консоль Server Manager и выберите компонент (Features) под названием Client for NFS. 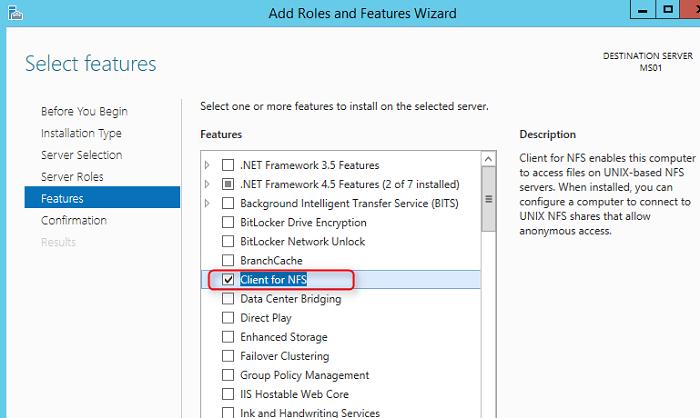
По умолчанию вместе с этим компонентом не устанавливается графическая консоль управления NFS, чтобы исправить это, установим опцию Services for Network File System Management Tools в разделе Remote Server Administration Tools -> Role Administration Tools -> File Services Tools. 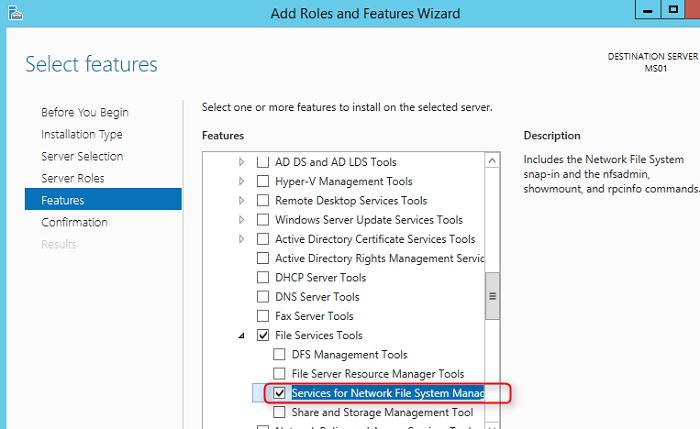
Для установки NFS-клиента в Windows 8 нужно активировать компонент Services for NFS ->Client for NFS, через установку/удаление компонентов (Turn Windows features on or off) в Панели управления (Control Panel -> Programs -> Programs and Features).
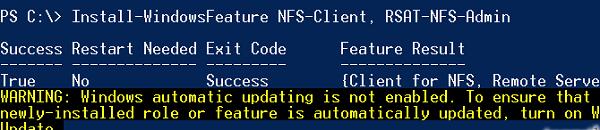
Все перечисленные выше компоненты системы можно установить всего одной командой Powershell:
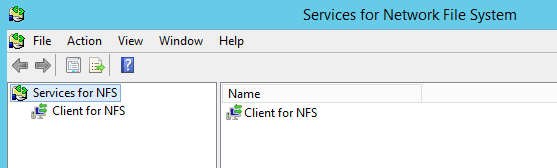
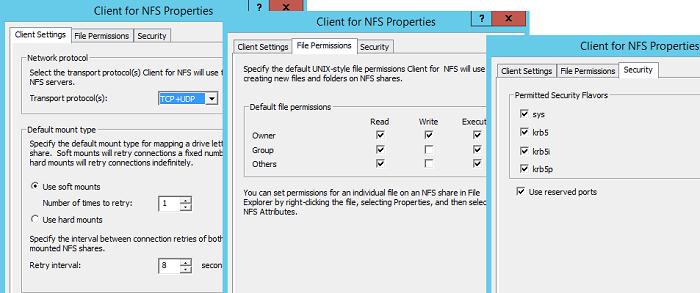
После окончания установки, запустите консоль Services for Network File System Managemen и откройте окно свойств NFS клиента (Client for NFS).
В настройках NFS клиента можно задать:
- Используемый транспортный протокол (Transport protocols) – по умолчанию TCP+UDP
- Тип монтирования NFS шар: hard или soft
- На вкладке File Permissions указываются дефолтные права для создаваемых папок и файлов на NFS шарах
- На вкладке Security указываются протоколы аутентификации, с помощью которых можно аутентифицироваться на NFS сервере
После настройки установки, администраторы смогут смонтировать NFS каталог с помощью команды mount:
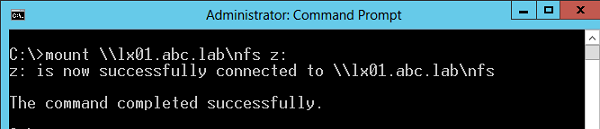
В этом примере мы смонтировали под буквой Z: каталог NFS, расположенный на сервере lx01.abc.lab.
После монтирования, подключенный таким образом каталог на NFS сервере доступен в системе как отдельный диск с буквой Z:\ .
Смонтировать NFS шару можно и с помощью Powershell:
Отключить смонтированный каталог можно так:
Как подключить NFS каталог в Windows 10
В Unix-подобных операционных системах подключить каталога NFS (Network File System) довольно просто, однако если вам понадобится использовать NFS шару в Windows, придется выполнить ряд дополнительных действий. В этой статье мы покажем, как в Windows 10 подключить NFS каталог, который находинся на UNIX системе. Все описанные инструкции будут работать в Windows 10 Pro (версия 10.0.14393 и выше).
Установка клиента NFS (службы для NFS)
В первую очередь в Windows 10 нужно установить клиент NFS. Для установки необходимо выполнить следующие шаги:
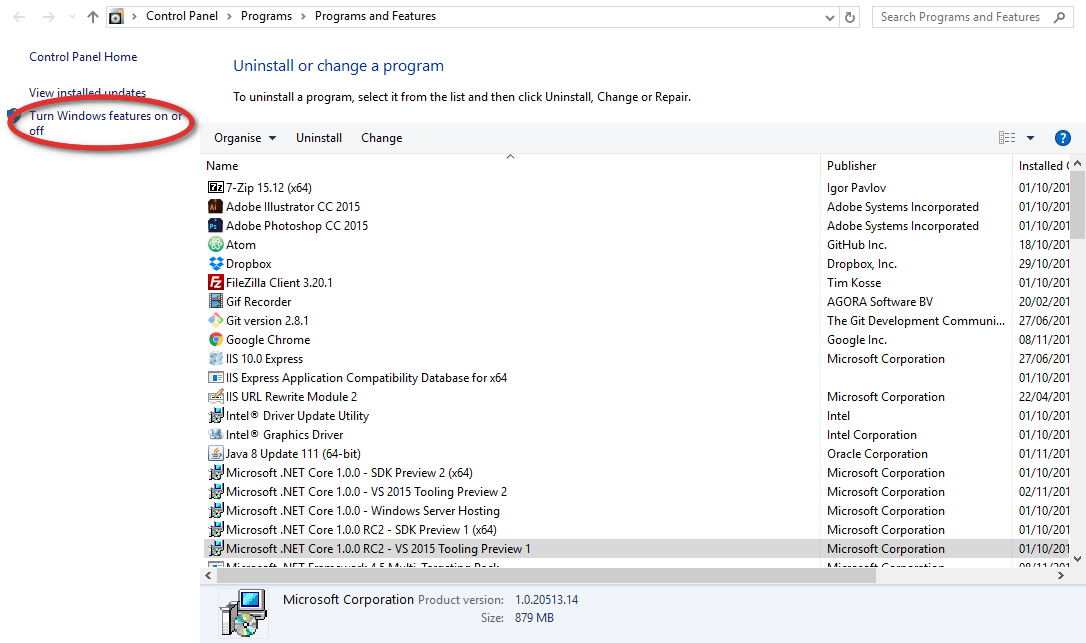
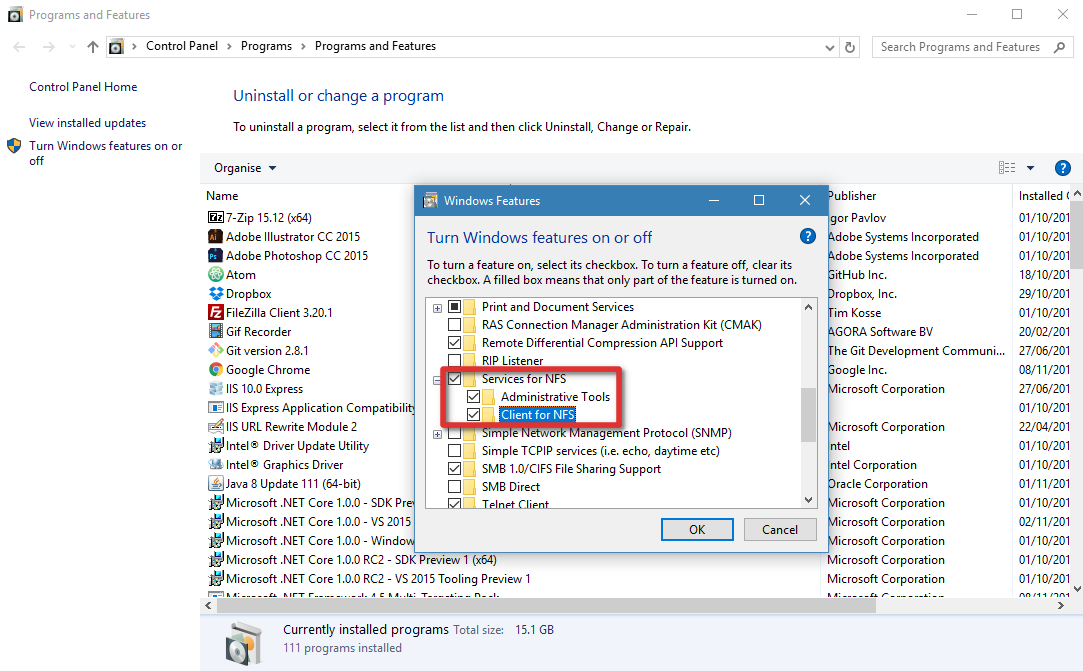
- Откройте раздел «Programs and Features».

- Щелкните по пункту «Turn Windows features on or off».
- В появившемся списке в разделе Services for NFS включите NFS клиента (Client for NFS), а затем нажмите «ОК».
- После установки нажмите кнопку «Close» и вернитесь на рабочий стол.

Как разрешить запись в NFS каталог анонимному пользователю
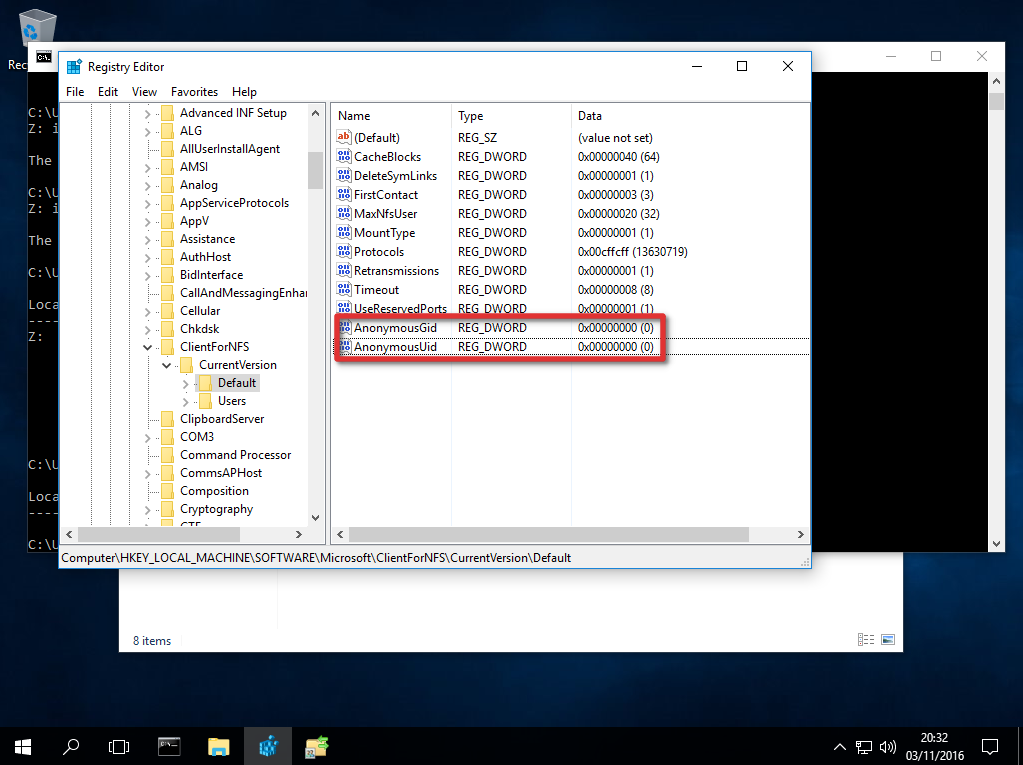
По умолчанию при подключении NFS каталога с UNIX системы, анонимному пользователю (anonymous) предоставляются права только на чтение. Чтобы предоставить анонимным пользователям право записи, необходимо изменить значения UID и GID, которые используются для монтирования NFS каталога в Windows. Пример стандартных настроек представлен на рисунке ниже.
Чтобы изменить значение полей UID и GID, нам потребуется внести изменения в реестр Windows.
- Откройте редактор реестра regedit.
- Перейдите в ветку реестра — HKEY_LOCAL_MACHINE\SOFTWARE\Microsoft\ClientForNFS\CurrentVersion\Default.
- В каталоге «Default» создайте новый параметр типа DWORD (32бит) с именем AnonymousUid и назначьте UID, назначенный на каталог в UNIX, к которому открыт доступ через NFS.
- В ветке Default создайте ещё один параметр DWORD (32-бит) с именем AnonymousGid и назначьте GID, назначенный данному каталогу в UNIX.
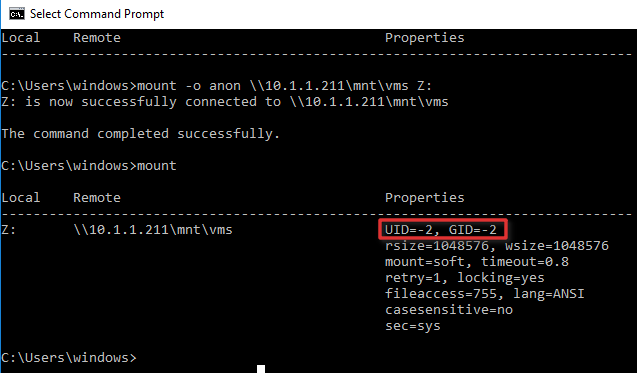
Список подключенных NFS каталогов и параметры монтирования можно вывести с помощью команды Mount без параметров.
Результат работы команды mount теперь должен выглядеть следующим образом:
Local Remote Properties
——————————————————————————-
Z: \\10.1.1.211\mnt\vms UID=0, GID=0
rsize=1078756, wsize=1078756
mount=soft, timeout=1.6
retry=1, locking=yes
fileaccess=755, lang=ANSI
casesensitive=no
sec=sys
Обратите внимание на значение полей UID и GID, которое равно 0. UID=0, GID=0 — означает, что общий ресурс монтируется под пользователем root.
Как подключить NFS каталог в Windows 10
Смонтировать NFS каталог в Windows 10 можно с помощью команды mount. Например, смонтируем NFS каталог и назначим ему букву диска Z:. Предположим, что ваше NAS устройство находится в той же сети, что и ваш компьютер с установленной операционной системы Windows, а IP-адрес устройства — 10.1.1.211. С помощью следующей команды можно смонтировать общий ресурс NFS в /mnt/vms.
Mount –o anon \\10.1.1.211\mnt\vms Z:
Z: is now successfully connected to \\10.1.1.211\mnt\vms
The command completed successfully .
Теперь общий ресурс создан, и мы можем получить доступ к данным. В нашем примере сетевой ресурс (диск) обозначается буквой «Z».
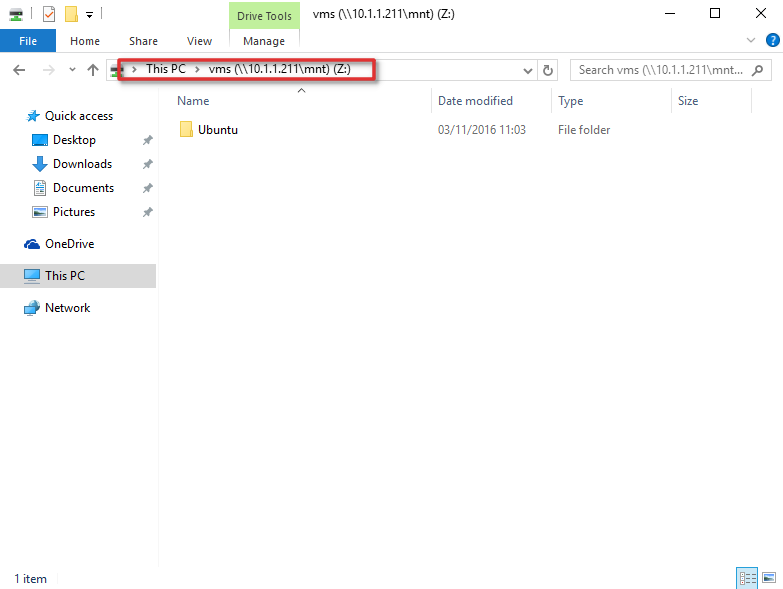
На этом настройка NFS завершена и вы сможете сохранять данные на свое NAS устройство через смонтированный NFS каталог. Обратите внимание, что при в первый раз открытие этого каталога выполняется довольно долго.
How to mount a an NFS Share in Windows Server 2019
I have recently been testing and working through some scenarios where I require the NFS client on a Windows machine to access some NAS shares over the NFS protocol, not much has changed I believe between Windows Server 2016 and Windows Server 2019 but thought it might help some to see how easy it is to get going.
I am picking up at this stage with my fully patched and ready to go Windows Server running 2019. As mentioned previously I want to use this machine to access my NFS share which doesn’t matter what it is or what it is for but this Windows machine is running in Microsoft Azure and I am access Azure NetApp Files over the NFS protocols, Azure NetApp Files can be presented over both NFS and SMB and I will have additional posts about this later.
Installing the Client for NFS
I am pretty sure this could also be achieved through the system manager and selecting the Add Features dialog and working through the wizard approach, I have been purposely doing a lot more of my tasks through PowerShell so that I can re-use and make my tasks quicker, this is something I have picked up from my learnings around Infrastructure as Code. For that reason, I am using PowerShell. I am sure someone else had documented the process through the system manager and UI.
First of all, let’s see what NFS based features we have available to us by running the below command.
Get-WindowsFeature -Name NFS*

As you can see from the image above, we have one feature available to us, “Client for NFS” by installing this it will allow us to mount NFS exports to our Windows machine so we can access the data within.
To install this feature run the following command.
Install-WindowsFeature -Name NFS-Client

That’s it, it’s that simple, hardly not worth mentioning. That’s the NFS Client installed on our machine, next we need to make sure from the NAS server point of view that the IP address of this windows machine can access that data.
As I said before I am using Azure NetApp Files, this export is configured in the following screen when configuring Azure NetApp Files. I will provide a step by step walkthrough of this process after this initial post.

As you can see from the above, I have allowed all clients from all subnets using the export policy (This is the default setting for ANF), my advice is that if this was production you should to create more secure export policies.
Mounting the share
Now we have our NFS Client and we have our export policy from whichever NAS device you are looking to mount onto your Windows, next we actually need to mount the share for use.
Some people will ask now, why you are using NFS when you can use SMB, certain applications, certain environments may require this method and protocol. If this was a traditional Windows environment and this share was going to house predominately user shares and home drives, then absolutely the way to do this would most likely be with the SMB protocol.
Next up is open up a command prompt with Administrator privileges, the mount command is going to be the command you use and then you will be using the NAS IP Address followed by the share name and then which letter you would like to mount this to on your Windows system.
Mount 10.1.1.4:/vZillaANFShare n:

Providing you have the correct configuration, mostly down to the export policy on your NAS device then this process should take seconds. And then by seeing the success message as per above but then checking this now as a mapped network drive as per below.

Quick post hope that it is useful for somebody. This was something I was working on so that I could test Azure NetApp Files without access to Azure Active Directory services (due to corporate policy) this stopped me from being able to use SMB but allowed me to test the functionality via NFS on Windows and Ubuntu.
Justin Parisi did a great blog on this at the start of the year – Windows NFS? WHO DOES THAT.
Mount nfs share from windows
This forum has migrated to Microsoft Q&A. Visit Microsoft Q&A to post new questions.
Asked by:
![]()
Question
![]()
![]()
I’m using windows server 2019 with isilon storage server. Here is my configuration:
- Every unix attribute (uid, gid, etc) in AD is properly filled for users/groups (based on object SID)
- Isilon storage server is connected to Active Directory
- NFS shares are exported from isilon storage server
- Files/folders inside NFS share are chown with uid and gid from linux host
Now when I try to mount NFS share on Windows 10 using command
users are not able to write files/folders inside directories even if they have permission based on posix attributes. So tell me how to mount NFS share on Windows 10 with posix attributes mapped from AD ?
All replies
![]()
![]()
Hello,
Thank you for posting in our TechNet forum.
1.We have the following AD domain environment, is that right?
AD domain controllers
Windows server 2019 with isilon storage server with NFS shares
Linux
Windows 10
2.Are Windows server 2019, Linux host and Windows 10 in the AD domain?
3.Based on «users are not able to write files/folders inside directories even if they have permission based on posix attributes. «, do we mean the AD users are not able to write files/folders inside directories?
4.If it is that AD users are not able to write files/folders inside directories, are they not able to write files/folders inside directories on both Linux host and Windows 10?
Meanwhile, we can refer to the following link to see if it helps.
How to Mount an NFS Share Using a Windows 10 Machine
https://graspingtech.com/mount-nfs-share-windows-10/
Please note: Information posted in the given link is hosted by a third party. Microsoft does not guarantee the accuracy and effectiveness of information.
This «Directory Services» Forum will be migrating to a new home on Microsoft Q&A, please refer to this sticky post for more details.
Best Regards,
Daisy Zhou
Please remember to mark the replies as answers if they help.
If you have feedback for TechNet Subscriber Support, contact tnmff@microsoft.com.
«Directory Services» forum will be migrating to a new home on Microsoft Q&A !
We invite you to post new questions in the «Directory Services» forum’s new home on Microsoft Q&A !
For more information, please refer to the sticky post.


