- Монтирование VirtualBox образов vdi в Ubuntu.
- How to Mount VirtualBox Disk Image (VDI) to Access VM File-System in Ubuntu
- Unmount:
- Как примонтировать vdi?
- Смонтировать образ диска VirtualBox (vdi)?
- 9 ответов
- Mount vdi in linux
- Ordeal
- How to Mount a VDI File
- First Your VDI File
- Installing qemu
- Making the VDI Accessible as a Device
- Mounting an LVM System
- Cleaning Up Once Done
- Re: Mounting a VDI disk in your host system to edit the file .
- Re: Mounting a VDI disk in your host system to edit the file .
- Re: Mounting a VDI disk in your host system to edit the file .
- Re: Mounting a VDI disk in your host system to edit the file .
Монтирование VirtualBox образов vdi в Ubuntu.
Если хочется подключать виртуальные диски операционных систем в формате VirtualBox в локальную папку для более удобной работы, то вам поможет vdfuse.
Модуль использует библиотеку для доступа к образам VirtualBox и монтирует в локальную папку, используя FUSE. В локальной папке вы обнаружите EntireDisk, Partition1 . PartitionN.
Сначала нужно установить vdfuse в Ubuntu.
sudo apt-get install virtualbox-fuse
Синтаксис команды такой:
vdfuse [опции] -f образ точка_монтирования
-h помощь
-r монтировать только для чтения
-t тип (VDI, VMDK, VHD или raw; по умолчанию: автоопределение)
-f образ
-a разрешить всем читать диск
-w разрешить всем читать и писать
-g запустить в фоне
-v подробнее
-d отладка
Нужно добавить user_allow_other в /etc/fuse.conf и указать корректные настройки прав доступа в /etc/fuse.conf.
Для примера, мы хотим подключить vdi образ.
sudo vdfuse -f /путь/к/файлу.vdi /путь/к/точке_монтирования
/путь/к/точке_монтирования будет содержать EntireDisk, Partition1 . PartitionN. Их можно опять таки подключить, чтобы видеть уже собственно файлы и папки на разделах виртуального диска.
Ещё монтируем смонтированное, в примере первый раздел Partition1:
sudo mount /путь/к/Partition1 /путь/для/монтирования/раздела
Вуаля! Получайте доступ к виртуальному жёсткому диску.
А знаете ли вы, что в VirtualBox можно виртуальную машину наблюдать НЕ в окне, а используя бесшовный режим, работать с окнами гостевой системы, как с окнами родной хостовой системы, стирая грани между системами?
Дополнительные материалы:
Proxmox VE — виртуализация уровня предприятия.
Источник
How to Mount VirtualBox Disk Image (VDI) to Access VM File-System in Ubuntu
This tutorial shows how to mount the VirtualBox virtual disk image in Ubuntu, so you can access the Guest OS file system with read and write permission, if it does not boot.
After misconfigured my VirtualBox Guest OS, it does not longer work. I know how to correct the issue to make it boot again, but firstly accessing to the file system is required!
Since the VBox user manual does not work, here’s what I did in Ubuntu 20.04 host with VirtualBox 6.1.x:
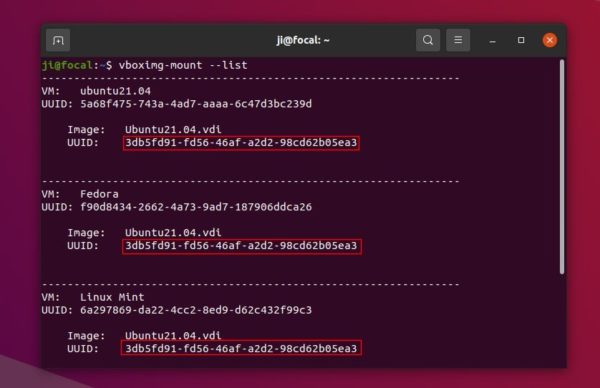
1.) Firstly open terminal from system application launcher. When it opens, run command:
vboximg-mount is a utility to make VBox disk images available to the host. With —list , it list all Disk Images as well as the UUID.
In the case, I have all Guest OSes on single Disk Image (.vdi). And the uuid is: “3db5fd91-fd56-46af-a2d2-98cd62b05ea3”
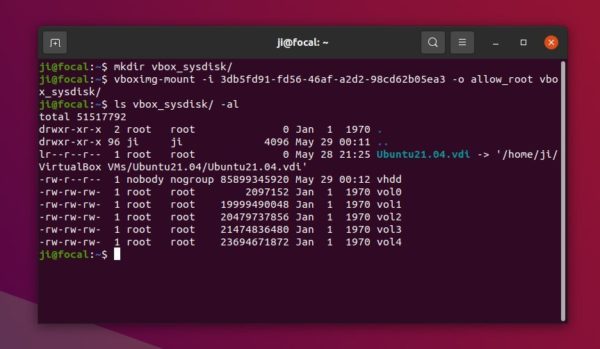
2.) Next perform a FUSE mount of the virtual disk image:
- First create a folder as mount point, vbox_sysdisk for instance:
- Then mount it via command (remember to change the UUID to yours):
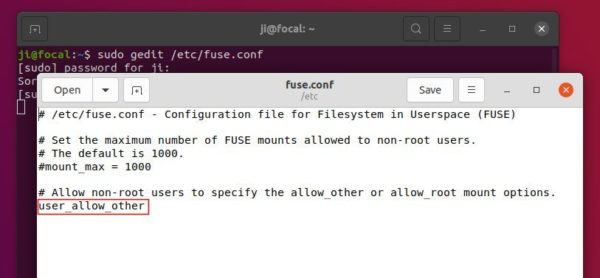
NOTE: You may need to edit the “/etc/fuse.conf” to make the -o allow_root flag work. To do so, run command sudo gedit /etc/fuse.conf and enable (remove # at its beginning) “user_allow_other” line.
3.) As the previous picture shows, I have 5 disk partitions: vol0, vol1, …, vol4. Now mount either partition (vol4 for instance) to /mnt via command:
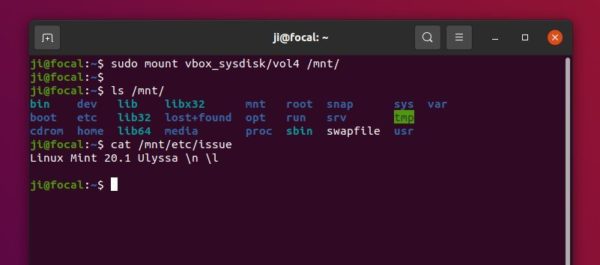
Finally go to /mnt directory and there you are.
Unmount:
To un-mount the guest os file system, run command:
To un-mount the VBox disk image, run command:
And you may finally remove that folder either from file manager or by running command in terminal:
Источник
Как примонтировать vdi?
caminati/mount_vdi.html — нифига не работает. +этому скрипту требуется фиксированный образ, что некомильфо.
Какие ещё есть вменяемые способы?(перегонять в img — невменяемый)
Желательно указывать, то, чем вы риально пользовались, а не нагугленные варианты.


Чем же вам в img не вменяемый?

>> Желательно указывать, то, чем вы риально пользовались, а не нагугленные варианты.
Чёто я не понял, а как им пользоваться?Т.е. примонтировать-то примонтировало. но вместо ожидаемой обычной структуры каталогов наблюдаю три каких-то непонятных файла
По обьёму основное EntireDisk
Да-да, уже разобрался. mount -o loop Partition1 надо
Спасибо, этот способ наиболее хороший.
А вот оно всегда в Partition1 или может отличаться?А то неудобно же, cкрипт хочу написать чтоб одним кликом монтировать.
Ну, там та же логика, что и с /dev/sda, sda1-4, 5 — расширенный раздел. Вроде не должно быть проблем с автоматизацией.
Второй вариант — использовать qemu-nbd из qemu-utils (см. How to mount a VirtualBox VDI image). Но предложенный выше вариант с virtualbox-fuse несомненно лучше и удобнее. nbd склонен падать при активном I/O с подмонтированными дисками, почему-то.

Только что смонтировал свой диск от VirtualBox’a (3.2.10 если что) с вендой
mount -t ntfs-3g winxp.vdi /mnt/tmp2 -o loop,offset=65536,force

Как offset вычислять?
В этом образе с 0-го по 64-ый сектор служебная инфа, в 65-ом MBR, в 128-ом начало раздела. 128секторов*512байт=65536байт смещения.
Это видно отличается для разных ф.с./cтpуктур дисков.Ext4 попробовал(ntfs у меня нет) — не монтирует, «wrong fs type, bad option, bad superblock . »
Скрипт из стартового поста, кстати, именно на вычислениях обламывался.
А вот с qemu тоже рабочий способ, в принципе даже более наглядный.
минус — делать modprobe да и учитывая
nbd склонен падать при активном I/O
Вцелом, думаю лучше использовать специально предназначенные для этой цели средства, т.е. fuse.
Это видно отличается для разных ф.с./cтpуктур дисков.
Ничего подобного. Оно зависит от того, как ты разметил виртуальный диск. У меня он размечен установщиком венды, потому сам ntfs-раздел начинается в 63-ем (при счёте с нуля) секторе виртуального диска, а поскольку собственно винт начинается с 64-ого сектора или как-то так (и это либо стандарт, либо в начале диска должно быть указано сколько секторов/байт занимает служебная область), то получается смещение первого раздела в 128 секторов по 512 байт
Если хочешь опробовать монтирование vdi на петле, посмотри в виртуалке разметку виртуального диска с точностью до секторов и выложи сюда, попробуем расчитать (+64), проверить.
И да, петлевая фс ИМХО получше всех этих наблыдокоженных fuse, особенно когда никаких модификаций над считываемыми данными не производится, посекторный образ же лежит, не то что там загзипованный или затаренный.
>> петлевая фс ИМХО получше всех этих наблыдокоженных fuse
Таки оно будет работать с динамически расширяемыми образами?
надо проверить, я никогда не пользовался динамически расширяемыми образами, ставлю статический размер всегда
Если хочешь опробовать монтирование vdi на петле, посмотри в виртуалке разметку виртуального диска с точностью до секторов и выложи сюда, попробуем расчитать (+64), проверить.
Ну, джастофан разве что, для практического использования нет смысла в изобретании велосипедов.
А чем смотреть разметку, fdisk пойдёт?
>ставлю статический размер всегда
Аааа, вот оно что. Наверное в этом проблема, у меня динамические.
А ну если джаст фор фан, погрепай из виртуалки
dd if=/dev/sda | hd -v | grep «55 aa |»
dd if=virtual_machine.vdi | hd -v | grep «55 aa |»
и покажи сравним
Предварительно нужно сделать том статическим vboxmanage clonehd —variant static win.vdi temp.vdi #hd -n 1000000 win.vdi | grep «eb 52 90 4e 54 46 53» | cut -c 1-8 00027e00 Что выдаст это и есть смещение в образе. mount -t ntfs-3g temp.vdi /mnt -o loop,offset=0x27e00
ps Кому трудно запомнить «eb 52 90 4e 54 46 53» это сигнатура .R.NTFS 🙂

 big-town , по поводу «ps», прежде чем громко именовать то, по чему ты привык детектировать начало ntfs-раздела, сигнатурой, стоит изучить доподлинно известный формат NTFS бутсектора.
0xeb5290 — это JUMP 52h, NOP — переход к IPL (Initial Program Loader) в этом же бутсекторе по известному смещению 0x52. А действительно OEM-сигнатурой NTFS является совсем не «NTFS», а «NTFS » или в hex’e 4e54465320202020.
//устраиватель цирка по кнопочкам
anonymous — это ты вообще о чем? Всегда «любил» вот таких «правильных выскочек» которые умеют только критиковать. То что eb 52 -это во первых не jump, а jmp 52h я знаю и без тебя, это команды короткого перехода где знаковый бай указывает на смещение на которое нужно перепрыгнуть вперед или назад в зависимости от знака. Первые три байта это действительно команда перехода на загрузочный код, далее следует информация о диске. А смещение в команде монтирования нужно указывать именно где располагаются данные eb 52 90 4e 54 46 53 . Проверяем sudo hd -n 512 /dev/sda1 первые байты какие? Вот то то и оно.
Источник
Смонтировать образ диска VirtualBox (vdi)?
Можно ли смонтировать образ диска VirtualBox (.vdi), чтобы содержимое можно было просматривать в Nautilus и т. Д .?
У меня есть Windows 2000 .vdi, которая не загружается («недоступное загрузочное устройство»). «) после обновления с VirtualBox 2.x до 3.1.6. Я считаю, что данные дисковода IDE изменились, и все, что мне нужно сделать, — это получить доступ к образу внутреннего диска и отредактировать Windows boot.ini , чтобы указать новое местоположение.
9 ответов
Можно преобразовать в стандартный образ и затем смонтировать его.
Нужно ЗНАЮТЬ тип файловой системы, ext3 в данном случае. После монтирования, зайдите и отредактируйте его с помощью выбранного вами редактора. Не путайте файлы внутри места /mnt с работающим хостом, иначе будет плохо.
Чтобы проверить подробности о вашем VDI файле, запустите: VBoxManage showhdinfo ubuntu.vdi .
Похоже, vdfuse — это инструмент, который вы ищете. Он находится в репозиториях Ubuntu. Если вы хотите скомпилировать себя (исходный код 2010 г.), вы можете сделать это тоже .
Однако для большинства из нас это сводится к простому:
Кажется, теперь он также поддерживает динамический vdi.
А чтобы смонтировать файл .vdi в каталоге / mnt , используйте команду:
Весь диск будет смонтирован с разделами Partition1 , Формат имени раздела 2 . Затем эти файлы можно монтировать в цикле. Например,
Установите диск как вторичный мастер для другой виртуальной ОС, затем загрузитесь в эту (виртуальную) ОС, и вы сможете смонтировать его.
Шаг 1: Предположим, что у вас уже установлена виртуальная ОС (скажем, Ubuntu 16.04) в Virtual box, добавим новое хранилище из настроек этой виртуальной ОС. Шаг 2: Просмотрите файл Vdi, к которому хотите получить доступ, и выберите его.
Шаг 3: Войдите в виртуальную ОС.
Шаг 4: Виртуальный диск, вероятно, будет доступен внутри ОС. Если нет, выполните шаг 5
Шаг 5: Внутри виртуальной ОС используйте Gparted и проверьте диски. и убедитесь, что диск имеет тип, доступный для виртуальной ОС. Если это не так, возможно, вам придется отредактировать диск, но тогда вы потеряете существующее содержимое.
Используйте qemu-nbd , процесс объясняется на serverfault и в этом блог .
По сути, вам придется установить qemu , если необходимо:
Затем вам нужно будет загрузить модуль сетевого блочного устройства :
Прикрепите образ .vdi к одному из только что созданных nbd:
Теперь вы получите блочное устройство / dev / nbd0 вместе с несколькими узлами устройства раздела / dev / nbd0p *.
Как только вы закончите, размонтировать все и отключить устройство:
Источник
Mount vdi in linux

Ordeal
Today I made a mistake and create the file /etc/sudoers.d/timeout which was definitely not compatible with sudo. The file was JSON when sudo only accepts very basic var=value lines.
I could not use sudo anymore on that VM. I had to find a way to fix the file system without having to rebuild the entire disk because that would have taken way too long.
How to Mount a VDI File
Since your VDI (VirtualBox Disk Image) files are literally disk files, they should be mountable, right? Yes! They are. Actually, that’s certainly exactly what the VirtualBox code does, but somehow we are not provided with a dead easy way (it seems) to do just that.
On my old system I had fuse and used that successfully but somehow with the VDI format, it seems to be confused. So I looked for a different method and there were so many steps that I really need to write them down to find them again.
The steps below work just fine in Ubuntu 16.04 and should continue to work for a while. Other solutions may work using FUSE, but I’ve never been too happy with FUSE.
First Your VDI File
My VDI disk is under my VirtualBox folder, something like this:
Note that in the console you will want to use quotes. At least I think quotes are easier to use than a ton of backslashes. In my full disk names, there are more spaces and parenthesis, so it becomes difficult to read with escaping instead of quotes.
Installing qemu
The file can be mounted using the qemu-nbd virtual device.
If you don’t have it yet, make sure to install qemu on your host machine:
You may only need qemu-kvm , although having the entire environment on your development machine probably won’t hurt.
Making the VDI Accessible as a Device
With qemu-nbd we can now start a virtual disk device this way:
Note: I use /dev/nbd1 instead of /dev/nbd0 because somehow when I use /dev/nbd0 the system does not automatically create the expected three partitions. This may be normal, but when using /dev/nbd1 it works as expected so I am thinking that there is something fishy about /dev/nbd0 .
The nbd device takes over and creates partitions. These are likely going to be named:
Partition 1 can be mounted as is because it is an old Linux type of file system. It is used to boot the Virtual Machine.
Partition 2 is a swap file system. You should not have to do anything with this one. Since it’s a swap partition, try to mount as is will fail. The swap has ways to mount these partitions which use a different type of file system than the default for speed reasons.
Partition 5 is your root drive. This includes /home, /etc, /usr, etc. Pretty much all your files. However, this one partition has code 8E. This means Linux LVM. The LVM part means Logical Volume Manager. This is an advanced partition system which reserves the handling of the physical drive to the base system and only gives you a logical way of partioning the available space. The partitioning handles many aspects of modern hard drive capabilities such as RAID capabilities. For example, if you have two hard drives you can very easily create a partition which is duplicated on both drives (RAID 1) or you can create a very large partition (RAID 5).
The «physical» partition numbers (1, 2, and 5) are managed by the LVM system too when you format your drive, although as far as I know these could be changed.
Mounting an LVM System
Now that we have a device available, we can think about mounting it. The LVM System makes things a little more complicated, but not impossible to handle.
First, we want to be able to run kparts so we need to install it if not yet available:
This tool transforms the LVM partitions into a set of mapped devices which can themselves to mounted.
To transform our physical drive partition 5 shown above into a set of partitions that we can mount, run this command:
The kpartx tool creates mapped devices. These appear under /dev/mapper and their respective names:
Here we see a list of physical and virtual devices each representing a partition that can be mounted.
In my case, the one that interests me is:
As we can see it has the base name of the Virtual Machine I created and it says «root» which means the files under «/. «. This is how I found the other set of devices under «snaptest-vg». You can also run the lvdisplay command. There is an example with the out logical volume of interest here:
The mounting here is done as usual with that logical volume of interest:
Now you have full access to the VDI volume from your host computer. Note that in most cases you will need sudo to make any changes on that partition.
Cleaning Up Once Done
It is recommended that you clean up the mounted device once done and especially once ready to run your VM because with two systems writing to the same disk from two completely different interfaces is not unlikely to cause problems and break your VDI disk.
If you don’t want to unmount, run the VM while not using the disk. Shutdown the VM, then do your additional edits. Finally, restart your VM. Again, try to be very careful. (Having your host and your guest both access the same VDI may work, but I suspect there may quirks. attempt such at your own risk.
Just run the steps backward with the opposite command:
It is important to remove the LVM. The lvchange with «-a n» does that for you. If you don’t do that, you get an error as follow from kpartx :
The name you use with lvchange is the group name. In the output of lvdisplay , it is actually the VG Name: . field (VG stands for Virtual Group).
Note that the -d with kpartx doesn’t delete the partition on the disk, it just removes them from the /etc/mapper and other areas.
Similarly, the -d on qemu-nbd just disconnect the device. It won’t hurt your VDI file in any way.
Re: Mounting a VDI disk in your host system to edit the file .
What I wrote worked for me. He! He! What you were trying to do is, I think, sufficiently different that it could fail compared to what I’ve done way back.
Although today’s implementation may have changed, I don’t know, I don’t think it’s changing much as far as the front end is concerned.
What I do on my website, though, is update when I try something again and the old examples do not work quite right. I don’t tweak my drivers much, though.
Re: Mounting a VDI disk in your host system to edit the file .
«These instructions are pretty old [. ]»
«may not work [. ]»
«I’ve not tested [. ]»
«may just not be compatible [. ]»
So. you didn’t test anything. you didn’t offer an alternative either.
Talk is cheap, player.
Re: Mounting a VDI disk in your host system to edit the file .
These instructions are pretty old and may not work properly anymore. I’ve not tested the qemu-ndb in a very long time. It may just not be compatible with the newer version of /dev .
Re: Mounting a VDI disk in your host system to edit the file .
LVM refuses to mount/create directories in /dev. Apparently, after running qemu-nbd, then kpartx, it created two volumes, with identical UUIDs.
nbd1
├─nbd1p1 LVM2_me AxG2cR-lrn7-TcvS-YF2M-bc1T-fY2s-P1hu0m
└─nbd1p1 LVM2_me AxG2cR-lrn7-TcvS-YF2M-bc1T-fY2s-P1hu0m
I’m unable to mount the drive, because it does not create LVM mountable directories.
Источник


