- Команда MOUNTVOL создание, удаление и просмотр точек подключения томов.
- How to unmount a volume in Windows
- Drive letters and mounted volumes
- What happens when a volume is unmounted?
- Example scenario: secondary volume is full
- Unmount a volume with Disk Management
- Mount the volume again later
- How the Volume Is Mounted
- Подключение диска в папке Mount a drive in a folder
- Подключение диска в пустой папке Mounting a drive in an empty folder
- Подключение диска в пустой папке с помощью интерфейса Windows To mount a drive in an empty folder by using the Windows interface
- Подключение диска в пустой папке с помощью командной строки To mount a drive in an empty folder using a command line
- Удаление точки подключения To remove a mount point
Команда MOUNTVOL создание, удаление и просмотр точек подключения томов.
Команда MOUNTVOL позволяет создавать, удалять и просматривать точки подключения томов ( точки монтирования ) в командной строке Windows. Точки монтирования доступны при использовании файловой системы NTFS. В среде операционных систем семейства Windows, существует два вида точек монтирования: точка монтирования каталога (англ. junction point) и точка монтирования тома (англ. volume mount point). Создание точек монтирования первого типа осуществляется через консольную команду mklink /J, создание точек монтирования второго типа — через команду mountvol. На практике утилита mountvol используется для изменения конфигурации томов, автоматически смонтированных операционной системой, подключения томов без назначения букв дискам, увеличения свободного места на томе без форматирования или замены жесткого диска, с использованием подключения к какому-либо его пути другого тома. Также, команда mountvol позволяет использовать один и тот же том с несколькими путями монтирования .
Формат командной строки:
Параметры командной строки :
При выполнении команды mountvol без параметров, кроме справки по использованию, отображаются возможные значения имен томов вместе с текущими точками подключения:
Имя тома содержит префикс \\?\Volume и уникальный глобальный идентификатор — GUID :
Алгоритм формирования GUID построен таким образом, что каждый новый генерируемый идентификатор никогда не совпадает с другим, существующим в данной системе. Обозначается GUID в виде наборов шестнадцатеричных цифр, разделяемых дефисами для удобства записи, и заключенными в фигурные скобки:
Соответственно, в каждой конкретной системе Windows, каждый конкретный том имеет свое уникальное имя.
mountvol — отобразить краткую справку и перечень томов с точками монтирования, допустимых в данной системе. Запись в форме:
означает, что в системе имеется том без точки монтирования. Обычно такая запись имеется в системах содержащих скрытые разделы восстановления или созданные при стандартной установке Windows 7/8 разделы для менеджера загрузки bootmgr.
При наличии точки монтирования в качестве пустой папки NTFS, информация отображается в следующем виде:
Том с данным именем смонтирован как логический диск D: и в качестве содержимого папки MountPointD на логическом диске C:
mountvol C:\mountpointD \\?\Volume
mountvol C:\mountpointd /l — отобразить список подключенных томов для папки C:\mountpointD
mountvol C:\mountpointd /d — удалить точку монтирования тома в виде папки C:\mountpointD. Если вместо параметра /d используется /P то кроме отключения тома из заданной папки, он переводится в неподключаемое состояние. Чтобы сделать том подключаемым, нужно заново создать точку подключения.
mountvol /R — удалить папки и параметры реестра точек подключения для томов, которые больше не существуют в системе. Точки монтирования для съемных дисков данной командой не затрагиваются, даже если они не подключены на момент ее выполнения.
Функциональные возможности утилиты командной строки mountvol практически полностью соответствуют возможностям оснастки «Панель управления» – «Администрирование» — «Управление дисками».
How to unmount a volume in Windows
If you want to take one of your drives offline, you can unmount it. In Windows, mounting and unmounting a volume is accomplished by changing the volume’s drive letter assignment.
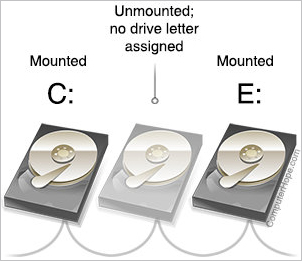
Drive letters and mounted volumes
In Windows, volumes are mounted as drive letters and include drive partitions, removable disks, optical drives, external hard drives, and network drives. For instance, you probably have a partition on your HDD or SSD mounted to the C: drive letter, which contains your Windows operating system. You may have a DVD drive mounted at D: or E:, and perhaps a secondary HDD or SSD mounted at a letter as well.
Anything with a drive letter is «mounted»: the operating system has made the volume’s filesystem available for reading and writing by the user programs and operating system. When a volume is not mounted, its data cannot be accessed or altered by conventional means.
The process of changing a drive from mounted to not mounted is called unmounting. Let’s look at a scenario where this operation can be useful, and how it can be done.
The following example is performed using Windows 10, but these instructions should also work for Windows 8.1, Windows 7, and Windows XP.
What happens when a volume is unmounted?
When a volume is unmounted, its drive letter is unassigned and may be used by another storage device. While unmounted, the volume’s file system is inaccessible by regular reads and writes.
Example scenario: secondary volume is full
In this scenario, you have a single HDD inside a laptop computer. The drive contains two NTFS partitions, mounted as Windows volumes:
- C:, which contains the operating system and all user programs and documents
- D:, which contains automatically created backups of critical files in C:
You can view how much free space you have on your mounted volumes if you open File Explorer (press Win + E), and choose This PC.

The D: drive is 100% full — it has no more free space. That’s OK in this case, though, because the backups it contains are complete and up-to-date. In this scenario, you know you won’t need to make another backup for a few weeks, so nothing on the volume needs to change before then.
However, you’re experiencing a problem. Because the partition is very full, Windows 10 continuously notifies you that D: is low on disk space:
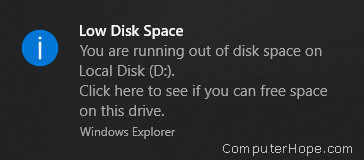
There’s no way to selectively disable this warning for individual partitions. The notifications can be disabled only by modifying the registry — but even then, the notifications cannot be selectively turned off.
If you unmount the volume, these notifications stop.
Unmount a volume with Disk Management
Disk Management is part of your Windows 10 system software. It allows you to make low-level changes to your storage devices. It can create volumes, resize them, and delete them. Here, you’ll use it to unmount a volume.
To unmount a volume:
- Open Disk Management. From your Start menu, choose Windows Administrative Tools, then Computer Management. Then, under Storage, choose Disk Management.
- Or, press Win + X (hold down the Windows Key and press X), and choose Disk Management.

- In Disk Management, locate the block that represents the volume you want to unmount. The blocks are labeled with volume information, including the drive letter. Right-click the volume, and choose Change Drive Letter and Paths.

- Select the volume’s drive letter, and click Remove.

- You’ll receive a warning, and the prompt «Are you sure you want to remove this drive letter?» Choose Yes.

- If any of your programs are currently using the volume, you’ll receive an additional warning, «The volume is currently in use… Do you want to continue?». Now is a good time to close any programs that are using the volume. If you choose Yes, Windows requires a restart before the volume is fully unmounted.

- You’ll be returned to Disk Management, and you can see that the partition no longer has a drive letter.
The partition is now protected from accidental writes, and is effectively frozen. As a benefit, the «Low Disk Space» notifications will no longer pop up (incessantly) for a partition you have intentionally filled with data.
Mount the volume again later
In the scenario above, you would mount the volume again when moving the data to a removable disk, for instance.
You can re-mount an unmounted volume at any time in Disk Manager.
- Right-click the unmounted volume and choose Change Drive Letter and Paths.

- Click Add. Choose Assign the following drive letter, then pick a letter from the selector on the right. When you’re done, click OK.
How the Volume Is Mounted
For optimal reliability and performance, use file system minifilter drivers with Filter Manager support instead of legacy file system filter drivers. To port your legacy driver to a minifilter driver, see Guidelines for Porting Legacy Filter Drivers.
After the volume has been recognized, how the volume is mounted depends on the file system and whether it has previously mounted the volume.
When a file system receives the volume mount request for a new volume, it creates a volume device object (VDO) for the volume. The VDO consists of a DEVICE_OBJECT plus an optional file-system-defined device extension. The newly created VDO forms the base of the file system volume stack for the new (or remounted) volume.
The file system mounts the volume by associating the VDO with the volume parameter block (VPB) for the corresponding storage device object and sets the VPB_MOUNTED flag on the VPB.
After the volume is mounted by the file system, file system filter drivers can attach to the top of the new file system volume stack. Any I/O requests sent to the file system are automatically sent first to the file system filter device object at the top of the volume stack. However, file system filters should only detach from the volume stack when the I/O Manager sends a fast I/O detach request to notify drivers on the volume stack that the volume is about to be removed.
The storage device object for the volume resides in the storage device stack, but it is not necessarily the topmost device object in the stack. Moreover, even after the volume is mounted, storage filter drivers can still attach to the top of the storage stack. It is important for driver writers to keep in mind that, when the file system sends an IRP from the VDO to the storage device stack, it sends it to the storage device object for the volume, not the topmost device object in the stack. (However, when the I/O Manager sends an IRP directly to the storage stack, bypassing the file system, that IRP is sent to the topmost device object in the stack.)
Подключение диска в папке Mount a drive in a folder
Относится к: Windows 10, Windows 8.1, Windows Server 2019, Windows Server 2016, Windows Server 2012 R2, Windows Server 2012. Applies To: Windows 10, Windows 8.1, Windows Server 2019, Windows Server 2016, Windows Server 2012 R2, Windows Server 2012
Вы можете использовать оснастку «Управление дисками» для подключения диска (предоставления доступа к нему) в папке, а не путем назначения ему буквы диска. You can use Disk Management to mount (make a drive accessible) in a folder rather than a drive letter if you want. В таком случае диск будет отображаться как обычная папка. This makes the drive appear as just another folder. Диски можно подключать только в пустых папках в базовых или динамических томах NTFS. You can mount drives only in empty folders on basic or dynamic NTFS volumes.
Подключение диска в пустой папке Mounting a drive in an empty folder
Для выполнения следующих шагов необходимо как минимум состоять в группе Операторы архива или Администраторы. You must be a member of the Backup Operators or Administrators group, at minimum, to complete these steps.
Подключение диска в пустой папке с помощью интерфейса Windows To mount a drive in an empty folder by using the Windows interface
- В диспетчере дисков щелкните правой кнопкой мыши раздел или том, который содержит папку для подключения диска. In Disk Manager, right-click the partition or volume that has the folder in which you want to mount the drive.
- Щелкните Изменить букву диска или путь к диску, а затем нажмите Добавить. Click Change Drive Letter and Paths and then click Add.
- Щелкните Подключить к следующей пустой папке NTFS. Click Mount in the following empty NTFS folder.
- Введите путь к пустой папке в томе NTFS или нажмите кнопку Обзор, чтобы найти ее. Type the path to an empty folder on an NTFS volume, or click Browse to locate it.
Подключение диска в пустой папке с помощью командной строки To mount a drive in an empty folder using a command line
Откройте командную строку и введите: diskpart . Open a command prompt and type diskpart .
В командной строке DISKPART введите list volume и запомните номер тома, которому требуется назначить путь. At the DISKPART prompt, type list volume , making note of the volume number you want to assign the path to.
В командной строке DISKPART введите select volume и укажите номер тома, которому требуется назначить путь. At the DISKPART prompt, type select volume , specifying the volume number that you want to assign the path to.
В командной строке DISKPART введите assign [mount=
] . At the DISKPART prompt, type assign [mount=
Удаление точки подключения To remove a mount point
Если вы хотите удалить точку подключения, чтобы доступ к диску нельзя было получить через папку, сделайте следующее: To remove the mount point so that the drive is no longer accessible via a folder:


