- Подключение диска в папке Mount a drive in a folder
- Подключение диска в пустой папке Mounting a drive in an empty folder
- Подключение диска в пустой папке с помощью интерфейса Windows To mount a drive in an empty folder by using the Windows interface
- Подключение диска в пустой папке с помощью командной строки To mount a drive in an empty folder using a command line
- Удаление точки подключения To remove a mount point
- How to enable or disable Auto-Mounting of Drives, Disks, Volumes in Windows
- Enable or Disable Auto-Mount feature in Windows 10
- Related Posts
- How to change Hard Disk Cluster Size in Windows 10
- How to check if a Disk uses GPT or MBR Partition in Windows 10
- 1720 SMART Hard Drive detects imminent failure
- [email protected]
- How Do I Mount a Drive in Windows?
- Mount a Drive in Windows
- How does one programmatically mount a drive in Windows?
- 2 Answers 2
- Code Snippets
- How to mount hard drive as folder on Windows 10
- How to assign folder path mount-point to drive with data on Windows 10
- How to assign folder path mount-point to drive without data on Windows 10
- More Windows 10 resources
- The Dell XPS 15 is our choice for best 15-inch laptop
- Halo: MCC’s live service elements make it better, not worse
- Microsoft’s Surface Duo is not ‘failing up’
- These are the best PC sticks when you’re on the move
Подключение диска в папке Mount a drive in a folder
Относится к: Windows 10, Windows 8.1, Windows Server 2019, Windows Server 2016, Windows Server 2012 R2, Windows Server 2012. Applies To: Windows 10, Windows 8.1, Windows Server 2019, Windows Server 2016, Windows Server 2012 R2, Windows Server 2012
Вы можете использовать оснастку «Управление дисками» для подключения диска (предоставления доступа к нему) в папке, а не путем назначения ему буквы диска. You can use Disk Management to mount (make a drive accessible) in a folder rather than a drive letter if you want. В таком случае диск будет отображаться как обычная папка. This makes the drive appear as just another folder. Диски можно подключать только в пустых папках в базовых или динамических томах NTFS. You can mount drives only in empty folders on basic or dynamic NTFS volumes.
Подключение диска в пустой папке Mounting a drive in an empty folder
Для выполнения следующих шагов необходимо как минимум состоять в группе Операторы архива или Администраторы. You must be a member of the Backup Operators or Administrators group, at minimum, to complete these steps.
Подключение диска в пустой папке с помощью интерфейса Windows To mount a drive in an empty folder by using the Windows interface
- В диспетчере дисков щелкните правой кнопкой мыши раздел или том, который содержит папку для подключения диска. In Disk Manager, right-click the partition or volume that has the folder in which you want to mount the drive.
- Щелкните Изменить букву диска или путь к диску, а затем нажмите Добавить. Click Change Drive Letter and Paths and then click Add.
- Щелкните Подключить к следующей пустой папке NTFS. Click Mount in the following empty NTFS folder.
- Введите путь к пустой папке в томе NTFS или нажмите кнопку Обзор, чтобы найти ее. Type the path to an empty folder on an NTFS volume, or click Browse to locate it.
Подключение диска в пустой папке с помощью командной строки To mount a drive in an empty folder using a command line
Откройте командную строку и введите: diskpart . Open a command prompt and type diskpart .
В командной строке DISKPART введите list volume и запомните номер тома, которому требуется назначить путь. At the DISKPART prompt, type list volume , making note of the volume number you want to assign the path to.
В командной строке DISKPART введите select volume и укажите номер тома, которому требуется назначить путь. At the DISKPART prompt, type select volume , specifying the volume number that you want to assign the path to.
В командной строке DISKPART введите assign [mount=
] . At the DISKPART prompt, type assign [mount=
Удаление точки подключения To remove a mount point
Если вы хотите удалить точку подключения, чтобы доступ к диску нельзя было получить через папку, сделайте следующее: To remove the mount point so that the drive is no longer accessible via a folder:
How to enable or disable Auto-Mounting of Drives, Disks, Volumes in Windows
Whenever a new drive or any storage device is attached to a Windows 10 computer, the Operating System tends to automatically allot at drive letter to it. This is not limited to assigning just a letter, but the OS also maps the location of the drive. This helps it in pointing the letter to the exact port location of the drive and serving requests from the user. This builds up a small chunk of cache as per the pattern in which the user tends to use the computer storage. This whole process is referred to as Auto Mounting. It works for Hard Disks or Optical Drive readers connected using the SATA Ports as well as for USB Drives connected using the USB Ports perfectly.
Enable or Disable Auto-Mount feature in Windows 10
We will be taking a look at three methods that will show us how to enable or disable Drives’ Auto Mounting:
- Using the Registry Editor.
- Using the DiskPart Utility.
- Using the MountVol tool.
I recommend that you create a System Restore Point. This is because if something goes wrong, you can always revert.
1] Using the Registry Editor
Hit the WINKEY + R button combination to launch the Run utility, type in regedit and hit Enter. Once Registry Editor opens, navigate to the following key-
Now, check if you find a DWORD named as NoAutoMount. If you don’t, just create one with the same name. Make sure that the base is selected to Hexadecimal.
Double-click on it and change its Value to 0 to enable it and, to 1 to disable it.
Reboot your computer for the changes to take effect.
2] Using the DiskPart utility
This will start the DiskPart Utility. It is a command line based utility and will get a UAC Prompt once you invoke it. You have to click on Yes for the UAC Prompt. Then, type in-
This will show output either – Automatic mounting of new volumes enabled or Automatic mounting of new volumes disabled.
This means it can be used to check the status of Auto Mount.
Another command which can be helpful is-
It can be used to enable the Auto Mount feature.
This command can help you to disable the Auto Mount feature-
The following command will help you to remove all the assigned letters and history of drives previously connected-
3] Using MountVol tool
Here, we will be taking a look at the mountvol command.
Run Command Prompt as Administrator and execute the following command:
It will enable the Auto Mount feature.
This command will help you in disabling the Auto Mount feature-
The following command will help you to remove all the previously assigned drive letters-
You need to reboot your computer for the changes to take effect.
Do note that you have to be signed in as an administrator to enable or disable the automount feature.
Date: February 5, 2019 Tags: Hard Disk
Related Posts
How to change Hard Disk Cluster Size in Windows 10
How to check if a Disk uses GPT or MBR Partition in Windows 10
1720 SMART Hard Drive detects imminent failure
[email protected]
Ayush has been a Windows enthusiast since the day he got his first PC with Windows 98SE. He is an active Windows Insider since Day 1 and is now a Windows Insider MVP. He has been testing pre-release services on his Windows 10 PC, Lumia, and Android devices.
How Do I Mount a Drive in Windows?
You can mount a drive in Windows so that you can map a certain drive’s available space to another drive. In simplest terms, this means that you can utilize a specific drive’s space so that it can be used by another drive. Imagine that you have no more available free space on your drive C, but you still have a large amount of unused space on your drive D. Now, let’s say you have a game on your drive C that needs an update, and the update requires a large amount of space that cannot fit into your drive. You can mount your drive C to drive D so that you will be able to add more files to your drive C without requiring additional space on the drive. This tutorial explains how to mount a drive in Windows.
Before proceeding with the steps on mounting a drive in Windows, you need to make sure you have met the following requirements:
1. You need to have an Administrator account. Mounting drives on your computer is a semi-critical procedure. You need to have admin access in order to complete the function.
2. Drives should be in NTFS format. Your selected drives must be in an NTFS file system format.
Mount a Drive in Windows
To mount a drive in your Windows computer, follow these steps:
1. Open your device’s Control Panel. You can use the search button to proceed with searching for Control Panel.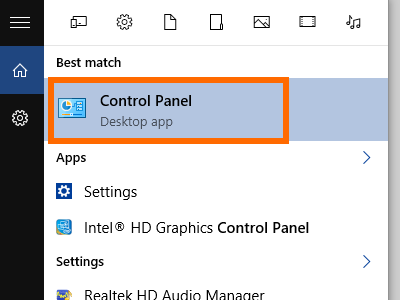
2. From the Control Panel, open the System and Security option.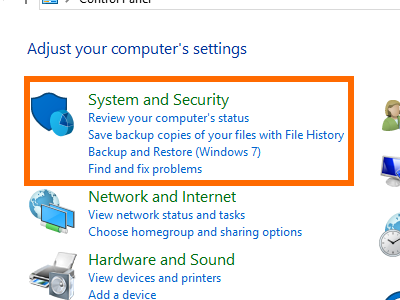
3. From System and Security, click on Administrative Tools.
4. From Administrative Tools, open the Computer Management option.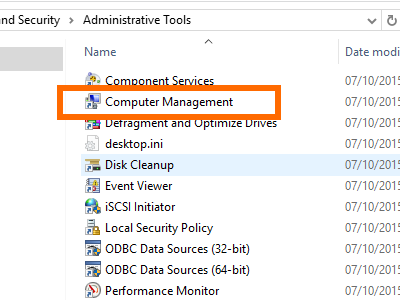
5. On the Computer Management window, click on Storage.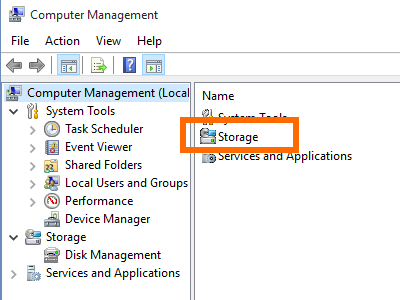
6. Click on Disk Management.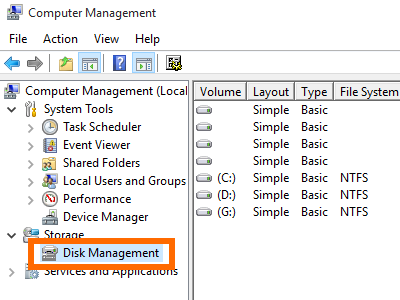
7. On the right side, right-click on the drive with which you want to be mounted, and click on Change Drive Letter and Paths.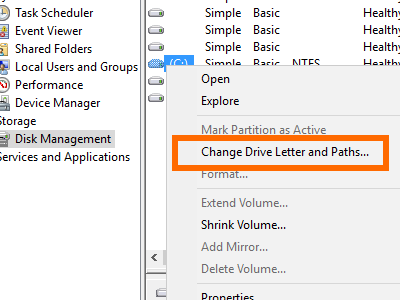
8. From the pop-up menu, click on Add.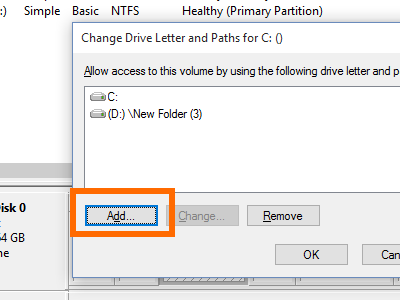
9. On the next pop-up screen, click Browse.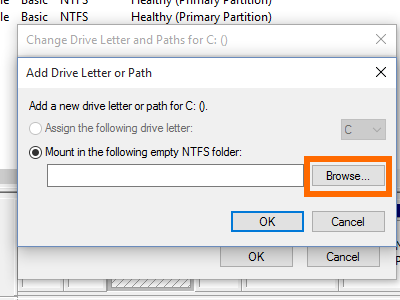
10. Browse for the drive that you want to mount and utilize. Click the target drive and your preferred location. 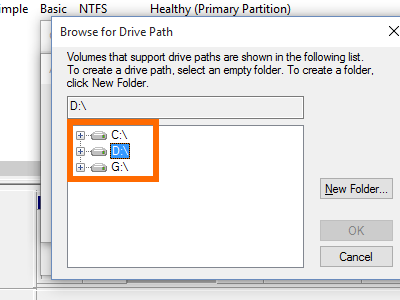
11. Click on New Folder to add the shortcut for the Drive that you want to mount. You can rename the created folder based on your preference.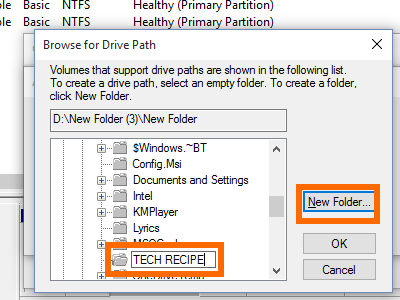
12. Click on OK to create the new folder.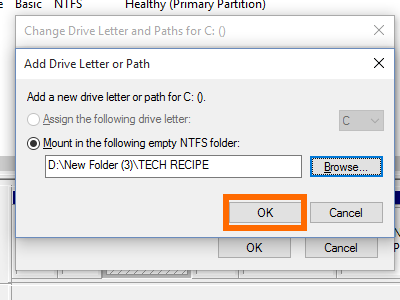
13. The newly mounted drive is now on your target drive. You are done.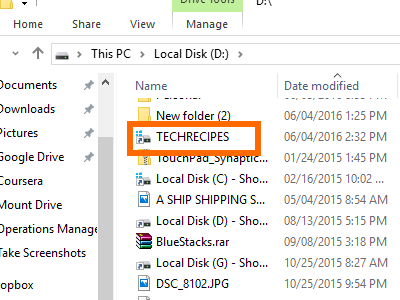
I have just described how to mount a drive in Windows. If you have questions with any of the steps outlined above, let me know in the comments section.
How does one programmatically mount a drive in Windows?
We make and sell a device that our users will sometimes want to connect to their computer in large quantities with multiple USB hubs. It is a USB composite device that has both human interface (HID) and mass storage (MSD) interfaces. Windows automatically mounts the file-system of each device until it runs out of letters at ‘Z:’.
I can walk the device tree and get the device instance identifiers for the HID and USBSTOR interfaces using a combination of the PnP Configuration Manager and Device Installation functions. With the USB storage device path I can also get the disk number (i.e. \\.\PhysicalDrive1 ).
The next step would be to mount these disks as need by cycling out drive letters as we communicate with the devices, or better yet, mount them in temporary directories on the C: drive. I’m having difficulties attempting to use DefineDosDevice for this task and cannot make headway with SetVolumeMountPoint since a device does not have a Volume GUID until it is mounted. That presents a chicken and egg problem.
If only our customers used unix.
2 Answers 2
Windows does not mount disks; it mounts volumes. However, the volume for a USBSTOR class device is not listed as a child node in the device tree. Therefore, you have to enumerate all volumes and and do a bunch of string manipulation and comparisons to match up STORAGE\VOLUME nodes with USBSTOR nodes.
All volume GUID values are enumerated with the FindFirstVolume set of functions. The leading «\.\» and trailing «\» characters can be stripped and the resulting string then passed to QueryDosDevice. This provides a device name.
Next, one must enumerate all volumes using GUID_DEVINTERFACE_VOLUME with SetupDiGetClassDevs and friends. Compare the device type and number of each volume to the USBSTOR device you are looking for using IOCTL_STORAGE_GET_DEVICE_NUMBER. Once those are matched, you can get the device name from the volume and compare that to the other list of device names to find the volume GUID.
Finally, the volume GUID can be successfully used with SetVolumeMountPoint.
Thanks to Gabe for his very helpful assistance in the comments to my question.
Code Snippets
Get device type and number from device path:
Find the device name for the corresponding USBSTOR instance by iterating over all volume interfaces and comparing the disk number from the above snippet:
How to mount hard drive as folder on Windows 10
![]() Source: Windows Central
Source: Windows Central
On Windows 10, when the hard drive starts to run out of space, you usually add another to extend the available storage. Although it is a quick solution, as time goes on, you could end up with a long list of drives on your computer, which sometimes may not be the best approach to organize your data.
Instead of using other solutions like Storage Spaces or Redundant Array of Independent Disks (RAID) to combine drives into a logical volume, Windows 10 also allows you to mount a hard drive to a folder rather than using a drive letter. This approach will not only reduce the number of drive letters, but it will also help you to organize your drives better.
Furthermore, this is also an ideal solution when you share a folder on the network, and the storage is running out of space. Instead of creating a new network share, you can simply assign a mount-point folder path to a hard drive inside the folder already shared in the network to make more storage available.
In this Windows 10 guide, we will walk you through two ways to mount a hard drive as a folder on your device using the Disk Management console.
How to assign folder path mount-point to drive with data on Windows 10
To mount a drive with data as a folder with Disk Management, use these steps:
- Open File Explorer.
- Browse to the folder location you want the mount-point to appear.
- Click the New folder button from the «Home» tab.
Confirm a name for the folder – for example, StoragePool.
 Source: Windows Central
Click the New folder button from the «Home» tab to create a folder to mount the drive – for example, HardDrive1.
 Source: Windows Central
Right-click the drive you want to mount and select the Change Drive Letter and Paths option.
 Source: Windows Central
Click the Add button.
Source: Windows Central
Click the Browse button.
 Source: Windows Central
Select the folder you created on step No. 6.
Source: Windows Central
(Optional) Right-click the drive again and select the Change Drive Letter and Paths option.
Source: Windows Central
Click the Remove button.
Source: Windows Central
Once you complete the steps, the secondary hard drive will now be accessible from the folder location you created.
How to assign folder path mount-point to drive without data on Windows 10
To mount an empty drive as a folder with Disk Management, use these steps:
- Open File Explorer.
- Browse to the folder location you want the mount-point to appear.
- Click the New folder button from the «Home» tab.
Confirm a name for the folder – for example, StoragePool.
Source: Windows Central
Click the New folder button from the «Home» tab to create a folder to mount the drive – for example, HardDrive1.
Source: Windows Central
Right-click the empty drive you want to mount as a folder and select the New Simple Volume option.
Source: Windows Central
Select the Mount in the following empty NTFS folder option.
Source: Windows Central
Select the folder you created on step No. 6.
Source: Windows Central
Check the Perform a quick format option.
Source: Windows Central
After you complete the steps, the new drive will be formatted and mounted as a folder from the specified folder.
When using this solution, each drive will continue to work independently without redundancy, which means that if a drive fails, you will lose the data on that drive, but not on the others. If you have important data, it is always recommended to periodically create a backup.
More Windows 10 resources
For more helpful articles, coverage, and answers to common questions about Windows 10, visit the following resources:
![]()
The Dell XPS 15 is our choice for best 15-inch laptop
For a lot of people, a 15-inch laptop is a perfect size that offers enough screen for multitasking, and in a lot of cases, some extra performance from powerful hardware. We’ve rounded up the best of the best at this size.
![]()
Halo: MCC’s live service elements make it better, not worse
Halo: The Master Chief Collection is more popular than ever, but some fans don’t agree with the live service approach 343 Industries has taken with it. Here’s why those elements are, at the end of the day, great for the game and for Halo overall.
![]()
Microsoft’s Surface Duo is not ‘failing up’
Microsoft announced this week that it was expanding Surface Duo availability to nine new commercial markets. While Surface Duo is undoubtedly a work in progress, this is not a sign of a disaster. It’s also doesn’t mean that Surface Duo is selling a ton either. Instead, the reason for the expansion is a lot more straightforward.
![]()
These are the best PC sticks when you’re on the move
Instant computer — just add a screen. That’s the general idea behind the ultra-portable PC, but it can be hard to know which one you want. Relax, we have you covered!


