Before you can access the files on a file system, you need to mount the file system. Mounting a file system attaches that file system to a directory (mount point) and makes it available to the system. The root ( / ) file system is always mounted. Any other file system can be connected or disconnected from the root ( / ) file system.
When you mount a file system, any files or directories in the underlying mount point directory are unavailable as long as the file system is mounted. These files are not permanently affected by the mounting process, and they become available again when the file system is unmounted. However, mount directories are typically empty, because you usually do not want to obscure existing files.
For example, the figure below shows a local file system, starting with a root ( / ) file system and subdirectories sbin , etc , and opt .
Figure 34-1 Sample root ( / ) File System
Now, say you wanted to access a local file system from the /opt file system that contains a set of unbundled products.
First, you must create a directory to use as a mount point for the file system you want to mount, for example, /opt/unbundled . Once the mount point is created, you can mount the file system (by using the mount command), which makes all of the files and directories in /opt/unbundled available, as shown in the figure below. See Chapter 36, Mounting and Unmounting File Systems (Tasks) for detailed instructions on how to perform these tasks.
Figure 34-2 Mounting a File System
The Mounted File System Table
Whenever you mount or unmount a file system, the /etc/mnttab (mount table) file is modified with the list of currently mounted file systems. You can display the contents of this file with the cat or more commands, but you cannot edit it. Here is an example of an /etc/mnttab file:
The Virtual File System Table
It would be a very time-consuming and error-prone task to manually mount file systems every time you wanted to access them. To fix this, the virtual file system table (the /etc/vstab file) was created to maintain a list of file systems and how to mount them. The /etc/vfstab file provides two important features: you can specify file systems to automatically mount when the system boots, and you can mount file systems by using only the mount point name, because the /etc/vfstab file contains the mapping between the mount point and the actual device slice name.
A default /etc/vfstab file is created when you install a system depending on the selections you make when installing system software; however, you can edit the /etc/vfstab file on a system whenever you want. To add an entry, the main information you need to specify is the device where the file system resides, the name of the mount point, the type of the file system, whether you want it to mount automatically when the system boots (by using the mountall command), and any mount options.
The following is an example of an /etc/vfstab file. Comment lines begin with #. This example shows an /etc/vfstab file for a system with two disks (c0t0d0 and c0t3d0).
In the above example, the last entry specifies that a UFS file system on the /dev/dsk/c0t3d0s7 slice will be automatically mounted on the /test mount point when the system boots. Note that, for root ( / ) and /usr , the mount at boot field value is specified as no, because these file systems are mounted by the kernel as part of the boot sequence before the mountall command is run.
See Chapter 36, Mounting and Unmounting File Systems (Tasks) for descriptions of each of the /etc/vfstab fields and information on how to edit and use the file.
The NFS Environment
NFS is a distributed file system service that can be used to share resources (files or directories) from one system, typically a server, with other systems across the network. For example, you might want to share third-party applications or source files with users on other systems.
NFS makes the actual physical location of the resource irrelevant to the user. Instead of placing copies of commonly used files on every system, NFS allows you to place one copy on one system’s disk and let all other systems access it across the network. Under NFS, remote files are virtually indistinguishable from local ones.
A system becomes an NFS server if it has resources to share over the network. A server keeps a list of currently shared resources and their access restrictions (such as read/write or read-only).
When you share a resource, you make it available for mounting by remote systems.
You can share a resource in these ways:
By using the share or shareall command
By adding an entry to the /etc/dfs/dfstab (distributed file system table) file and rebooting the system
See Chapter 36, Mounting and Unmounting File Systems (Tasks) for information on how to share resources. See System Administration Guide, Volume 3 for a complete description of NFS.
AutoFS
You can mount NFS file system resources by using a client-side service called automounting (or AutoFS), which enables a system to automatically mount and unmount NFS resources whenever you access them. The resource remains mounted as long as you remain in the directory and are using a file. If the resource is not accessed for a certain period of time, it is automatically unmounted.
AutoFS provides the following features:
NFS resources don’t need to be mounted when the system boots, which saves booting time.
Users don’t need to know the root password to mount and unmount NFS resources.
Network traffic might be reduced, since NFS resources are only mounted when they are in use.
The AutoFS service is initialized by automount , which is run automatically when a system is booted. The automount daemon, automountd , runs continuously and is responsible for the mounting and unmounting of the NFS file systems on an as-needed basis. By default, the Solaris operating environment automounts /home .
AutoFS works with file systems specified in the name service. This information can be maintained in NIS, NIS+, or local /etc files. With AutoFS, you can specify multiple servers to provide the same file system. This way, if one of the servers is down, AutoFS can try to mount from another machine. You can specify which servers are preferred for each resource in the maps by assigning each server a weighting factor.
See System Administration Guide, Volume 3 for complete information on how to set up and administer AutoFS.
The Cache File System (CacheFS)
If you want to improve the performance and scalability of an NFS or CD-ROM file system, you should use the Cache File System (CacheFS). CacheFS is a general purpose file system caching mechanism that improves NFS server performance and scalability by reducing server and network load.
Designed as a layered file system, CacheFS provides the ability to cache one file system on another. In an NFS environment, CacheFS increases the client per server ratio, reduces server and network loads, and improves performance for clients on slow links, such as Point-to-Point Protocol (PPP). You can also combine CacheFS with the AutoFS service to help boost performance and scalability.
See Chapter 37, The Cache File System (Tasks) for detailed information about CacheFS.
Deciding How to Mount File Systems
The table below provides guidelines on mounting file systems based on how you use them.
Table 34-3 Determining How to Mount File Systems
If You Need to Mount .
Then You Should Use .
Local or remote file systems infrequently
The mount command entered manually from the command line.
Local file systems frequently
The /etc/vfstab file, which will mount the file system automatically when the system is booted in multi-user state.
Remote file systems frequently, such as home directories
The /etc/vfstab file, which will automatically mount the file system when the system is booted in multi-user state.
AutoFS, which will automatically mount or unmount the file system when you change into (mount) or out of (unmount) the directory.
To enhance performance, you can also cache the remote file systems by using CacheFS.
You can mount a CD-ROM containing a file system by simply inserting it into the drive (Volume Management will automatically mount it). You can mount a diskette containing a file system by inserting it into the drive and running the volcheck command. See Chapter 14, Guidelines for Using CDs and Diskettes (Overview) for more information.
Mounting File Systems
Users of Unix-style operating systems and Windows Server 2012 R2 and later versions can connect to a file system and write files. Mount targets serve as file system network access points for file systems. After your mount target is assigned an IPВ address, you can use it together with the file system export path to mount the file system. On the instance from which you want to mount the file system, you need to install an NFSВ client. For Unix-style operating systems, you create a mount point. When you mount the file system, the mount point effectively represents the root directory of the File Storage file system, allowing you to write files to the file system from the instance. Windows operating systems use a drive letter assignment instead of a mount point to represent root access.
Prerequisites
The file system must have at least one export in at least one mount target. When you create a new file system, an export for the file system is created at the same time. See Creating File Systems for more information.
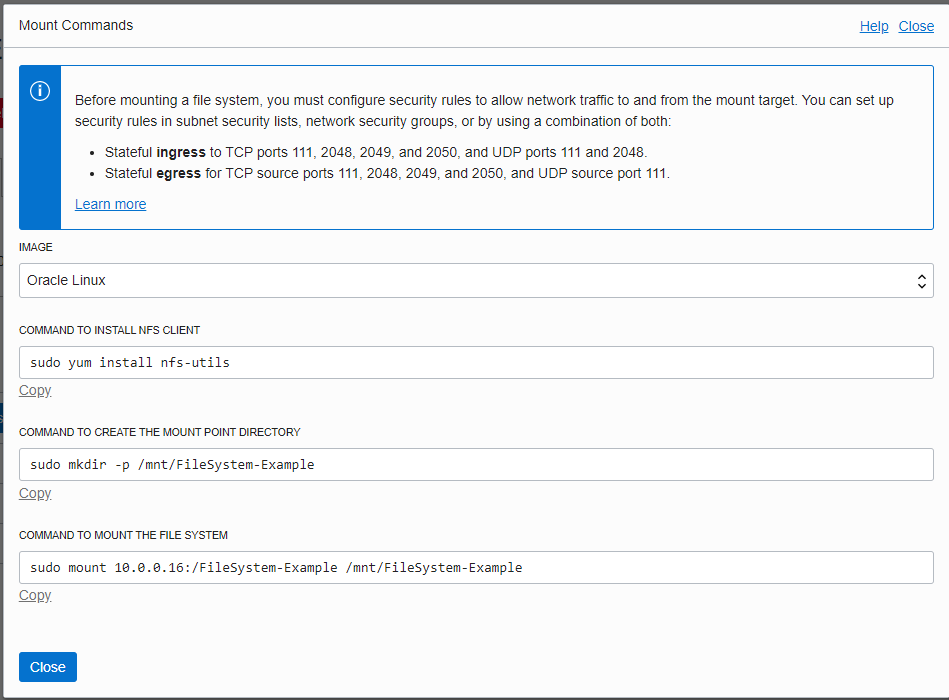
Correctly configured security rules for the mount target. See Security Rules for information about how security rules work in Oracle Cloud Infrastructure . Use the instructions in Configuring VCN Security Rules for File Storage to set up security rules correctly for your file systems.
Mounting File Systems From an Instance
Obtaining Mount Command Samples
Mount command samples that include mount information for a specific mount target and file system are available in the Console . Samples are available for the following operating system images:
Oracle Linux
CentOS
Debian
Red Hat Linux
Ubuntu
Here’s an example of the information contained in a mount command sample. The file system name is used to create directory names:
If you specified a hostname for the mount target, the sample uses the FQDN in the commands. If you didn’t specify a hostname, the sample uses the mount target IP address. Using a FQDN to mount your file system is optional; even if you specified a hostname, you can edit the command to use the IP address instead. If you use an FQDN to mount the file system, ensure that the the FQDN correctly resolves to the mount target’s IP address. For more information, see DNS in Your Virtual Cloud Network.
Mount command samples mount the file system at the file system root directory. Mount command samples don’t include subdirectory information for the file system. If you want to mount a subdirectory of the file system, you must edit the sample to append the subdirectory path to the export path. For more information on mounting subdirectories in Linux-type instances, see To mount a file system subdirectory (Linux). For more information on mounting subdirectories in Windows instances, see To mount a file system subdirectory (Windows).
Caution
When mounting file systems, the following mount option combination is not supported by the File Storage service:
soft when the file system is mounted with the read/write mount option ( -o rw ). This combination can cause corruption of your data.
The following mount options or mount option combinations are not recommended for use with the File Storage service:
soft when the file system is mounted with the read-only mount option ( -o ro ) and the timeo has been specified as less than 300 seconds. This combination can cause a profusion of I/O error responses.
rsize , or wsize . These options cause issues with performance.
Note
When mounting file systems, Network Lock Manager (NLM) is enabled for file locking by default. The default requires no specified mount option. Typical NFS workloads function normally using the default.
Some applications might require you to specify the nolock mount option. Refer to your application documentation for best practices regarding this mount option.
Required IAM Service Policy
To use Oracle Cloud Infrastructure , you must be granted security access in a policyВ by an administrator. This access is required whether you’re using the Console or the REST API with an SDK, CLI, or other tool. If you get a message that you don’t have permission or are unauthorized, verify with your administrator what type of access you have and which compartmentВ to work in.
For administrators: The policy in Let users create, manage, and delete file systems allows users to obtain mount commands.
Using the Console
In the List Scope section, select a compartment.
The Console displays a list of file systems that have already been created in the compartment, if any.
Find the export in the mount target you want to use to mount the file system, click the Actions icon (three dots) , and then click Mount Commands.
Tip
To be sure that you select the correct export, check the following:
The export path: This path uniquely identifies the file system within the mount target. No two exports in a mount target can have the same export path, even if the exports are for the same file system.
The mount target name: File systems can be exported through more than one mount target. Be sure that you’ve selected the export for the correct mount target.
Next, mount the file system from a Unix-style or Windows instance.
Mounting File Systems From Windows Instances
Users of Windows Server 2012 R2 and later versions can mount a file system on any available drive letter using the mount target IP address and the file system export path.
The Windows NFSВ client must be installed on the instance from which you want to mount the file system.
Caution
Installing the Windows NFSВ client may require a restart of your system.
Caution
Updating the ‘AnonymousGid’ and ‘AnonymousUid’ values require registry changes to your system.
Prerequisites
The file system must have at least one export in at least one mount target. When you create a new file system, an export for the file system is created at the same time. See Creating File Systems for more information.
Correctly configured security rules for the mount target. See Security Rules for information about how security rules work in Oracle Cloud Infrastructure . Use the instructions in Configuring VCN Security Rules for File Storage to set up security rules correctly for your file systems.
Caution
When mounting file systems, the following mount option combination is not supported by the File Storage service:
soft when the file system is mounted with the read/write mount option ( -o rw ). This combination can cause corruption of your data.
The following mount options or mount option combinations are not recommended for use with the File Storage service:
soft when the file system is mounted with the read-only mount option ( -o ro ) and the timeo has been specified as less than 300 seconds. This combination can cause a profusion of I/O error responses.
rsize , or wsize . These options cause issues with performance.
Note
When mounting file systems, Network Lock Manager (NLM) is enabled for file locking by default. The default requires no specified mount option. Typical NFS workloads function normally using the default.
Some applications might require you to specify the nolock mount option. Refer to your application documentation for best practices regarding this mount option.
Using Windows Command Prompt
If you are using Windows platform images, the NFSВ client is already installed, and the correct user identities are mapped. Skip to step 4.
Open Windows PowerShell and run as Administrator:
Go to Start and click the Windows PowerShell icon.
In Windows PowerShell, type the following to run as Administrator:
Important
If you’ve set export options for your file system to require clients to connect from a privileged source port (1-1023), then you must set the UseReservedPorts registry key to 1.
Close the Administrator:В PowerShell window.
Open a standard Command Prompt Window:
Important
NFS file systems mounted as Administrator are not available to standard users.
In the standard Windows Command Line (CMD) window, mount the file system by typing the following. Replace 10.x.x.x: with the local subnet IP address assigned to your mount target, fs-export-path with the export path you specified when associating the file system with the mount target, and X with the drive letter of any available drive you want to map the file system to.
Tip
IP address and export path information is available in the Details page of the mount target associated with your file system. See To view details of a mount target for more information.
Important
The export path is the path to the file system (relative to the mount target IP address or hostname). If you did not specify a path when you associated the file system and mount target, then «/» represents the full extent of the mount target. In that case, you must use a «!» when mounting the file system. For example:В mount 10.0.0.0:/! X:
Write a file to the file system by typing the following. Replace X with the drive letter you used in step 10 and helloworld with your file name.
Verify that you can view the file by typing the following.
See Troubleshooting Windows NFS Connections for more information about common issues you might encounter.