- How to Mount IMG Files in Linux
- Method 1: Mount With Graphical Menus
- Method 2: Via the Loopback Device
- How to mount an ISO image/file under Linux
- How to Mount ISO File on Linux
- More about loop devices on Linux
- Procedure to mount ISO file/images under Linux
- How do I unmount the ISO image on Linux?
- How to mount an ISO file using a GUI app on Linux
- How to install furiusisomount app
- Mounting ISO Files using Linux Gnome or KDE GUI
- Conclusion
- andremiller.net
How to Mount IMG Files in Linux
ISO images are often used to contain CD-ROM or DVD data, but Linux users will occasionally find themselves working with IMG files instead. These contain direct disk images, which can be worked with in a similar way. At one point these were generally used for writing an entire file system directly to a discrete diskette, but few people would ever wish to do that in today’s world. There are two major reasons modern Linux users would need to work with them, however. One is if an IMG file was used to distribute a driver or other piece of an operating system that needed to be restored. The IMG file can be mounted and the individual file from inside of it’s contained system could then be copied over to a booted file structure. The other reason, which is becoming extremely popular, is for working with virtual machines and other forms of hardware virtualization.
Linux provides several different ways to work with these contained structures. Depending on your distribution, you might be able to work with them in a purely graphical environment. The same CLI tools that mount ISO images could also mount IMG if this isn’t possible for you, however.
Method 1: Mount With Graphical Menus
If you’re using PCManFM or another file manager that supports mounting an image directly via the /media folder with a menu driven system such as some versions of Nautilus, then you should hold launch your manager to start. You’ll either need to launch this from the Panel Menu in LXDE or from the Applications menu in GNOME. Once you’re open, navigate to the Downloads folder by clicking the link in the left panel and then right click on the disk image you downloaded. It’s generally smart to have ensured that your browser didn’t detect any malware before proceeding.
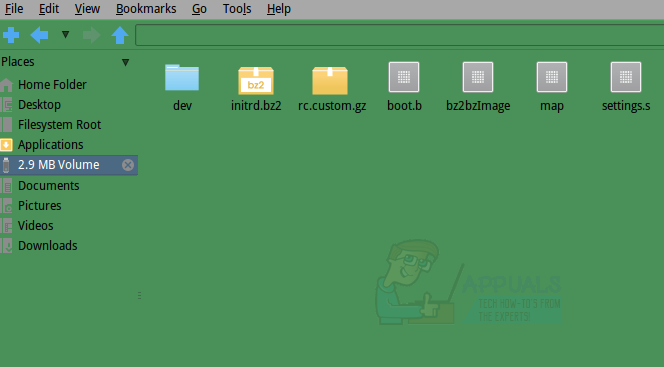
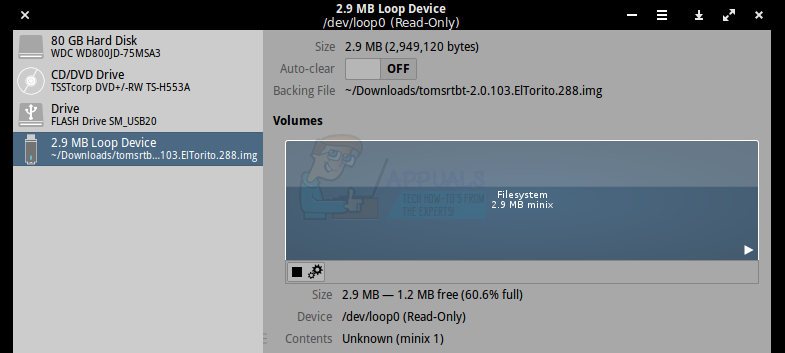
Once the context menu appears, select the “mount disk image” option. The label for this command will change depending on your particular distribution. The image will automatically mount at /media/USERNAME/disk, with USERNAME being replaced with your actual user name. Click on the left panel of the file manager where it reads the size of the image in question. In our example we used an image of an older Linux distribution called tomsrtbt (pronounced Tom’s Root Boot), which fit an entire operating system in less than three megabytes. Hence the “2.9 MB Volume” label refers to the image in question.
You may now drag or right click and copy any of these files to any other section of your file system for safekeeping. When you’re done you can click on the X logo next to the label to close it. If you’re using a file manager that doesn’t support this method of unmounting an image, then start the GNOME Disks utility from the Panel Menu or the Applications tab. Click on the device that has the same name as the label from the file manager and then click on the square stop button to close down the file system.
Method 2: Via the Loopback Device
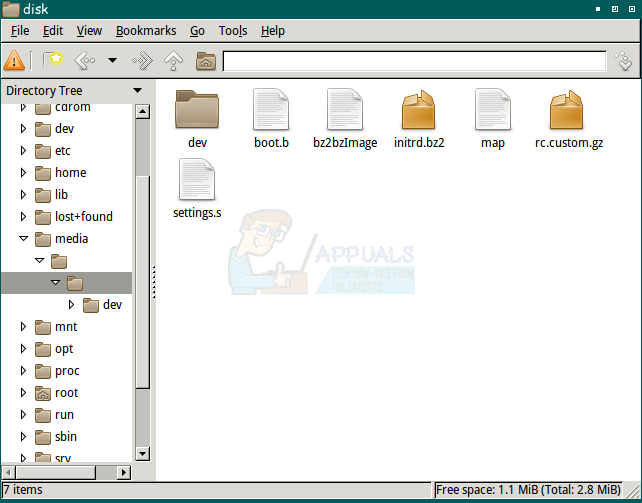
Disk images could be mounted via the loopback device as well, in much the same way as ISO images can be. This technique will be necessary if you use Thunar, Konqueror or any other file manager that doesn’t support direct mounting via graphical techniques. If you haven’t been able to mount an image graphically, then hold down CTRL, ALT and T at the same time. Type ls /mnt to make sure your /mnt directory is empty. If it’s not or if you don’t feel comfortable using it directly, then you can use sudo mkdir /mnt/toms to create a mountable directory. You could theoretically call the directory whatever you’d like. Type sudo mount -o loop tomsrtbt-2.0.103.ElTorito.288.img /mnt and press enter. You will be prompted to enter your password, which you will be required to do. The /mnt directory can then be explored via the CLI or the file manager you prefer. Naturally you’ll need to replace tomsrtbt-2.0.103.ElTorito.288.img with the image you’re using and /mnt with the directory tree segment you’re using.
Hold down CTRL and E to open your graphical manager or start it from the Applications or Whisker menu depending on which desktop environment you are using. Select the File System option from the left pain, navigate to /mnt and then select the /mnt folder. You’ll now be able to examine the contents of the image file.
At the CLI type sudo umount /mnt and press enter to umount the image. You would need to substitute whatever mount point you used for /mnt when you do so.
Источник
How to mount an ISO image/file under Linux
H ow do you mount ISO file on Linux using the CLI and GUI app? First, try to understand an ISO image. It is an archive file (disk image) of an optical disc using a conventional ISO (International Organization for Standardization) format. ISO image files typically have a file extension of .ISO. The name “ISO” comes from the ISO 9660 file system used with CD-ROM or DVD media, but an ISO image can also contain UDF file system because UDF is backward-compatible to ISO 9660. You can mount an ISO file or images via the loop device under Linux. It is possible to specify transfer functions (for encryption/decryption or other purposes) using loop device. This page explains how to mount ISO files on Linux.
How to Mount ISO File on Linux
- Create the mount point directory on Linux: sudo mkdir /mnt/iso
- Mount the ISO file on Linux: sudo mount -o loop /path/to/my-iso-image.iso /mnt/iso
- Verify it, run: mount OR df -H OR ls -l /mnt/iso/
- Unmount the ISO file using: sudo umount /mnt/iso/
More about loop devices on Linux
The loop device is a block device that maps its data blocks not to a physical device such as a hard disk or optical disk drive, but to the blocks of a regular file in a filesystem or to another block device. This can be useful for example to provide a block device for a filesystem image stored in a file, so that it can be mounted with the mount command.
A loop device is a pseudo-device that makes a file accessible as a block device. Loop devices are often used for CD ISO images and floppy disc images. Mounting a file containing a filesystem via such a loop mount makes the files within that filesystem accessible. They appear in the mount point directory using following Linux commands. So, how do you mount an ISO image file under Linux? You need to use the mount commandas follows:
Let us see all commands and examples in details.
Procedure to mount ISO file/images under Linux
First, you must login as a root user, if not root user then switch to root user using the su command:
$ su —
One can use the sudo command:
$ sudo -i
Next, create the directory i.e. mount point using the mkdir command, run:
# mkdir -p /mnt/disk
Finally, use the mount command as follows to mount iso file called disk1.iso:
# mount -o loop disk1.iso /mnt/disk
OR
# mount -o loop /path/to/disk1.iso /mnt/disk
Verify it with the df command or mount command:
# df -H
# mount
# ls -l /mnt/disk/
Change directory to list files stored inside an ISO image:
# cd /mnt/disk/
# ls -l
To copy files using the cp command:
$ cp file1 file2 /home/vivek/Downloads
Mounting ISO files on Linux using mount command
How do I unmount the ISO image on Linux?
Use the following command to unmount the ISO file/image on Linux:
$ sudo umount /mnt/disk/
OR
$ sudo umount /path/to/disk1.iso
Verify it:
$ df -H
$ mount
$ ls -l /mnt/disk/
How to mount an ISO file using a GUI app on Linux
Not a fan of the CLI? Try image management utility called furiusisomount:
Furius ISO Mount is a simple application for mounting ISO, IMG, BIN, MDF and NG image files even without burning them to disk. It provides the following features:
1. Automatically Mounts ISO, IMG, BIN, MDF and NRG image files.
2. Creates a mount point in your home directory.
3. Unmounts the Image files and mnd more.
How to install furiusisomount app
Type the following apt-get command/apt command on a Debian/Ubuntu/Mint Linux:
$ sudo apt install furiusisomount
Start furiusisomount:
$ furiusisomount &
Sample outputs:
Mount an ISO file on Linux using Furius ISO Mount GUI app
Just select an ISO image an click on the mount button. Open your file browser:
- No ads and tracking
- In-depth guides for developers and sysadmins at Opensourceflare✨
- Join my Patreon to support independent content creators and start reading latest guides:
- How to set up Redis sentinel cluster on Ubuntu or Debian Linux
- How To Set Up SSH Keys With YubiKey as two-factor authentication (U2F/FIDO2)
- How to set up Mariadb Galera cluster on Ubuntu or Debian Linux
- A podman tutorial for beginners – part I (run Linux containers without Docker and in daemonless mode)
- How to protect Linux against rogue USB devices using USBGuard
Join Patreon ➔
View mounted iso image in Ubuntu Linux file manager
Mounting ISO Files using Linux Gnome or KDE GUI
Conclusion
You learned how to use the mount, unmount command and GUI apps for mounting the ISO9660 images or files. For more information see:
| Category | List of Unix and Linux commands |
|---|---|
| Documentation | help • mandb • man • pinfo |
| Disk space analyzers | df • duf • ncdu • pydf |
| File Management | cat • cp • less • mkdir • more • tree |
| Firewall | Alpine Awall • CentOS 8 • OpenSUSE • RHEL 8 • Ubuntu 16.04 • Ubuntu 18.04 • Ubuntu 20.04 |
| Linux Desktop Apps | Skype • Spotify • VLC 3 |
| Modern utilities | bat • exa |
| Network Utilities | NetHogs • dig • host • ip • nmap |
| OpenVPN | CentOS 7 • CentOS 8 • Debian 10 • Debian 8/9 • Ubuntu 18.04 • Ubuntu 20.04 |
| Package Manager | apk • apt |
| Processes Management | bg • chroot • cron • disown • fg • glances • gtop • jobs • killall • kill • pidof • pstree • pwdx • time • vtop |
| Searching | ag • grep • whereis • which |
| Shell builtins | compgen • echo • printf |
| Text processing | cut • rev |
| User Information | groups • id • lastcomm • last • lid/libuser-lid • logname • members • users • whoami • who • w |
| WireGuard VPN | Alpine • CentOS 8 • Debian 10 • Firewall • Ubuntu 20.04 |
Comments on this entry are closed.
Cheers, worked like a charm 🙂
Quick comment:
You need the kernel module loop for it; people that get the error about it in mount should get the latest copy of the linux source and proceed to compile the correct module which is under block devices
Other than that it works 😉
Just what i needed, mahalo!
Thanks! This was very very easy to find and follow. I’m new to linux and this is the reason I made the swicth, the help that everyone give make learning linux easy and fun. Thank you for your time, thank you!
sweet! worked cleanly, no stupid paid software for windows needed to do such a simple task!
Looks like we cant mount it for RW. Bloody well then.
You’d have to finalize the RW disc so that it becomes an iso image. You can still erase the disc later.
I think he means mounting the iso file for reading and writing.
This tip was a great help! I only need to read the iso for installations so thanks a heap!
richard, to edit bootable ISO mount it as it’s described here, copy it’s contents to some directory, edit files you need and generate new ISO by command:
sudo mkisofs -o /tmp/new.iso -b isolinux/isolinux.bin -c isolinux/boot.cat -no-emul-boot -boot-load-size 4 -boot-info-table -J -R -V “new iso name” .
Works like a charm. It kept me from Burning a DVD for a computer that didn’t read DVDs. I did a Net Install of Linux over FTP. I copied the File to a Linux FTP Server, mounted the ISO and did an install. Sweet.
But what if I don’t have root? Or am too lazy to su or sudo?
Источник
andremiller.net
A while ago I thought it would be a good idea to make a backup of my Linux server by just dumping the complete disk to a file. In retrospect, it would have been much easier had I just dumped the individual filesystems.
When I finally got around to using this backup, long after the 10GB disk had perished I realized that to use the loopback device to mount a filesystem it actually needs a filesystem to mount. What I had was a disk image, including partition table and individual partitions. To further complicate matters the data partition was also not the first partition inside this image.
For reference, I created this image using the Unix ‘dd’ tool:
I followed the instructions on http://www.trekweb.com/
jasonb/articles/linux_loopback.html to try and mount the partitions inside the disk image, but ran into two problems.
To mount a partition inside the disk image you need to calculate the offset of where the partition starts. You can use fdisk to show this information to you, but you need to specify the number of cylinders if you are using a disk image.
You then also need to multiply the start and end numbers with the calculated sectors to get a byte offset.
I found another tool more useful for this task, called parted. If you are using Ubuntu, you can install it with ‘apt-get install parted’
Now we have the offsets and we can use those to mount the filesystems using the loopback device:
That mounted the first partition, the ‘boot’ partition, but this didn’t have the data on it that I was looking for. Lets try to mount partition number 3.
Oops, that doesn’t look right. According the article referred to above if you are using a util-linux below v2.12b then you cannot specify an offset higher than 32bits. I’m using util-inux 2.13 which shouldn’t have that problem, and besides, my offset is well below the 32bit limit.
The article also offers an alternative loopback implementation that supports mounting partitions within an image, but that requires patching and recompiling your kernel which I would rather not do.
Instead I decided to extra ct the filesystem from the image which would then allow me to mount it without specifying an offset.
Doing this is quite straightforward with ‘dd’. You need to give ‘dd’ a skip count, or, how far into the source to start copying, and a count, how much to copy.
Here you can either use the single byte offsets retrieved with parted or divide them by 512 and let ‘dd’ use 512 byte blocks. Copying just one byte at a time takes a very long time, so I suggest using a larger block size.
Here is the command I used to extract my filesystem. Skip is 2313360 (1184440320/512) and Count is 17719695 (9072483840/4)
After extracting the filesystem I was able to mount it without any problems.
Источник


