- How to Mount and Burn ISO Files in Windows 10 and Previous
- How to Mount and Unmount an ISO File in Windows
- How to Burn an ISO file to Disc
- Mounting iso file windows
- How do I mount ISO Image File In Windows 7?
- 6 best Windows 7 ISO mounting software solutions
- What are the best Windows 7 ISO mounting tools for your PC?
- WinZip (recommended)
- WinZip
- PowerISO
- PowerISO
- WinCDEmu
- Virtual CloneDrive
- DAEMON Tools Lite
- Magic ISO
- WinCDEmu
- The easiest way to mount an ISO. And more.
- Features
- Translations
- Tutorials
- Support
- Windows 2000 compatibility
- Tutorial: How to Mount an ISO File Using WinCDEmu
How to Mount and Burn ISO Files in Windows 10 and Previous
By Melanie Pinola 28 January 2016
Microsoft and other companies often distribute software as an ISO file, an exact copy of a DVD. In Windows 8 and Windows 10, you can easily work with these files without needing third-party software. Here’s how to mount the ISO image so you can see the contents and burn it to a physical disc so you can install the software on any computer.

How to Mount and Unmount an ISO File in Windows
Mounting or opening an ISO file is as simple as double-clicking on it, thanks to Windows’ built-in ISO-handling capabilities. In Windows 7 and earlier, you’d need to use a utility like Virtual Clone Drive to mount an ISO.
When you double-click on an ISO file in Windows 8 and above, however, it opens to show you the contents, just as if you were browsing a CD or DVD.
In fact, it shows up as a virtual DVD drive and is assigned a drive letter. You can open and copy individual files and folders from the ISO once it’s mounted.
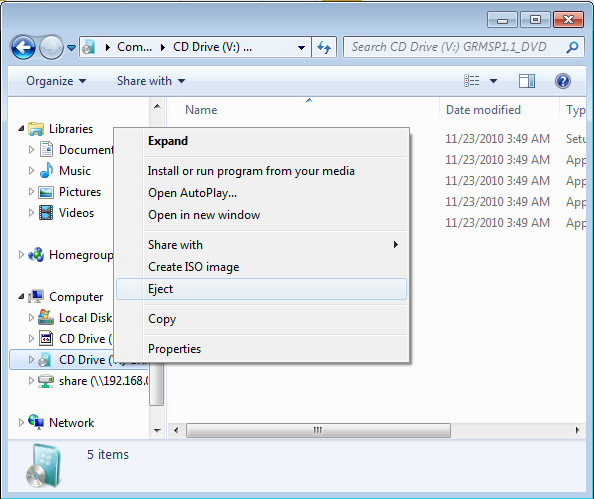
When you no longer need to work with the ISO, here’s how to unmount it: Right-click on the drive and select Eject.
How to Burn an ISO file to Disc
Creating a disc of the ISO contents, whether as a backup or to install the software on other computers, is a cinch too.
1. Insert a blank CD or DVD in your writable optical drive.
2. Right-click on the ISO file and select «Burn disk image.»
3. Select «Verify disc after burning» to make sure the ISO was burned without any errors.
4. Click Burn.
That’s it! Windows Disc Image Burner will do its thing and let you know when it’s finished.
Windows 10 doesn’t include any built-in way to create an ISO file from a DVD, but there are free utilities that will help you do this, such as open-source InfraRecorder.
Mounting iso file windows

How do I mount ISO Image File In Windows 7?
In Windows 7, to mount an ISO disk image for installing software or recover backup files, you need to install a third-party utility. Now here comes WinISO Standard 6 which will allow these older versions of Windows mount ISO files as virtual CD-ROM/ DVD-ROM drives.
Mount ISO is one of the main features of WinISO. It’s dead simple so that the novice can also handle it with ease.
Here we will show you the way to mount ISO image in Windows 7 step by step.
Step 1: Download and Run WinISO
Free Download WinISO from our official website and install it. It will just take you several seconds.

Step 2: Click «Mount»
Run WinISO, open the ISO file. Click «Mount» on the toolbar, or you can also click «Tools» on the menu, then choose «Mount Image».

Step 3: Click «Open in Explorer»
A few seconds later, you will get a message: Current image has been mounted to Drive H(as an example). Then click «Open in Explorer». The extracted file list will appear in the drive.

Furthermore, you can also stop mounting the image files by pressing «Unmount».
For more guides, please take closer look here:
6 best Windows 7 ISO mounting software solutions

- If you’re looking for the best ISO mounting software to use on your Windows 7 computer.
- Take a look at some of the top tools we’ve included on our list and make your pick.
- Still a fan of Windows 7? Then go and visit our dedicated Windows 7 section.
- For more useful product lists for every occasion visit our Software Hub.
- Marvel
- Starwars
- National Geographic
- Pixar
If you’re looking for the best Windows 7 ISO mounting software to use on your computer, take a peek at some of the top tools.
Mounting software, also known as disk image tools, let you turn discs and drives into virtual images so you can easily store and/or modify them from your computer’s storage.
An ISO file is a disk image file derived from an optical disc that contains the same contents from the disc, including its file system.
ISO files are characterized by their .iso extension, so if you have or receive any such files» href=’https://windowsreport.com/computer-file/’ data-id=»http://data.windowsreport.com/windowsreport/entity/computer_file;http://rdf.freebase.com/ns/m.020s1;http://dbpedia.org/resource/Computer_file»>files for users who are not on Windows 8 or 10 – because these two already automatically mount ISO files – then you need the best Windows 7 ISO mounting software to execute the task.
Mounting such files is one of the best things to have happened after CD and DVD drives because the latter was becoming cumbersome to move around with, plus added to the clutter around us.
Today, you don’t have to struggle with carrying around volumes of files in several discs on which you’ll burn your files to. Simply get mounting software or disk image tools, and you’re all set.
Here are our top picks for the best Windows 7 ISO mounting software you can use today.
What are the best Windows 7 ISO mounting tools for your PC?
WinZip (recommended)
Topping off our list is a software utility that is a top choice when it comes to archiving, extracting, or encrypting data, and it is called WinZip.
That being said, WinZip is perfectly compatible with Windows 7, even if it is an outdated OS. It supports all major archive file formats, as well as image files like ISO or BIN.
What makes WinZip ideal for handling ISO files is just how easy it is to use. Simply install it, then right-click the ISO file, and select the Extract here or Extract options.
Once you’ve done that, whatever was on the ISO files will be up for grabs in the location of your choosing.
Here are some of the perks of using WinZip:
- Require no prior knowledge of using software
- Universal archiver and file extractor
- Can handle image file formats
- Low system impact
- Easy-to-use
WinZip
PowerISO
As its name suggests, PowerISO can and will mount ISO files onto your virtual drives and it supports Windows 7 too.
The good thing about this mounting software is you can create bootable USB flash drives with it, plus you can use it to rip audios from your CD/DVD discs and convert them to mp3 files for easier storage and listening.
It also supports other image file formats besides ISO.

PowerISO
WinCDEmu

This is a free, open source mounting software that lets you mount ISO files in Windows 7 through Windows Explorer.
All you do is click on the disc images, or if you have an ISO image you intend to use, then WinCDEmu is your friend.
It is a one-click ISO mounting tool that runs on both 32 and 64 bit versions of Windows 7. What’s more, you can mount as many virtual drives as you so wish with this tool.
It also doesn’t take up so much time during installation as it is smaller than 1MB, so you can use it to mount whatever files you want like movies, games, music, and any other files you may have.
The beauty is that unlike the CD/DVD discs, you get more storage with a virtual drive, plus it opens up faster from your computer than a disc.
⇒ Download WinCDEmu
Virtual CloneDrive

As one of the best Windows 7 ISO mounting software in the market, this tool mimics an optical disc only that it exists virtually in your computer.
You can mount ISO files to a virtual drive and still use it the way you would a CD/DVD drive.
It is so simple to use, plus it comes free of charge and supports Windows 7 operating system.
The only flaw is the limited amount of virtual drives you can get with this tool at just 8 drives, otherwise, it is one of the most popularly used mounting software.
DAEMON Tools Lite

One of the most frequently used applications in the market. DAEMON Tools Lite works on Windows 7 and any other Windows platform, for that matter.
It brings all the usual jazz to the table, with multi-drive virtual simulation and a simple-to-use interface.
As the name itself suggests, this is a lightweight application and it even has a portable version that doesn’t require installation in order for you to mount ISO files.
Even though the interface is a bit outdated in comparison to some other entries on this list, you’ll figure it out in a matter of minutes.
You can either set a permanent virtual volume drive or add it only when needed. Not to mention a large variety of supported formats and fast access from the system tray.
Magic ISO

This mounting software works magic on ISO files as it mounts multiple images simultaneously – such a time saver right?
However, you only get up to 15 drives with this tool, which is pretty much better than Virtual CloneDrive, but this one doesn’t have a user-friendly interface like the other tools.
This tool also lets you extract images from optical discs, convert different formats, plus you get to work with your disk image the same way you would have with an active CD/DVD drive.
The best part is you can use it with Windows 7 as it works with the Windows Explorer so you can drag and drop your files and mount with zero hassles.
⇒ Download Magic Disc
Which of these best Windows 7 ISO mounting software sounds like a plan for you? Let us know in the comments section below, and share your experience if you’ve used any of them.
UPDATE: Microsoft made the official Windows 7 ISO files available for download. This means that you can go to Microsoft’s official website and copy the ISO files to an external device. You can then use the respective files to install Windows 7 on your computer.
Here are the official download links:
⇒ Download Windows 7 ISO from Microsoft
Important note: Microsoft officially ended Windows 7 support. If you’re planning to upgrade to Windows 10, make sure to check out our wide collection of guides on how to make the transition as smooth as possible.
WinCDEmu
The easiest way to mount an ISO. And more.
WinCDEmu is an open-source CD/DVD/BD emulator — a tool that allows you to mount optical disc images by simply clicking on them in Windows Explorer. If you have downloaded an ISO image and want to use it without burning it to a blank disc, WinCDEmu is the easiest way to do it.
Features
One-click mounting of ISO, CUE, NRG, MDS/MDF, CCD, IMG images.
Supports unlimited amount of virtual drives.

Runs on 32-bit and 64-bit Windows versions from XP to Windows 10.
Allows creating ISO images through a context menu in Explorer.
Small installer size — less than 2MB!
Does not require rebooting after installation.
A special portable version is available.
Translated to more than 20 languages.
Does not occupy drive letters when not used.
Supports data, DVD-video and BD-video images.
WinCDEmu is free for any kind of use — it is licensed under LGPL

Translations
WinCDEmu supports various UI languages through the LNG files maintained by the community. You can download the latest language files or submit your own translation in the Online Translation System.
Tutorials
If you want to get step-by-step instructions on installing and using WinCDEmu, including detailed screenshots, consider these tutorials:
Support
WinCDEmu is provided free of charge, and hence does not come with technical support.
Windows 2000 compatibility
Windows 2000 is not directly supported. However, you can build the sources using Windows 2000 DDK to obtain a Win2K-compatible version.
Tutorial: How to Mount an ISO File Using WinCDEmu
An ISO image is simply a «virtual copy» of an optical CD/DVD disc. Lots of software is distributed in the form of ISO images (e.g. you can download Windows 7 Service Pack ISO from Microsoft website). To mount an ISO file means to access its contents as if it was recorded on a physical medium and then inserted in the optical drive. If you downloaded a software in the form of an ISO image and want to install it, mounting it will be faster and easier than recording it on an actual disc.
To mount an image you need to install WinCDEmu. Then follow these steps:
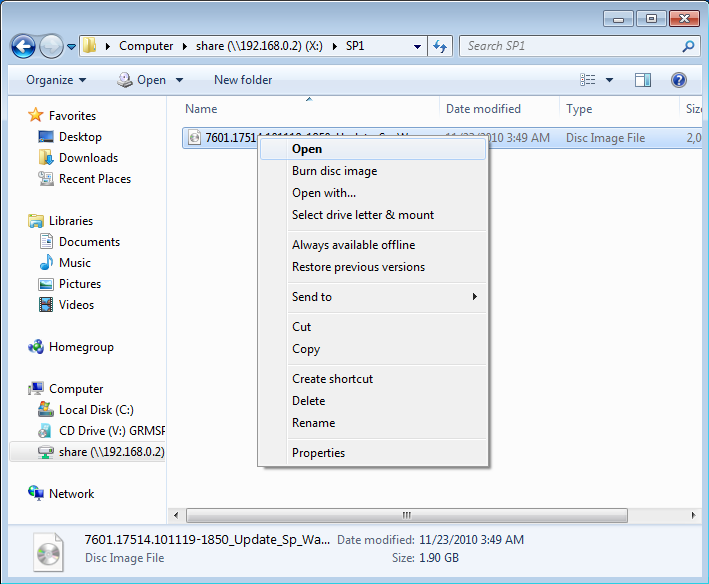
- Open the folder containing the image file:

- Double-click at the image. Alternatively, you can right-click and select «Select drive letter & mount» from the context menu.
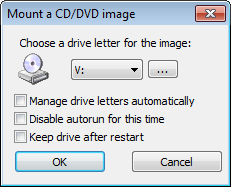
- Click at the OK button or press enter. If you don’t want to see this dialog every time you mount an image, set the «Manage drive letters automatically» checkbox.
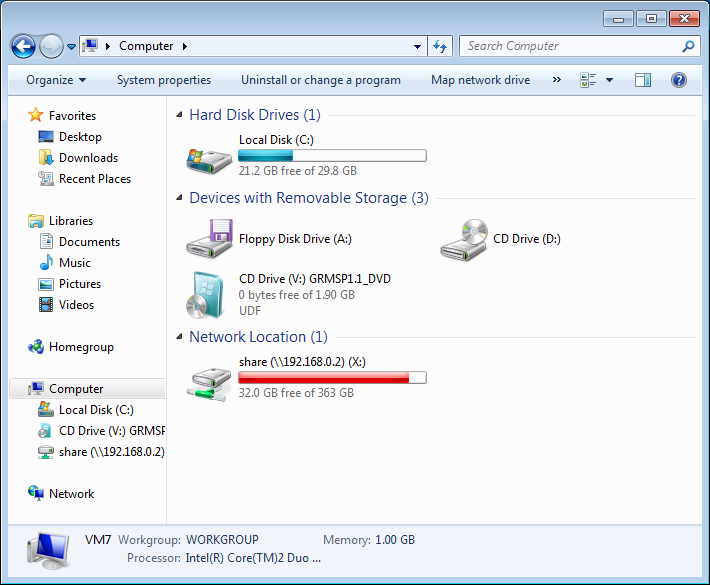
- A new virtual drive will appear among all other drives in the «computer» folder:
- You can use the virtual drive the same way as you would use a «real» optical disc — browse its contents, open files, start programs.
- Once you are done with the image, right-click on the virtual drive and select «Eject»:
- You can alternatively unmount the image by double-clicking at the image file again.
Read other WinCDEmu tutorials to learn how to create images with WinCDEmu and edit various settings.
If you have any questions or problems, feel free to post on WinCDEmu forum.


