- How To Mount NFS Share In Linux and Windows?
- Install NFS Server
- Ubuntu, Debian, Mint, Kali Client Packages
- Fedora, CentOS, Fedora Client Packages
- Ubuntu, Debian, Mint, Kali Server Packages
- Fedora, CentOS, Fedora Server Packages
- Check NFS Service Status
- Start NFS Service
- Create NFS Share
- Enable Exports
- Mount NFS Share For Linux
- List NFS Mounts
- Unmount NFS Share For Linux
- Mount NFS Share For Windows
- How to Mount an NFS Share Using a Windows 10 Machine
- NFS Only Works in Windows 10 Enterprise
- Install the NFS Client (Services for NFS)
- Enable Write Permissions for the Anonymous User
- How to Mount an NFS Share
- Read Next
- Использование клиента NFS в Windows 10 редакции Professional
How To Mount NFS Share In Linux and Windows?
Network File System or NFS is a network-based filesystem protocol which is mainly used to share files and folders over the network. NFS is a UNIX based technology but can be used by most of the operating systems like Linux, Ubuntu, Debian, Kali, Mint, Fedora, CentOS, RedHat and Windows operating systems Windows 7, Windows 8, Windows 10, Windows Server 2008, Windows Server 2012, Windows Server 2016.
Install NFS Server
NFS packages mainly divided into two parts. First is the server side packages which will install related kernel modules and server tools.
Ubuntu, Debian, Mint, Kali Client Packages
Fedora, CentOS, Fedora Client Packages
Ubuntu, Debian, Mint, Kali Server Packages
After the installation is complete the nfs-server service will be also created automatically.
Fedora, CentOS, Fedora Server Packages
Check NFS Service Status
As the NFS shares will be served over nfs-server we need to the if it is working. We will use systemctl status command with the nfs-server service name.
 Check NfS Service Status
We can see that the service is active and working properly.
Start NFS Service
If the service is not started or stopped in any way we need to start the nfs-server service. We will use systemctl start command with the nfs-server service name like below.
Create NFS Share
NFS main configuration is stored in the /etc/exports file. Each share is created line by line. For example, if we want to share /mnt with the IP address 192.168.10.10 we will use the following configuration.
But generally, we share the files and folders with everyone who has access to the NFS server. We can use the following configuration to share everyone.
Enable Exports
After creating the share configuration we need to refresh the NFS table where the shares are stored. We can simply use exportfs command with the -a option which will add current configuration to the NFS table.
Mount NFS Share For Linux
We can use mount command in order to mount NFS share. We will specify the filesystem type as nfs to the mount command with the -t option like below. The server IP address is 192.168.142.144 and share is /mnt . We will mount to the /home/ismail/poftut1 .
List NFS Mounts
After mounting the NFS share we can check it by listing the NFS mount. We will use mount command and filter NFS shares with the grep command like below.
 List NFS Mounts
Unmount NFS Share For Linux
We can unmount already mounted NFS shares with the umount command. We will just specify the mount path to the umount command with the sudo command like below.
Mount NFS Share For Windows
First, we will enable NFS modules or features on Windows operating systems. Open Start > Control Panel > Programs. Select Turn Windows Features on or off. Select Services for NFS. Click OK.
We can mount NFS shares in Windows operating systems too. We will use mount command. We will also provide nolock option and other parameters like remote NFS server IP address and local drive which is Z in this case.
Alternatively, we can use net use command which can also mount NFS shares. We will provide the partition name which is z and remote NFS server.
How to Mount an NFS Share Using a Windows 10 Machine
By Tony Mackay В· 08 Dec 2016
Mounting an NFS (Network File System) share using a Unix-like operating system is pretty straight forward. But how do you mount an NFS share of a UNIX system from a Windows 10 machine? Keep reading to find out how.
NFS Only Works in Windows 10 Enterprise
Update 2012-04-20 – These instructions should now work on Windows 10 Pro (Version 10.0.14393 and above) as mentioned by EyeDocGeek in the comments.
This tutorial only applies to the enterprise version of Windows 10 because it is the only version which includes the Services for NFS feature. If you don’t have the enterprise version of Windows, then you might be better off exposing your share using Samba which should work on all versions of Windows.
With that said let’s install the Services for NFS feature and mount an NFS share.
Install the NFS Client (Services for NFS)
The first thing we need to do is install the NFS Client which can be done by following the steps below:
Step 1: Open Programs and Features.

Step 2: Click Turn Windows features on or off.

Step 3: Scroll down and check the option Services for NFS, then click OK.

Step 4: Once installed, click Close and exit back to the desktop.
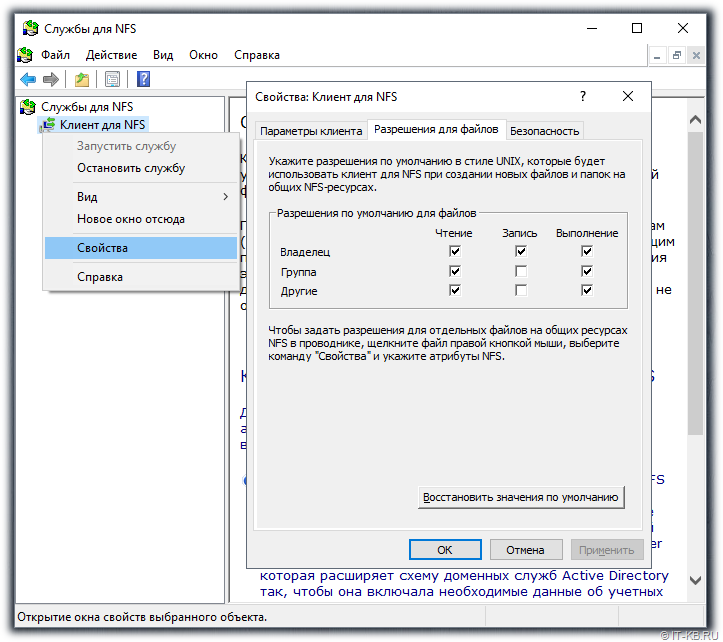
Enable Write Permissions for the Anonymous User
With the default options you will only have read permissions when mounting a UNIX share using the anonymous user. We can give the anonymous user write permissions by changing the UID and GID that it uses to mount the share.
The image below shows the a share mounted using the default settings.

To change the UID and GID we need to make a simple change to the Windows registry by performing the following steps:
- Open regedit by typing it in the search box end pressing Enter.
- Browse to HKEY_LOCAL_MACHINE\SOFTWARE\Microsoft\ClientForNFS\CurrentVersion\Default.
- Create a new New DWORD (32-bit) Value inside the Default folder named AnonymousUid and assign the UID found on the UNIX directory as shared by the NFS system.
- Create a new New DWORD (32-bit”) Value inside the Default folder named AnonymousGid and assign the GID found on the UNIX directory as shared by the NFS system.

- Restart the NFS client or reboot the machine to apply the changes.

The output of the mount command should now look like this:
Notice the 0 value applied to the UID and GID. This means the share is mounted using the root user.
How to Mount an NFS Share
Assuming your NAS device is on the same network as your Windows machine and the IP address of the device is 10.1.1.211, the following command will mount a share on the NFS system at /mnt/vms.
The share is now mounted and we can access the data by navigating to the Z: drive.

That’s it, we can now write to the NAS device. Although, I did notice that trying to open the share for the first time takes a long time.
Read Next
Tony is the founder and editor of GraspingTech, a blog which provides tutorials for Cloud Architects, DevOps Engineers and System Administrators. He has written over one hundred tech tutorials which have been read by more than a million people.
Connect with Tony on LinkedIn or contact him by email.
Использование клиента NFS в Windows 10 редакции Professional
 Администрируя серверы на базе ОС Linux в среде, где в качестве основной клиентской ОС используется Windows, время от времени приходится сталкиваться с необходимостью что-либо скопировать с клиентской Windows на Linux-систему или наоборот, с Linux-системы на Windows. Чаще всего для этого используются возможности протоколов SSH/SCP с помощью таких инструментов, как например, утилита pscp.exe. Но когда приходится сталкиваться с файловыми Linux-серверами, позволяющими использовать возможности протокола NFS, мы можем задаться вопросами типа «может ли клиентская ОС Windows выступать в качестве NFS-клиента?», «есть ли в клиентской ОС Windows какая-то встроенная реализация клиента NFS?». Именно такие вопросы у меня возникли в период времени, который совпал с периодом, когда мы перебирались с Windows 8.1 на первый релиз Windows 10. Информация, которую в тот момент удалось найти по этому вопросу, заключалась в том, что функциональность NFS-клиента имеют только «старшие» редакции клиентских ОС Windows, такие как Windows 7 Ultimate/Enterprise, Windows 8/8.1 Enterprise и Windows 10 Enterprise. Однако в нашем случае использовалась ОС Windows 10 редакции Professional, поэтому пришлось отбросить эти мысли.
Недавно, читая обсуждения на форумах TechNet, я столкнулся с информацией о том, что с какого-то момента времени в ОС Windows 10 редакции Professional появилась возможность использовать функционал NFS-клиента. По информации из некоторых источников такая возможность появилась в Windows 10 версии 1607 (10.0.14393 / Anniversary Update).
Решив проверить эту информацию на имеющейся у меня под руками Windows 10 1803 (10.0.17134 / April 2018 Update) редакции Professional, я обнаружил, что теперь у нас действительно имеется возможность использования этого функционала.
Чтобы включить NFS-клиента, можем воспользоваться оснасткой управления программами и компонентами appwiz.cpl. Здесь в перечне «компонентов Windows» можно найти доступные к включению «Службы для NFS«.
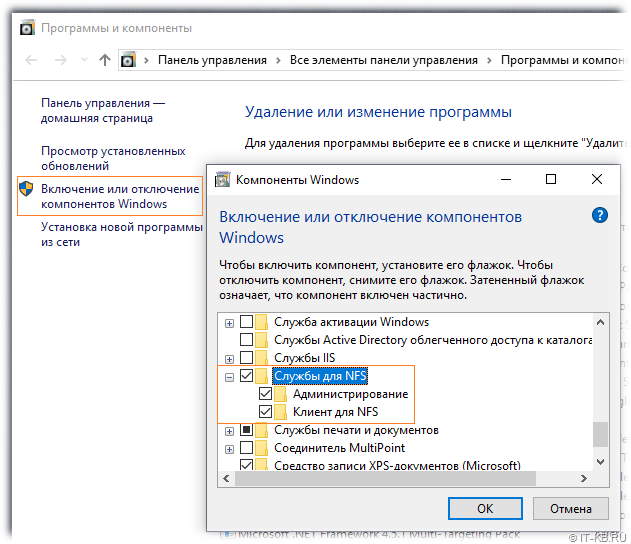
После завершения установки компонент в Панели управления в разделе «Администрирование» появится оснастка «Службы для NFS» (nfsmgmt.msc), в которой мы сможем управлять некоторым параметрами работы NFS-клиента.
Предполагаем, что на стороне NFS сервера уже настроены разрешения для доступа с клиентской системы, например, явно разрешён доступ по IP адресу клиента. Простейший пример установки и настройки NFS-сервера на стороне CentOS Linux можно найти в статье Вики «Установка и настройка сервера и клиента NFS в CentOS Linux 7.2».
После настройки прав доступа на стороне NFS-сервера переходим на Windows 10 и выполняем подключение сетевого каталога с помощью утилиты «mount«. Простейший пример анонимного подключения к сетевому каталогу выглядит так:
- «-o anon» — подключаться с правами анонимного пользователя;
- «KOM-FS01» — имя NFS-сервера;
- «mnt\vdo-vd1\ovirt-iso-domain» — локальный путь к каталогу на NFS-сервере;
- «I» — буква диска Windows
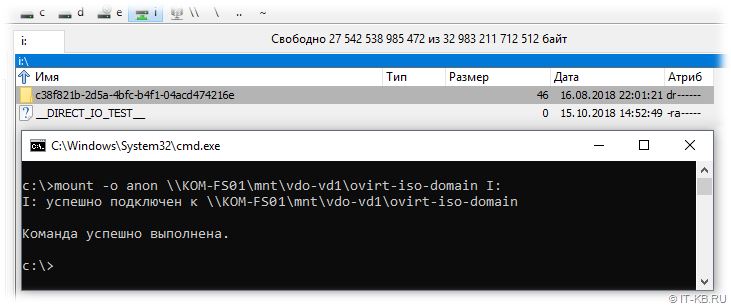
Другие доступные параметры и ключи утилиты, можно посмотреть командой «mount /?«. Например, при подключении мы явно можем указать имя пользователь и пароль на NFS-сервере.
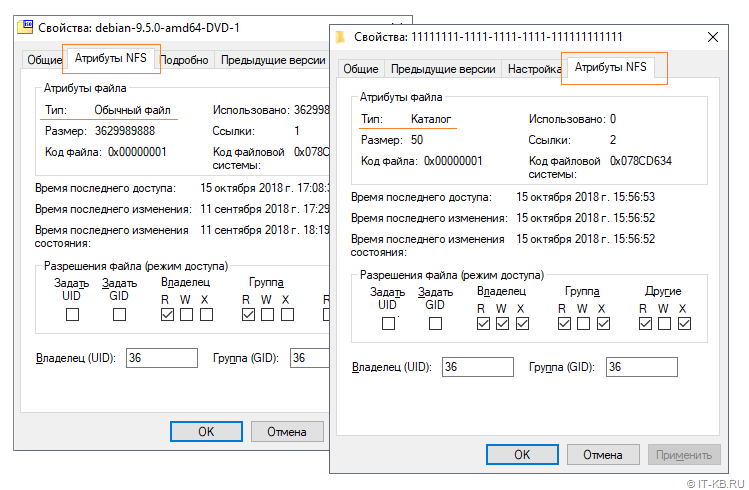
При открытии свойств каталогов и файлов в подключённом NFS-каталоге мы увидим специальную вкладку «Атрибуты NFS» с соответствующими атрибутами, в том числе и информацию о текущих разрешениях на каталог/файл, которыми, в случае достаточных прав, мы можем управлять.
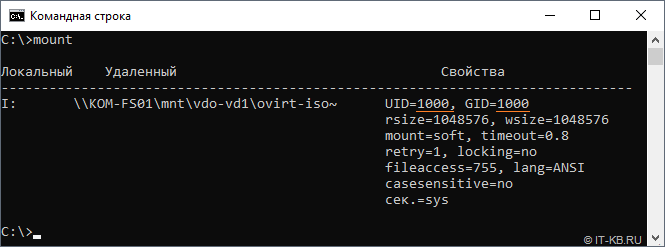
При повторном выполнении команды mount без указания параметров, мы получим сведения о текущий подключениях NFS-клиента и свойствах этих подключений:
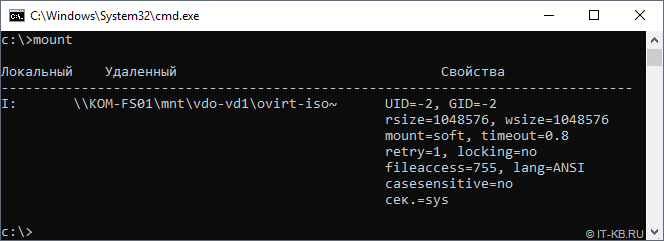
Здесь мы сможем увидеть то, с какими UID и GUID, выполнено подключение. Для анонимных подключений это по умолчанию -2/-2. Если по какой-то причине у нас возникнет необходимость изменить эти идентификаторы для всех анонимных клиентских подключений, то мы можем добавить пару отсутствующих по умолчанию параметров реестра типа DWORD (32-бита):
В значениях созданных параметров можно записать нужные UID и GUID, которые будут использоваться при всех анонимных подключениях. На скриншоте ниже используется пример со значениями 1000:1000 (десятичное).
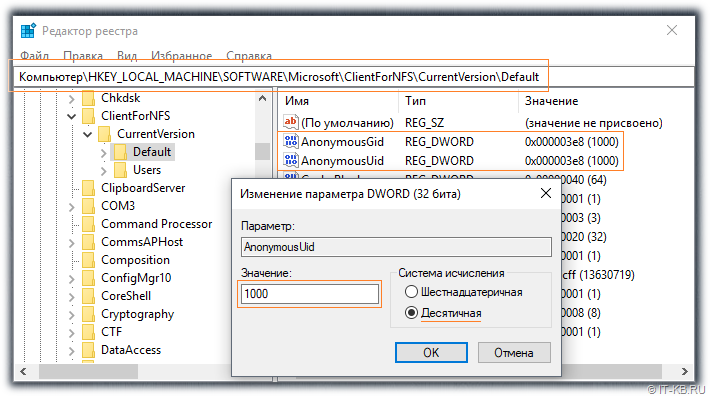
Если мы хотим, чтобы все анонимные подключения использовали root-овые идентификаторы, то в соответствующих параметрах реестра нужно указать AnonymousUid = 0 и AnonymousGid = 0. Указание root-овых идентификаторов может быть полезно в случае, если, например, нам требуется не только чтение, но запись в подключенном NFS-каталоге, а удалённый NFS-сервер разрешает запись только root-пользователю и/или членам группы root.
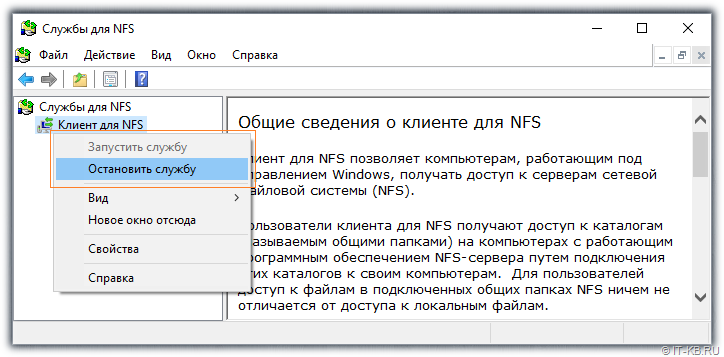
Для вступления изменений в силу потребуется выполнить остановку и повторный запуск службы клиента NFS из ранее упомянутой оснастки «Службы для NFS» (nfsmgmt.msc).
Либо, если перезапуск компьютера не составляет проблемы, то для вступления изменений в силу можно выполнить и перезагрузку клиентского компьютера.
Здесь хочу сделать маленькое отступление относительно перезапуска службы клиента NFS и поделиться своими наблюдениями.
Мои попытки перезапускать системную службу «Клиент для NFS» (NfsClnt) через стандартные механизмы, такие как оснастку управления службами services.msc или утилиту «net«, показали, что это по какой-то причине приводит к невозможности запуска службы после её остановки. Поэтому для перезапуска NFS-клиента лучше использовать именно «родную» оснастку. Хотя, опять же, замечено, что многократные остановки/запуски службы в оснастке «Службы для NFS» также могут привести к неадекватной работе NFS-клиента. В результате чего, например, утилита «mount» может перестать подключать NFS-каталоги, выдавая ошибку сети:
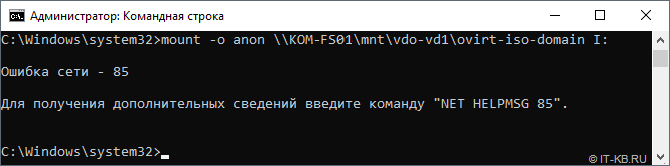
В таких случаях помогает только перезагрузка клиентского компьютера, после которой всё снова начинает работать.
После того, как нужные нам изменения внесены в реестр и служба клиента NFS успешно перезапущена, снова попытаемся подключить NFS-каталог и посмотрим командой «mount» сведения о подключениях.
Как видим, теперь в качестве идентификаторов безопасности выступают именно те, что были ранее нами указаны в реестре.
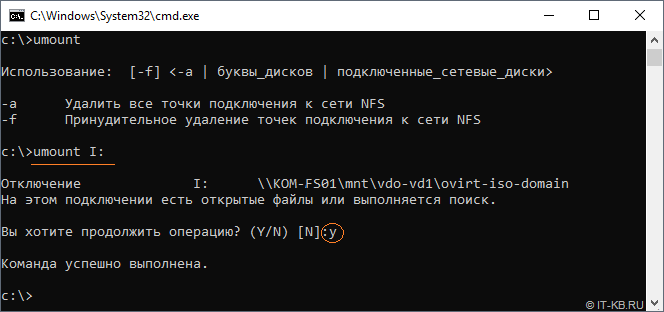
Отключение подключенных по протоколу NFS сетевых ресурсов выполняется также просто, как и подключение, только с помощью другой утилиты – «umount«
В общем это хорошо, что теперь у пользователей ОС Windows 10 редакции Professional есть штатная возможность работать с сетевыми файловыми ресурсами по протоколу NFS. Будем использовать это в работе.


