- Support Articles
- Mounting NTFS on Linux
- NTFS drives
- Types of drives
- Getting started
- Installing the required packages and setting up fstab
- How Do I Access or Mount Windows/USB NTFS Partition in RHEL/CentOS/Fedora
- How to Mount Windows NTFS Partition in Linux
- If You Appreciate What We Do Here On TecMint, You Should Consider:
- Как монтировать NTFS в Linux
- Установка компонентов
- Ручное монтирование
- Автоматическое монтирование
- ИТ База знаний
- Полезно
- Навигация
- Серверные решения
- Телефония
- Корпоративные сети
- Как смонтировать раздел NTFS в Linux
- Смонтировать раздел NTFS с разрешением только для чтения
- Определить раздел NTFS
- Создать точку монтирования и смонтировать раздел NTFS
- Смонтировать раздел NTFS с разрешениями на чтение и запись
- Обновить репозитории пакетов
- Установите Fuse и ntfs-3g
- Смонтировать раздел NTFS
Support Articles
Mounting NTFS on Linux
Mounting NTFS drives on Linux and why the hell its so hard for Plex to read it. This guide shows one of the ways to add NTFS drives to your Fedora/CentOS/Ubuntu Linux distribution.
NTFS drives
Types of drives
When working with NTFS formatted devices in Linux, we most often come across two types. First, you have internal NTFS drives/partitions from a Windows install or an old Windows drive that you weren’t using any more. Second, you have a USB externally mountable drive that you were using on you Windows PC. So, now you decided you wanted to try and use that drive for Plex Media Server on your new shiny Linux install. In this guide we’ll cover Fedora/Ubuntu and specifically the ntfs-3g package that allows Linux to mount NTFS drives and have them actually usable.
Before we dive into drives, devices, fstab, ntfs-3g, UUIDs (and assuming you don’t know how to control permissions or have only a vague idea of how to use them), it’s recommended that you read the Linux Permissions Guide.
Getting started
Getting back to the fun stuff: So, assuming you’ve already attached your NTFS drive to your Linux machine, chances are that it’s already automounted and you have probably even been able to see data on it from your local user. On Linux this is usually the case when using USB drives; the automounter daemon kicks off a mount of the drive when you connect it via USB, but it does this as your local user and with local user permissions. So, to get around this we need to tell Linux where to mount that drive and how.
Installing the required packages and setting up fstab
We will go through the package installation on both Fedora and Ubuntu, and also show you how to configure your fstab file for automounting of that specific drive.
First off we’ll go through what the fstab file is and what it does. It’s a text file placed in /etc named fstab (/etc/fstab). It contains the information of what filesystems need to be read and mounted (connected) to your linux server during boot. It can be both internal drives/partitions as well as USB drives and even network shares. Below is an example of how the fstab file can look like.
To under stand it better we will put it into a form and explain each field in the file. Below we have two example lines from an fstab file:
The fields have the following meaning and impact on the filesystem mounting:
- device: device is the reference to actual device the will be mounted. This can be /dev/sda1 or as in the example/dev/mapper/fedora-root. It can be used as a direct reference to the device file, or in the case of using UUID, by entering UUID=
- mountpoint: This field defines where the device gets mounted. So /, /var, /usr or even /media/ntfs if you want your drive mounted there. (Don’t play with re-arranging where you mount your system drives as it will break the system)
- fs type: This field defines what type of filesystem Linux will try to mount the drive with. If this is not the correct type then you cannot mount the drive. Examples of types of filesystem are ext4, xfs, hfs and ntfs-3g.
- options: This is where we define extra or specific options we need to mount the drive to our needs. A huge list of options per filesystem type exist and can be found here: http://linux.die.net/man/8/mount and here for ntfs-3g http://linux.die.net/man/8/mount.ntfs-3g
- dump: (1=backup, 0=don’t backup)
- fsck order: Here is where we define if the drive should be checked on boot/mount. 0 means don’t fsck. Other values define the order in which to fsck ordering 1-X
Now that we have gotten a quick overview of the fstab file, we can move on to getting started at installing packages. For both Linux distributions you have to open a terminal window. Then run the respective command to get ntfs-3g package installed.
Once you have the ntfs-3g package installed, the steps are the same for both Linux distributions.
Now we need to do some pretty tricky stuff to ensure that we catch the unique ID of the NTFS drive and print out a text line you can add to fstab. As root on you server you need to run the next set of commands:
Elevate to root:
Catch UUID command and spit out fstab line (THIS HAS TO BE ON ONE LINE):
If you’re unsure if you can type all that in, you can get it from plexrpms.markwalker.dk and pipe it through a script like so (run as root):
If you are unsure what’s in it and want to see it before you run, you can cat the output like so:
The command should if, you have any ntfs drvies attached to your system, spit out a line or two if you have more drives that look similar to this:
In this example I’m using /media/nftsdrive an example mountpoint. If you want to change this you will have to modify that line in the command run above. Once we have that command it should be possible for us to get things set up in fstab. But, as with all mounted drives, we need to ensure that the mountpoint we are going to be using exists. So, check that your mountpoint is in place (and don’t use any mountpoint under /home/username, as it will only break things). Run the next command to verify that the directory is in place. Check mountpoint:
If the mountpoint isn’t in place and you get an error back etc. Then run the next command to create it. Create mountpoint:
Now we are ready to add the mount reference in fstab. Open any editor of your choice, vi/emac/nano or even graphical texteditor in the GUI, just make sure you run them all as root or administrator; it’s the only way we can edit the fstab file.
As an example I will use vi:
It should show you a file similar to this one:
Now we want to add the previous output that we had before, being:
In the editor type: SHIFT + G
Followed by: SHIFT + A
Then hit: RETURN
This should put us at the bottom of the file and ready to add the mounting line we need to mount the NTFS drive so we can actually use it.
The next step is to paste the line the one-liner command gave us, with any corrections that you did.
Once you have entered the correct line (and this has to be correct otherwise it won’t work and you will have to go back and edit this file again), all you need to do is run the mount command:
If all goes well you should have your NTFS drvie mounted in /media/ntfsdrive. With the mount options we have used you should be able to change permissions on the drive as well. Ain’t that cool.
To make sure that Plex can read the files on your NTFS drvie simply run:
Enjoy happy Plexness from your Plex Media Server.
To vote if this article was helpful, please sign in with your plex account.
Источник
How Do I Access or Mount Windows/USB NTFS Partition in RHEL/CentOS/Fedora
Sometimes it may happens in some stage, you may have to access data on a Windows partition, USB device or any similar device. Today most of the modern Linux systems automatically recognize and mount any disks.
However, in some occasions where you may required to configure your system manually to mount ntfs partitions on your Linux system. Specially when you are using dual boot operating environment. Fortunately, this process is not so complicated task its just very fairly straight forward.
![]() How to mount Windows NTFS Partition in Linux
How to mount Windows NTFS Partition in Linux
This article explains you on how to access or mount Windows XP, Vista NTFS or USB filesystem using the ‘mount‘ command in RHEL/CentOS/Fedora systems.
How to Mount Windows NTFS Partition in Linux
First you need to enable EPEL (Extra Packages for Enterprise Linux) Repository. You may refer the article on how to enable EPEL Repository under RHEL, CentOS and Fedora systems.
To mount any NTFS based filesystem, you need to install a tool called NTFS3G. Before heading up for installation let’s understand NTGS3G.
What is NTFS3G
NTFS3G is an open source cross-platform, stable, GPL licensed, POSIX, NTFS R/W driver used in Linux. It provides safe handling of Windows NTFS file systems viz create, remove, rename, move files, directories, hard links, etc.
Once EPEL is installed and enabled, let’s install ntfs-3g package using the below command with root user.
Fuse Install
Next, install and load FUSE driver to mount detected devices with below command. FUSE module is included in the kernel itself in version 2.6.18-164 or newer.
Identify NTFS Partition
Once fuse module is loaded, type below command to find out NTFS Partitions in Linux.
Mount NTFS partition
First create a mount point to mount the NTFS partition.
Simply run the following command to mount the partition. Replace sda1 with your actual partition found.
Once it’s mounted on /mnt/ntfs, you may use regular Linux ls -l command to list the content of mounted filesystem.
If you want to make mount point permanent at the boot time, then simple add the following line at the end of /etc/fstab file. This will remain as permanent.
Umount NTFS Partition
Simply, use the following command to unmount the mounted partition.
If You Appreciate What We Do Here On TecMint, You Should Consider:
TecMint is the fastest growing and most trusted community site for any kind of Linux Articles, Guides and Books on the web. Millions of people visit TecMint! to search or browse the thousands of published articles available FREELY to all.
If you like what you are reading, please consider buying us a coffee ( or 2 ) as a token of appreciation.

We are thankful for your never ending support.
Источник
Как монтировать NTFS в Linux
Инструкция на примере Linux CentOS 7.
Установка компонентов
Для начала необходимо установить пакет ntfs-3g. В противном случае, при попытке запустить команду на монтирование раздела NTFS мы получим ошибку mount: unknown filesystem type ‘ntfs’.
Сначала устанавливаем расширенный репозиторий:
yum install epel-release
Затем сам пакет ntfs-3g
yum install ntfs-3g
После установки данного пакета в системе появятся дополнительные команды mount.ntfs-fuse и mount.ntfs-3g., а также команда mount распознает опцию -t ntfs.
Ручное монтирование
Монтирование NTFS на чтение и запись выполняется любой из трех команд:
mount -t ntfs /dev/sdb1 /mnt
mount -t ntfs-3g /dev/sdb1 /mnt
mount.ntfs-3g /dev/sdb1 /mnt
* в данном примере, примотировано устройство /dev/sdb1 в раздел /mnt. Понять, какой устройство нужно монтировать можно при помощи команды fdisk -l
Автоматическое монтирование
Чтобы раздел автоматически монтировался при перезапуске компьютера, открываем на редактирование файл:
/dev/sdb1 /mnt ntfs defaults 0 0
* в данном примере мы раздел /dev/sdb1 будем монтировать в каталог /mnt.
Чтобы применить настройку и проверить ее, вводим:
Посмотреть примонтированные разделы и файловые системы можно командой:
Источник
ИТ База знаний
Курс по Asterisk
Полезно
— Узнать IP — адрес компьютера в интернете
— Онлайн генератор устойчивых паролей
— Онлайн калькулятор подсетей
— Калькулятор инсталляции IP — АТС Asterisk
— Руководство администратора FreePBX на русском языке
— Руководство администратора Cisco UCM/CME на русском языке
— Руководство администратора по Linux/Unix
Навигация
Серверные решения
Телефония
FreePBX и Asterisk
Настройка программных телефонов
Корпоративные сети
Протоколы и стандарты
Как смонтировать раздел NTFS в Linux
New Technology File System
3 минуты чтения
NTFS — это система хранения файлов, стандартная для компьютеров Windows, но системы Linux также используют ее для организации данных.
Мини — курс по виртуализации
Знакомство с VMware vSphere 7 и технологией виртуализации в авторском мини — курсе от Михаила Якобсена

Большинство систем Linux монтируют диски автоматически. Однако в конфигурациях с двойной загрузкой, где требуется обмен файлами между двумя системами с разделами NTFS, эта процедура выполняется вручную.
Эта статья покажет вам, как смонтировать раздел NTFS в Linux с разрешениями только для чтения или чтения и записи.
Смонтировать раздел NTFS с разрешением только для чтения
Выполните следующие действия, чтобы смонтировать раздел NTFS с доступом только для чтения.
Примечание. Раздел только для чтения позволяет пользователям читать файлы. Чтобы включить запись в раздел NTFS, обратитесь ко второму разделу статьи.
Определить раздел NTFS
Перед монтированием раздела NTFS определите его с помощью команды parted :
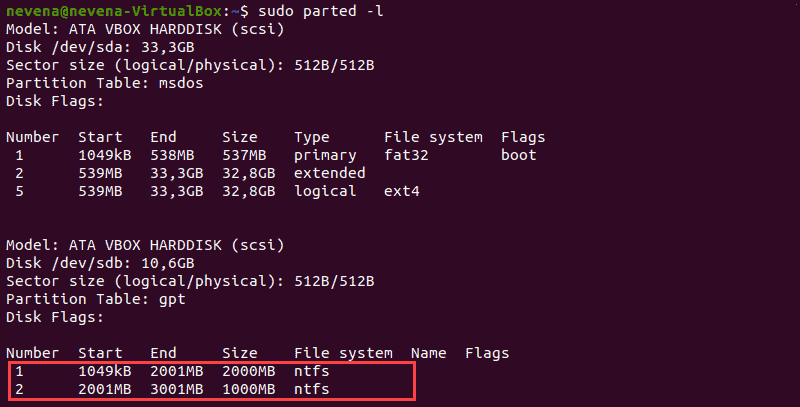
В приведенном выше примере два раздела NTFS находятся на диске /dev/sdb . Прежде чем продолжить, запишите номер раздела, который вы хотите смонтировать.
Вы также можете использовать команды fdisk и grep , чтобы показать на диске только разделы NTFS:
Создать точку монтирования и смонтировать раздел NTFS
В этом примере мы смонтируем раздел /dev/sdb1 с разрешением только для чтения.
Сначала создайте точку монтирования с помощью команды mkdir :
Затем смонтируйте раздел в созданный вами каталог. Используйте команду mount и путь к разделу, который вы указали ранее:
Используйте инструмент для освобождения диска, чтобы проверить подробную информацию обо всех файловых системах и убедиться, что вы успешно смонтировали раздел:
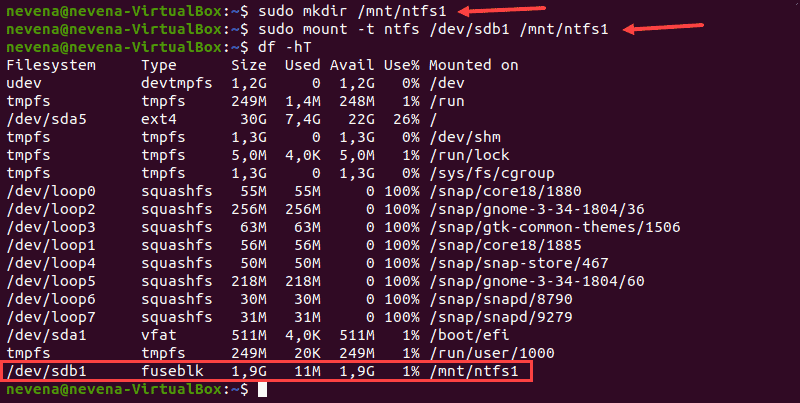
Раздел /dev/sdb1 отображается как смонтированный в нижней части списка. Теперь у вас есть доступ только для чтения к этому разделу NTFS.
Смонтировать раздел NTFS с разрешениями на чтение и запись
Чтобы смонтировать раздел NTFS с разрешениями на чтение и запись, вам необходимо установить fuse и ntfs-3 в вашей системе.
Выполните следующие действия, чтобы завершить процесс монтирования.
Примечание. В некоторых дистрибутивах Linux по умолчанию уже установлены fuse и ntfs-3g .
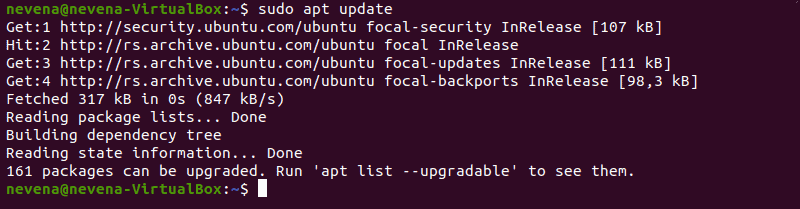
Обновить репозитории пакетов
Выполните следующую команду, чтобы загрузить и обновить репозитории пакетов:
Установите Fuse и ntfs-3g
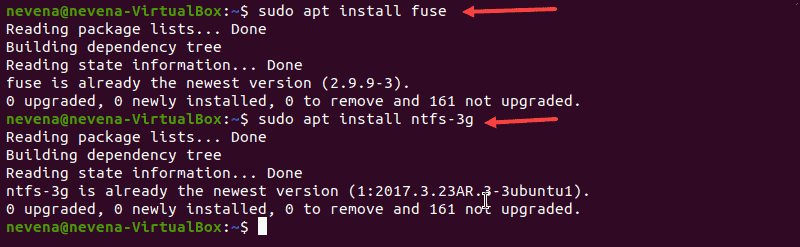
Чтобы установить fuse в вашей системе Linux из репозитория по умолчанию, используйте соответствующий менеджер пакетов. В нашем примере мы используем apt в Ubuntu.
Когда установка завершится, установите ntfs-3g , запустив:
В случае, если fuse и ntfs-3g уже установлены, вывод выглядит примерно так, как показано ниже:
Смонтировать раздел NTFS
После установки пакетов программного обеспечения fuse и ntfs-3g смонтируйте раздел NTFS.
Сначала создайте точку монтирования с помощью команды mkdir :
Затем используйте команду mount , чтобы смонтировать нужный раздел. Например, /dev/sdb2 :
Чтобы проверить, смонтирован ли раздел, выполните команду df :

Теперь у вас есть права на чтение и запись для подключенного раздела NTFS.
Примечание. Для монтирования раздела через ntfs-3g рекомендуется ядро Linux версии 2.6.20 или новее.
Онлайн курс по Linux
Мы собрали концентрат самых востребованных знаний, которые позволят тебе начать карьеру администратора Linux, расширить текущие знания и сделать уверенный шаг к DevOps
Источник


