- Как смонтировать файла образа VMDK в Windows
- Подключение vmdk файла в проводнике Windows Explorer
- Подключение образа VMDK в VMware Workstation
- Монтирование VMDK с помощью пакета vSphere Disk Development Kit
- Используем OSFMount для монтирования vmdk
- Mounting VMDK disks directly to your windows box – how to
- How to Open VMware VMDK File in Windows 10/8.1 and 7
- Steps to Open VMware VMDK File in Windows 10/8.1 and 7
- Remember
- Mounting ESX/ESXi Server Disks or VMDK files
- Method 1: mounting a *.vmdk disk from a certain Datastore.
- Method 2: mounting a physical hard drive hosting the ESX (ESXi) server
- Method 3: mounting any file from an ESX (ESXi) server
- Method 4. Mount VMDK disk with 7-Zip
- Method 5. Use Windows Explorer for VMDK disk mounting
- Method 6. Use VMware Workstation for VMDK disk mounting
- Method 7. Try vSphere Disk Development Kit for VMDK disk mounting
Как смонтировать файла образа VMDK в Windows
Если у вас есть файл VMDK (Virtual Machine Disk), который содержит один или несколько разделов виртуальной машины VMware, вы можете смонтировать его в операционной системе Windows в качестве диска. Подключить vmdk диск в Window можно несколькими способами.
Подключение vmdk файла в проводнике Windows Explorer
В операционной система Windows имеется встроенная поддержка VMDK файлов. Если вы используете операционную систему Windows 7 или выше, вы можете смонтировать файл VMDK прямо через проводник Windows.
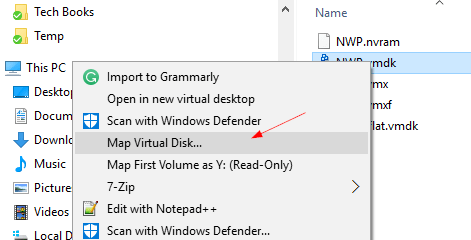
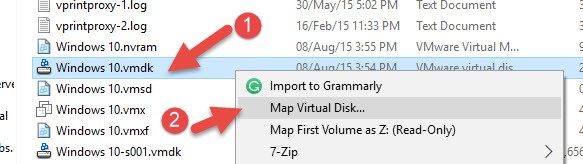
Для этого нужно перейти в каталог, в котором хранится файл VMDK. В проводнике Windows щелкните по файлу правой кнопкой мыши и выберите пункт «Map Virtual Disk».
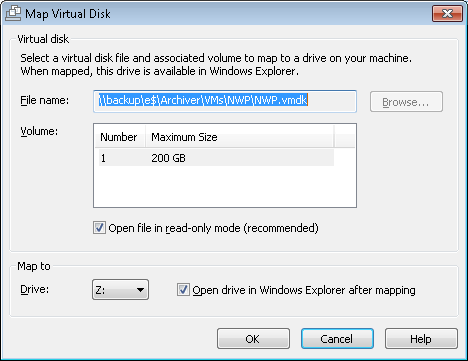
В окне «Map Virtual Disk» выберите букву, которая будет присвоена диску и нажмите кнопку «ОК».
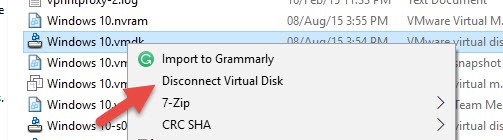
Для того, чтобы отключить виртуальный диск — щелкните правой кнопкой мыши по диску и выберите пункт «Disconnect Virtual Disk».
Подключение образа VMDK в VMware Workstation
VMware Workstation – это настольное ПО для виртуализации от VMware. В нем имеется встроенная функция подключения vmdk образов — «Map Virtual Disks», с помощью которой также можно смонтировать и открыть файл VMDK. Если открыть файл VMDK при помощи первого описанного нами способа не получается (Проводник Windows), то при помощи VMware Workstation сделать это удастся наверняка.
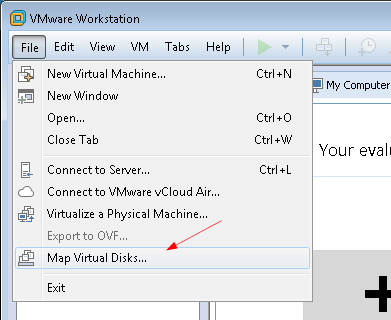
Все довольно просто, перейдите в меню «File» и в раскрывающемся списке выберите пункт «Map Virtual Disks …».
Монтирование VMDK с помощью пакета vSphere Disk Development Kit
VMware-mount — это консольная утилита, которую вы можете использовать для монтирования VMDK дисков без использования графического интерфейса. Эта утилита входит в пакет разработчика vSphere Disk Development Kit, поэтому для её использования вам понадобиться его установить.
Чтобы смонтировать файл VMDK (сохраненный в каталоге C:\temp) в режиме только для чтения, используйте следующую команду:
vmware-mount.exe X: “C:\Temp\TestVM.vmdk”
Если файл VMDK содержит более одного раздела, вы можете использовать параметр /v:x для монтирования других томов:
vmware-mount.exe /v:2 X: “C:\Temp\TestVM.vmdk”
Если вам необходима возможность записи, воспользуйтесь параметром «/m:w». Этим можно воспользоваться, например — если вам нужно заменить испорченный системный файл.
vmware-mount.exe /m:w X: “C:\Temp\TestVM.vmdk”
Если вы хотите вывести все подключенные виртуальные диски, необходимо воспользоваться параметром /L:
Командной строкой очень легко пользоваться, при этом она довольно функциональна.
Используем OSFMount для монтирования vmdk
OSFMount – это бесплатная сторонняя утилита, которая монтирует файлы образов не только формата ISO, но также и файлы VMDK. Она работает практически во всех версиях Windows.
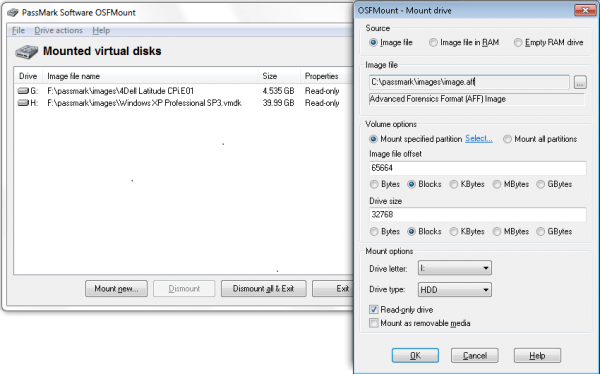
Эта утилита довольно проста в использовании. Достаточно нажать кнопку «Mount new…» расположенную в нижней части окна, выбрать vmdk файл и указать параметры подключения.
Mounting VMDK disks directly to your windows box – how to
By Vladan SEGET | Last Updated: December 11, 2014
How to mount your VMDK hard disks easily? Vmware is using VMDK format for virtual disks. You might do not know that you can mount virtual disks (.VMDK) file directly to your windows explorer interface with a little software called VMware Disk Mount Utility.
This utility can be downloaded from VMware.
I will show you how to do it but beforre let me tell you few things before you get started:

Step by step how to use the VMware disk mount utility:
1.) Go to the VMware Disk Mount download page and accept the EULA before you can download the software, then save it to your disk. (file is called VMware-mount-5.5.0-18463.exe )
2.) Install the software, then open the command prompt window.
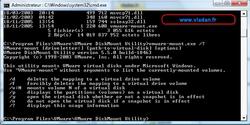
3.) Type there: cd “\Program Files\VMware\VMware DiskMount Utility”
4.) Then if you do not know any of the switches type: vmware-mount /?

5.) Now let’s mount really some disks… You must know the exact location of your virtual disk. In my exemple I have my VMDK files on different partition, because I separated the system and the data. So my vmdk files are at E:\VMs
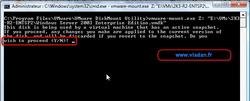
6.) So I type vmware-mount Z: “E:\VMs\2K3-R2-ENTSP2” and press ENTER. (I want the VMDK file to appear as Z: )
7.) If your disk has a snapshots you’ll have to answer if I want to proceed because any changes (if any) would be lost if I revert to the snapshot. I said yes.

8.) To access the disk you do like you access any other hard disks or mapped network disks.

9.) If you want to umount the volume just type: “vmware-mount.exe /d z:”

As see, with this little utility you can easily and fast access your VMware Virtual Disks from your Windows box.
If you want to read more information on this utility, you can get a PDF here: VMware disk mount utility online manual.
If you want more informations how to do it in Linux, take a look at Accessing Virtual Hard Disks Outside of VMware on Linux.
Now if you have VMware Workstation, you can do the same thing :
1.) You go to menu File > Map Virtual Disk

2.) Select the hard disk, and click ok to mount it in Windows explorer.
You liked this article? You can subscribe to my RSS feed here .
You can find some Free VMware Tools or Free Whitepapers to download on my Free Resources page.
How to Open VMware VMDK File in Windows 10/8.1 and 7
For some reason, you may need to open a VMDK file to read or transfer the content without using on a virtual machine. In this guide let me show the simple and easy method to open a VMware VMDK file in Windows 10, the same method is applicable for any earlier Windows Operating Systems such as 8.1 and 7 as long as you have any VMware products on your computer.
Also, we can access the Physical hard disk (like C or D partition of the host computer) inside VMware Virtual Machine by this method. But, here we are going to discuss how we can access the Virtual disk (VMDK file) in Windows OS without opening VMware software. This method could be an ideal solution when you have a Virtual machine which is not booting, but you need to access some important data from the specified virtual hard disk file – VMDK.
Steps to Open VMware VMDK File in Windows 10/8.1 and 7
1) Locate the Virtual Disk file you want to open or edit in Windows host OS. Right-click on it as below.
2) You must have VMware workstation on the host computer to make it work.
Most of the time the VMDK file type would have been already associated with the VMware program. Once your Windows 10 or 8.1 host computer knows that VMDK files should be opened by VMware Workstation program, you will see an option “Map Virtual Disk..” as shown above. If you notice, there is another option below called “Map First Volume as Z:”, it will automatically mount and open the first volume of the VMDK file.
But we are not sure what is the first volume and mostly it would be the system reserved disk on the bootable partition, hence it will not be helpful always. So, better select the first option “Map Virtual Disk..” and explore all partitions, then select the desired partition to mount as shown in the next step.
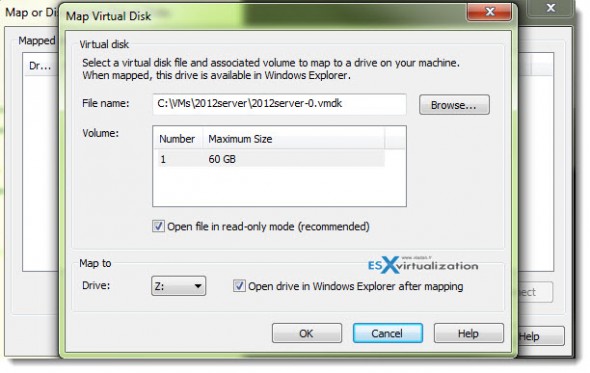
3) It is always recommended to open the VMDK files in Read-only format to prevent any modifications in the virtual disk that may cause booting or OS issues in the virtual machine. If you are certain what you are doing, then you can remove the tick and open the drive with writing access.
This method will help to modify some boot options, overwrite corrupted files and any other tasks you can do in the virtual disk to boot the virtual machine. Once the ‘Map Virtual Disk’ option opened, select the partition you want to open on the host computer, change the Read-only access (required) and the mount point drive letter.
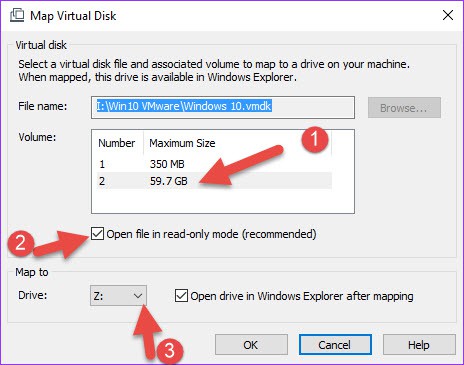
In the above example, I selected the 2nd partition (which is the C drive of the Virtual machine) with read-only access. Z is the drive letter of the mount point on my Windows 10 host.
4) Here is the VMDK file mounted on the Windows Explorer with the specific drive letter.
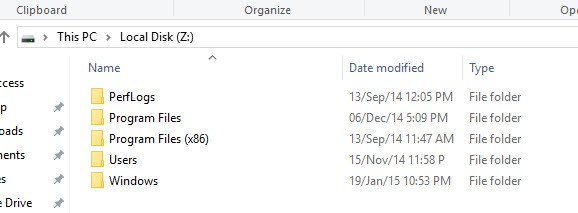
5) Now I can easily copy the data from the virtual hard disk (VMDK) to host Windows 10 or 8.1/1 through Windows Explorer. Since I opned opened in Read-only access, I can’t delete or modify any files inside the opned VMDK file.
Remember
Remember to unmount (Disconnect) the file once your task complted. Otherwise you can’t use the VMDK file in VMware programs or move the file to diffrent location.
I hope this guide is useful in opening the VMware VMDK file in Windows 10, 8.1 and 7 easily. Though there are several 3rd party tools available to mound or extratct the VMDK files, some are complicated paid versions. This method can be done without any tools if you have VMware workstaion in your computer.
Dinesh
Dinesh is the founder of Sysprobs and written more than 400 articles. Enthusiast in Microsoft and cloud technologies with more than 15 years of IT experience.
Mounting ESX/ESXi Server Disks or VMDK files
With Diskinternals VMFS Recovery, you can mount any VMDK file that belongs to any given virtual machine on a server. In order to use the available file access and data recovery tools, you will need to connect to the ESX/ESXi server and mount its disks, partitions and VMDK files. You will be able to repair and open VMDK files and no need in VMDK viewer tool.
Make sure that SSH connectivity is enabled on your ESX/ESXi server. Configure connection settings by entering the IP address of your server, login and password information, and click “Connect”.
How to open VMDK file? There are three different ways to access files after connecting to an ESX (ESXi) server.
Method 1: mounting a *.vmdk disk from a certain Datastore.
Select a folder with the virtual machine being recovered. There, select *.vmdk (or other type) files to mount.
Note: the ESX server does not normally permit low-level disk access to a running virtual machine. With VMFS Recovery, you can still mount the working disk by following the steps described in the how-to guide: Mounting Hard Drives (VMDK files) of a Running Virtual Machine
Method 2: mounting a physical hard drive hosting the ESX (ESXi) server
In this mode, the actual physical hard drive will be mounted, allowing you to access all partitions and unpartitioned areas of the drive. By mounting the physical drive, you’re essentially replicating physical access to the actual hard disk as if it’s been removed from the server and connected directly to your PC.
Method 3: mounting any file from an ESX (ESXi) server
With this method, you can mount any file from an ESX (ESXi) server. This method includes both methods #1 and #2. You can look up Datastore at /vmfs/volumes/. The hard drives are located at /dev/disks/
After selecting the files or drive images to mount, click Mount to add newly mounted disks into the main window.
Diskinternals VMFS Recovery is a tool which makes easy for a user to mount VMDK file on Windows.
Method 4. Mount VMDK disk with 7-Zip
«Unpacking» or mounting VMDK disk is possible with the help of the well-known 7-Zip archiver. This method is quite fast compared to the others and, at the same time, is fairly simple. You just need to right-click on the VMDK file and select “Open Archive”.
You can also try the following method, if this does not suit you.
Method 5. Use Windows Explorer for VMDK disk mounting
You can try to mount VMDK on Windows using built-in tools; Windows Explorer should help you with this.
Here’s how to do it: right-click Start and select “Explore”. Now you need to open the folder with the VMDK file using the right mouse button. From the list, select «Virtual Disk Map». Next you need to select the drive letter where you intend to mount the VMDK disk. Then click on “OK”.
Method 6. Use VMware Workstation for VMDK disk mounting
VMware Workstation is a desktop program for mounting VMDK on Windows. Just open it, and on the taskbar, select the File tab. Then from the list, select «Map Virtual Disks . «. Next, you need to select the drive letter where you want to mount the VMDK file and click OK. Again, this is a simple and efficient method for mounting VMDK on Windows.
Method 7. Try vSphere Disk Development Kit for VMDK disk mounting
You can use vSphere Disk Development Kit to mount VMDK on Windows. This program must be downloaded and installed before use.
Depending on what you want to do, you need to enter certain commands; for example:
- to mount a read-only disk — vmware-mount.exe X: “C:\Temp\TestVM.vmdk”
- to mount several volumes — vmware -mount.exe /v:2 X: «C:\Temp\TestVM.vmdk»
- to mount the disks for recording — vmware-mount.exe /m:w X: «C:\Temp\TestVM.vmdk»
- to list all the mounted VMDK disks: vmware-mount.exe /L
A – A physical hard drive of an ESX (ESXi) server connected via method #2. A new partition labeled “data_store_2TB” with VMFS file system appears immediately after mounting the drive. B – A *.vmdk disk from a virtual machine mounted via method #1. Partitions “/” and «Linux Swap Volume 1” are available immediately after mounting. C – This is just a file connected via method #3. All *.vmdk disks and physical drives of ESX servers can be scanned with any tool included with VMFS Recovery: п‚· Recovery mode: NTFS, FAT, Ext2/3/4, VMFS п‚· Uneraser and Reader modes: NTFS, FAT, Ext2/3/4, VMFS, Reiser4, ReiserFS, HFS, UFS2, exFAT, ReFS In addition, the mounted *.vmdk disks can be assembled into a RAID array (LDM, Linux RAID).


