- How to use multiple monitors in Windows 10
- Video: Connecting a monitor
- Before you start
- Rearrange your displays
- Identify a display
- Detect a display
- Arrange your displays
- Change display options
- Change orientation
- Choose a display option
- Related topics
- Active windows all moved to main monitor after sleep/off
- Replies (7)
- How can I move all windows to one screen with a single command?
- 3 Answers 3
- Windows: Bring Off-Screen Window Back Onto Screen
- Fix 1 – Resolution Trick
- Windows 10 & 8
- Windows 7
- Fix 2 – Show Desktop Toggle
- Fix 3 – Move Option 1
- Fix 4 – Move Option 2
- Fix 5 – Cascade Windows
- Fix 6 – Maximize
How to use multiple monitors in Windows 10
After you’ve connected your Windows 10 PC to external displays, you can adjust the settings for each one.
Video: Connecting a monitor
Here’s a video on the basics of connecting to an external monitor.

Before you start
Before changing settings for your external displays, make sure everything is connected properly. Here’s what you can do:
Make sure your cables are properly connected to your PC or dock.
Check for Windows updates. To check for updates, select Start > Settings > Updates & Security > Windows Update > Check for updates.
Tip: If you’re using a wireless display adapter, connect to an HDMI port on newer TVs, then wirelessly connect your PC to it. After connecting your wireless display adapter to your TV, go to your Windows 10 PC and select Start > Settings > System > Display, then select Connect to a wireless display.
Rearrange your displays
You’ll see this option when Windows detects more than one display. Each display will be numbered to help you identify them more easily.
Identify a display
To see which number corresponds to a display, select Start > Settings > System > Display > Rearrange your displays, then select Identify. A number appears on the screen of the display it’s assigned to.
Detect a display
If you connected another display and it isn’t showing in Settings, select Start > Settings > System > Display > Rearrange your displays, then select Detect.
Arrange your displays
If you have multiple displays, you can change how they’re arranged. This is helpful if you want your displays to match how they’re set up in your home or office. In Display settings, select and drag the display to where you want. Do this with all the displays you want to move. When you’re happy with the layout, select Apply. Test your new layout by moving your mouse pointer across the different displays to make sure it works like you expect.
Change display options
After you’re connected to your external displays, you can change settings like your resolution, screen layout, and more. To see available options, select Start > Settings > System > Display.
Change orientation
Windows will recommend an orientation for your screen. To change it in Display settings, go to Scale and Layout, then choose your preferred Display orientation. If you change the orientation of a monitor, you’ll also need to physically rotate the screen. For example, you’d rotate your external display to use it in portrait instead of landscape.
Choose a display option
To change what shows on your displays, press Windows logo key + P. Here’s what you can choose.
See things on one display only.
See the same thing on all your displays.
See your desktop across multiple screens. When you have displays extended, you can move items between the two screens.
See everything on the second display only.
Second screen only
Related topics
Simply Windows on Youtube — These videos are only available in English
Active windows all moved to main monitor after sleep/off
I am running Windows 10 connected to two monitors via Display Ports. I have set the monitors to sleep after 10 minutes of inactivity, but not the PC. Every time I return to the displays and switch them back on again all the active windows have moved to the main monitor, and I have to relocate them again between the two monitors. I suspect this is a Windows problem — there are several threads about similar things happening for both Windows 7 and Windows 10. Can anyone suggest a fix for this — please explain it in layperson’s terms as far as possible, as I’m not a techie.
Replies (7)
![]()
The issue might be occurring due to corrupted display drivers.
Lets update the display drivers :
1. Press Windows key + R, to open the run command. 2. Type «devmgmt.msc» and press enter to open device manager.
3. Expand «display adapter».
4. Right-click on the driver and click on Update Driver Software.
5. Your computer should find and automatically install the updated driver.
6. After the installation is complete, Restart your computer.
Keep us informed with the status of the issue.
We are here are to assist you.
6 people found this reply helpful
Was this reply helpful?
Sorry this didn’t help.
Great! Thanks for your feedback.
How satisfied are you with this reply?
Thanks for your feedback, it helps us improve the site.
How satisfied are you with this reply?
Thanks for your feedback.
Thank you for your suggestion. I tried it and the message I get is that the drivers are up to date.
My PC is an HP Envy 750-250na, running Windows 10 Home (Version 1511 OS Build 10586.318).
I don’t get an error code, but the windows that were open on the second monitor all end up on the first monitor when I switch on the monitors again. The hard disk and monitors are not set to sleep or go off under the power management system, and the PC also has an SSD.
Was this reply helpful?
Sorry this didn’t help.
Great! Thanks for your feedback.
How satisfied are you with this reply?
Thanks for your feedback, it helps us improve the site.
How satisfied are you with this reply?
Thanks for your feedback.
62 people found this reply helpful
Was this reply helpful?
Sorry this didn’t help.
Great! Thanks for your feedback.
How satisfied are you with this reply?
Thanks for your feedback, it helps us improve the site.
How satisfied are you with this reply?
Thanks for your feedback.
![]()
Thank you for writing us back.
I would suggest you to go through the below methods:
Method 1: Try to run the Hardware and Device troubleshooter:
Press Windows key+X.
Click on Control Panel.
Click on Troubleshooting.
On the left pane, click on view all.
From the list, click on Hardware and Devices and run the troubleshooter.
Method 2: Try to perform clean boot and check if it helps:
A clean boot is performed to start Windows by using a minimal set of drivers and startup programs. This helps eliminate software conflicts that occur when you install a program or an update or when you run a program in Windows 8.1, Windows 8, Windows 7, or Windows Vista. You may also troubleshoot or determine what conflict is causing the problem by performing a clean boot.
How to perform a clean boot in Windows
Note: Refer «How to reset the computer to start normally after clean boot troubleshooting» to reset the computer to start as normal after troubleshooting.
I hope this helps. Please post back with the status of the issue and we will be glad to assist you further.
2 people found this reply helpful
Was this reply helpful?
Sorry this didn’t help.
Great! Thanks for your feedback.
How satisfied are you with this reply?
Thanks for your feedback, it helps us improve the site.
How satisfied are you with this reply?
Thanks for your feedback.
76 people found this reply helpful
Was this reply helpful?
Sorry this didn’t help.
Great! Thanks for your feedback.
How satisfied are you with this reply?
Thanks for your feedback, it helps us improve the site.
How satisfied are you with this reply?
Thanks for your feedback.
![]()
Thank you for writing us back.
I would like to inform you that troubleshooter and clean boot are the diagnostic steps to check what it show about the device and drivers or any other third party programs.
I would suggest you to go through the below steps and check if it helps:
Steps: Install the drivers in the compatibility mode.
Compatibility mode:
Install the latest available drivers on manufacturer’s website in compatibility mode.
Follow the steps below on how to install driver in compatibility mode:
1. Download the driver from the manufacturer’s website and save it on your local disk.
2. Right click on the setup file of the driver and select “Properties”.
3. Select “Compatibility” Tab.
4. Place a check mark next to “Run this program in Compatibility mode” and select previous operating system from the drop down list.
5. Let the driver install and then check the functionality.
Hope this helps. Please feel free to write us back, we’ll be glad to assist you.
How can I move all windows to one screen with a single command?
When undocking my laptop from twinview external monitors back to a single screen I would like to have a single command to move all windows onto my primary screen.
Although nvidia does some of the work so that I can see the edge of the windows, moving each one with the mouse, keyboard or compiz plugins takes time.
3 Answers 3
You can use wmctrl and a little bash script to loop through the windows and then position them onto your primary display. I threw this together. It might be sufficient for you.
Save it to a file called «move_windows.sh» or something and give it execute permissions with chmod +x move_windows.sh and then create a launcher for it.

The script I made below works for me, only requires wmctrl . You can get this on Ubuntu with the command sudo apt-get install wmctrl .
If needed, you may need to make some minor modifications.
$BEFORE_WINDOW_NAME must be set to the last string of your computer name pulled (you can view this from System Settings > Details > Device name ).
$MONITORS this will work with 2 monitors (with a resoloution of 1920x#### ) although you may re-define this variable by setting an element for each monitor connected to your device and setting it to any x coordinate on that screen.
$SKIPPED_WINDOWS is a list of windows you do not want to move when this script is called. Feel free to add or remove items. List of items can be view by typing in the command wmctrl -l .
Windows: Bring Off-Screen Window Back Onto Screen
By Mitch Bartlett 115 Comments
While using Microsoft Windows, I had a window that had somehow fallen completely off of my screen. Right-clicking the window in the Taskbar and selecting Maximize brought it back, but there was no way I could get the window restored to where I could move it around my screen with my mouse.
Luckily, there are a couple of ways to bring off-screen windows back to the desktop screen.
Fix 1 – Resolution Trick
Windows 10 & 8
- Start the problematic application.
- Right-click a blank area of the Desktop, then choose “Display settings“.
- Select “Advanced display settings” at the bottom of the window.
- Temporarily change the “Resolution” to another value, then choose “Apply“.
- See if you can see the window on your screen now.
- Change the resolution back to the previous value, then select “OK“.
Windows 7
- Start the problematic application.
- Right-click a blank area of the Desktop, then choose “Screen Resolution“.
- Temporarily change the “Resolution” to another value, then choose “Apply“.
- See if you can see the window on your screen now.
- Change the resolution back to the previous value, then select “OK“.
Fix 2 – Show Desktop Toggle
- Hold down the Windows Key, then press “D“. Repeat these steps to see if it makes the window you are looking for reappear.
- Alternately, you can right-click a blank area of the taskbar, then choose “Show the desktop“, then repeat.
Fix 3 – Move Option 1
- Select the program in the task bar.
- Hold the Windows Key while pressing Left Arrow or Right Arrow repeatedly to move the window back into view.
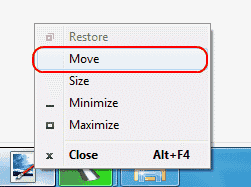
Fix 4 – Move Option 2
- In Windows 10, 8, 7, and Vista, hold down the “Shift” key while right-clicking the program in the taskbar, then select “Move“. In Windows XP, right-click the item in the task-bar and select “Move“. In some instances, you may have to select “Restore“, then go back and select “Move“.

- Use your mouse or the arrow keys on your keyboard to move the window back onto the screen.
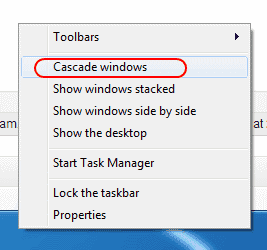
Fix 5 – Cascade Windows
- Right-click a blank area of the task-bar, then select “Cascade windows“.
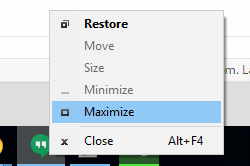
Fix 6 – Maximize
Sometimes a single app will get stuck in a state where it cannot redraw onto the Window. You can usually alleviate this by doing the following.
- Hold “Shift” and right-click on the program icon in the taskbar, then choose “Maximize“.
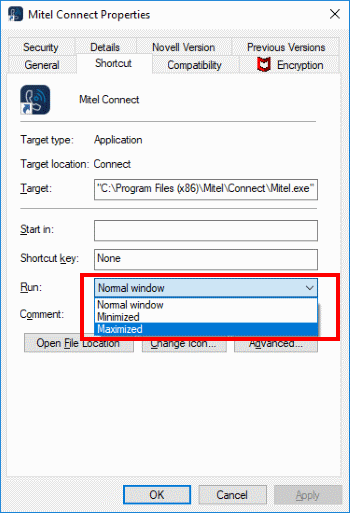
How do I prevent my application from starting off the screen every time I launch it?
Most applications will stop doing this if you properly exit out of the application while it is on the screen. If you have already properly exited the application, you might need to uninstall and reinstall it.
Otherwise, you can try right-clicking the icon for the application, then choosing “Properties“. Under the “Shortcut” tab, change the “Run” setting to “Maximized“, then select “OK“.