- Move Microsoft Store Apps and Games to Another Drive
- Where Are the Windows Store AppsВ В
- Method 1: Move Microsoft Store Apps and Games to Another Drive Using Software
- Method 2: Manually Change Microsoft Store Installation Location
- Windows 10. How to move AppData files?
- Replies (8)
- Can I move my AppData folder in Windows 10?
- 2 Answers 2
- Moving AppData (or contents of) from SSD to HDD to save space
- www.makeuseof.com
- Follow MUO
- How to Move Installed Apps & Programs in Windows 10
- How to Move Apps and Programs to Another Drive on Windows 10
- How to Move Windows 10 Apps to Another Drive
- How to Move Desktop Programs to Another Drive
- How to Change the Default Installation Path of Apps and Programs on Windows 10
- How to Change the Default Installation Path on Windows 10
- How to Change the Default Installation Path on Windows 8 and Prior
- Free Up Disk Space on Your Drive
- Subscribe To Our Newsletter
- One More Step…!
Move Microsoft Store Apps and Games to Another Drive
| Workable Solutions | Step-by-step Troubleshooting |
|---|---|
| Method 1: [Fastest] Move Microsoft Store Apps and Games to Another Drive Using Software | Open EaseUS Todo PCTrans > Choose «App Migration» > Select apps. Full steps |
| Method 2: [Manual] Manually Change Microsoft Store Installation Location | Head to Settings > App > Apps & Features > Find Games. Full steps |
Where Are the Windows Store AppsВ В
You just downloaded a four-star game from the Microsoft Store. Easy games such as Gardenscapes, can take up at least 300MB of disk space not to mention other games that take up more space.В

Most people don’t know where their Microsoft games are actually stored. You can crack the mystery today. The Microsoft apps and games are saved in:
But you are not allowed to access this folder. You receive this message You Don’t Currently Have Permission To Access This Folder every time you try to access this folder. You cannot access this folder directly, you cannot change the apps’ location by copy and paste. What else can you do? Here are two ways to change the location of Microsoft Store games or programs. Read on and follow the details below.
Method 1: Move Microsoft Store Apps and Games to Another Drive Using Software
Why not use an easy-to-use program? EaseUS Todo PCTrans is an easy PC transfer tool that can satisfy your needs. It can not only migrate apps to another drive, but also transfer your data, applications, and account settings from one PC to another quickly. More information about this software:
- Supports more than 100 types of applications migration.
- Supports almost all Windows OS — Windows XP/Vista/7/8/8.1/10 & Windows Server 2003/2008/2012/2016/2019.
- Three ways to transfer data and apps: PC to PC transfer, image transfer, and app migration.
You can get this software and transfer Microsoft games to another drive by the following steps:
Support Windows 10/8.1/8/7/Vista/XP
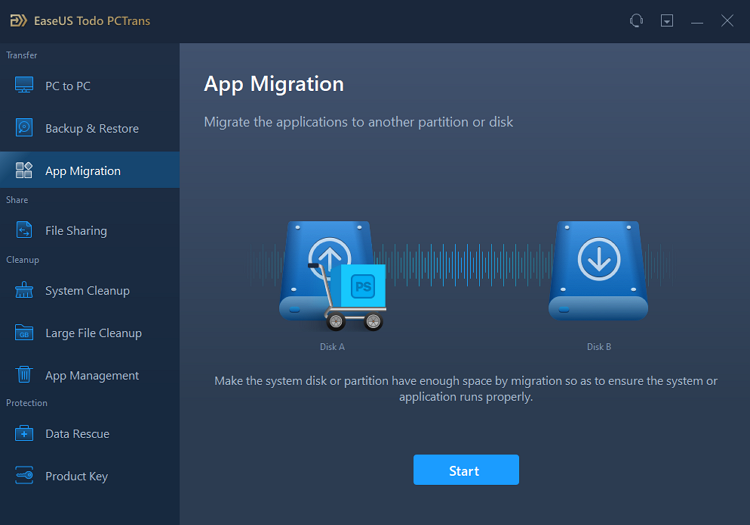
Step 1. Launch EaseUS Todo PCTrans and select transfer mode
On the main screen of EaseUS Todo PCTrans, go to «App Migration» section and click «Start» to continue.
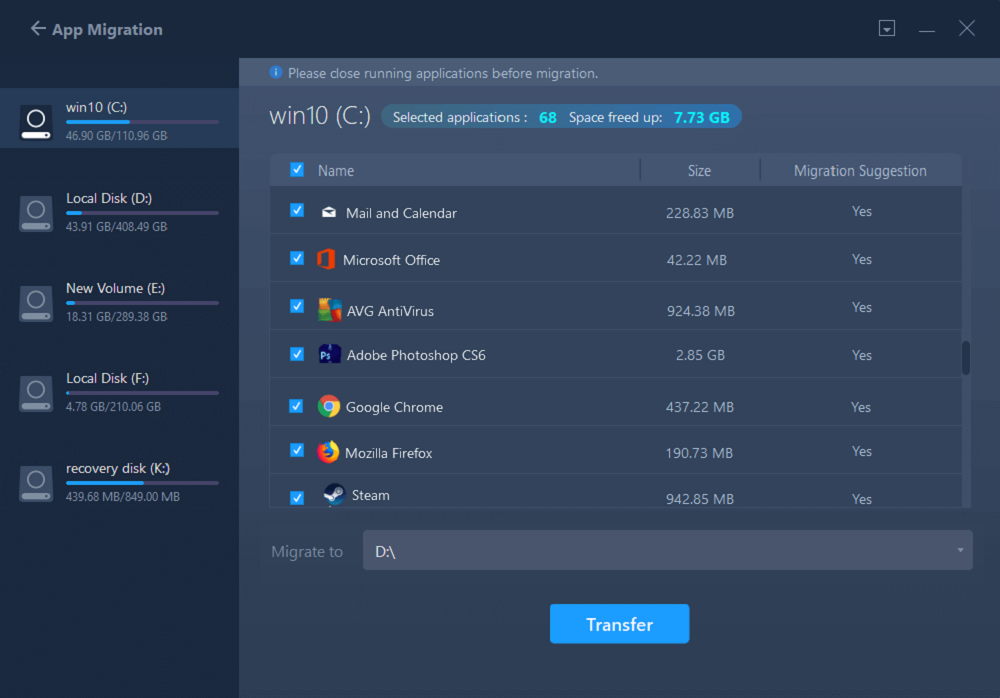
Step 2. Select apps and another drive to transfer
1. Select the source partition and tick applications, programs and software (marked as «Yes») that you’d like to migrate.
2. Click triangle icon to select another drive or disk as your target device and click «Transfer» to start the migration.
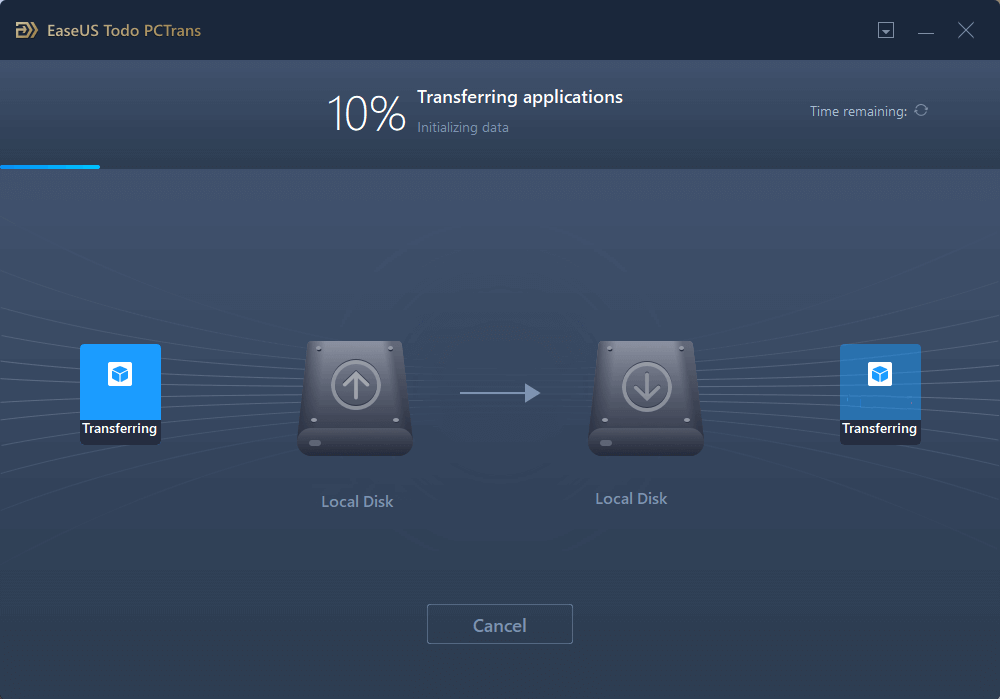
Step 3. Finish the migration process
When the transferring process finishes, click «OK» to complete.
You can restart your PC to keep all the changes, and you should be able to run your migrated apps on the other drive again.
Support Windows 10/8.1/8/7/Vista/XP
Method 2: Manually Change Microsoft Store Installation Location
This is a manual way to move the wanted app. Here, I move Candy Crush Soda Saga to Local Disk (D:).В
- Step 1: Go to «Settings > Apps > Apps & features»
- Step 2: Find the game and select «Move»
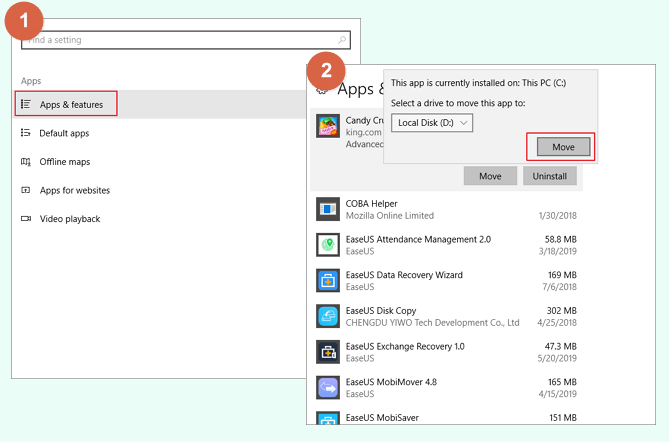
This is also easy, but not all games or apps have this feature to move to a different drive. For some apps, there is no such option as “Move” only «Uninstall». If you cannot move it, you can go back toВ Method 1 to solve your problem.
Was This Page Helpful?
Daisy is the Senior editor of the writing team for EaseUS. She has been working in EaseUS for over ten years, starting from a technical writer to a team leader of the content group. As a professional author for over 10 years, she writes a lot to help people overcome their tech troubles.
Brithny is a technology enthusiast, aiming to make readers’ tech life easy and enjoyable. She loves exploring new technologies and writing technical how-to tips. On her spare time, she loves sharing things about her favorite singer — Taylor Swift on her Facebook or Twitter.
EaseUS Todo PCTrans Free is a useful and and reliable software solution created to serve in computer migration operations, be it from one machine to another or from an earlier version of your OS to a newer one.
EaseUS Todo PCTrans is by the folks at EaseUS who make incredible tools that let you manage your backups and recover your dead hard disks. While it is not an official tool, EaseUS has a reputation for being very good with their software and code.
 Read More
It offers the ability to move your entire user account from your old computer, meaning everything is quickly migrated. You still get to keep your Windows installation (and the relevant drivers for your new PC), but you also get all your apps, settings, preferences, images, documents and other important data.
Roxanne/2021/02/24
Cedric/2020/12/18
Tracy King/2021/02/24
Jean/2021/03/31
About EaseUS Todo PCTrans
EaseUS Todo PCTrans can transfer settings, applications and data between PCs and HDDs. Your all-round PC transfer and migrate software to upgrade devices without re-installation.
Windows 10. How to move AppData files?
How does one move a Windows 10 User AppData files ?
Replies (8)
1 person found this reply helpful
Was this reply helpful?
Sorry this didn’t help.
Great! Thanks for your feedback.
How satisfied are you with this reply?
Thanks for your feedback, it helps us improve the site.
How satisfied are you with this reply?
Thanks for your feedback.
Sumit
Available 6 PM — 8 AM PST
It is always good to include your PC Specs, make and model in the question
Never Call the Phone numbers received in Emails from the Microsoft Community
Was this reply helpful?
Sorry this didn’t help.
Great! Thanks for your feedback.
How satisfied are you with this reply?
Thanks for your feedback, it helps us improve the site.
How satisfied are you with this reply?
Thanks for your feedback.
![]()
How does one move a Windows 10 User AppData files ?
One does not. They stay where they are.
1 person found this reply helpful
Was this reply helpful?
Sorry this didn’t help.
Great! Thanks for your feedback.
How satisfied are you with this reply?
Thanks for your feedback, it helps us improve the site.
How satisfied are you with this reply?
Thanks for your feedback.
The AppData folder cannot be safely moved at all . . .
While there are hacks that allow you to move that folder, the next time you receive a large Windows update, your system will brick and it will need to be re-installed — it is not worth the effort . . .
Power to the Developer!
MSI GV72 — 17.3″, i7-8750H (Hex Core), 32GB DDR4, 4GB GeForce GTX 1050 Ti, 256GB NVMe M2, 2TB HDD
Was this reply helpful?
Sorry this didn’t help.
Great! Thanks for your feedback.
How satisfied are you with this reply?
Thanks for your feedback, it helps us improve the site.
Can I move my AppData folder in Windows 10?
I have 3 Drives, Boot(C:), Data(D:) and Restore(E:) My C: , which has 116 GB is full, and most of it is in my Appdata\Local (50GB) My D: has 377GB Free Space and I wanted to Know if it is safe to move the AppDta folder to it.
I did this with the Appdata\roaming yesterday and it did not work but after a restart it was back to normal and this time I searched for it on google and made a User\username\AppData folder in my D: drive and went to the properties of Local and manually moved it to the new folder like the search told me and after opening the Local\ElevatedDiagnostics Folder which had admin rights it was possible for me and it is copying everything right now
Will this work? and if not, will it be easy to return back to the previous state like with the roaming folder?

2 Answers 2
Just moving the folder is not enough.
Once you have moved it, you must replace the original with a symbolic link to the new location. This will make windows think the data is still located on your C drive, while it actually is on your D drive.
Do note, this does work with AppData, but not with Program Files nor with the Windows folder, as it will break things like Windows Update.
To create the Directory Junction (Symbolic Link) do the following:
- Open a cmd window with administrative privileges.
- Navigate to c:\Users\username\appdata
- execute the following command: mklink /d local d:\appdata\local
replace d:\appdata\local with the actual path of where you moved the appdata to.
If you cannot move/delete the original copy, create a 2nd user, make it administrator, login with it, and retry the option. This should ensure that no files are in use.
Moving AppData (or contents of) from SSD to HDD to save space
I’ve recently completed a custom build computer with an SSD drive and an HDD drive. I’ve bought Windows 8, installed it used it for a few days and upgraded to Windows 8.1.
I’ve moved the location of My Documents, Videos, Music etc to my HDD (F:\) to save space on the SSD (C:\ where Windows is installed) but AppData is still taking up a huge amount of space.
Searching on the Microsoft Community it doesn’t look like I can move AppData.
For software like Spotify I can change the settings to make sure that files are saved to F:\, but what about other applications (like Windows Apps) or whatever else is in the AppData folder? How can I move the contents of AppData to a different drive?
I’m trying to save space on my SSD — can I set it up automatically so that everything going into AppData goes to the F:\ drive (and is subsequently read from there)? If not, what is safe to move and how can it be moved?
Any help on minimising the size (or changing the location) of AppData would be much appreciated.
Follow this tutorial to make a symbolic link to your new appdata file. It might be complicated to move the file because it will be in use. but i succeeded with all but one folder.
be warned that this will make your computer a little slower as a lot of programs use the data in this folder. I would suggest using this symbolic link tutorial to move different files (such as big program installs) to your HDD
121 people found this reply helpful
Was this reply helpful?
Sorry this didn’t help.
Great! Thanks for your feedback.
How satisfied are you with this reply?
Thanks for your feedback, it helps us improve the site.
How satisfied are you with this reply?
Thanks for your feedback.
Unfortunately you cannot move AppData folder to another drive. Moving AppData folder to another drive might cause system stability.
AppData or Application data is a hidden folder in Windows 8/8.1. It is to protect user data and settings from any unwanted change or deletion. It contains many important data such as program settings, IE cookies, toolbar settings, IE browsing history, temporary files created by applications, Libraries, send to items, templates and many more.
By default Windows 8 stores all apps in a folder «WindowsApps» present in «Program Files» folder. To access this folder. You need to unhide the system folders and take the permission of the folder to view installed apps.
Moving WindowsApps folder to another drive is also not recommended. If you move this folder the apps won’t get updated or might not function normally.
If you want more disk space on computer you can use Disk Cleanup to remove unnecessary files on your drives.
Delete files using Disk Cleanup
Hope this information helps. If you need further assistance with Windows, let us know and will be glad to help.
www.makeuseof.com
Follow MUO
How to Move Installed Apps & Programs in Windows 10
Running out of disk space on Windows 10? Learn how to move Windows apps and desktop programs without breaking anything.
If you’ve got a lot of apps and programs installed on Windows 10, you might want to move them to another drive to free up space. It may also be necessary to change your default install location. Happily, all of these things are possible.
Windows has a built-in utility that allows you to move modern apps to a location of your choice. Although this method doesn’t work for traditional desktop programs, it’s still possible to move these programs to another drive.
Let us show you how to move an app or program to another drive.
How to Move Apps and Programs to Another Drive on Windows 10
The process you need to follow depends on what you want to move to another drive—whether it’s a native Windows 10 app or a third-party program.
First, we’ll outline the process for Microsoft Store apps, then we will take a look at traditional desktop programs.
How to Move Windows 10 Apps to Another Drive
This method will only work for apps that you have installed from the Microsoft Store.
- Press Windows key + I to open Settings.
- Click Apps. You should be on the Apps & features page. Here you will find a list of all apps and programs installed on your system.
- Scroll to the app that you want to move and click it.
- Click Move.
- Select the new drive from the dropdown.
- Click Move again.
You can repeat this process if you want to move the app back or to a different drive.
If the Move button is greyed out, it means it’s a Windows 10 app that can’t be moved. If you see a Modify button instead, it’s a traditional desktop program, and you’ll need to follow the method outlined below.
How to Move Desktop Programs to Another Drive
Microsoft doesn’t recommend moving the installed programs’ file location because it can cause issues, like the program not running or data loss. A safer, albeit less efficient, method is to uninstall the program and reinstall it to your desired drive.
If you want to proceed, create a Windows 10 restore point to reverse the changes if anything goes wrong.
We recommend using a program called Steam Mover. This was originally designed to move Steam games between drives but will actually work on any program.
Whether it’s where the installed program currently sits or where you want it moved to, any drive that you want to use with this program needs to be in the NTFS format. To check this:
- Press Windows Key + E to open This PC.
- Right-click a drive and click Properties.
- Refer to the File system to see if it’s NTFS.
With that confirmed, you can now use Steam Mover to move your programs from one drive to another:
- Open Steam Mover.
- Next to Steams Apps Common Folder, click the three-period button to select the folder path on the drive containing the programs you want to move (for example, your Program Files on the C drive).
- Next to Alternative Folder, click the three-period button to select the drive and folder path where you want to move the program to.
- Select the program from the list that you want to move. You can select multiple programs by holding Ctrl as you click.
- When ready to move, click the right arrow at the bottom to begin. Command Prompt will open and process the move.
- When complete, you’ll see the new folder path next to the program in the Junction Point column.
How to Change the Default Installation Path of Apps and Programs on Windows 10
If you just want to change the default install location on Windows 10, that’s simple. If you’re on Windows 8 or prior, you need a third-party program.
How to Change the Default Installation Path on Windows 10
- Press the Windows Key + I to open Settings.
- Click System and then select Storage from the left-hand menu.
- Underneath the More storage settings heading, click Change where new content is saved.
- To change the default drive for new apps, use the New apps will save to dropdown.
You will notice that this page also allows you to change the default location of things like documents, music, and pictures.
How to Change the Default Installation Path on Windows 8 and Prior
Microsoft doesn’t recommend changing the default install path for programs. Doing so could cause problems with existing programs and some Windows features. It’s best to perform this operation on a clean system. If that’s not suitable, create a restore point so that you can roll back if necessary.
The majority of programs will let you change the installation path when installing them. It’s a minor inconvenience to do this each time, perhaps, but it requires no system change.
If you do want to proceed, use a program called Install Dir Changer. Download it from SourceForge and then run the program:
- Click Enable Editing and then click Yes when the User Account Control window pops up.
- You can set a different path for 64-bit applications and 32-bit applications. To set the default installation path for each, click the three-period button to browse to a folder path.
- Once you’ve selected your new path, click Apply Changes. Now all new programs you install will default to these folder paths.
Free Up Disk Space on Your Drive
Now that you know how to move your apps and programs and how to change their default install location, you can free up space on your drives. But remember to take all precautions when using third-party programs.
And if you want to salvage even more disk space, consider deleting old Windows files and folders. Along with having moved your programs to another drive, you’ll have a superbly organized drive.
Need to clear disk space on your Windows computer? Here are the Windows files and folders that can be safely deleted to free up disk space.

Joe was born with a keyboard in his hands and immediately started writing about technology. He has a BA (Hons) in Business and is now a full-time freelance writer who enjoys making tech simple for everyone.
Subscribe To Our Newsletter
Join our newsletter for tech tips, reviews, free ebooks, and exclusive deals!
One More Step…!
Please confirm your email address in the email we just sent you.


