- How to Move/Transfer Windows 10 to New Hard Drive (HDD/SSD) | 2021 Full Guide
- Preparations:В Make Everything Ready for Moving Windows 10
- 1. Prepare a New Hard Drive — HDD/SSD
- 2. Download A Reliable Windows 10 Migration Tool
- Solution 1. How to Move Windows 10 to a New Hard Drive ViaВ OS Migration Tool
- #Phrase 1. Migrate Windows 10 to a New Hard Drive (HDD/SSD) in 3 Steps
- #Phrase 2. Set Up Windows 10 to Boot from New Hard Drive
- SolutionВ 2. TransferВ Windows 10 To Another HDD/SSD WithВ Windows System Image Tool
- #Phrase 1. CreateВ Windows 10 System Image to An External Hard Drive
- #Phrase 2. Create Windows Media Creation Tool
- #Phrase 3. Restore and Move Windows 10 System Image to Another New Disk
- Conclusion
- Further Readings — FAQs about Windows 10 OS Migration to HDD/SSD
- How to move Windows 10 to an SSD without reinstalling
- How do I move Windows 10 to an SDD?
- How do I transfer my OS from HDD to SSD?
- 1. Use Laplink PCMover
- Run a System Scan to discover potential errors
- Laplink PCMover
- 2. Use AOMEI Backupper
- AOMEI Backupper
- How to restore your personal files and user folders
How to Move/Transfer Windows 10 to New Hard Drive (HDD/SSD) | 2021 Full Guide
Migrating Windows OSВ to another driveВ is a tough task for mostВ Windows users.В Fortunately, it can be easy and fast for all levels of Windows usersВ to transfer Windows 10 to a new hard drive, whether it’s an HDD or SSD, with the help of professional Windows 10 migration solutions as shown below.
![]()
This page covers a full guide for you to follow andВ moveВ Windows 10 or other Windows OS to a new HDD/SSD with ease. LearnВ how to do this on your own:
Also work to: Move everything from CВ to D drive, move program files x86to another drive, move OS with installed apps to a new disk.
Preparations:В Make Everything Ready for Moving Windows 10
Before transferring Windows 10 OS, here are some preparation jobs that you should have done in advance.
1. Prepare a New Hard Drive — HDD/SSD
Before Windows 10 migration, you need to connect or install aВ new hard driveВ so to make sure that your computer can detect it correctly with the following tips:
Step 1. Prepare a new HDD/SSD and a SATA cable.
NoteВ that space on the new hard drive/SSD must beВ biggerВ than the system C drive used space on the source disk.
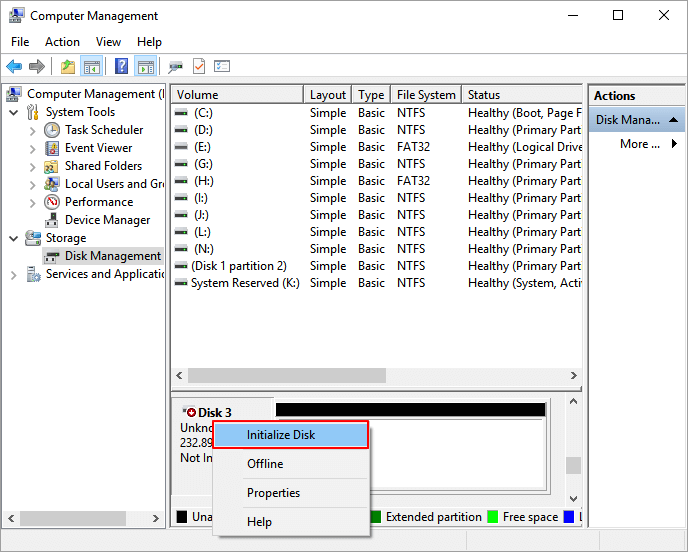
Step 2. Connect the new SSD/HDD toВ PC and initialize the disk.
Connect SSD/HDD to yourВ PC viaВ SATAВ andВ power cablesВ > Locate and right-click the new disk inВ Disk Management > Select «Initialize Disk» > Set the disk as GPT or MBR (the same as source OS disk).
2. Download A Reliable Windows 10 Migration Tool
To migrate OS to another new disk, you’ll need a reliable OS migration tool for help. Here we collect two tools for you to try:
| EaseUS OS Migration Tool — Solution 1 | Windows System Image Tool — Solution 2 |
|---|---|
|
|
EaseUS Suggestion:В To safely migrate or move your Windows 10/8/7 OS to another hard drive, EaseUS partition manager software — Partition Master in Solution 1В is the best option for you.В
Solution 1. How to Move Windows 10 to a New Hard Drive ViaВ OS Migration Tool
Duration: 25 minutes — 1 hour or so.В
Support:В OS migrationВ on Windows 10/8/7/XP/VistaВ and Windows servers, big to small or small to big HDD/SSD.
To move Windows 10 to another new hard drive or SSD, follow through the next two phrases.В You’ll successfully transfer everything from C drive to another disk without losing any data. Also, Windows and program reinstallations are not needed.
#Phrase 1. Migrate Windows 10 to a New Hard Drive (HDD/SSD) in 3 Steps
Note: The operation of migrating OS to SSD or HDD will delete and remove existing partitions and data on your target disk when there is not enough unallocated space on the target disk. If you saved important data there, back up them to an external hard drive in advance.
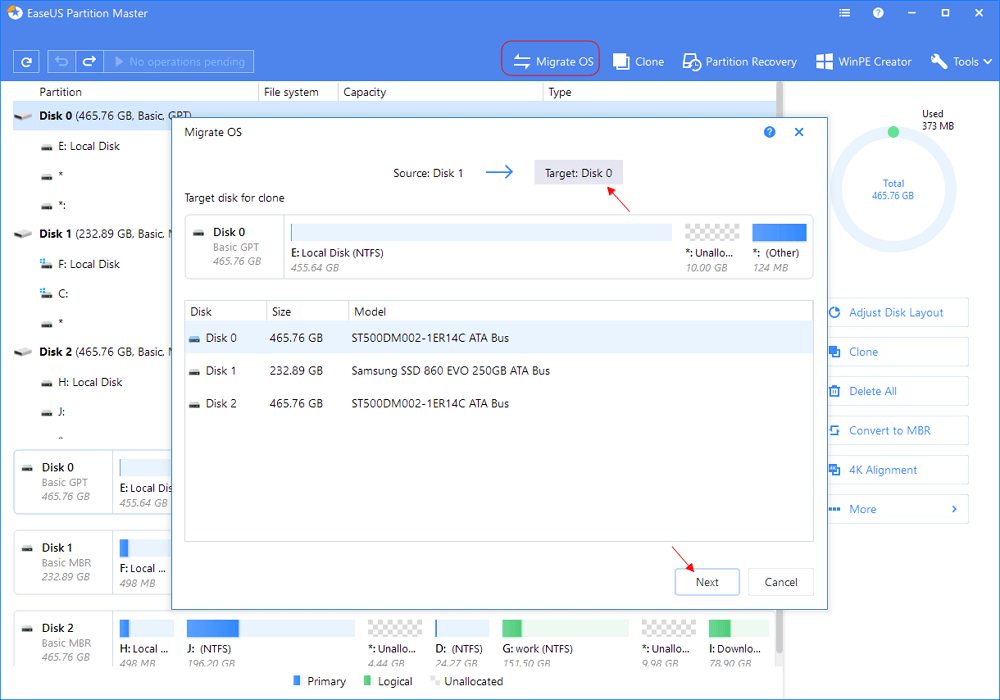
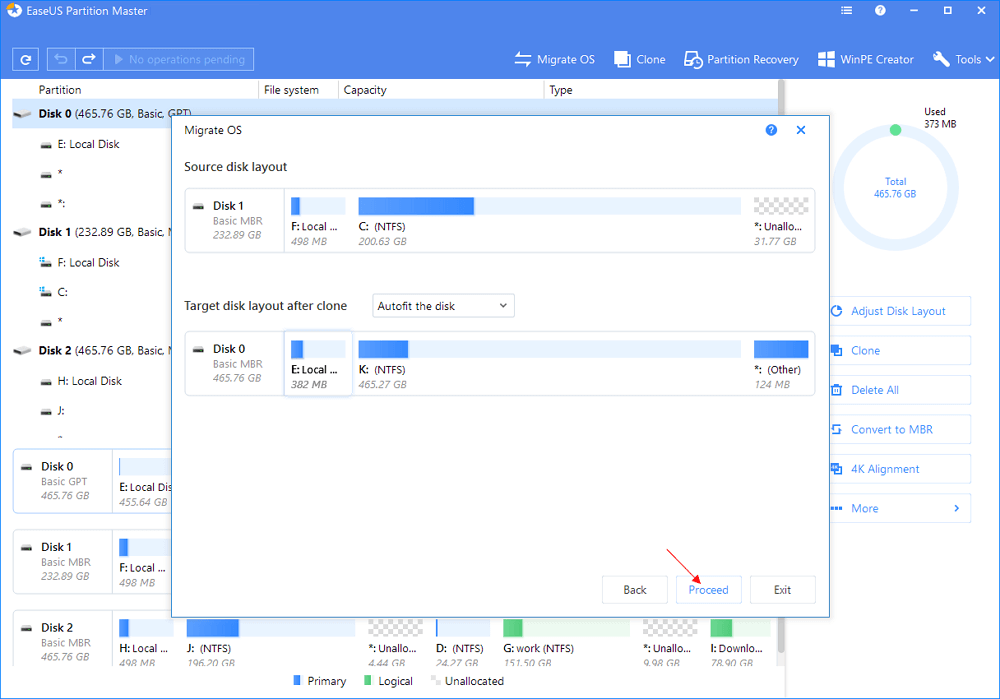
Step 1.В Select «Migrate OS» from the top menu. Select the SSD or HDD as the destination disk and click «Next».
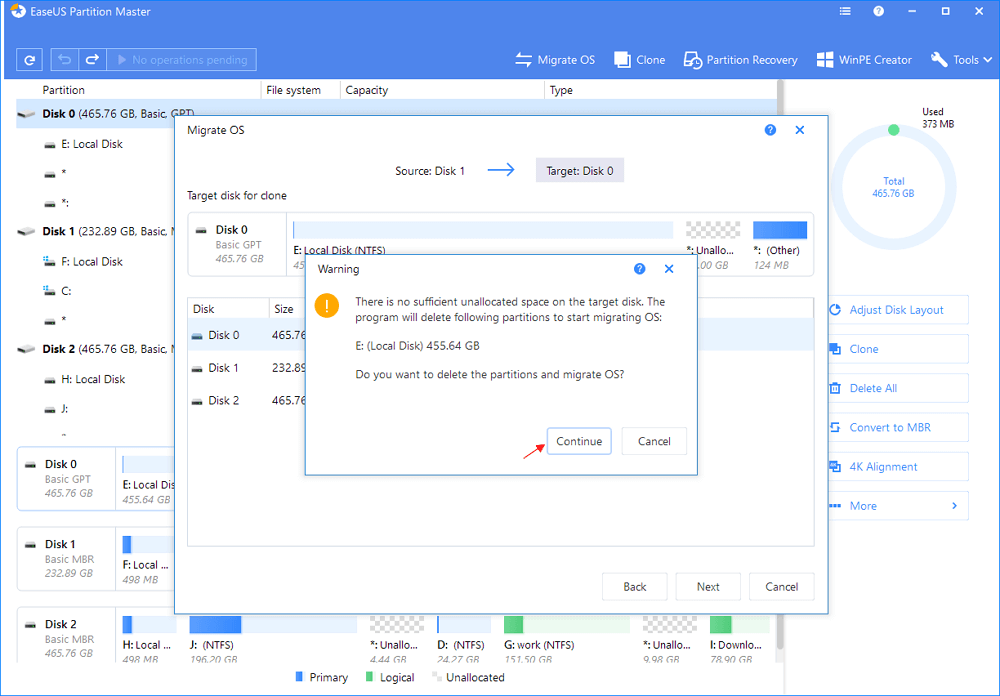
Step 2. Click «Continue» after check warning message.В The data and partitions on the target disk will be deleted. Make sure that you’ve backed up important data in advance. If not, do it now.
Step 3. Preview the layout of your target disk. You can also click the disk layout options to customize the layout of your target disk as you want. Then click «Proceed» to start migrating your OS to a new disk
Video Tutorial to MoveВ Windows 10 to Another New Hard Drive:
When the OS migration process finishes, you can move toВ the next phraseВ to setВ Windows 10 boot fromВ the newВ disk.
#Phrase 2. Set Up Windows 10 to Boot from New Hard Drive
After the OS migration, you need to set up the computerВ to boot Windows 10 from the new hard drive. If you forget to do so, your computer will continue booting up from the old system disk.
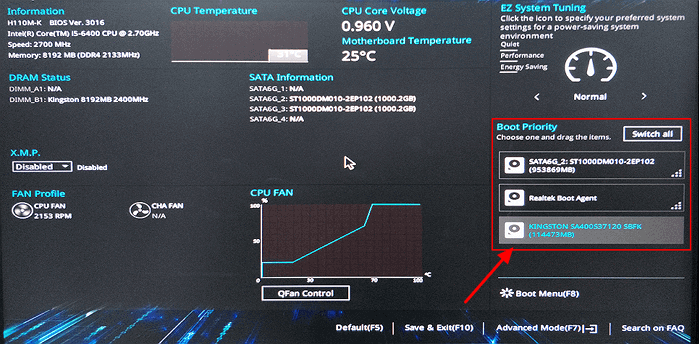
Here are the steps to set the OS to boot from the new disk by changing itsВ boot priority from BIOS:
Step 1. Restart PC and press F2/F12/Del to enter BIOS.
Step 2. Go to the Boot section, set PC to boot from the new hard drive.
Step 3. Save changes, exit BIOS, restart PC.
After this, you are able to log in to your account and use Windows 10 on the new hard drive or SSD successfully.В
If you needВ toВ repartition the old hard drive or make full use of the space on both new and old hard drives, EaseUS Partition Master with its partition Windows 10 features can help.В
SolutionВ 2. TransferВ Windows 10 To Another HDD/SSD WithВ Windows System Image Tool
Duration: 30 minutes — 1 and half an hourВ or so.В
Support:В OS migrationВ on Windows 10,В small disk to big SSD/HDD only.
Limites:В New disk must be bigger than the original system disk space.В
For some experienced Windows users, they may feel like running the WindowsВ system image tool for the Windows 10 migration operation. Although free, yet it’s still not a handy solution for most average Windows users.
If you insist on doing so, follow the step-by-step operations in the below 3 phrases:
#Phrase 1. CreateВ Windows 10 System Image to An External Hard Drive
Step 1. Connect an empty external hardВ drive to your PC.В
Step 2. TypeВ Control PanelВ in the Search box and select to open it.В Click «Backup and Restore (Windows 7)».
Step 3. Click «Create a system image», select the external USB driveВ asВ destinationВ to save Windows 10 system image, click «Next» to continue.
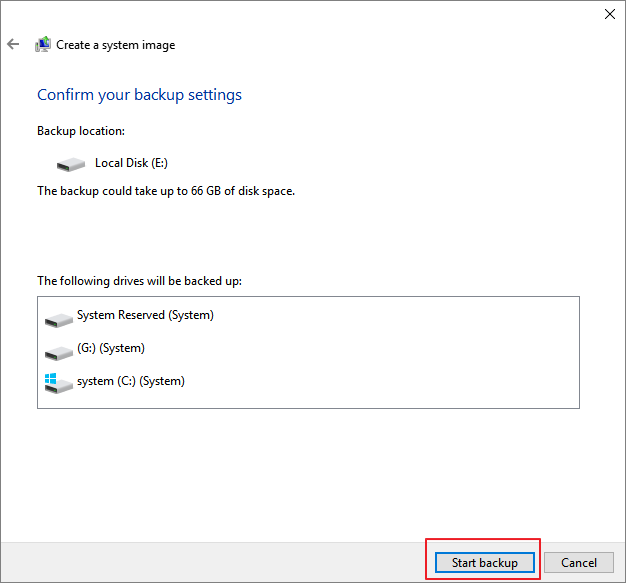
Step 4. The System andВ System Reserved partitions willВ be selected by default, click «Next» to continue.
Step 5. Click «Start backup» to begin creating your current system image to the USB drive.
#Phrase 2. Create Windows Media Creation Tool
Step 1.В Connect an empty USB flash drive (min 8GB) to PC.В
Step 2.В Download Windows 10 installation mediaВ andВ run it as an administrator.
Step 3. On the «What do you want to do?» interface, select «Create installation media for another PC», andВ select «Next».
Step 4. Choose the language, edition, and architecture (64-bit or 32-bit) for Windows 10.
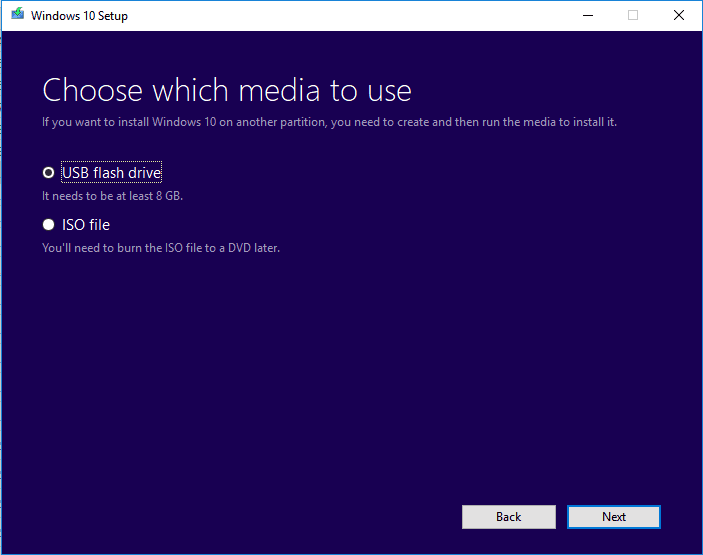
Step 5. Select USB flash driveВ to use:
#Phrase 3. Restore and Move Windows 10 System Image to Another New Disk
Step 1.В Connect bothВ Windows 10 installation media and Windows image backup diskВ to your PC and reboot it.
Step 2.В Press F1/F2/Del to enter BIOS and set the installation media as the boot drive.В
Step 3.В Reboot PC from Windows Installation Media, click «Repair your computer» on the Install Now window.
Step 4.В Enter the Advanced options, click «Troubleshoot» and then select «System Image Recovery».В
Step 5.В Check «Select a system image» to bring up your Windows 10 system image disk and select it. Click «Next» to continue.
Step 6.В Click «Exclude disks. » to exclude the original system disk, leaving the new HDD/SSD only. Click «OK» to confirm.
Step 7. Click «Next» to start the restoration process and wait for the restoration process to complete.В

Once finish restoring Windows 10 image to the new disk, Windows 10 will restart and boot up.В
If Windows 10 doesn’t boot up, revert to Phrase 2 in Solution 1 to set the new disk as boot drive. You will be able to run Windows 10 on the new disk without any issue any more.В
Conclusion
This page covers a full guide to help you migrate, move, or transfer Windows 10 OS to a new hard drive or SSD without losing any data or boot issue. You can get everything done in three parts:
- Part 1. Prepare new hard drive/SSD — initialize the disk and download a reliable OS migration tool.
- Part 2. Migrate Windows 10 to new hard drive/SSD via OS migration tool.
- Part 3. Move Windows 10 via System Image Tool.В
As for Windows beginners, we would like to suggest you run reliable EaseUS Partition Master for moving Windows 10 to a new HDD/SSD with ease.
If you have more questions about migrating Windows 10 or transfer Windows OS to HDD/SSD, check the Further Readings below and you’ll find satisfying answers.
Further Readings — FAQs about Windows 10 OS Migration to HDD/SSD
Here, we collect some related questions that are frequently asked in the Windows forum. If you are having the same questions, check and find answers here.
1. How do I move Windows 10 to a new SSD?
As the full guide provided on this page, to move Windows 10 to a new SSD, follow through the guide steps below:
- 1. Connect the new SSD to PC via SATA cable and initialize it (as the same partition style as your OS disk).
- 2. Download, install and run EaseUS Partition Master on your PC.
- 3. Select Migrate OS to HDD/SSD, and select the new SSD as your target disk to move Windows 10.
- 4. Confirm and execute the operation.
- 5. Insert new SSD to the computer, restart it and set the computer to boot from new SSD in BIOS.
2. How do I transfer Windows 10 to a USB flash drive?
It’s possible to transfer Windows 10 to a USB drive and take your OS anywhere now. Here are the steps for you to follow:
- 1. Prepare an empty USB flash drive or external USB drive (external hard drive) with a bigger space than your system drive.
- 2. Download and run a reliable system migration software. Here we recommend you try EaseUS Todo Backup.
- 3. Run EaseUS Todo Backup and select System Clone > Create a Windows portable USB.
Wait for the process to finish. After this, you can take the USB to any computer and boot your own Windows 10 OS on the new computer. For more detailed steps, refer to Transfer Windows 10 to a USB flash drive for help.В
3. How do I fresh install Windows OS, like Windows 10, to SSD?
There are two ways that you can install OS like Windows 10 to SSD. One is as recommended on this page, to migrate or transfer Windows 10 to SSD using the Migrate OS feature in EaseUS Partition Master.
The other way is to fresh install Windows 10 on SSD with the following steps:
- 1. Download the media creation tool from Microsoft.
- 2. Run the downloaded tool,В choose «Create installations media for another PC» and click «Next».
- 3. Select «Language, Edition, and Architecture for Windows 10» and then click «Next».
- 4. Choose the USB Flash drive.
- 5. Insert the USB drive into PC and click «Next».
- After the drive is selected, the tool will start downloading Windows 10 and it will take a few minutes to finish the downloading process.
- 6. Connect the USB drive with Windows 7/8 and run it in Explorer, click Setup.
- 7. When you get with the Ready to Install dialog, click «Change» what to keep and choose Nothing. Click «Next»
Follow the on-screen tutorial to complete the Windows 10 installation process. If you prefer a detailed guide, you can refer to this page: Transfer/Install Windows OS to SSD. It has allВ the detailed steps that you need.
4. How to move installed programs to another drive windows 7?
To move installed programs and apps to another drive in Windows 7, you have two options to try:
- 1. Transfer programs and program data to another drive via PC Transfer software.
- 2. Manually copy and move installed program file like .exe to another drive.
For more detailed steps, you can follow Transfer Installed Programs to New Hard Drive for help.
How to move Windows 10 to an SSD without reinstalling

- Moving your OS from a new SDD can improve the booting time and overall performance of the system.
- In this article, we’re showing you how to move an already installed system to an SSD , without performing a clean install .
- While you’re waiting for the transfer to complete, check out our full library of Windows 10 Guides. For sure you’ll find something useful!
- For even more guides, see our Laptop & PC Troubleshooting Hub.

- Download Restoro PC Repair Tool that comes with Patented Technologies (patent available here).
- Click Start Scan to find Windows issues that could be causing PC problems.
- Click Repair All to fix issues affecting your computer’s security and performance
- Restoro has been downloaded by 0 readers this month.
Windows 10 already has improved booting time compared to previous versions of Windows, but moving it from a regular HDD to a new SDD will improve the booting time and overall performance of the system even more.
There are a couple of ways to transfer your system data from your current HDD to a new SDD, and we’re going to talk about all of them in this article.
Probably the simplest solution is performing a clean install on the SSD drive, but you will lose all your data, and you’ll have to install all your programs once again.
And it could take even more time than moving an already installed operating system. But if you don’t like to experiment, you might choose this path.
Installing a fresh copy of Windows 10 on an SSD drive is no different than installing it on an HDD. You have to format your current system partition, and then just install the fresh copy of Windows 10 on an SSD.
How do I move Windows 10 to an SDD?
But there’s also a way to move an already installed system to an SSD, without performing a clean install. All you have to do is to clone your system partition to the SSD, and you’re good to go.
In short, you need to back up your drive, reduce your disk space, copy your system partition to the SSD, and format the system partition on your HDD.
Is that all so simple? No, it requires some work on your side to move the OS properly.
And in the remainder of the article, we’re going to show you all the necessary instructions to move your installed system to the SSD drive properly.
But before all, you must backup your data, because if something goes wrong, you might lose it forever, and it will be required for the process.
When you backed up your drive, it’s time to get rid of the additional disk space, because SSDs have much less space than regular hard disks, so we want your system partition to fit on the SSD drive.
So, delete your personal files, music, photos, videos, and particularly all non-system files to make your partition as small as possible.
It’s okay to delete your personal stuff because you’ll be able to get it back from the backup, once the process is done.
It is also recommended to perform a defragmentation of your system hard drive before you move it on the SSD.
And now, it’s finally time to move your Windows 10 to the SSD! To do so, follow one of these steps.
How do I transfer my OS from HDD to SSD?
1. Use Laplink PCMover
Run a System Scan to discover potential errors


Laplink PCMover is a small desktop application that can help you to easily move all your files, settings, and user profiles to your SSD. All you need to do is download the software and follow the simple wizard steps.
With Laplink PCMover, the whole process is hasslefree, extremely user-friendly, and intuitive. The programs are installed and ready to use right away.
Extremely important, you don’t need OS images, DVDs, download links, OS keys, or similar. You just need to configure the transfer and the tool will do the rest for you!
Laplink PCMover
How do I use Laplink PCMover to transfer my OS?
- First, download Laplink PCMover on both your computer and your SSD. (Make sure the SSD is connected to your computer at all stages of the process.)
- Then, open the tool on both your PC and SSD.
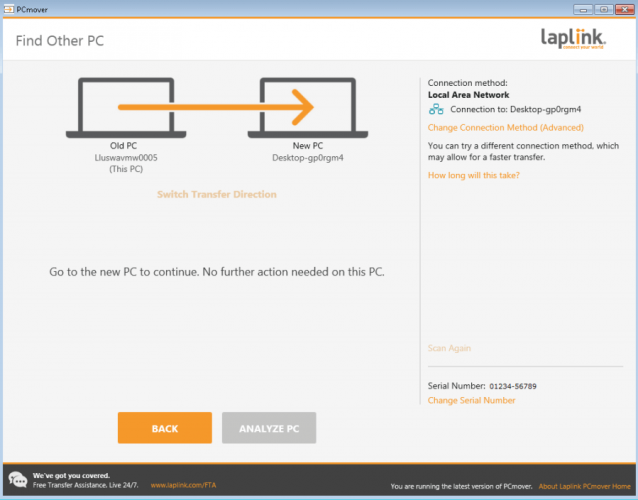
- Choose which network method you will use to connect your systems for the transfer. Laplink recommends using WiFi.
- Then follow the on-screen prompts to allow the tool to discover the SSD (seen as New PC).

- Once the two are connected, open Laplink PCMover on the SSD.
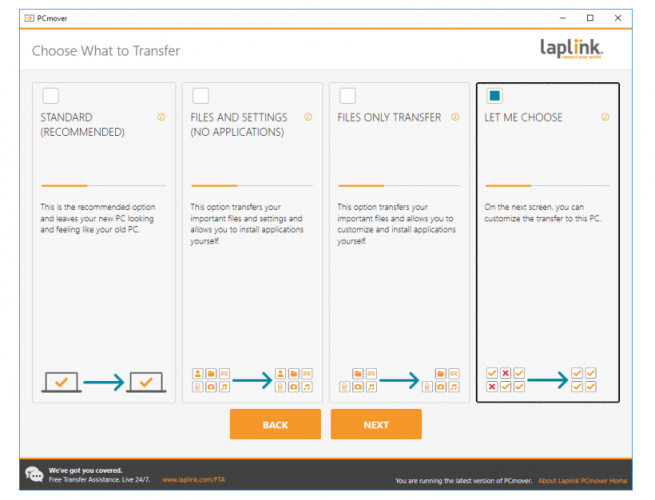
- Click on Analyze PC, then follow the prompts to customize what you want to be transferred and allow the transfer to complete.
It will take a few hours for the process to finish.
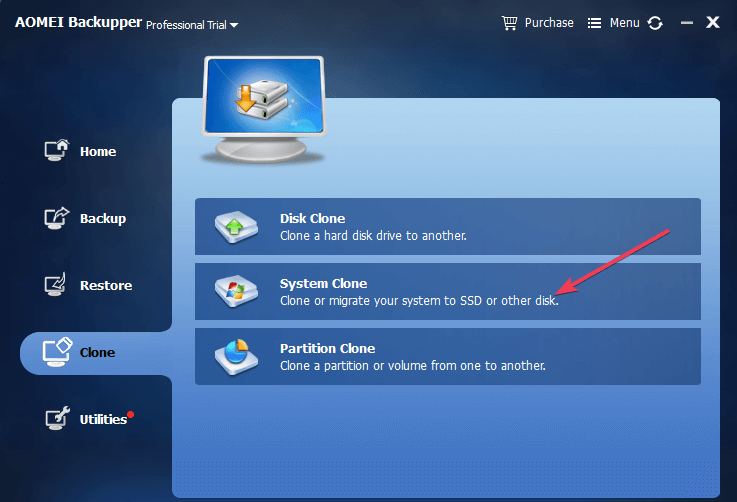
2. Use AOMEI Backupper
- First of all, you need to download and install the AOMEI Backupper to your machine.
- Then, you need to connect your hard drive to your computer.
- Now, go to Clone, then to System Clone to launch the process.
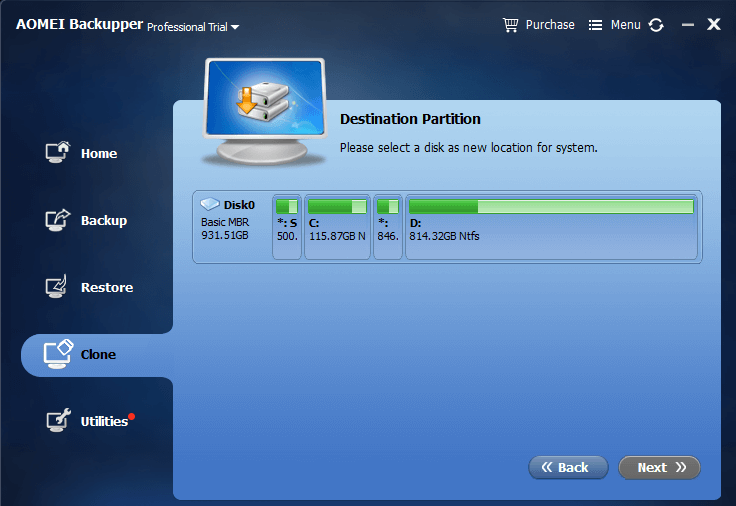
- Your machine should now display a new window asking you where you want to move the OS files. Select your SSD and confirm your choice.
- Hit Next and follow the on-screen instructions to complete the process. It’s as simple as that.
If Windows won’t activate after the cloning process is complete, follow this guide to solve the problem.
And that’s about that, your Windows 10 is now successfully moved to the SSD drive, and it will perform a lot faster from now on.

AOMEI Backupper
How to restore your personal files and user folders
Since you probably don’t have enough space on your SSD, we’ll have to restore your files to the old, formatted HDD drive.
First, go to your old drive (which is now completely empty), and create a new folder to store all your user folders and personal files. Name it whatever you want (we used WinReport).
Now, go to C:Users
You should see all your user folders there. Right-click on each one, go to Properties, and then go to the Location tab.
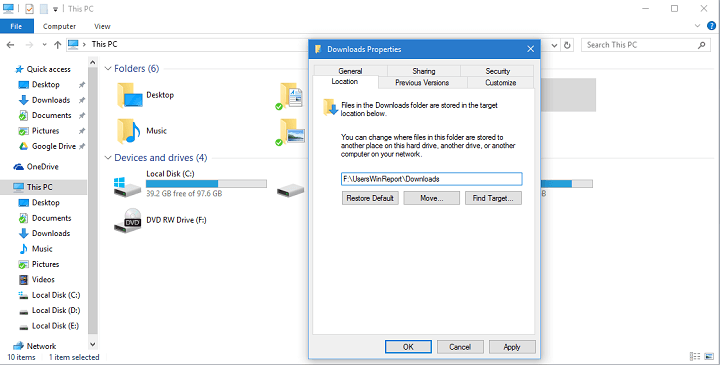
Click on the Move button, and choose your newly created folder as the target.
And all your user folders, like Desktop, Downloads, Documents, Pictures, Music, etc. should all be placed on your old HDD Drive.
And finally, the only thing left to do is restoring your personal files.
To restore your personal files to the old HDD drive, follow these steps:
- Open your backup (whatever you chose to be your backup destination, cloud, external storage, another partition, etc.)
- And now drag all your user files (documents, music, pictures, and other files) to your new My Documents, My Music, and other folders.
By doing this, all your personal files will be accessible, besides the fact that they’re not on the system partition. But you may need to change the settings of your favorite apps and games because they’ll probably save files in the old My Documents.
If you’re looking to reinstall your Windows 10 apps on the new drive, check out this guide for a seamless transition.
That would be all, we presented you a full guide on how to move your Windows 10 system from your old HDD partition to the SSD, and how to get everything to work.
If you followed our instructions, and successfully moved your system to the SSD, please tell us your impressions in the comments section below and we’ll be sure to take a look.


