- Перемещение дисков на другой компьютер Move disks to another computer
- Проверка работоспособности томов Verify volume health
- Удаление дисков Uninstall the disks
- Удаление динамических дисков Remove dynamic disks
- Установка дисков на новый компьютер Install disks in the new computer
- Обнаружение новых дисков Detect new disks
- Дополнительные сведения Additional considerations
- Move disks to another computer
- Verify volume health
- Uninstall the disks
- Remove dynamic disks
- Install disks in the new computer
- Detect new disks
- Additional considerations
- How to: Move Windows 10 to another Hard Drive with Secure Boot
- Can I move Windows 10 to another hard drive?
- A safe OS migration tool for Windows 10, 8, 7
- Detailed steps to transfer Windows 10 from one drive to another
- How to boot from the new drive after OS migration
Перемещение дисков на другой компьютер Move disks to another computer
Относится к: Windows 10, Windows 8.1, Windows Server (Semi-Annual Channel), Windows Server 2016, Windows Server 2012 R2, Windows Server 2012 Applies To: Windows 10, Windows 8.1, Windows Server (Semi-Annual Channel), Windows Server 2016, Windows Server 2012 R2, Windows Server 2012
В этом разделе описывается процедура перемещения дисков на другой компьютер и связанные с ней рекомендации. This section describes the steps to take, and the considerations associated with, moving disks to another computer. Распечатайте эту процедуру или запишите необходимые действия, прежде чем приступать к перемещению дисков между компьютерами. You might want to print this procedure or write down the steps before attempting to move disks from one computer to another.
Для выполнения следующих шагов необходимо как минимум состоять в группе Операторы архива или Администраторы. You must be a member of the Backup Operators or Administrators group, at minimum, to complete these steps.
Проверка работоспособности томов Verify volume health
С помощью средства управления дисками убедитесь, что состояние томов на дисках — Исправен. Use Disk Management to make sure the status of the volumes on the disks is Healthy. Если состояние отлично от Исправен, восстановите тома перед перемещением дисков. If the status is not Healthy, repair the volumes before you move the disks.
Чтобы проверить состояние томов, в меню Представление обратите внимание на столбец Состояние в представлении Список томов или в разделе сведений о размере тома и файловой системе в Графическом представлении. To verify the volume status, from the View menu, check the Status column in the Volume List view, or under the volume size and file system information in the Graphical View.
Удаление дисков Uninstall the disks
Удалите диски, которые требуется переместить, с помощью диспетчера устройств. Uninstall the disks you want to move using Device Manager.
Процедура удаления дисков To uninstall disks
Откройте диспетчер устройств в консоли управления компьютером. Open Device Manager in Computer Management.
В списке устройств дважды щелкните Диски. In the device list, double-click Disk drives.
Щелкните правой кнопкой мыши диски, которые требуется удалить, и нажмите кнопку Удалить. Right-click the disks you want to uninstall, and then click Uninstall.
В диалоговом окне Подтверждение удаления устройства нажмите кнопку ОК. In the Confirm Device Removal dialog box, click OK.
Удаление динамических дисков Remove dynamic disks
Если требуется перенести динамические диски, в средстве управления дисками щелкните правой кнопкой мыши диски, которые требуется удалить, а затем выберите пункт Удалить диск. If the disks you want to move are dynamic disks, in Disk Management, right-click the disks you want to move, and then click Remove Disk.
После удаления динамических дисков или при перемещении базовых дисков можно их физически отключить. After having removed dynamic disks, or if you are moving basic disks, you can now physically disconnect them. Если диски являются внешними, можно отключить их от компьютера. If the disks are external, you can now unplug them from the computer. Если диски являются внутренними, отключите компьютер, а затем физически извлеките их. If the disks are internal, turn off the computer, and then physically remove them.
Установка дисков на новый компьютер Install disks in the new computer
Если диски являются внешними, подключите их к компьютеру. If the disks are external, plug them into the computer. Если диски являются внутренними, убедитесь, что компьютер выключен, а затем физически установите диски на этот компьютер. If the disks are internal, make sure the computer is turned off and then physically install the disks in that computer.
Запустите компьютер, на котором находятся перемещенные диски, и следуйте инструкциям в диалоговом окне «Найдено новое оборудование». Start the computer that contains the disks you moved and follow the instructions in the Found New Hardware dialog box.
Обнаружение новых дисков Detect new disks
- На новом компьютере откройте средство управления дисками. On the new computer, open Disk Management.
- В меню Действие выберите команду Повторное сканирование дисков. Click Action and then click Rescan Disks.
- Щелкните правой кнопкой мыши все диски с пометкой Инородный. Right-click any disk marked Foreign.
- Щелкните Импортировать инородные диски и следуйте инструкциям на экране. Click Import Foreign Disks and then follow the on-screen instructions.
Дополнительные сведения Additional considerations
При перемещении на другой компьютер базовые тома получают следующую доступную на этом компьютере букву диска. When moved to another computer, basic volumes receive the next available drive letter on that computer.
Динамические тома сохраняют букву диска, присвоенную им на предыдущем компьютере. Dynamic volumes retain the drive letter they had on the previous computer. Если на предыдущем компьютере динамическому тому не была назначена буква диска, он не получит ее при перемещении на другой компьютер. If a dynamic volume did not have a drive letter on the previous computer, it will not receive a drive letter when moved to another computer. Если на компьютере, на который перемещается том, эта буква диска уже используется, том получает следующую доступную букву диска. If the drive letter is already used on the computer where a volume is moved, the volume receives the next available drive letter.
Если администратор использовал команду mountvol /n или diskpart automount, чтобы предотвратить добавление новых томов в систему, тома, перемещенные с другого компьютера, не могут подключиться и получить букву диска. If an administrator has used either the mountvol /n or the diskpart automount command to prevent new volumes from being added to the system, volumes moved from another computer are prevented from being mounted and from receiving a drive letter. Для использования тома необходимо вручную подключить его и назначить ему букву диска с помощью средства управления дисками или команд DiskPart и mountvol. To use the volume, you must manually mount the volume and assign it a drive letter using Disk Management or the DiskPart and mountvol commands.
При перемещении составных, чередующихся и зеркальных томов, а также томов RAID-5 рекомендуется перемещать все содержащие том диски вместе. If you are moving spanned, striped, mirrored, or RAID-5 volumes, it is highly recommended that you move all disks containing the volume together. В противном случае тома на дисках не удастся подключить и сделать доступными для каких-либо действий, кроме удаления. Otherwise, the volumes on the disks cannot be brought online and will not be accessible except to delete them.
Чтобы переместить несколько дисков с разных компьютеров на один компьютер, установите их, откройте средство управления дисками, щелкните правой кнопкой мыши все новые диски и выберите пункт Импортировать инородные диски. You can move multiple disks from different computers to a computer by installing the disks, opening Disk Management, right-clicking any of the new disks, and then clicking Import Foreign Disks. При импорте нескольких дисков с разных компьютеров следует всегда импортировать все диски с одного компьютера за раз. When importing multiple disks from different computers, always import all the disks from one computer at a time. Например, если вы собираетесь переместить диски с двух компьютеров, сначала импортируйте все диски с первого компьютера, а затем — все диски со второго компьютера. For example, if you want to move disks from two computers, import all disks from the first computer and then import all disks from the second computer.
В средстве управления дисками описывается состояние томов на дисках перед их импортом. Disk Management describes the condition of the volumes on the disks before they are imported. Внимательно ознакомьтесь с этими сведениями. Review this information carefully. При наличии проблем вы узнаете из этих сведений, что произойдет с каждым томом на перемещаемых дисках после импорта последних. If there are any problems, this information will tell you what will happen to each volume on these disks once the disks have been imported.
При перемещении диска со стилем раздела в виде таблицы разделов GUID (GPT), содержащего операционную систему Windows, на компьютер на базе архитектуры x86 или x64, доступ к данным сохраняется, но выполнить загрузку через эту операционную систему невозможно. If you move a GUID Partition Table (GPT) disk containing the Windows operating system to an x86-based or x64-based computer, you can access the data, but you cannot boot from that operating system.
Move disks to another computer
Applies To: Windows 10, Windows 8.1, Windows Server (Semi-Annual Channel), Windows Server 2016, Windows Server 2012 R2, Windows Server 2012
This section describes the steps to take, and the considerations associated with, moving disks to another computer. You might want to print this procedure or write down the steps before attempting to move disks from one computer to another.
You must be a member of the Backup Operators or Administrators group, at minimum, to complete these steps.
Verify volume health
Use Disk Management to make sure the status of the volumes on the disks is Healthy. If the status is not Healthy, repair the volumes before you move the disks.
To verify the volume status, from the View menu, check the Status column in the Volume List view, or under the volume size and file system information in the Graphical View.
Uninstall the disks
Uninstall the disks you want to move using Device Manager.
To uninstall disks
Open Device Manager in Computer Management.
In the device list, double-click Disk drives.
Right-click the disks you want to uninstall, and then click Uninstall.
In the Confirm Device Removal dialog box, click OK.
Remove dynamic disks
If the disks you want to move are dynamic disks, in Disk Management, right-click the disks you want to move, and then click Remove Disk.
After having removed dynamic disks, or if you are moving basic disks, you can now physically disconnect them. If the disks are external, you can now unplug them from the computer. If the disks are internal, turn off the computer, and then physically remove them.
Install disks in the new computer
If the disks are external, plug them into the computer. If the disks are internal, make sure the computer is turned off and then physically install the disks in that computer.
Start the computer that contains the disks you moved and follow the instructions in the Found New Hardware dialog box.
Detect new disks
- On the new computer, open Disk Management.
- Click Action and then click Rescan Disks.
- Right-click any disk marked Foreign.
- Click Import Foreign Disks and then follow the on-screen instructions.
Additional considerations
When moved to another computer, basic volumes receive the next available drive letter on that computer.
Dynamic volumes retain the drive letter they had on the previous computer. If a dynamic volume did not have a drive letter on the previous computer, it will not receive a drive letter when moved to another computer. If the drive letter is already used on the computer where a volume is moved, the volume receives the next available drive letter.
If an administrator has used either the mountvol /n or the diskpart automount command to prevent new volumes from being added to the system, volumes moved from another computer are prevented from being mounted and from receiving a drive letter. To use the volume, you must manually mount the volume and assign it a drive letter using Disk Management or the DiskPart and mountvol commands.
If you are moving spanned, striped, mirrored, or RAID-5 volumes, it is highly recommended that you move all disks containing the volume together. Otherwise, the volumes on the disks cannot be brought online and will not be accessible except to delete them.
You can move multiple disks from different computers to a computer by installing the disks, opening Disk Management, right-clicking any of the new disks, and then clicking Import Foreign Disks. When importing multiple disks from different computers, always import all the disks from one computer at a time. For example, if you want to move disks from two computers, import all disks from the first computer and then import all disks from the second computer.
Disk Management describes the condition of the volumes on the disks before they are imported. Review this information carefully. If there are any problems, this information will tell you what will happen to each volume on these disks once the disks have been imported.
If you move a GUID Partition Table (GPT) disk containing the Windows operating system to an x86-based or x64-based computer, you can access the data, but you cannot boot from that operating system.
How to: Move Windows 10 to another Hard Drive with Secure Boot
To upgrade system disk to SSD drive or larger drive without OS reinstallation, you can move Windows 10, 8 or 7 to another drive using AOMEI Partitoin Assistant Professional.

By Bryce  / Last Updated December 7, 2020
Can I move Windows 10 to another hard drive?
«I have purchased an SSD to replace my original 256GB HDD to improve computer performance. But I don’t want to reinstall Windows 10 on the newly purchased SSD from scratch. Then, could you tell me whether it is possible to transfer windows 10 from HDD to SSD without reinstalling? And Can I boot from the new drive successfully after migration?»
A safe OS migration tool for Windows 10, 8, 7
During the usage of computer, there could be many reasons for you to replace or upgrade old hard drive like storage capacity increase, running speed improvement, etc.
To avoid the trouble of Windows reinstallation, an OS migration tool for Windows 10, 8, 7, AOMEI Partition Assistant Professional can be helpful! Its Migrate OS to SSD function allows you to clone only OS related partitions to another hard drive (SSD/HDD) with secure boot. You can use its Disk Clone Wizard, if you want to move all data, including Windows, apps, files from the current hard drive to a new one.
Detailed steps to transfer Windows 10 from one drive to another
вњ” Preparation work:
в–Є Connect the destination hard drive to your Window based computer. If your computer has no extra disk bay for it, a USB-SATA connection cable is necessary.
в–Є Ensure that the unallocated space on the target disk is not smaller than the used space of the current OS partition. Or you can create unallocated space on it via partition shrink or deletion.
вњ” Then, refer to the following step-by-step guide about how to move Windows 10 to another hard drive via the OS migration tool.
PS.: You can download the demo version of AOMEI Partition Assistant Professional to try!
Step 1. Install and open AOMEI Partition Assistant Professional. Click Migrate OS to SSD under Wizards.

Step 2. Choose an unallocated space on the target hard drive and click Next.
Note: If there is no unallocated space, all partitions on the target disk will be deleted after you check the option I want to delete all partitions on disk 2 to migrate system to the disk.

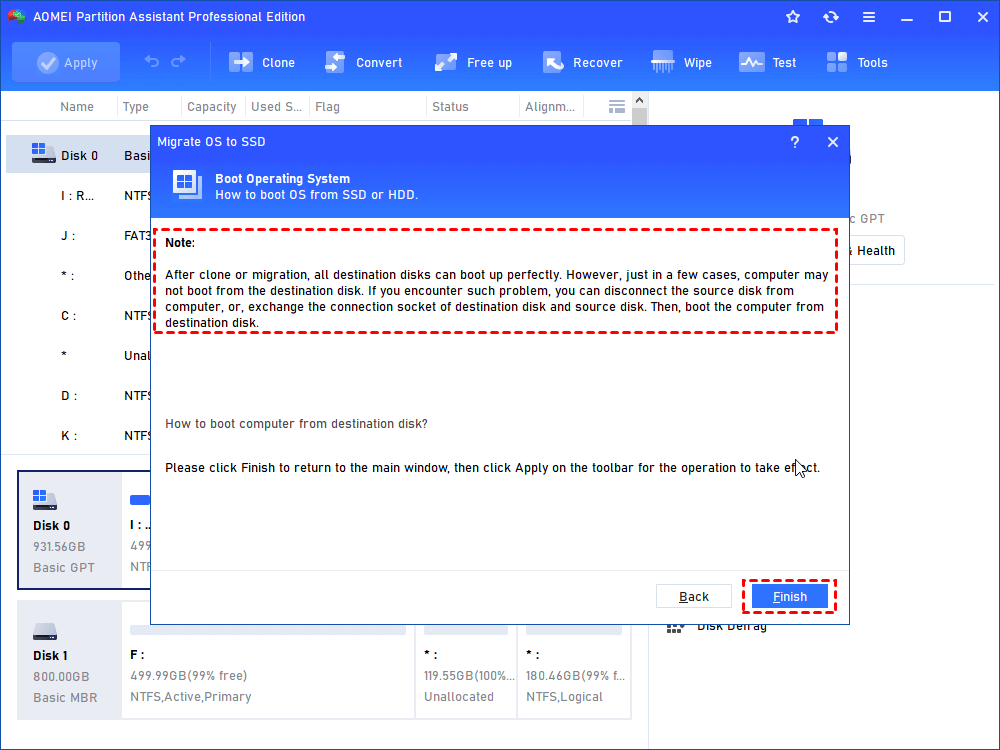
Step 3. In this window, you can change the size of the system partition.

Attend to Note about how to boot OS from HDD or SSD, which might be helpful after migration.
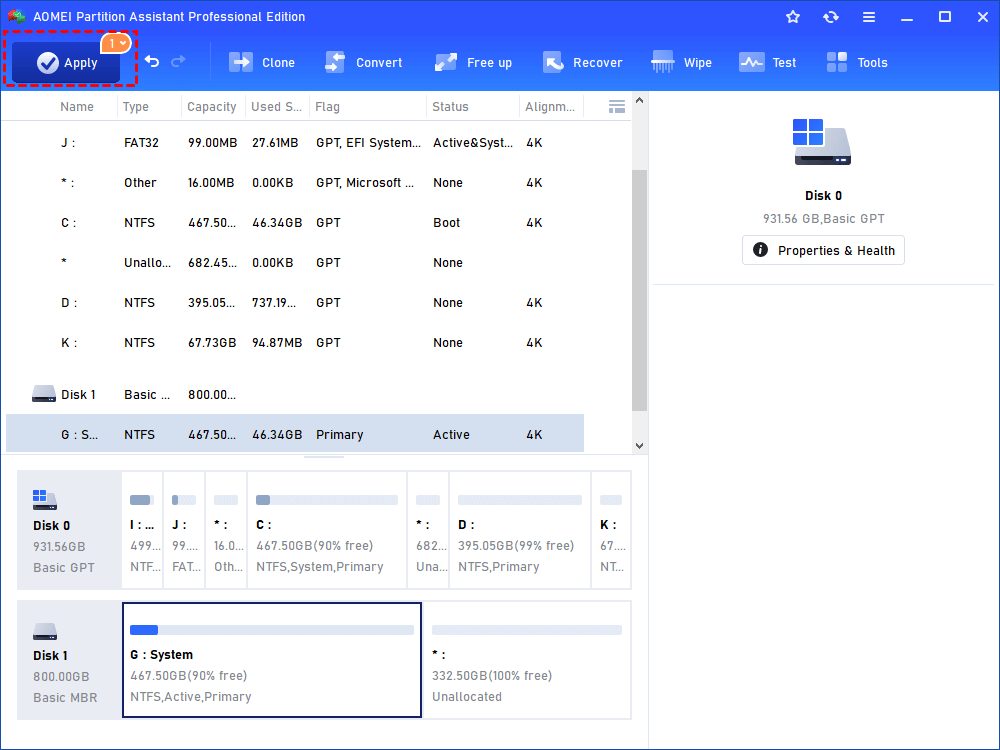
Step 4. In this screen, you can review the result. Click Apply and Proceed after confirmation.
вњЌ Notes:
▪ Before you migrate Windows 10 to GPT hard drive, make sure that the motherboard supports EFI/UEFI boot; otherwise, you’ll be unable to boot the computer from the destination hard drive.
в–Є In fact, it is featured with various other useful functions, helping you to solve many issues. For example, when you have accidentally deleted partition in Windows, its Partition Recovery Wizard enables you to recover the deleted partition easily.
в–Є This software can be used to migrate Windows 7, Windows 8, or Windows 8.1 to another drive. To clone Windows Server 2019, 2016, 2012, 2008 to another hard drive, you can use AOMEI Partition Assistant Server.
How to boot from the new drive after OS migration
After you transfer Windows from original hard drive to another one, you can check out how to boot from the new drive when you keep two hard drives simultaneously.
Step 1. Start your PC, press the function key during the initial startup to enter BIOS settings.
Step 2. In the Boot option, choose the new HDD or SSD as the boot drive and save all the changes.
Step 3. Restart the computer.


