- Как передавать и обмениваться файлами между Windows и Linux
- 4 способа передачи файлов из Windows в Linux
- 1. Совместное использование сетевых папок между Linux и Windows
- 2. Скопируйте файлы через SSH из Windows в Linux
- 3. Как перенести файлы из Linux в Windows, используя FTP
- 4. Делитесь файлами между Linux и Windows с помощью Resilio Sync
- How to move files and folders on the computer
- How to move files in Windows
- Cut and paste
- Drag-and-drop
- Use «Move to Folder»
- How to move files in the Windows command line (MS-DOS)
- How to move files in macOS
- Drag-and-drop
- Keyboard shortcut
- Terminal
- FTPClient move files from Linux to windows. Know when they end generating [duplicate]
- 1 Answer 1
- How to Move Files Using Linux Commands or File Managers
- Command line moving
Как передавать и обмениваться файлами между Windows и Linux
Копирование данных с ПК с Windows в Linux — или в другом направлении — поначалу может показаться пугающим. В конце концов, это то, что кажется простым, но оказывается сложным.
По правде говоря, делиться файлами из Windows в Linux легко, но только если вы знаете, как это сделать. Готовы выяснить?
4 способа передачи файлов из Windows в Linux
Перенос данных между операционными системами Windows и Linux проще, чем вы думаете. Мы собрали пять способов сделать это:
- Поделиться сетевыми папками
- Передача файлов с FTP
- Безопасное копирование файлов через SSH
- Обмен данными с помощью программного обеспечения для синхронизации
С помощью каждого из этих методов вы сможете легко (а в некоторых случаях легко) перемещать файлы между операционными системами.
Давайте посмотрим на них по очереди и выясним, какой из них подходит вам больше всего.
1. Совместное использование сетевых папок между Linux и Windows
Наиболее очевидный способ обмена файлами между Linux и Windows — это использование сетевых ресурсов. Этот термин относится к папкам на одном ПК, которые доступны пользователям на других компьютерах. В сети только для Windows это легко настроить. Добавление устройства Linux немного усложняет ситуацию, хотя это можно преодолеть.
Начиная с Windows, щелкните правой кнопкой мыши значок сетевого подключения на панели задач и выберите «Открыть сеть и настройки Интернета». Далее нажмите «Параметры общего доступа» и включите текущий профиль.
- Включить обнаружение сети
- Включите общий доступ к файлам и принтерам
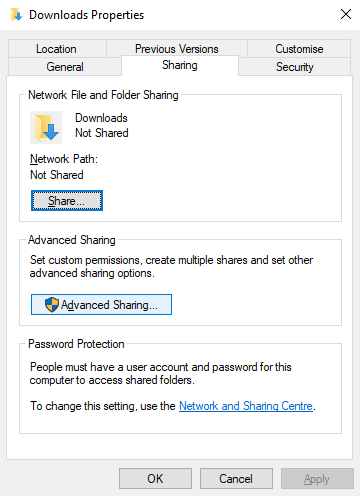
Нажмите «Сохранить изменения» для подтверждения, затем перейдите в папку, содержащую файлы, которыми вы хотите поделиться. Щелкните правой кнопкой мыши папку, выберите «Свойства» и откройте вкладку «Общий доступ». Здесь нажмите «Расширенный общий доступ», затем установите флажок «Поделиться этой папкой».
Вы можете управлять доступом к папке через разрешения; это относится к локальным пользователям Windows, а не к сетевым устройствам.
Нажмите OK, чтобы подтвердить изменение, затем откройте вкладку Безопасность в Свойствах. Настройте это, чтобы отразить настройки в поле Полномочия ранее. Вам не нужно делать слишком много здесь, так как Windows 10 должна включать группу под названием Authenticated Users. Это используется для удаленного доступа к вашему компьютеру.
Снова нажмите ОК, когда вы закончите.
Чтобы найти общий ресурс Windows на ПК с Linux, просто откройте браузер файлов и выберите «Сеть». Отсюда перейдите к папке, размещенной в Windows, и начните обмен данными.
Доступ к общему ресурсу Linux из Windows
Чтобы переместить данные в другом направлении, вам нужно установить Samba на ваш компьютер с Linux.
Затем установите имя пользователя для общего ресурса samba.
Вам будет предложено ввести пароль для новой учетной записи (не используйте для этого «имя пользователя»!).
Затем создайте каталог для обмена данными.
Затем отредактируйте файл smb.conf в своем текстовом редакторе:
Добавьте следующее в конец файла конфигурации:
Внесите необходимые изменения в соответствии со своими потребностями, затем нажмите Ctrl + X, чтобы выйти, и нажмите Y, чтобы сохранить. Далее перезапустите Samba:
После этого вы сможете получить доступ к общему ресурсу из Windows. Откройте проводник или браузер и введите IP-адрес или имя хоста удаленного устройства Linux, а затем имя папки. В нашем примере это
2. Скопируйте файлы через SSH из Windows в Linux
С включенным SSH на вашем устройстве Linux вы можете отправлять данные через командную строку с одного компьютера на другой. Однако, чтобы это работало, вам нужно настроить SSH-сервер на вашем Linux-компьютере.
Начните с открытия терминала и обновления и обновления ОС.
После завершения установите сервер SSH. Сервер OpenSSH — хороший вариант.
Подождите, пока он установит. Чтобы в любой момент проверить, работает ли сервер OpenSSH, используйте
Для передачи данных из Windows используйте SSH-клиент, например PuTTY. Это требует загрузки инструмента PSCP в вашу систему Windows для запуска вместе с PuTTY. Найти оба на домашней странице PuTTY.
Обратите внимание, что в то время как PuTTY нужно будет установить, PSCP — нет. Однако его следует сохранить в корне диска C:\ или настроить как переменную среды. Вам также необходимо подтвердить IP-адрес устройства Linux. Отметьте это на коробке с
После установления соединения вы можете отправлять данные следующим образом:
Перед началом передачи вам будет предложено ввести пароль для компьютера с Linux.
Хотите скопировать данные из Linux в Windows в одном сеансе SSH? Эта команда загрузит указанный файл в текущий каталог:
Обратите внимание на одиночный период в конце — включите его, иначе перевод не будет работать.
3. Как перенести файлы из Linux в Windows, используя FTP
Можно также использовать приложение протокола передачи файлов (FTP) с поддержкой SSH. Передача файлов через SFTP в пользовательском интерфейсе, управляемом мышью, возможно, проще, чем полагаться на набранные команды.
Опять же, сервер SSH должен быть запущен на компьютере с Linux перед началом работы. Вы также должны убедиться, что вы установили приложение FTP, такое как FileZilla, которое поддерживает SFTP.
Чтобы использовать этот метод, запустите FileZilla, затем откройте Файл → Менеджер сайтов. Создайте новый сайт, заботясь о том, чтобы установить протокол на SFTP. Добавьте целевой IP-адрес в Host, затем имя пользователя и пароль, установив тип входа в систему как Нормальный.
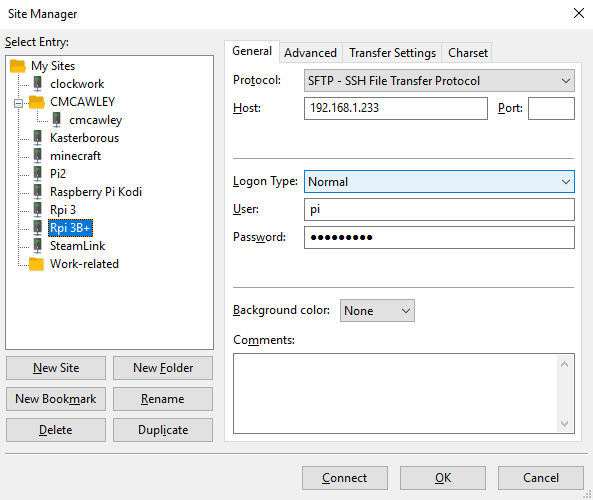
Нажмите Готово, когда будете готовы, затем используйте интерфейс FTP для перетаскивания файлов между двумя компьютерами.
4. Делитесь файлами между Linux и Windows с помощью Resilio Sync
Другим вариантом, который вы должны рассмотреть, является программа синхронизации файлов. Обычно они кроссплатформенные и используют зашифрованный ключ для управления соединением между устройствами.
Все, что вам нужно сделать, это установить приложение, назначить папку синхронизации, а затем создать ключ. Установите это на втором ПК, и ваши данные будут синхронизированы. Для этого есть два хороших варианта:
- Resilio Sync: ранее известная как BitTorrent Sync, Resilio доступна практически на любой платформе, о которой вы только можете подумать. Есть платная версия, но бесплатного варианта достаточно для синхронизации двух устройств.
- SyncThing: для Linux, Windows, macOS и Android эта альтернатива Resilio Sync предлагает аналогичную функцию без платного компонента.
Совместное использование файлов между Windows и Linux очень просто
Если вы новичок в Linux, или вы находите Windows незнакомой, обмен данными между ними проще, чем вы думаете.
Мы рассмотрели несколько методов. Мы рекомендуем вам попробовать все из них и решить, какой из них вам наиболее удобен.
Источник
How to move files and folders on the computer

There are several methods available to move, or transfer, computer files and folders (directories) from one source or level to another. Click one of the links below to view steps relating to the operating system you need help with, or scroll down to review them all.
When moving files or folders, you’re going to have only one copy of the files moved. If you want more than one copy of the files, copy the files and not move them. See: How to copy files.
How to move files in Windows
In Windows, you can move files using several method. You can drag-and-drop, cut and paste, or use the «Move to Folder» command. Below are the steps on how you can move files in Windows. Choose the option that works best for you.
You can also select multiple files and move multiple files at once using any of the steps below. See: How to select or highlight multiple files and folders.
Cut and paste
To cut and paste a file, select the file you want to move, right-click the highlighted file, and then select Cut. Browse to the folder you want to move the file to, right-click in the folder, and select Paste.
Alternatively, you can click Edit from the file menu, select Cut to cut the files, browse to where you want to move the files, then select Edit and Paste in the file menu.
Finally, you can also use shortcut keys to cut and paste files. Select the files you want to cut, then press the shortcut key Ctrl + X to cut the files. «Cutting» the files is like cutting text in a document: it moves the files to a temporary «clipboard» until you «paste» them somewhere. Navigate to the destination folder and press the shortcut key Ctrl + V to paste the files. The files are now in your destination folder.
Drag-and-drop

Highlight the files you want to move, press and hold your right mouse button, and drag-and-drop the files to where you want to move them. When you release the mouse button, a menu appears, similar to the example shown in the picture. Select the Move here option to move the files.
For drag-and-drop to work, you’ll need to be able to see the window of where you are moving the files.
Use «Move to Folder»
To use the «Move to Folder» command, select the file by clicking the file name. Click the Edit menu near the top-left of the window and select the Move to Folder option. In the new window browse to the folder you would like to move the file, then click the Move button to move the file to that folder.
If you are using Windows 8, once the files are selected the Move to option is shown under the Home tab.
How to move files in the Windows command line (MS-DOS)
In the Windows command line and MS-DOS, you can move files using the move command. For example, if you want to move a file named «stats.doc» to the «c:\statistics» folder, you would type the following command, then press the Enter key.
If you’d like to move multiple files, you can separate the file names with a comma, as in the following command.
In the next example, we are moving the file «example.doc» to the D:\ drive.
You can also move multiple files with wildcards. In the example below, the move command moves all files that have the «.doc» file extension to the «c:\statistics» directory.
Using the move command, you can also move a directory (folder). In the example below, the move command moves the «example» directory in the current directory to the «new» directory also in the current directory.
If you want to move a directory or file into a different directory, you need to specify the full path.
- See our move command reference for full information, available options, and other examples on this command.
How to move files in macOS
There are several ways to move files in macOS.
Drag-and-drop
In the macOS Finder, you can drag-and-drop one or more file icons, moving them from one folder to another. To drag-and-drop a file, highlight the files you want to move. Click any of them, and before you release the mouse button, move the mouse cursor until it is over the destination folder. Release the mouse button to move the files to this location.
Keyboard shortcut
You can also move files using keyboard shortcuts by following the steps below.
- Highlight the files you want to move.
- Press the keyboard shortcut Command + C .
- Move to the location you want to move the files and press Option + Command + V to move the files.
Terminal
To move files in the Terminal command line, use the mv command.
Источник
FTPClient move files from Linux to windows. Know when they end generating [duplicate]
I create an service that moves files from Linux Computer to Windows by FTPClient. The files in LinuxComputer are generate by an Oracle Store Procedure.
The problem is, I don’t know when the files are not being write anymore. Because, first Oracle create the file with 0kb, and then it start writing in it. I add a delayed to get the file, but it is not the solution.
I thougth in moving file to another copy, to check if it is being copy or not, but if I move file, to another folder in Linux while it is being write, it is move ok, and continue being write ok in the other folder so it does not work.e

1 Answer 1
What I usually do is to create an empty file after the main file has been written. The empty file will have the same name as the main file but either have a ‘RDY_’ suffix or ‘_RDY’ prefix..
The client will then just check for these files, if it finds one, transfer the main file and after the transfer is complete delete the ‘RDY’ file. That way the process generating those files won’t have a lock on that RDY file when you delete it.
Your download routine would have to be modified like this:
You would, of course, have to adjust the stored procedure that generates the main file as well.
Источник
How to Move Files Using Linux Commands or File Managers
Learn how to move files with Linux commands in this tutorial from our archives.
There are certain tasks that are done so often, users take for granted just how simple they are. But then, you migrate to a new platform and those same simple tasks begin to require a small portion of your brain’s power to complete. One such task is moving files from one location to another. Sure, it’s most often considered one of the more rudimentary actions to be done on a computer. When you move to the Linux platform, however, you may find yourself asking “Now, how do I move files?”
If you’re familiar with Linux, you know there are always many routes to the same success. Moving files is no exception. You can opt for the power of the command line or the simplicity of the GUI – either way, you will get those files moved.
Let’s examine just how you can move those files about. First we’ll examine the command line.
Command line moving
One of the issues so many users, new to Linux, face is the idea of having to use the command line. It can be somewhat daunting at first. Although modern Linux interfaces can help to ensure you rarely have to use this “old school” tool, there is a great deal of power you would be missing if you ignored it all together. The command for moving files is a perfect illustration of this.
The command to move files is mv . It’s very simple and one of the first commands you will learn on the platform. Instead of just listing out the syntax and the usual switches for the command – and then allowing you to do the rest – let’s walk through how you can make use of this tool.
The mv command does one thing – it moves a file from one location to another. This can be somewhat misleading, because mv is also used to rename files. How? Simple. Here’s an example. Say you have the file testfile in /home/jack/ and you want to rename it to testfile2 (while keeping it in the same location). To do this, you would use the mv command like so:
mv /home/jack/testfile /home/jack/testfile2
or, if you’re already within /home/jack:
mv testfile testfile2
The above commands would move /home/jack/testfile to /home/jack/testfile2 – effectively renaming the file. But what if you simply wanted to move the file? Say you want to keep your home directory (in this case /home/jack) free from stray files. You could move that testfile into /home/jack/Documents with the command:
mv /home/jack/testfile /home/jack/Documents/
With the above command, you have relocated the file into a new location, while retaining the original file name.
What if you have a number of files you want to move? Luckily, you don’t have to issue the mv command for every file. You can use wildcards to help you out. Here’s an example:
You have a number of .mp3 files in your
/ – is an easy way to represent your home directory – in our earlier example, that would be /home/jack/) and you want them in
/Music. You could quickly move them with a single command, like so:
That command would move every file that ended in .mp3 from the Downloads directory, and move them into the Music directory.
Should you want to move a file into the parent directory of the current working directory, there’s an easy way to do that. Say you have the file testfile located in
/Downloads and you want it in your home directory. If you are currently in the
/Downloads directory, you can move it up one folder (to
The “../” means to move the folder up one level. If you’re buried deeper, say
/Downloads/today/, you can still easily move that file with:
Just remember, each “../” represents one level up.
As you can see, moving files from the command line, isn’t difficult at all.
There are a lot of GUIs available for the Linux platform. On top of that, there are a lot of file managers you can use. The most popular file managers are Nautilus (GNOME) and Dolphin (KDE). Both are very powerful and flexible. I want to illustrate how files are moved using the Nautilus file manager (on the Ubuntu 13.10 distribution, with Unity as the interface).
Nautilus has probably the most efficient means of moving files about. Here’s how it’s done:
Open up the Nautilus file manager.
Locate the file you want to move and right-click said file.
From the pop-up menu (Figure 1) select the “Move To” option.
When the Select Destination window opens, navigate to the new location for the file.
Once you’ve located the destination folder, click Select.
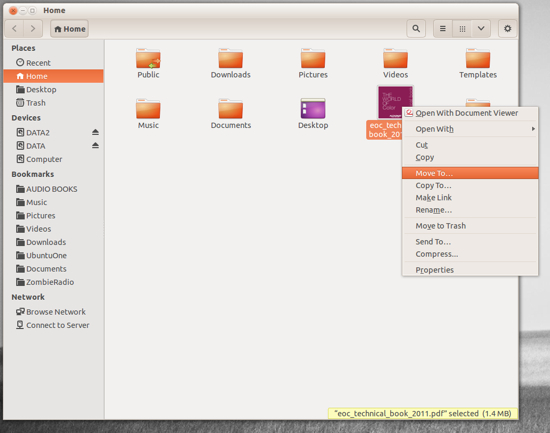
This context menu also allows you to copy the file to a new location, move the file to the Trash, and more.
If you’re more of a drag and drop kind of person, fear not – Nautilus is ready to serve. Let’s say you have a file in your home directory and you want to drag it to Documents. By default, Nautilus will have a few bookmarks in the left pane of the window. You can drag the file into the Document bookmark without having to open a second Nautilus window. Simply click, hold, and drag the file from the main viewing pane to the Documents bookmark.
If, however, the destination for that file is not listed in your bookmarks (or doesn’t appear in the current main viewing pane), you’ll need to open up a second Nautilus window. Side by side, you can then drag the file from the source folder in the original window to the the destination folder in the second window.
If you need to move multiple files, you’re still in luck. Similar to nearly every modern user interface, you can do multi-select of files by holding down the Ctrl button as you click each file. After you have selected each file (Figure 2), you can either right-click one of the selected files and the choose the Move To option, or just drag and drop them into a new location.
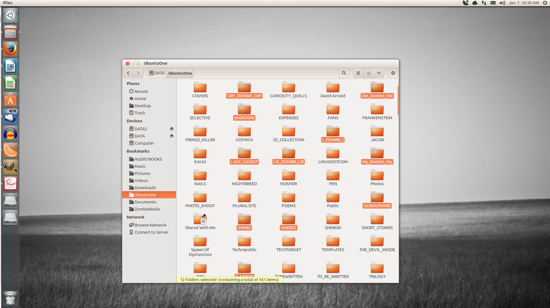
The selected files (in this case, folders) will each be highlighted.
Moving files on the Linux desktop is incredibly easy. Either with the command line or your desktop of choice, you have numerous routes to success – all of which are user-friendly and quick to master.
Источник


